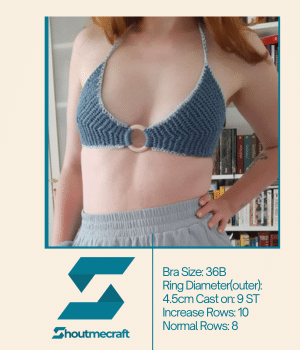
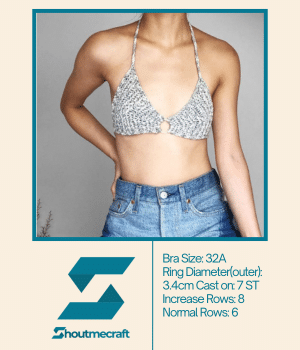
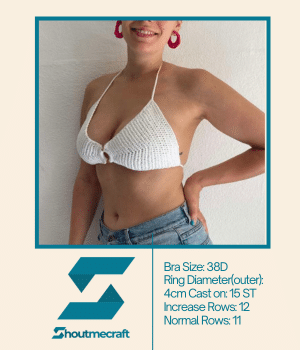
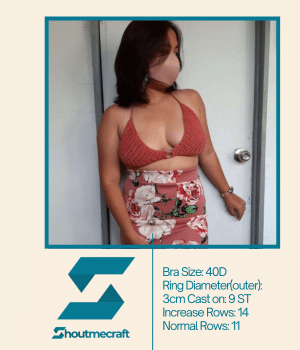
Crochet Pattern Bikini Top – This is a crochet pattern for just the bikini top in both English and US terms. The recommended directions for general sizes XS, S, M, L, and XL (bra cup sizes from A to DD) are included in the design. Additionally, you may see references for various body shapes in the testers’ remarks and a guide to customize it to your unique fit.
Written directions, illustrations, a stitch count for each size at the end of each row, and an extra note to help with comprehension are all included in this design.
For this project, I chose yarn that is 100% cotton; as the top fits close to the body, I recommend using yarn that has a nice touch.
Materials / Tools
- Any category #3 yarn. (110 yds for size XS.)
- 4mm hook
- Middle Ring Ø from 3cm to 4cm (depends on the size.)
- Stitch marker
- Yarn needle
- Scissors
- Tape Measure
Skill Level : Advanced Beginner
Construction of This Pattern
A. Bikini Top
- Bra Cups
- Edging and Straps
Gauge 4” x 4” (Stretch your work slightly when measuring your piece.)
- 16 Single Crochet Herringbone Stitch x 14 rows
Size Guide
| SIZE | Bra Cup |
| XS | 32A or smaller |
| S | 32A, 34A, 32B |
| M | 36A, 34B, 36B, 32C, 34C, 32D |
| L | 36C, 32D, 34D, 36D, 32DD |
| XL | 36D or larger |
- Since everyone has different preferences when it comes to coverage, sizes above are a suggestion only.
- Head over to the testers page (p.8) to see the references!
- The pictures shown in the pattern is in size S
Abbreviations (US)
• CH – Chain Stitch
• SP – Space
• ST – Stitch
• SL ST – Slip Stitch
• SC – Single Crochet
• DC – Double Crochet
• SCH – Single Crochet Herringbone Stitch
• SC2tog – Single Crochet 2 together
• DC2tog – Double Crochet 2 together
• PM – Place Marker
• SK – Skip
• REP – Repeat
• RS – Right Side
• WS – Wrong Side
• SCH2tog – Single Crochet Herringbone Stitch 2 together
Pattern Stitch
Single Crochet Herringbone ST (SCH):
When working on the right side:
- Insert the hook into the left leg of the previous ST. (see the needle)
- Insert the hook again into the next ST. (see the needle)
- Yarn over and pull up a loop.
- Yarn over and pull through all three loops on the hook.
- Start the next SCH stitch from inserting the hook in the left leg of the previous ST just made (see the needle in pic.4) and REP form step 2.
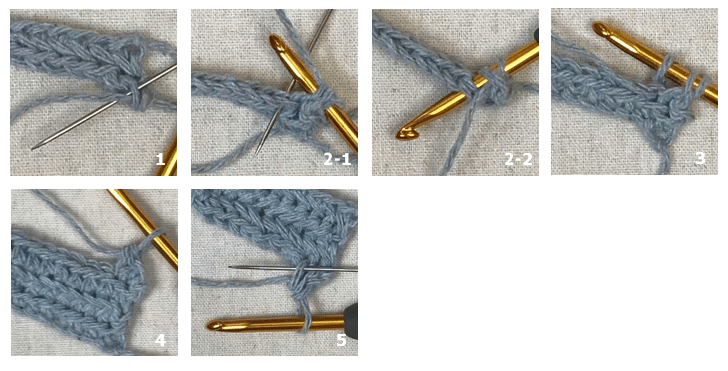
When working on the wrong side:
- Insert the hook into the left leg of the previous ST (from right to left as shown with the needle).
- Insert the hook again into the next ST (from back to front as shown with the needle).
- Yarn over and pull up a loop.
- Yarn over and pull through all three loops on the hook.
- Start the next SCH stitch from inserting the hook in the left leg of the previous ST just made (from right to left as shown with the needle) and REP form step 2.
I learnt the stitch from the video tutorial. Check out the link if you need more information for this stitch.
Instructions (The beginning CH never count as a ST. )
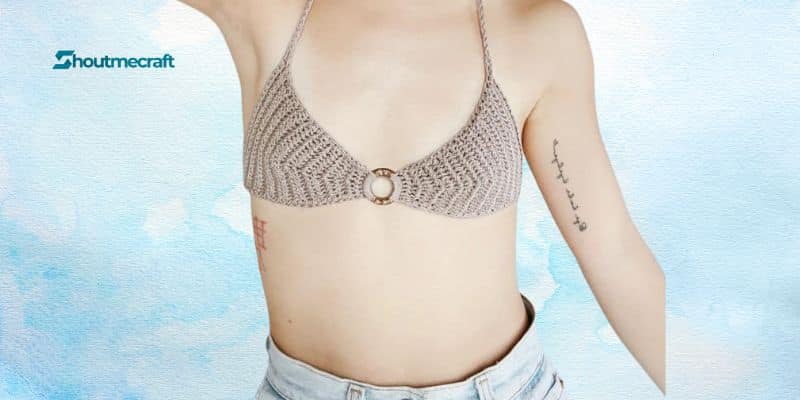
Bikini Top – Bra Cup
Cast on 7 (9, 9, 11, 11) SC on the ring. CH1, turn.
*Cast on on the back side of the ring if your ring has an obvious front/back.
*Increase the cast on stitch if the provided number is not enough. Check the testers page (p.8) to see which number might works the best for you.
*To cast on SC, follow the steps below. ↓
- With a SL ST on, insert the hook into the ring.
- Yarn over and pull up a loop.
- Yarn over and pull through both loops.

Row 1 (RS): 1SC in the first ST. 1SCH in the next ST and each ST across. PM at the 4 (5, 5, 6, 6)th ST. CH1, turn. [7, 9, 9, 11, 11]
Row 2 (WS) : Make 1 backward SC in the first ST (see instructions below ↓). 1SCH in the next ST and each ST until the marked ST. 3SCH in the marked ST. PM back in the middle SCH. 1SCH in the next ST and each ST across to the end. CH1, turn. [9, 11, 11, 13, 13]
*To make a backward SC, insert the hook into the ST from back to front. Yarn over and pull up a loop. Yarn over and pull through both loops on the hook.

Row 3 (RS) : 1SC in the first ST. 1SCH in the next ST and each ST until the marked ST. 3SCH in the marked ST. PM back in the middle SCH. 1SCH in the next ST and each ST across to the end. CH1, turn. [11, 13, 13, 15, 15]
*Remember to follow the instructions for the right and wrong side on page 3 when making the SCH stitches.
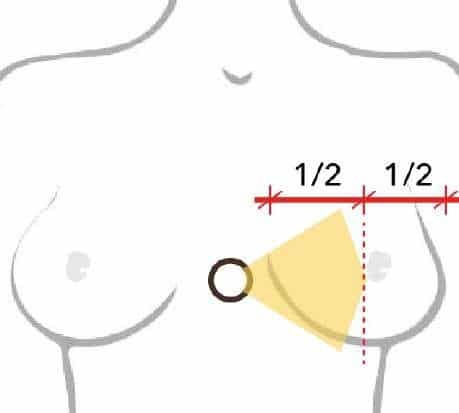
REP row2 and row3 until when you put the ring against the middle of your chest , the peak of the panel reaches the mid-point of one of your breast (see diagram↓).
Suggest amount of increase rows :
| SIZE | INC Row | TOTAL INC Row | TOTAL ST |
| XS | Row2-Row9 | 8 | 23 |
| S | Row2-Row11 | 10 | 29 |
| M | Row2-Row12 | 11 | 31 |
| L | Row2-Row14 | 13 | 37 |
| XL | Row2-Row15 | 14 | 39 |
*Check the testers page (p.8) to see which number might works the best for you.
Normal (no increase) row : 1SC in the first ST. 1SCH in the next ST and each ST across. CH1, turn.
*Make as many normal rows as needed to achieve the proper coverage for the side breast. Suggest amount of normal (non-INC) rows:
| XS | S | M | L | XL | |
| Rows | 8 | 8 | 9 | 11 | 11 |
*DO NOT cut the yarn after the last row.
Bikini Top – Edging and Straps
Row 1: From the corner of the last ST for the normal row (see diagram ① ↓)1SC into each ST across to the end. After the last SC, continue to CH up 80 (90, 100, 110, 120) or any length preferable for the neck strap.
Row 2: SL ST in the back hump of each CH ST all the way back. SC in the side of the SC row. 1SC into each of the SCH rows. CH1, cut the yarn and fasten off.
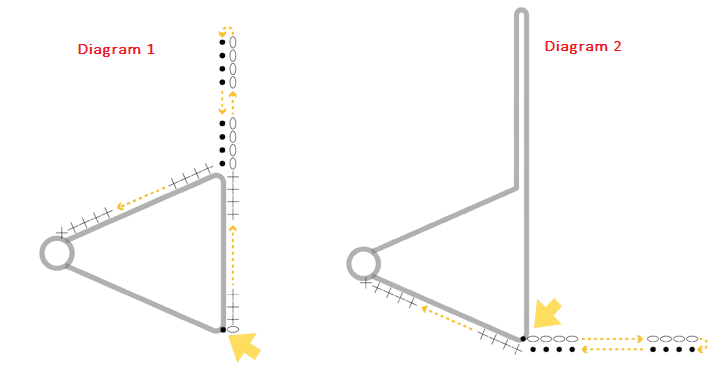
Row 1: Reattach the yarn with a SL ST in the first SC we made for the edging (see diagram ↑ ②) and continue to CH up 90 (100, 115, 125, 140) or any length preferable for the back strap.
Row 2: SL ST in the back hump of each CH ST all the way back. 1SC into the side of the SC row. 1SC into each of the SCH rows. CH1, cut the yarn and fasten off.
*REP above steps to make the second bra cup.
*Remember to start the SC on the ring from the wrong side so that the Herringbone ST would appear on the same side of the cups.
*For the second bra cup, do the back strap first and the neck strap after so the two cups are symmetric.
Weave in all the yarn ends and we are done.
Meet the Testers
