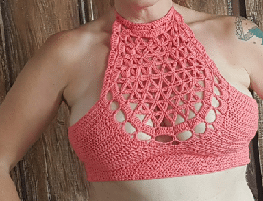
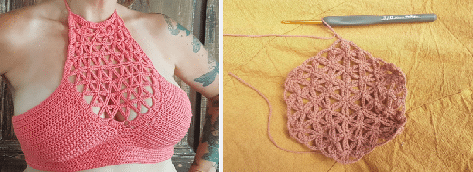
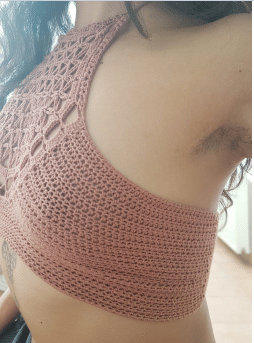
Crochet Halter Top Pattern Woman Flower – To make things run as smoothly as possible, this article guides the steps. There are answers to any questions you might have while creating your designs inside; if not, please send me an email.
Skill level: Advanced
Material
- Lana Grossa Cashair Zimtbraun (no.5),sport weight yarn/ 5ply/ 2 fine. Find substitute yarn here!
- Crochet hook 3mm & 3.5mm
- Scissors & yarn needle
***I demonstrate size XS and have used about 1 skein of yarn***
Below is the yarn that testers used.
- XS – Bernat Softee Baby – Bright Sky less than a skein
- S – Premier Cotton Fair color Blue Ice #32-02 275m
- S – Premier Cotton Fair Color Silver #27-26
- M – Premier Cotton Fair 52% cotton 48% acrylic, Bright Peach, colour #27-07 2 balls for option A, used approx 320-325yd. 1 ball for option B, used approx 315yd.
- M – Yarn Collection multi black/grey/white 55% polyester 45% cotton
- L – Premier Cotton Fair color Turquoise-450 meters
Stitch used & code
- Ch = chain
- St = stitch
- Sc = single crochet
- HDc = half double crochet
- Dc = double crochet
- Rep = repeat
- Tog = together
Size
- XXS – 30A,32A,30B
- XS – 34A,32B,34B,30C
- S – 36A,38A,36B,32C,34C,30D,32D,30DD
- M – 40A,38B,40B,36C,34D,32DD,34DD,30DDD,32DDD
- L – 38C,40C,36D,38D,40D,36DD,34DDD
- XL – 38DD,40DD,36DDD,38DDD,40DDD
With the guidelines from the flower of life geometry, You can add as many rows as You wish and make any size to fit You.
Gauge swatch:
Watch this video to help get the best result of gauge swatch.Go down or up the hook size to match the gauge swatch if needed.25hdc x 23 rows = 10cm x 10cm
Different sizes follow different colour theme below!
- Size XXS, XS, S, M, L, XL
- I demonstrate size XS
- Start with 3mm hook
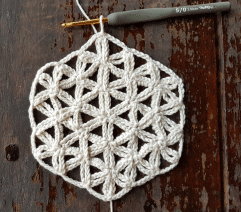
Note: Images below are from my previous Flower of life pattern, as Wild Flower of Life top follows the same pattern on this part.
***All sizes start with the same wild flower of life motif***
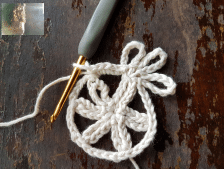
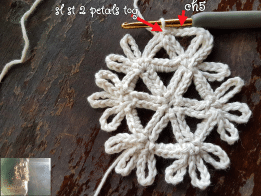
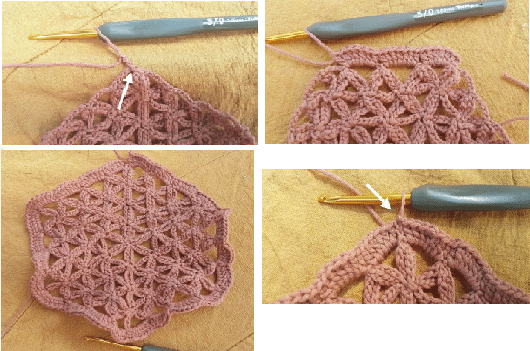
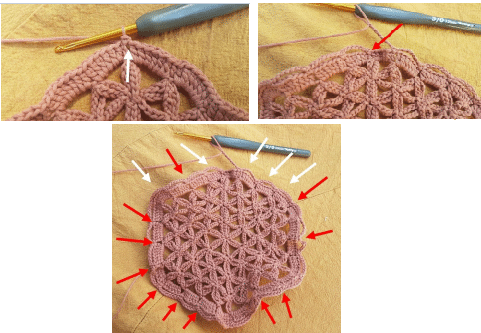
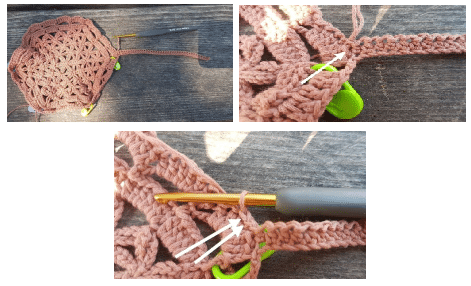
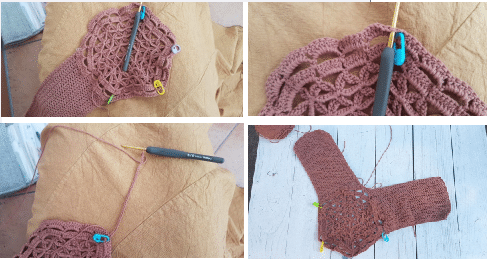
Round 1 – Begin with the magic ring, *ch10, sl st in the ring (it’s now call as 1 petal), rep from* for a total of 6 petals, to close/pull tight the magic circle when the petals are completed.SEE IN PHOTO BELOW
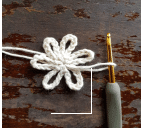
Sl st along half of the petal
Ch5,connecting the petals with a sl st. SEE IN PHOTOS below
Now You have completed Round 1.
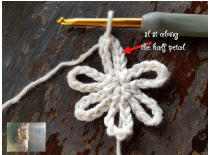
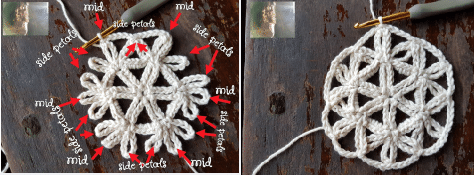
Round 2 – *Ch10, sl st on top of the petal below, rep from* in total of 3 petals. SEE IN THE PHOTO
5sc in ch-space
Sl st on top of the petal below, *ch10, sl st on the same sl st before (on top of the petal below), rep from* in total of 3 petals
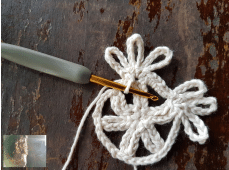
You will repeat this pattern of 3 petals on top of the petal below, and 5sc in each ch-space around to complete Round 2.
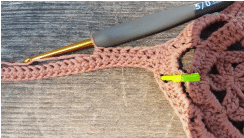
Sl st to complete Round 2, sl st along the half petal (the middle petal) to prepare for connecting petals tog
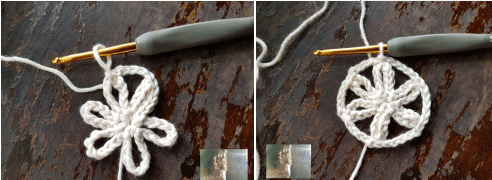
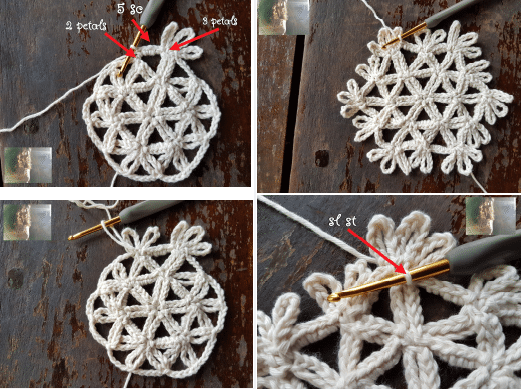
Connecting round – Ch5, sl st 2 petals tog (it’s now call “side petals”)
Ch5, sl st on the top of the middle (mid) petal, *ch5, sl st side petals tog, ch5, sl st the middle petal, rep from* around to complete the connecting round
Now You’ve completed the connecting round.
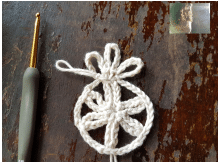
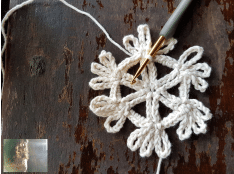
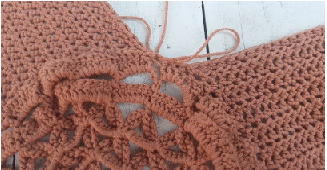
Round 3 – *Ch10 (count as 1 petal), sl st on top of the petal below × 3 times = 3 petals in total, 5sc in ch-space, 2 petals on top of the 2 petals below, rep from* across.
Sl st to complete Round 3Sl st halfway of the petal (the middle petal) to prepare for the connecting round Connecting round – Ch5, sl st side petals tog,
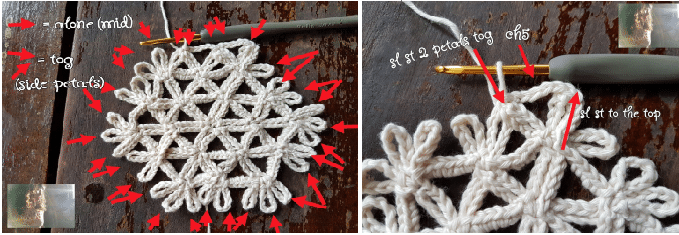
Ch5, sl st side petals tog, ch5, sl st the middle (mid) petal alone SEE THE ARROWS THAT GUIDE YOU ***remember to always ch5 to connect petals in this round***
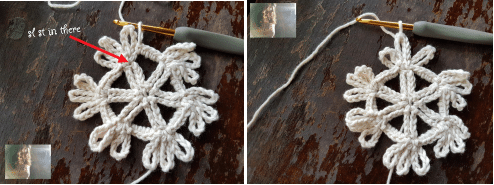
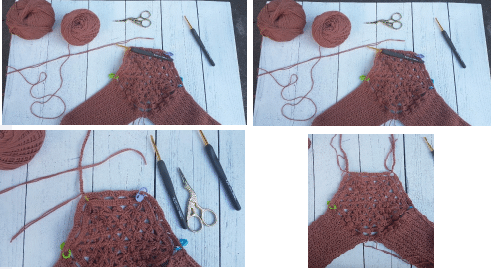
Size XXS stop here and prepare for the border rounds.
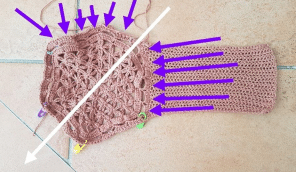
Size XS,S,M make 1 more round. Please look up the image that has many arrows above for the guideline (pages 9 & 14) Finish with Connecting round.
Note: At the border rounds, skip rounds 1 & 2, continue on to round 3 if You wish the top to show less skin.
Here are the photos of the result of different options.Option A: No skipping rounds 1 & 2 at the border rounds. (size M)
Option B: Skipping rounds 1 & 2 at the border rounds. (size M)
A: Size L,XL make 1 more round. Please look up the image that has many arrows above for the guideline (pages 9 & 14). Finish with connecting round and follow everything from the border rounds below.
Or
B: Size L,XL make 2 more rounds. Please look up the image that has many arrows above for the guideline (page 9 & 14). Finish with connecting round. At the border rounds, skip Rounds 1 & 2, continue on to Round 3 if You wish the top to show less skin.
Or
C: Size L,XL make 1 more round. Please look up the image that has many arrows above for the guideline (page 9 & 14). Finish with connecting round. At the border rounds, skip Rounds 1 & 2, continue on to Round 3 if You wish the top to show less skin.18
Border rounds
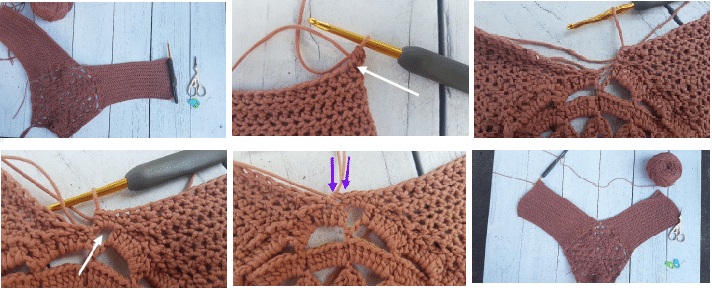
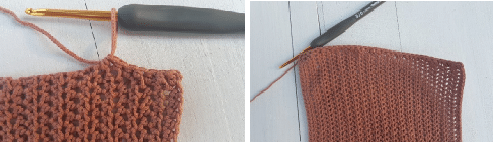
Round 1 – Slip st in the ch-space, ch3 (count as 1dc), 6dc in ch-space, *7dc in the next ch-space, rep* around, sl st at 3rd ch of the beginning ch to finish this round.
Round 2 – 1sc in the gap between dc set, *ch7, 1sc in the gap between dc set**, rep from*-**, ending with sl st in the 1st sc from the beginning.
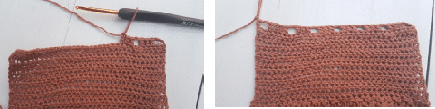
Now You will need to mark the position with stitch markers to create the last round of the border rounds. In the image below, I’ve finished the earlier round at the green stitch marker. The opposite is the blue stitch marker, so from green to blue will be the body part. The yellow and purple will be the straps for the neck.
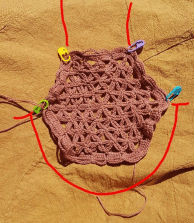
Round 3 – Sl st in ch-space, ch3 (count as 1dc), 6dc in the same ch-space, *7dc in the next ch-space, rep* until You arrive at the blue stitch marker, ch2, 7dc in the next ch-space, rep* until You arrive at the purple stitch marker, ch2, 7dc in the next ch-space, rep* until You arrive at the yellow stitch marker, ch2, 7dc in the next ch-space, rep* until You arrive at the green stitch marker, ch2, sl st at the 3rd ch of the beginning ch to finish this round.
The breast part has 3 portions.
Breast parts right & left (A & B) (do not cut the yarn, as we are continuing from the green stitch marker.)
Part A
Start with – ch38+2, ch38+2, ch42+2, ch44+2, ch55+2, ch60+2(note: at the option B above from size M, Debbi has made only 38+2 ch, she then adds more rows at the side body.)
Note: Above is just the guideline for the majority size. This part varies from body to body. If You have made less ch here, You can always add more rows at the side body that comes at the end. And if You make too many ch here, You then will add less rows at the side body.
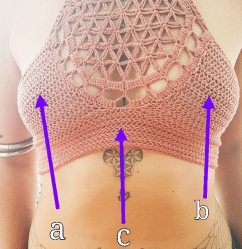
Tips on how to make the right number of ch: Make a long chain to go across your breasts to reach a bit under your arm. You can see how my top at the breast part sits on me.
Row 1 – 1hdc in 3rd ch from hook, 1hdc in each of ch st for a total of 38hdc sts, when You arrive at the end of the row, sk 1st, sl st in the next, then sl st in the next 2 sts, turn
Row 2 – 1hdc in each of hdc from previous row in total of 38hdc sts, turn,
Row 3 – Ch2(to build up the yarn), 1hdc in 3rd ch from hook, 1hdc in each of hdc from previous row, total of 38hdc sts, when You arrive at the end of the row, sk 1st, sl st in the next, then sl st in the next 2 sts, turn
rep R.2 & R.3 for the pattern
Note: You will make as many rows as needed until You arrive at the middle part(white arrow).
- Size XXS total of 14 rows
- Size XS total of 21 rows
- Size S total of 21 rows
- Size M total of 21 rows
- Size L total of 21 rows (option C, page 18)
- Size XL total of 28 rows (option B, page 18)
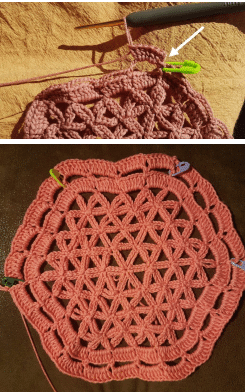
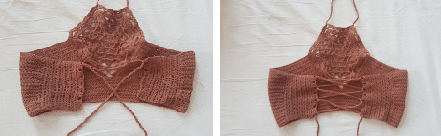
Rep all steps at the opposite side, in my case at the blue stitch marker.
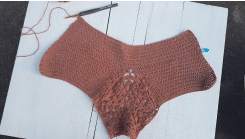
ch1, cut the yarn. You will have something like this 😁
Straps Part
(The reason we are making the straps part now is because it will be easier to check the length of the rows for the middle part of the breast that is coming after this part.)
Change hook to 3.5mm, and yarn to double strands.Sl st at one of the stitch markers from the straps part. Ch 100 for each strap. Rep same steps at the other side.
Breast part at the middle (part C)
Change back to 3mm hook.
Row 1 – Sl st at the end of the row, ch2 (to build up the yarn), in the same st 1hdc, 1hdc in each of the next 34hdc, 37hdc, 41hdc, 43hdc, 54hdc, 59hdc, from previous row, at the middle add 3hdc in ch-space, 1hdc in each of the next 2sts (middle part need to have 5hdc extra), 1hdc in each of the next hdc from previous row, total of 35hdc, 38hdc, 42hdc, 44hdc, 55hdc, 60hdcTotal number of this row is 75hdc, 81hdc, 89hdc, 93hdc, 115hdc, 125hdc, (35hdc, 38hdc, 42hdc, 44hdc, 55hdc, 60hdc, at the right breast + 5hdc in the middle + 35hdc, 38hdc, 42hdc, 44hdc, 55hdc, 60hdc, in the left breast), turn
Note: size M, option B counting number is 38+5+38=81
Row 2 – C h2 (to build up the yarn), 1hdc in each of the hdc from previous row, total of 75hdc, 81hdc, 89hdc, 93hdc, 115hdc, turn
Note: size M, option B counting number is 81hdc
Rep R.2 for the pattern
- Size XXS total of 13 rows
- Size XS total of 13 rows
- Size S total of 5 rows
- Size M total of 13 rows
- Size L total of 5 rows
- Size XL total of 5 rows
Note: You can see the different numbers on this part due to the tension and preferable coverage.
Side body
(do not cut the yarn as we are continuing from the last row above.)
Row 1 – Ch2 (to build up the yarn), 1hdc in the end of each row, total of 27hdc, 34hdc, 26hdc, 34hdc, 26hdc, 33hdc, (14+13 rows, 21+13 rows, 21+5 rows, 21+13 rows, 21+5 rows, 28+5 rows), turn
Row 2 – Ch2 (to build up the yarn), 1hdc in each of the hdc from previous row, total of 27hdc, 34hdc, 26hdc, 34hdc, 36hdc, 33hdc, turn
rep R.2 for total of 8rows, 13rows, 8rows, 8rows, 8rows, 10rows,
Note: Feel free to adapt this part as You wish. Less rows will show more skin at the back and the other way around.
Last row for all sizes
Ch5, 1dc in 8th ch from hook, 1dc in each of the next 2 sts, *ch2, sk2, 1dc in each of the next 3sts**, rep from*-**, the last set of dc st I have made are 4dc sts following with ch2, sk2, 1dc at the last st.The reason: it’s better to have the last st of 1dc to match with the beginning.
Rep all steps on the other side.
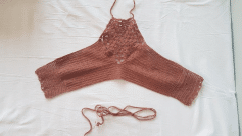
With double strands and hook 3.5mm make a long strap of 300 – 350ch for the closure.
You will have something like this at this point.😊🌹🌺