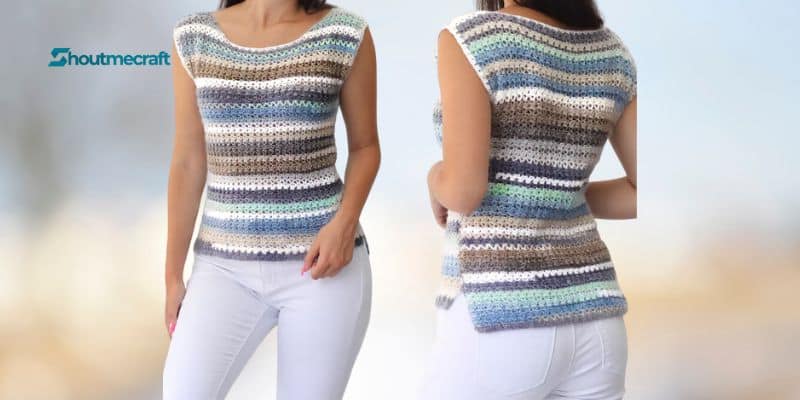
Women Crochet Top Patern – A basic design for a shirt that is purely feminine. This is the ideal project if you’re looking for a fresh, simple pattern to work on for spring or summer. You’ll like how simple it is to crochet this cozy yet stylish shirt.
Wear it in the morning or at night, at the beach or in the city. This simple design is ideal for summers and beyond because it’s effortless to create and stylish to don.
- Using the most simple textures and forms
- Basic stitches are used
- Neither a rise nor a fall.
- The length may be changed.
Materials needed:
Sport weight yarn, #2 : 590[650, 720, 790, 850, 920, 1000]yds – I used L&T Swirl Shawl . Other yarns: Premier Yarns Cotton Fair, Lorena-Ice Yarns.
-also, you can use a Light weight yarn, #3, as Truboo-Lion Brand.
Crochet F5-3.75mm / Tapestry needle
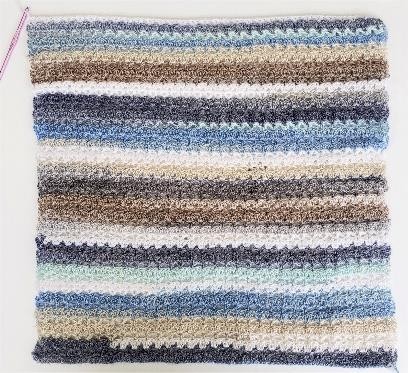
Gauge: 8 V-st = 4’’/10 cm. For swatch, chain 18 and work rows 1-5 of pattern.
Take time to check the gauge and adjust if necessary.
Ch=chain / St(s) =stitch(es) /R=row / SlSt=Slip stitch /DC= double crochet
V-st =( DC, ch1, DC) in the same DC from the previous row
*Turn at the end of each row.
**Total stitches are indicated between < >.
***For size XS work pattern as written. Counts in brackets ([]) are for size S, M, L, XL, 2XL, 3XL.
**** This top is crochet in two pieces. Each piece is worked from the bottom up.
So let’s get started!
Sizes: XS [S, M, L, XL, 2XL, 3XL] – Measure your bust to choose the size.
Bust: 31″ [34″, 37″, 40″, 44″, 48″, 52″] – 78 [86, 94, 101, 112, 122, 132]cm
Top Measurements (double the width for bust measurements)/ Front panel length:
- XS = 17.5″ (44.5 cm) Width across back X 21″ (53cm) Length
- S = 19″ (48 cm) Width across back X 21″ (53 cm) Length
- M = 20.5″ (52 cm) Width across back X 21.75″ (55 cm) Length
- L = 22″ (56 cm) Width across back X 21.75″ (55 cm) Length
- XL = 24″ (61 cm) Width across back X 22.5″ (57 cm) Length
- 2XL = 26″ (66 cm) Width across back X 23.25″ (59 cm) Length
| *The back panel is 1” longer |
3XL = 29″ (74 cm) Width across back X 24″ (61 cm) Length

The FRONT PANEL
Chain 109[ 118, 127, 136, 148, 160, 175].
R1 (WS): 1DC in 3rd Ch from hook (the 2 skipped chains do not count), DC in each chain, across. Turn. < 107[116, 125, 134, 146, 158, 173] DC>
R2 (RS): Ch3, skip the first st, V-st in the next st, *skip the next 2 sts, V-st in the next st*, repeat from *-* until the last 2 sts, skip the first st, DC in last st.
<35[38, 41, 44, 48, 52, 57] V-st, and 1DC>

R3 (WS): Ch3, 3DC around each ch 1 from previous R, end the R by 1DC in the space between the last V-st and the Ch3. < 35[38, 41, 44, 48, 52, 57] groups of 3-DC, and 1DC>

R4 (RS): Ch3, V-St in center DC of each 3-DC group (skip first DC, DC in 2nd DC, skip the third DC), around. End the R by DC in the space between the last 3-DC group and Ch3. <35[38, 41, 44, 4,8, 52, 57] V-st, and 1DC>

R5 – 48 [ 48, 50, 50, 52, 54, 56]: Repeat rows 3 & 4.
The last R must be R4 ( with V-st).
Do not fasten off. Proceed directly to ’’Shoulder Shaping’’ instructions.* You can add or remove rows in multiples of 2 to make your top longer or shorter.

Shoulder Shaping / Front panel
First Shoulder
R1: Ch3, (3DC around ch 1 from previous R) x 10[11, 12, 3, 14, 16, 18] times, 1DC around the next ch1. <10[11, 12, 13, 14, 16, 18] groups of 3-DC, 1DC>. Leave remaining sts unworked. Turn.

R2: Ch3, 1DC in center DC of the first 3-DC group, V-St in center DC of the each 3-DC group, end the R by DC in space between the last 3-DCgroup and Ch3.<9 [10, 11, 12, 13, 15, 17] V-st, 2DC>. Turn.

R3: Ch3, (3DC around ch 1 from previous R) x 8[9, 10, 11, 12, 14, 16] times, 1DC around the next ch1. <8[9, 10, 11, 12, 14, 16] groups of 3-DC, 1DC>. Turn.

R4: Ch3, 1DC in center DC of the first 3-DC group, V-St in center DC of the each 3-DC groups, end the R by DC in space between the last 3-DCgroup and Ch3.
<7 [8, 9, 10, 11, 13, 15] V-st, 2DC>. Turn.

R5: Ch3, (3DC around ch 1 from previous R) x 6[7, 8, 9, 10, 12, 14] times, 1DC around the next ch1. <6[7, 8, 9, 10, 12, 14] groups of 3-DC, 1DC>. Tie off, leave a long tail for seaming shoulder.
Opposite Shoulder – lay front panel out in front of you.
R1: Join yarn with a Sl St around the center chain of 11[12, 13, 14, 15, 17, 19] V-st, counted from the shoulder to center and make Ch3 in the same center chain, (3DC around ch 1 from previous R) x 10[11, 12, 13, 14, 16, 18] times, end the R by 1DC in the space between the last V-st and the Ch3.
< 10[11, 12, 13, 14, 16, 18] groups of 3-DC, 1DC >
R2: Ch3,( V-St in center DC of the next 3-DC group) x 9 [10, 11, 12, 13, 15, 17], 1DC in center DC of the last 3-DC group. Turn. <9 [10, 11, 12, 13, 15, 17] V-st, DC>.
R3: Ch3, 1DC around the next ch1, (3DC around ch1 from previous R) x 8[9, 10, 11, 12, 14, 16] times, end the R by 1DC in the space between the last V-st and the Ch3. Turn.
< 8[9, 10, 11, 12, 14, 16] groups of 3-DC, 2DC>.
R4: Ch3,( V-St in center DC of the next 3-DC group) x 7 [8, 9, 10, 11, 13, 15], 1DC in center DC of the last 3-DC group. Turn. <7 [8, 9, 10, 11, 13, 15] V-st, DC>.
R5: Ch3, 1DC around the next ch1, (3DC around ch1 from previous R) x 6[7, 8, 9, 10, 12, 14] times, end the R by 1DC in the space between the last V-st and the Ch3. Turn.
< 6[7, 8, 9, 10, 12, 14] groups of 3-DC, 2DC>.
Tie off, leave a long tail for seaming shoulder.

The BACK PANEL
Chain 109[ 118, 127, 136, 148, 160, 175].
Repeat the rows of the front panel for a Total of 56 [ 56, 58, 58, 60, 62, 64] Rows.
*To get the same length for front and back panel, make 52 [52, 54, 54, 56, 58, 60] Rows.
First Shoulder
Shoulder Shaping /Back panel
R1: Ch3, (3DC around ch 1 from previous R) x 6[7, 8, 9, 10, 12, 14] times, 1DC around the next ch1. <6[7, 8, 9, 10, 12, 14] groups of 3-DC, 1DC>.
Leave remaining sts unworked. Tie off, leave a long tail for seaming shoulder.
Opposite Shoulder – lay back panel out in front of you.
R1: Join yarn with a Sl St around the center chain of 7[8, 9, 10, 11, 13, 15] V-st, counted from the shoulder to center and make Ch3 in the same center chain, (3DC around ch 1 from previous R) x 6[7, 8, 9, 10, 12, 14] times, end the R by 1DC in the space between the last V-st and the Ch3.
< 6[7, 8, 9, 10, 12, 14] groups of 3-DC, 1DC >
Tie off, leave a long tail for seaming shoulder

Join shoulders – all sizes
Place your panels right side facing and using the tail of yarn from the front panel, sew the front and back panel together at the shoulder seam.
Be sure your sts are lined up correctly and that you are not skipping any as you go.
Use mattress stitch or whichever method you prefer to sew. Repeat on other shoulder.
Join sides – all sizes
Place your top in front of you, right sides facing.
Arm opening: measure from the shoulder, leave a total of 7[7.5, 8, 8.5, 9, 9.5, 10]” opening for the arm hole, place a Stitch Marker( SM). Repeat on other side. Make sure your SM was placed on the same row on both sides.
Start sewing from SM down, leaving the arms opening unworked, making sure that your rows on both panels are aligned correctly. Leave approximately 2” slit un-seamed from the front panel. Repeat on opposite side. Fasten off and weave the ends.
Armhole finishing row:
Wrong side facing you, attach the yarn with a Sl St to the bottom of your arm opening.
Ch2, work 2DC stitches around each ch3 and 2DC stitches around each DC, around the opening, until reaching starting point, sl st into first DC to join.
Repeat for both sides.
Fasten off and weave the ends.

Congratulations!