The Melody Shawl is a triangle shawl that uses both the classic Granny stitch and the V stitch to create a “melody” of beloved stitches.
Skill Level : Intermediate
Pattern Notes
- This shawl will benefit from blocking to open up the V stitches and ensure a straight edge on the wingspan.
- This shawl is designed to a specific side and weight of yarn, however, you can easily alter the size by adding or removing rows.
- You can use another weight of yarn if you prefer but keep in mind that the yarn requirements are listed for DK weight and do not reflect any other weight of yarn.
- This pattern calls for usage of a magic circle. You can use the magic circle or you can chain 3 and slip stitch to the first chain made to create a circle to work into.
- Chain 1 and chain 2 at the beginning of a round do not count as stitches. Always place your first stitch of the round in the same stitch you chained out of.
- Stitch counts are referenced at the end of each round in parentheses and bold italics (#).
- Repeats are listed in brackets [ ].
- Instructions within parenthesis ( ) indicate to work all instructions in the same stitch or space.
Abbreviations
Abbreviations are in Standard US terms.
- Ch – Chain
- Dc – Double crochet
- V st – V stitch (1 dc, ch 1, 1 dc all in the same stitch or space).
- St(s) – Stitch(es)
- Spc(s) – Space(s)
- Sk – Skip
- Cluster – A set of 3 double crochets worked all in the same stitch or space.
Yarn Requirements
- DK (Light – 3) weight acrylic yarn of your choice. You will need approximately 10.5 oz / 300g / 1181 yards.
Yarn Used
- Lion Brand Mandala Bonus Bundle in colorway
- Meowth. I used just shy of 1 entire cake.
Tools & Notions
- 4.5 mm (G+) hook Tapestry needle Scissors
- Stitch Markers
Size
Wingspan (along shoulders): 74 inches Length (at longest point): 39 inches Size is listed after blocking.
Gauge
Gauge isn’t massively important as you can add or remove rows to reach the size listed or your desired size. For reference, after Row 4, the shawl should measure approximately 5 inches from side to side along the wingspan.
Note: I am a tight crocheter, so my tension is usually tighter than others. Learn more about gauge and what this means here.
Special Stitch – Magic Circle
This pattern is written to use a magic circle. You can use the magic circle or you can chain 3 and slip stitch to the first chain made to create a circle to work into. Your choice! If you would like a tutorial on how to work the magic circle, follow this link
Blocking the Shawl
Because this shawl uses V stitches for some of the rows, blocking the shawl is recommended, especially along the wingspan (longest edge which you would drape over your shoulders). The shawl may seem to have a bit of a wobble or dip along these V stitch rows while you are working it, but blocking the shawl will fix this.
Stitch Counts
Stitch counts are listed at the end of each row in parentheses and bold italics. For ease of counting, I’ve included both the total amount of stitches and the amount of stitches on each side of the work.
For example, in a later row, you will see a stitch count like this: (348 sts | 174 each side) This means you will have 348 total stitches for the entire row and 174 stitches on either side of the chain 2 space.
Another example: (230 sts + 112 ch 1 spcs = 342 | 56 V sts + 3 dc each side) This means you will have 230 stitches PLUS 112 chain 1 spaces which is a TOTAL of 342 stitches. On either side of the chain 2 space, you’ll have 56 V stitches + 3 double crochet.
“Space Between Clusters”
You will see instructions stating to place 3 double crochet in the “space between clusters”. A cluster is 3 double crochet all worked into the same stitch or space. Between each cluster worked, we skip 2 (sometimes 3) stitches.
These skipped stitches create a space. An arrow points to this space in the image below.
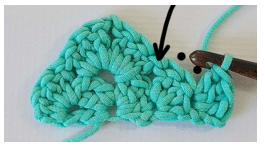
Any time the instructions state to work in the “space between clusters”, you will work the instructed stitches in this space.
Pattern Instructions
Row 1 – In Magic Circle, ch 2 (doesn’t count here or throughout), place 3 dc, ch 2, 3 dc. Pull tail tight. (6 sts | 3 each side)
Row 2 – Ch 2, turn. 3 dc in first st. Sk 2 sts. In ch 2 spc, place (3 dc, ch 2, 3 dc). Sk 2 sts, 3 dc in last st. (12 sts | 6 each side)
Row 3 – Ch 2, turn. 3 dc in first st. Sk 2 sts, place 3 dc in spc between clusters. Sk 3 sts. In ch 2 spc, place (3 dc, ch 2, 3 dc). Sk 3 sts, place 3 dc in spc between clusters. Sk 2 sts, 3 dc in last st. (18 sts | 9 each side)
Row 4 – Ch 2, turn. 3 dc in first st. Sk 2 sts, [Place 3 dc in spc between clusters, sk 3 sts] Repeat inside brackets 2x. In ch 2 spc, place (3 dc, ch 2, 3 dc). [Sk 3 sts, place 3 dc in spc between clusters]. Repeat inside brackets 2x. Sk 2 sts, place 3 dc in last st. (24 sts | 12 each side)
Row 5 – Ch 2, turn. Place 2 dc in first st, and 1 dc in each st to ch 2 spc. In ch 2 spc, place (2 dc, ch 2, 2 dc). 1 dc in each st until 1 st remains. 2 dc in last st. (30 sts | 15 each side)
Row 6 – Ch 2, turn. Place 2 dc in first st, and 1 dc in each st to ch 2 spc. In ch 2 spc, place (2 dc, ch 2, 2 dc). 1 dc in each st until 1 st remains. 2 dc in last st. (36 sts | 18 each side)
Row 7 – Ch 2, turn. Place 3 dc in first st, sk 2 sts, [V st next, sk 2]. Repeat inside brackets to ch 2 spc. In ch 2 spc, place (V st, ch 2, V st). [Sk 2 sts, V st next] Repeat inside brackets until 3 sts remain. Sk 2 sts, 3 dc in last st. (30 sts + 12 ch 1 spcs = 42 | 6 V sts + 3 dc each side)
Row 8 – Ch 2, turn. 3 dc in first st, 1 dc in next st. [Sk 2 sts, 3 dc in ch 1 spc]. Repeat inside brackets until 1 st remains before ch 2 spc. Sk 1 st. In ch 2 spc, place (2 dc, ch 2, 2 dc). Sk 1 st, [3 dc in ch 1 spc, sk 2 sts]. Repeat inside brackets until 4 sts remain. Sk 2 sts, 1 dc next, 3 dc last. (48 sts | 24 each side)
Row 9 – Ch 2, turn. Place 3 dc in first st, sk 2 sts, [V st next, sk 2]. Repeat inside brackets to ch 2 spc. In ch 2 spc, place (V st, ch 2, V st). [Sk 2 sts, V st next] Repeat inside brackets until 3 sts remain. Sk 2 sts, 3 dc in last st. (38 sts + 16 ch 1 spcs = 54 | 8 V sts + 3 dc each side)
Row 10 – Ch 2, turn. 3 dc in first st, 1 dc in next st. [Sk 2 sts, 3 dc in ch 1 spc]. Repeat inside brackets until 1 st remains before ch 2 spc. Sk 1 st. In ch 2 spc, place (2 dc, ch 2, 2 dc).
Sk 1 st, [3 dc in ch 1 spc, sk 2 sts]. Repeat inside brackets until 4 sts remain. Sk 2 sts, 1 dc next, 3 dc last. (60 sts | 30 each side)
Row 11 – Ch 2, turn. Place 2 dc in first st, and 1 dc in each st to ch 2 spc. In ch 2 spc, place (2 dc, ch 2, 2 dc). 1 dc in each st until 2 sts remain. 2 dc last st. (66 sts – 33 each side)
Row 12 – Ch 2, turn. 3 dc in first st. Sk 2 sts, [3 dc next st, sk 2 sts] Repeat inside brackets to ch 2 spc. In ch 2 spc, place (3 dc, ch 2, 3 dc). [Sk 2 sts, 3 dc next st]. Repeat inside brackets to end of row. Your last 3 dc should be in the last st. (72 sts | 36 each side)
Row 13 – Ch 2, turn. 3 dc in first st. Sk 2 sts, [Place 3 dc in spc between clusters, sk 3 sts] Repeat inside brackets to ch 2 spc. In ch 2 spc, place (3 dc, ch 2, 3 dc). [Sk 3 sts, place 3 dc in spc between clusters]. Repeat inside brackets until 3 sts remain. Sk 2 sts, place 3 dc in last st. (78 sts | 39 each side)
Row 14 – Ch 2, turn. 3 dc in first st. Sk 2 sts, [Place 3 dc in spc between clusters, sk 3 sts] Repeat inside brackets to ch 2 spc. In ch 2 spc, place (3 dc, ch 2, 3 dc). [Sk 3 sts, place 3 dc in spc between clusters]. Repeat inside brackets until 3 sts remain. Sk 2 sts, place 3 dc in last st. (84 sts | 42 each side)
Row 15 – Ch 2, turn. 3 dc in first st. Sk 2 sts, [Place 3 dc in spc between clusters, sk 3 sts] Repeat inside brackets to ch 2 spc. In ch 2 spc, place (3 dc, ch 2, 3 dc). [Sk 3 sts, place 3 dc in spc between clusters]. Repeat inside brackets until 3 sts remain. Sk 2 sts, place 3 dc in last st. (90 sts | 45 each side)
Row 16 – Ch 2, turn. 3 dc in first st. Sk 2 sts, [Place 3 dc in spc between clusters, sk 3 sts] Repeat inside brackets to ch 2 spc. In ch 2 spc, place (3 dc, ch 2, 3 dc). [Sk 3 sts, place 3 dc in spc between clusters]. Repeat inside brackets until 3 sts remain. Sk 2 sts, place 3 dc in last st. (96 sts | 48 each side)
Rows 17 through 58 – Repeat Rows 5 through 16 in sequence. For example, Row 17 is a repeat of Row 5 and Row 18 is a repeat of Row 6. Row 58 will be a repeat of Row 10.
Repeat Rows and Stitch Count The following shows the repeat rows and stitch counts in more detail so that you always know your stitch counts regardless of where you are in the 12 row repeat. This can also be helpful for marking off rows as you work, if you prefer to print your patterns.
This information is listed similar to standard pattern instructions.
Row 17 – Repeat Row 5 (102 sts | 51 each side)
Row 18 – Repeat Row 6 (108 sts | 54 each side)
Row 19 – Repeat Row 7 (78 sts + 36 ch 1 spcs = 114 | 18 V sts + 3 dc each side)
Row 20 – Repeat Row 8 (120 sts | 60 each side)
Row 21 – Repeat Row 9 (86 sts + 40 ch 1 spcs = 126 | 20 V sts + 3 dc each side)
Row 22 – Repeat Row 10 (132 sts | 66 each side)
Row 23 – Repeat Row 11 (138 sts | 69 each side)
Row 24 – Repeat Row 12 (144 sts | 72 each side)
Row 25 – Repeat Row 13 (150 sts | 75 each side)
Row 26 – Repeat Row 14 (156 sts | 78 each side)
Row 27 – Repeat Row 15 (162 sts | 81 each side)
Row 28 – Repeat Row 16 (168 sts | 84 each side)
Row 29 – Repeat Row 5 (174 sts | 87 each side)
Row 30 – Repeat Row 6 (180 sts | 90 each side)
Row 31 – Repeat Row 7 (126 sts + 60 ch 1 spcs = 186 | 30 V sts + 3 dc each side)
Row 32 – Repeat Row 8 (192 sts | 96 each side)
Row 33 – Repeat Row 9 (134 sts + 64 ch 1 spcs = 198 | 32 V sts + 3 dc each side)
Row 34 – Repeat Row 10 (204 sts | 102 each side)
Row 35 – Repeat Row 11 (210 sts | 105 each side)
Row 36 – Repeat Row 12 (216 sts | 108 each side)
Row 37 – Repeat Row 13 (222 sts | 111 each side)
Row 38 – Repeat Row 14 (228 sts | 114 each side)
Row 39 – Repeat Row 15 (234 sts | 117 each side)
Row 40 – Repeat Row 16 (240 sts | 120 each side)
Row 41 – Repeat Row 5 (246 sts | 123 each side)
Row 42 – Repeat Row 6 (252 sts | 126 each side)
Row 43 – Repeat Row 7 (174 sts + 84 ch 1 spcs = 258 | 42 V sts + 3 dc each side)
Row 44 – Repeat Row 8 (264 sts | 132 each side)
Row 45 – Repeat Row 9 (182 sts + 88 ch 1 spcs = 270 | 44 V sts + 3 dc each side)
Row 46 – Repeat Row 10 (276 sts | 138 each side)
Row 47 – Repeat Row 11 (282 sts | 141 each side)
Row 48 – Repeat Row 12 (288 sts | 144 each side)
Row 49 – Repeat Row 13 (294 sts | 147 each side)
Row 50 – Repeat Row 14 (300 sts | 150 each side)
Row 51 – Repeat Row 15 (306 sts | 153 each side)
Row 52 – Repeat Row 16 (312 sts | 156 each side)
Row 53 – Repeat Row 5 (318 sts | 159 each side)
Row 54 – Repeat Row 6 (324 sts | 162 each side)
Row 55 – Repeat Row 7 (222 sts + 108 ch 1 spcs = 330 | 54 V sts + 3 dc each side)
Row 56 – Repeat Row 8 (336 sts | 168 each side)
Row 57 – Repeat Row 9 (230 sts + 112 ch 1 spcs = 342 | 56 V sts + 3 dc each side)
Row 58 – Repeat Row 10 (348 sts | 174 each side)
Cut yarn, weave ends. You’re done!
Blocking the Shawl
You will now want to block the shawl. As mentioned in the notes at the beginning of this pattern, you may notice that the wingspan line dips a little bit when we worked V stitch rows. This will block out. Blocking helps open up the lace-like style of the V stitches and helps them settle into their placement.
If you used an acrylic fiber like I did, you will want to block the shawl by pinning it onto blocking mats while it is dry. Then, use a steamer to apply steam. Hover the steamer an inch or so away from the work while you steam it. Make sure that the fibers feel damp and warm before you finish.
Leave the shawl to dry. You can unpin it as soon as it’s dry.
Make sure that you DO NOT touch the steamer to the yarn as it will melt it.
If you used a natural fiber like cotton, wool or a wool blend, you can wet block. Soak the project, GENTLY squeeze the moisture out (don’t twist it!), pin it into shape and leave it to dry.
Picture Tutorial
This picture tutorial will show what your work should look like after completing each row, as well as explaining the steps more in detail.
The instructions for each row will be listed as written in the pattern and then will be explained in full sentence detail to help you feel confident working this shawl. There will also be arrows, dots and highlighted stitches to help provide visuals to the instructions.
“Row 1 – In Magic Circle, ch 2 (doesn’t count here or throughout), place 3 dc, ch 2, 3 dc.
Pull tail tight. (6 sts | 3 each side)”
To begin Row 1, we start with a Magic Circle. If you prefer, you can chain 3 and slip stitch to the first chain made to create a circle. Either way, begin with a circle and chain 2. This chain 2 does not count as a stitch here or anywhere in the pattern.
In the circle, place 3 double crochet, chain 2 and place 3 more double crochet. Then, pull the tail of your magic circle tight, if you used one.
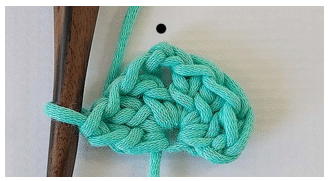
With Row 1 complete, your work should look like the image above. You will have 6 total stitches, 3 on each side and a chain 2 space in the middle. The chain 2 space is marked with a black dot in the image above.
“Row 2 – Ch 2, turn. 3 dc in first st. Sk 2 sts. In ch 2 spc, place (3 dc, ch 2, 3 dc). Sk 2 sts, 3 dc in last st. (12 sts | 6 each side)”
For Row 2, we chain 2 and turn.
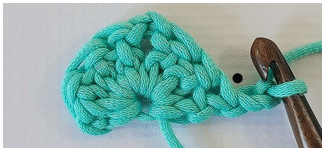
In the first stitch of the row, we will place 3 double crochet. This stitch is marked with a black dot in the image above.
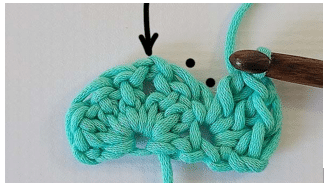
Then, we will skip 2 stitches (marked with black dots) and, all in the chain 2 space (marked with an arrow), we will place 3 double crochet, chain 2 and 3 more double crochet.
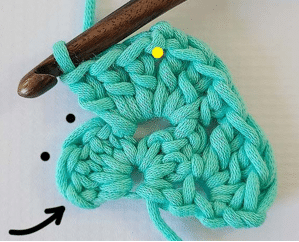
With the (3 double crochet, chain 2, 3 double crochet) in the chain 2 space completed, the work will look like the image above. A yellow dot indicates the chain 2 space.
Then, we will skip 2 stitches and place 3 double crochet in the last stitch.
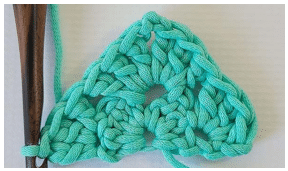
With Row 2 complete, your work should look like the image above. You will have 2 “clusters” of 3 double crochet all in the same stitch or space on either side of the work. You will have 12 stitches total, 6 on each side of the chain 2 space.
“Row 3 – Ch 2, turn. 3 dc in first st. Sk 2 sts, place 3 dc in spc between clusters. Sk 3 sts. In ch 2 spc, place (3 dc, ch 2, 3 dc). Sk 3 sts, place 3 dc in spc between clusters. Sk 2 sts, 3 dc in last st. (18 sts | 9 each side)”
For Row 3, we chain 2 and turn. We then place 3 double crochet in the first stitch, just like we did in Row 2.
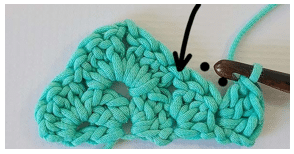
Then, we skip 2 stitches (black dots) and place 3 double crochet in the space between the two clusters of 3 double crochet (an arrow points to this space).
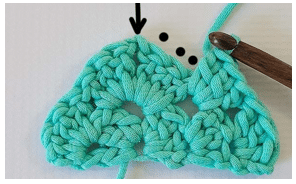
Then, we skip 3 stitches and, all in the chain 2 space, we place (3 double crochet, chain 2, 3 double crochet).
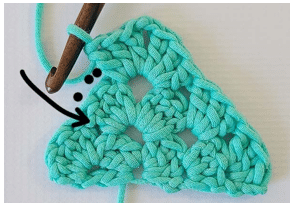
Now we mirror the instructions down the second side of the row. We skip 3 stitches (black dots) and place 3 double crochet in the space between clusters (arrow).
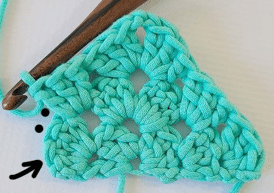
Then we skip 2 stitches and place 3 double crochet in the last stitch.
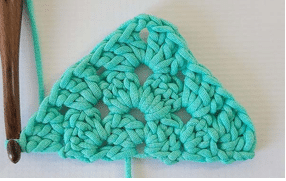
Row 3 is now complete and your work should look like the image above. You will have 18 total stitches and 9 stitches on each side.
There are 3 clusters of 3 double crochet on each side.
“Row 4 – Ch 2, turn. 3 dc in first st. Sk 2 sts, [Place 3 dc in spc between clusters, sk 3 sts] Repeat inside brackets 2x. In ch 2 spc, place (3 dc, ch 2, 3 dc). [Sk 3 sts, place 3 dc in spc between clusters]. Repeat inside brackets 2x. Sk 2 sts, place 3 dc in last st. (24 sts | 12 each side)”
Just like the previous rows, we begin Row 4 by chaining 2, turning our work and placing 3 double crochet in the first stitch.
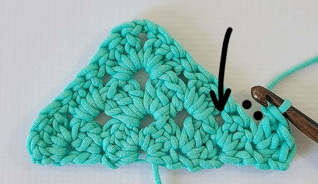
Then we skip 2 stitches and begin our first repeat.
We will [Place 3 double crochet in the space between clusters, skip 3 stitches] and we will repeat these instructions 2 times.
So, place your 3 double crochet in the space between clusters (arrow in image above), then skip 3 stitches.
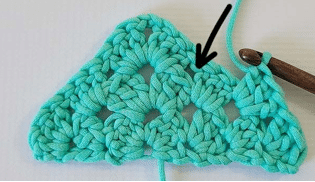
Place 3 double crochet in the next space between clusters (arrow in image above) and skip 3 stitches.
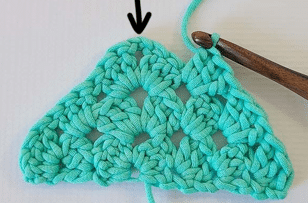
This brings us to the chain 2 space. In the chain 2 space, we will place (3 double crochet, chain 2, 3 double crochet).
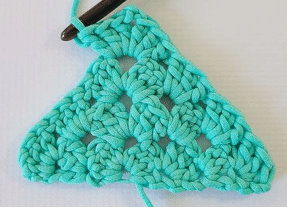
Then, we mirror the instructions back down the second side of the triangle.
So we will [Skip 3 stitches and place 3 double crochet in the space between clusters] 2 times. Then we will skip 2 stitches and place 3 double crochet in the last stitch.
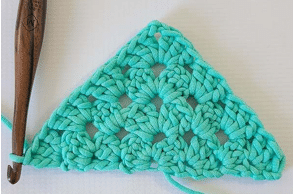
With Row 4 completed, your work should look like the image above. You will have 24 total stitches with 12 stitches on either side of the chain 2 space.
“Row 5 – Ch 2, turn. Place 2 dc in first st, and 1 dc in each st to ch 2 spc. In ch 2 spc, place (2 dc, ch 2, 2 dc). 1 dc in each st until 1 st remains. 2 dc in last st. (30 sts | 15 each side)”
Row 5 is a straightforward row. Chain 2, turn. Place 2 double crochet in the first stitch.
Then, place 1 double crochet in each stitch until you reach the chain 2 space.
In the chain 2 space, place (2 double crochet, chain 2, 2 double crochet). Then, place 1 double crochet in each stitch until 1 stitch remains. Place 2 double crochet in the last stitch.
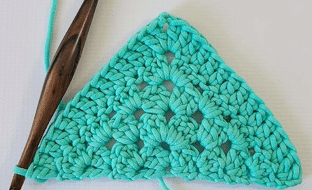
With Row 5 complete, your work should look like the image above. You will have a total of 30 stitches with 15 stitches on either side of the chain 2 space.
“Row 6 – Ch 2, turn. Place 2 dc in first st, and 1 dc in each st to ch 2 spc. In ch 2 spc, place (2 dc, ch 2, 2 dc). 1 dc in each st until 1 st remains. 2 dc in last st. (36 sts | 18 each side)”
Row 6 is worked the same as Row 5, there are just more stitches to work this time.
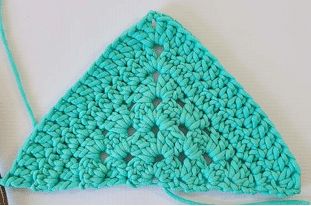
With Row 6 complete, your work should look like the image above. You will have a total of 36 stitches with 18 stitches on either side of the chain 2 space.
“Row 7 – Ch 2, turn. Place 3 dc in first st, sk 2 sts, [V st next, sk 2]. Repeat inside brackets to ch 2 spc. In ch 2 spc, place (V st, ch 2, V st). [Sk 2 sts, V st next] Repeat inside brackets until 3 sts remain. Sk 2 sts, 3 dc in last st. (30 sts + 12 ch 1 spcs = 42 | 6 V sts + 3 dc each side)”
For Row 7, we chain 2, turn and place 3 double crochet in the first stitch.
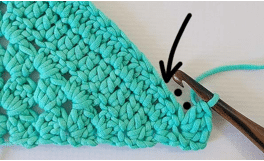
Then, we skip 2 stitches (black dots in image above) and begin our repeat in the next stitch (arrow points to this stitch).
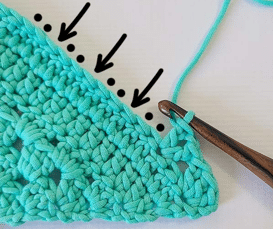
For our repeat, we will [V stitch (1 double crochet, chain 1, 1 double crochet all in the same stitch) in the next stitch, skip 2 stitches]. We will repeat the instructions inside the brackets until we reach the chain 2 space.
In the image above, I have started the first repeat by placing the first V stitch and am prepared to skip the next 2 stitches. Arrows in the image point to the stitches in which we will place V stitches and black dots indicate the stitches we will skip.
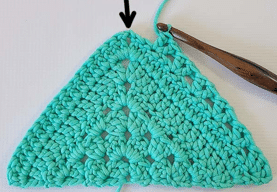
The repeat ends on “skip 2”, so we will have 2 stitches to skip before the chain 2 space.
In the chain 2 space, we will place (1 V stitch, chain 2, 1 V stitch).
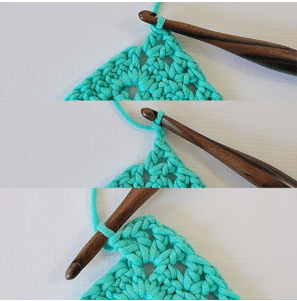
In the set of images above, you can see 1 V stitch placed, then the chain 2 created and finally the second V stitch placed.
Then, we mirror the instructions back down the second side of the triangle.
So we will [Skip 2 stitches and place 1 V stitch in the next stitch]. We will repeat the instructions within brackets until only 3 stitches remain.
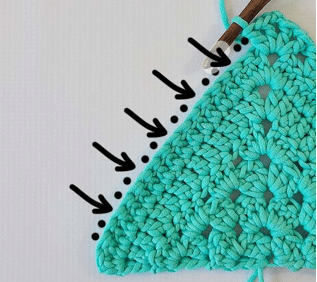
Then we will skip 2 stitches and place 3 double crochet in the last stitch.
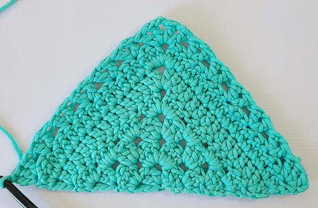
With Row 7 completed, we now have a total of 12 V stitches or 6 V stitches on each side of the triangle.
We also have 3 double crochet in the first and last stitch of the row.
This means that we have a total of 42 stitches (30 double crochet + 12 chain 1 spaces = 42)
“Row 8 – Ch 2, turn. 3 dc in first st, 1 dc in next st. [Sk 2 sts, 3 dc in ch 1 spc]. Repeat inside brackets to ch 2 spc. In ch 2 spc, place (2 dc, ch 2, 2 dc). Sk 1 st, [3 dc in ch 1 spc, sk 2 sts]. Repeat inside brackets until 4 sts remain. Sk 2 sts, 1 dc next, 3 dc last. (48 sts | 24 each side)”
For Row 8, we chain 2, turn and place 3 double crochet in the first stitch.
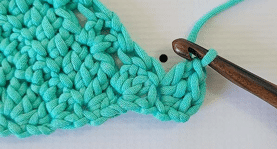
Then, we place 1 double crochet in the next stitch.
Now we begin our repeat. For our repeat, we will [Skip 2 stitches and place 3 double crochet in the next chain 1 space].
We will repeat the instructions inside the brackets until we reach the chain 2 space.
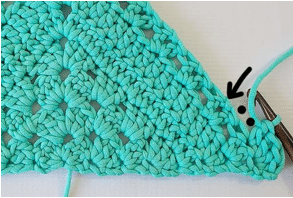
So, we will skip 2 stitches (marked with black dots) and place 3 double crochet in the chain 1 space of the V stitch from the previous row (an arrow points to the chain 1 space).
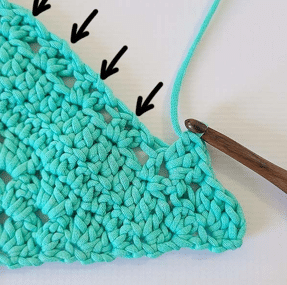
We will continue skipping 2 stitches and placing 3 double crochet in the next chain 1 space until we reach the chain 2 space.
Skip the stitch before the chain 2 space.
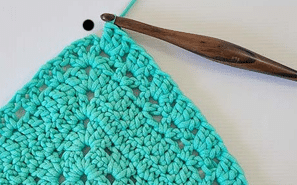
In the chain 2 space, we will place (2 double crochet, chain 2, 2 double crochet).
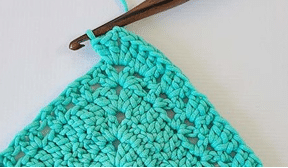
Then, we will skip 1 stitch and mirror the instructions back down the second side of the triangle.
So we will [Place 3 double crochet in the next chain 1 space and then skip 2 stitches]. We will repeat the instructions within brackets until only 4 stitches remain.
We will skip 2 stitches, place 1 double crochet in the next stitch and 3 double crochet in the last stitch.
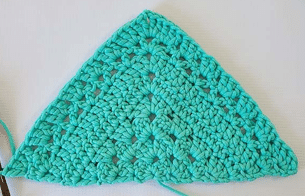
At the end of the row, your work should look like the image above. You will have 48 total stitches with 24 stitches on either side of the chain 2 space.
Rows 9 and 10 are basically repeats of Rows 7 and 8, there are just more stitches to work. Review the images above if needed to work these rows.
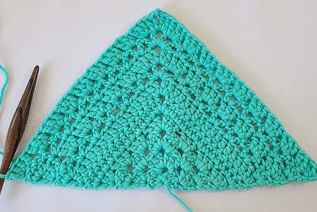
The image above shows Rows 9 and 10 completed.
Rows 11 is basically a repeat of Row 5, there are just more stitches to work. Review the images above if needed to work these rows.
Rows 12, 13, 14, 15 and 16 are worked similar to the previous rows in this pattern.
Row 12 is worked like Row 7, except we place 3 double crochet instead of a V stitch (1 double crochet, chain 1, 1 double crochet).
Rows 13, 14, 15 and 16 are worked similar to
Rows 2, 3 and 4.
You should feel confident moving forward with this pattern using the picture tutorial above, regardless of the row you’re working.