Fox Toy Amigurumi – This easy-to-follow pattern instructions on how to crochet and assemble all the parts to make this fox.
Materials Needed
- 2 hanks of Vita Cotton Lily 100% cotton, 1.75 oz/50g approx 137yds/125m. You can substitute yarn just make sure that it matches original proportions.
Suggested substitute yarn “Scheepjes Catona”, “Alpina Anabel” “Schachenmayr Catania”
Yardage approx MC yarn (Orange) 85yds/75m
55yds/50m CC (Beige) yarn, CC1 -brown - Crochet hook 2mm or 2.5mm
- Stuffing
- Scissors
- Black embroidery floss or yarn
- Tapestry needle
Gauge
- 26 sc and 25 rows = 4 inches
Abbreviations (US terminology)
- BOR – beginning of round
- ch – chain
- sl st – slip stitch
- st(s) – stitch(es)
- sc – single crochet
- dec – decrease (sc2tog)(I recommend to make
invisible decreases) - inc – increase (2sc in one st)
- dc – double crochet
- rnd – round
- foll – follow(ing)(s)
- rep – repeat
- rem – remain(ing)
- cont – continue
- The number in parenthesis at the end of each
rnd is the total number of sts in the rn
Notes
All pieces worked in a continuous spiral. Do not join work in the rnd, just work sc in the next st. Place marker or use contrasting color yarn to mark beg of rnd. Use hook 2.5 mm or size matching your yarn and obtaining gauge.

Head
With CC make a magic ring.
Rnd 1: 6sc into magic ring = 6 sts
Rnd 2 (INC): [inc] 6 times = 12 sts
Rnd 3 (INC): [inc, sc in next st] 6 times = 18 sts
Rnd 4 (INC): [inc, sc in next 2 sts] 6 times = 24 sts
Rnd 5 (INC): [inc, sc in next 3 sts] 6 times = 30 sts
Rnd 6 (INC): [inc, sc in next 4 sts] 6 times = 36 sts
Rnd 7 (INC): [inc, sc in next 5 sts] 6 times = 42 sts
Rnd 8 (INC): [inc, sc in next 6 sts] 6 times = 48 sts
Rnd 9-15: sc in every st = 48 sc (work even for 7 rnds)
Rnd 16 (DEC): [dec, sc in next 6 sts] 6 times = 42 sts
Rnd 17 (DEC): [dec, sc in next 5 sts] 6 times = 36 sts
Rnd 18 (DEC): [dec, sc in next 4 sts] 6 times = 30 sts
Rnd 19 (DEC): [dec, sc in next 3 sts] 6 times = 24 sts
Start to stuff the head
Rnd 20 (DEC): [dec, sc in next 2 sts] 6 times = 18 sts
Stuff the head tightly, for your convenience you can use tweezers.
Rnd 21 (DEC): [dec, sc in next st] 6 times = 12 sts
Rnd 22 (DEC): [dec] 6 times = 6 sts
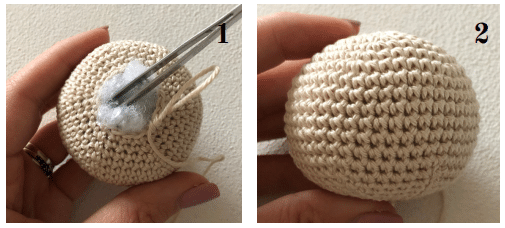
Bind off rem sts using tapestry needle. Weave the end.
Upper head piece
With MC work the upper head piece
Rnd 1: 6sc into magic ring = 6 sts
Rnd 2 (INC): [inc] 6 times =12 sts
Rnd 3 (INC): [inc, sc in next st] 6 times = 18 sts
Rnd 4 (INC): [inc, sc in next 2 sts] 6 times = 24 sts
Rnd 5 (INC): [inc, sc in next 3 sts] 6 times = 30 sts
Rnd 6 (INC): [inc, sc in next 4 sts] 6 times = 36 sts
Rnd 7 (INC): [inc, sc in next 5 sts] 6 times = 42 sts
Rnd 8 (INC): [inc, sc in next 6 sts] 6 times = 48 sts
Rnd 9-13: sc in every st = 48 sts (work even for 5 rnds)
Rnd 14 (DEC): [dec, sc in next 6 sts] 6 times = 42 sts
Rnd 15: sc in every st = 42 sts (work even)
Turn the piece and start to work flat.
Row 16: ch1, sc in next 6 sts, turn.
Row 17: ch1, sc in next 6 sts, turn.
Row 18: sc in next 5 sts starting from the 2nd st from the hook, turn.
Row 19: sc in next 4 sts starting from the 2nd st from the hook, turn.
Row 20: ch1, sc in next 4 sts, turn.
Row 21: sc in next 3 sts starting from the 2nd st from the hook, turn.
Row 22: sc in next 2 sts starting from the 2nd st from the hook, turn.
Rows 23-24: ch1, sc in next 2 sts, turn
Row 25: ch1, sc in next 2 sts
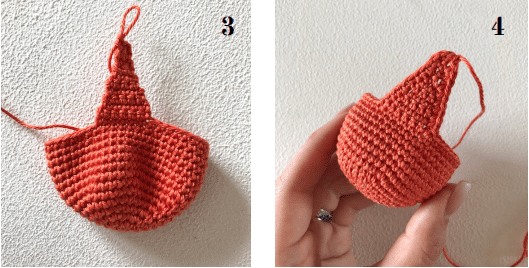
Sc in every st to end of upper head piece.(pic.4)
Sl st in next st, fasten off leaving a long tail approx 25-27 in (65-70 cm) for sewing to the head.
Nose
Work with CC yarn (beige).
Rnd 1: 5 sc into magic ring = 5 sts
Rnd 2 (INC): [inc] 5 times = 10 sts
Rnd 3-5: sc in every st = 10 sts (work even for 3 rnds)
Sl st in next st, fasten off leaving a tail for sewing.
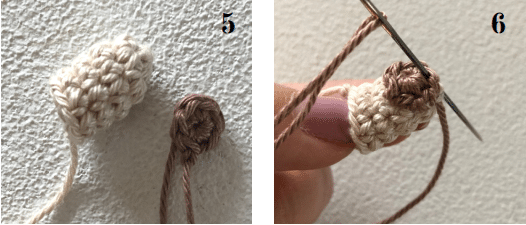
With CC1 yarn (brown) work 6sc into magic ring for the nose tip, fasten off and sew it to the nose or embroider the tip of the nose using CC1 yarn. Stuff the nose firmly.
Ears (Make 2)
With CC1 yarn work as foll:
Rnd 1: 6 sc into magic ring = 6 sts
Rnd 2: sc in every st (work even around) = 6 sts
Rnd 3 (INC): [inc, sc in next 2 sts] 2 times = 8 sts
Cont to work with MC yarn:
Rnd 4 (INC): [inc, sc in next st] 4 times = 12 sts
Rnd 5 (INC): [inc, sc in next 5 sts] 2 times = 14 sts
Rnd 6 (INC): [inc, sc in next 6 sts] 2 times = 16 sts
Rnd 7: sc in every st (work even around) = 16 sts
Sl st in next st, fasten off leaving a long tail for sewing to the head.
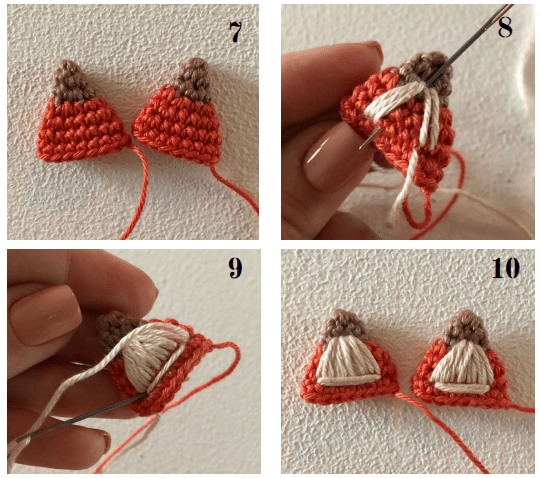
With CC yarn embroider triangle on the ear. Rep the same for the 2nd ear.
Head Assembly
Sew the nose to the head at level of rnd 6 from the last inc, attaching the upper head piece to the head, checking the right place for embroidering the nose. (pic 11-12). You may have to ad just nose to be in center of head.
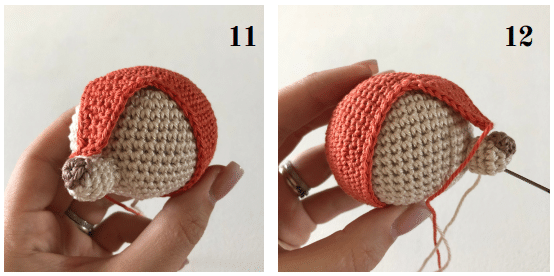
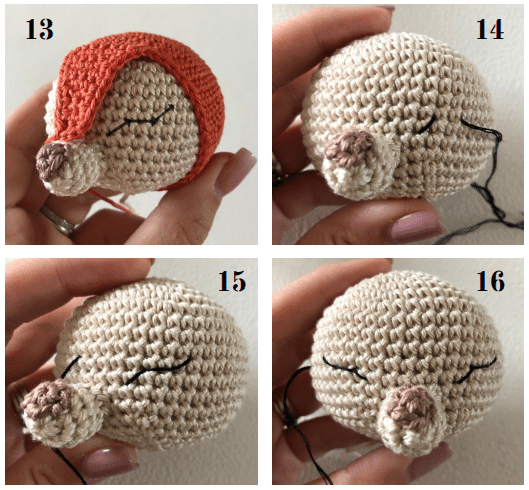
Then outline the eyes and remove the upper head piece. With black embroidery floss or fingering weight yarn embroider sleepy eyes.
You can bring the needle from the back side of the head. The upper head piece will hide all the knots, when attaching it. Embroider the eyes as it’s shown on the photo, mirror the 2nd eye. Pay attention to the symmetrical position of the eyes regarding to the nose.
For your convenience attach the upper head piece. When eyes are finished, secure the thread on the back of the head and cut it.
Now sew the upper head piece. Attach it as it’s shown on the photo 17 and sew it to the head around the edge.
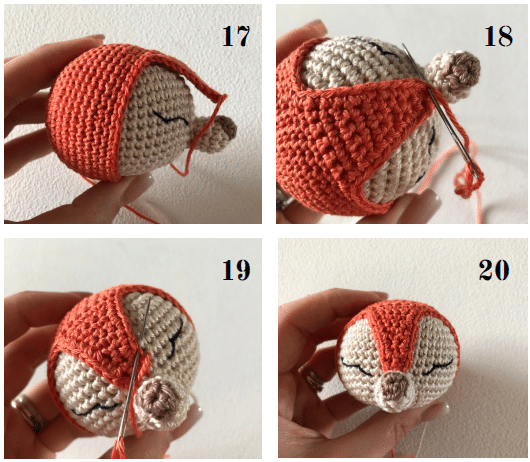
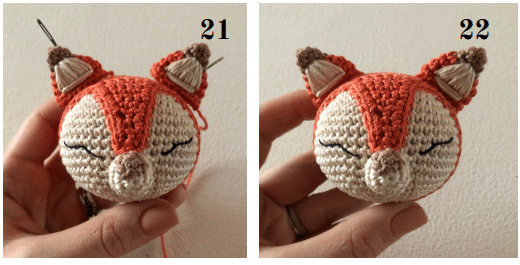
Sew the ears at level of 2-3 rows from the edge of the upper head piece with 5 sts in between. The head is done.
Leg (Make 2)
With CC make a magic ring.
Rnd 1: 6 sc into magic ring = 6 sts.
Rnd 2 (INC): [inc] 6 times = 12 sts.
Rnd 3-4: sc in every st = 12 sts (work even for 2 rnds).
Rnd 5: dec, sc in next 4 sts, inc, sc in next 5 sts = 12 sts.
With MC yarn
Rnd 6: sc in every st = 12 sts (work even).
Rnd 7: dec, sc in next 5 sts, inc, sc in next 4 sts = 12 sts.
Rnd 8: sc in every st = 12 sts (work even).
Rnd 9: dec, sc in next 4 sts, inc, sc in next 5 sts = 12 sts.
Rnd 10: sc in every st = 12 sts (work even).
Fasten off.
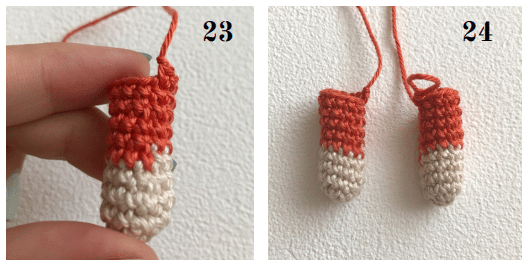
One leg is ready. Cut yarn. Rep for the second leg. Important! Do not cut yarn when the second leg is finished.
Body
Work body starting from the second leg using working yarn that hasn’t been cut.
Rnd 1:
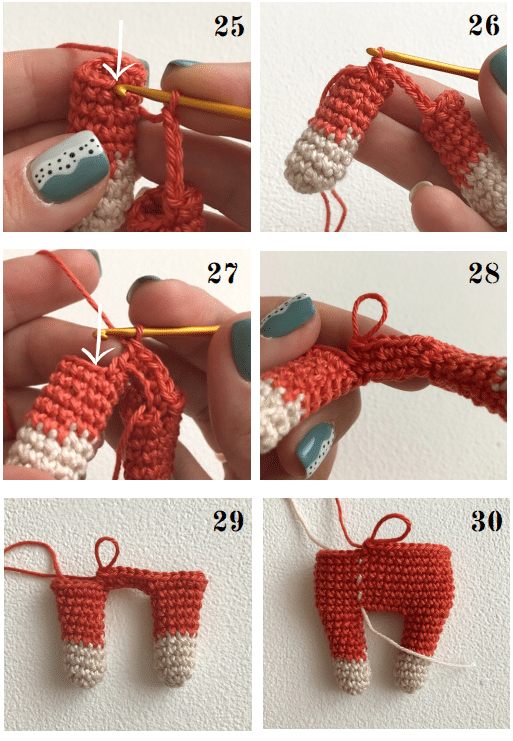
1) ch5, join to first leg with sc, work in the st, indicated on the pic. 25, sc in next 4 sts, inc in next 2 sts, sc in next 5 sts,
2) (work chain) sc in next 2 sts, inc, sc in next 2 sts,
3) sc in the st, indicated on the pic. 27, sc in next 4 sts, inc in next 2 sts, sc in next 5 sts,
4) (work chain) sc in next 2 sts, inc, sc in next 2 sts = 40 sts. (pic.30)
This is back of the toy. Place BOR marker or use CC yarn to mark. It’s necessary for the right dec position. Dec should be on sides.
This round may have seemed difficult to you, so I made a video to demonstrate the process.
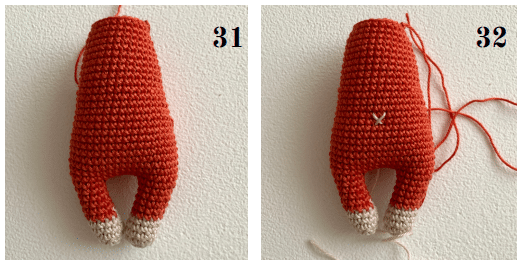
Rnd 2-8: sc in every st = 40 sts. (work even for 7 31 32 rnds).
Stuff legs firmly.
Rnd 9 (DEC): sc in next 7 sts, dec, sc in next 18 sts, dec, sc in next 11 sts = 38 sts.
Rnd 10-11: sc in every st = 38 sts (work even for 2 rnds).
Rnd 12 (DEC): sc in next 7 sts, dec, sc in next 17 sts, dec, sc in next 10 sts = 36 sts.
Rnd 13: sc in every st = 36 sts (work even).
Rnd 14 (DEC): sc in next 7 sts, dec, sc in next 16 sts, dec, sc in next 9 sts = 34 sts.
Rnd 15: sc in every st = 34 sts (work even).
Rnd 16 (DEC): sc in next 6 sts, dec, sc in next 15 sts, dec, sc in next 9 sts = 32 sts.
Rnd 17-19: sc in every st = 32 sts (work even for 3 rnds)
Stuff body gradually.
Rnd 20 (DEC): sc in next 6 sts, dec, sc in next 14 sts, dec, sc in next 8 sts = 30 sts.
Rnds 21-22: sc in every st = 30 sts (work even for 2 rnds).
Rnd 23 (DEC): sc in next 6 sts, dec, sc in next 13 sts, dec, sc in next 7 sts = 28 sts.
Rnd 24-25: sc in every st = 28 sts (work even for 2 rnds).
Rnd 26 (DEC): sc in next 6 sts, dec, sc in next 12 sts, dec, sc in next 6 sts = 26 sts.
Rnd 27 (DEC): sc in next 5 sts, dec, sc in next 11 sts, dec, sc in next 6 sts = 24 sts.
Work sc in next 5 sts to shift BOR. Finish with sl st.
Fasten off. Cut yarn leaving a long tail approx 18- 20in(45-50cm) for sewing. Body is ready. Embroider a navel a little bit below the middle of the body using CC yarn. It should be 2 sts wide and 2 sts high (pic.32).
Stuff it completely
Arm (Make 2)
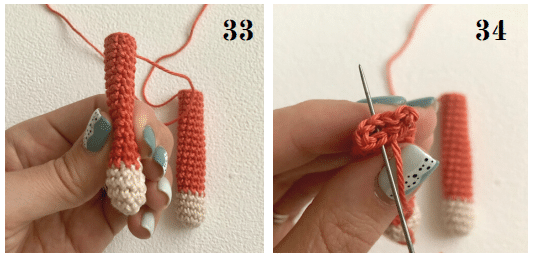
For your convenience stuff arms gradually while working them. Stuff only bottom part of each piece (pic.33), this will help to avoid sticking out of arms after assembly.
With CC make a magic ring.
Rnd 1: 6sc into magic ring = 6 sts.
Rnd 2 (INC): [inc] 6 times = 12 sts.
Rnd 3-4: sc in every st = 12 sts (work even for 2 rnds).
Rnd 5 (DEC): [dec] 2 times, sc in next 8 sts = 10 sts.
With MC yarn
Rnd 6-20: sc in every st = 10 sts (work even for 15 rnds).
Join with sl st. Fasten off. Cut yarn leaving a long tail approx 18-20in(45-50cm) for sewing. Sew the arms as it’s shown on pic.34.
Tail
With CC make a magic ring.
Rnd 1: 6sc into magic ring = 6 sts.
Rnd 2 (INC): [inc, sc in next st] 3 times = 9 sts.
Rnd 3: sc in every st = 9 sts (work even).
Rnd 4 (INC): [inc, sc in next 2 sts] 3 times = 12 sts.
Rnd 5: sc in every st = 12 sts (work even).
Rnd 6 (INC): [inc, sc in next 3 sts] 3 times = 15 sts.
With MC yarn
Rnd 7: sc in every st = 15 sts (work even).
Rnd 8 (INC): [inc, sc in next 4 sts] 3 times = 18
Rnd 9-14: sc in every st = 18 sts (work even for 6 rnds).
Rnd 15 (DEC): [dec, sc in next 4 sts] 3 times = 15 sts.
Rnd 16 (DEC): [dec, sc in next 3 sts] 3 times = 12 sts.
Join with sl st. Fasten off. Cut yarn leaving a long tail approx 18-20in(45-50cm) for sewing.
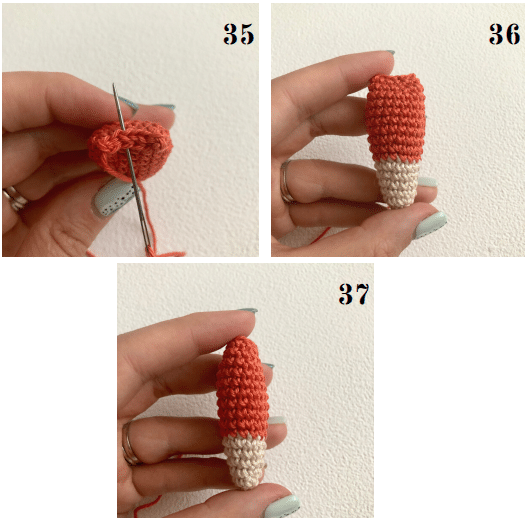
Stuff tail, but not firmly. Sew the tail as it’s shown on pic.35
Collar
With CC yarn (or use any color you like).
Row 1: ch24, sc in the 2nd st from the hook, sc in next 22 sts = 23 sts, turn.
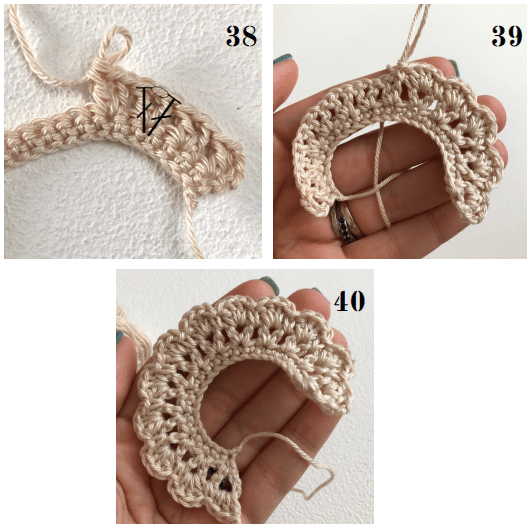
Row 2: – ch4, dc in next st, [sk1, dc in next st, ch1, dc in the same st] 11 times, turn. (pic. 38)
Row 3: ch2, 2 dc in next ch space, sc in next st, [4 dc in next ch space, sc in next st] 10 times, 3 dc in next post, to end of row. Cut yarn leaving a long tail approx 18-20in(45-50cm) for sewing. The collar is ready. (pic. 40)
How to crochet collar (2-3 rows)
Assembly
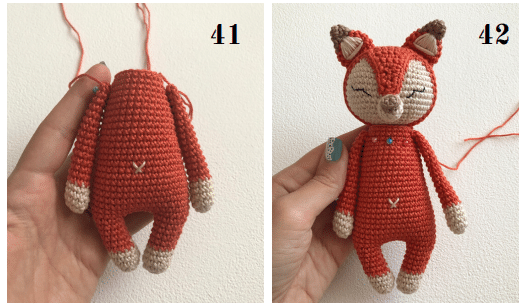
Pin and sew arms as it’s shown on pic. 41 one rnd below the last rnd of body. Place head at center,pin and sew it to body (pic.42).
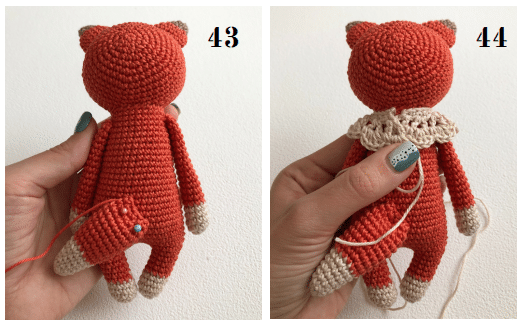
Sew the tail to the body as shown in photo 43. I sew at an angle, you can sew as you like. Wrap collar around neck and sew it as it’s shown on the photo 44.
