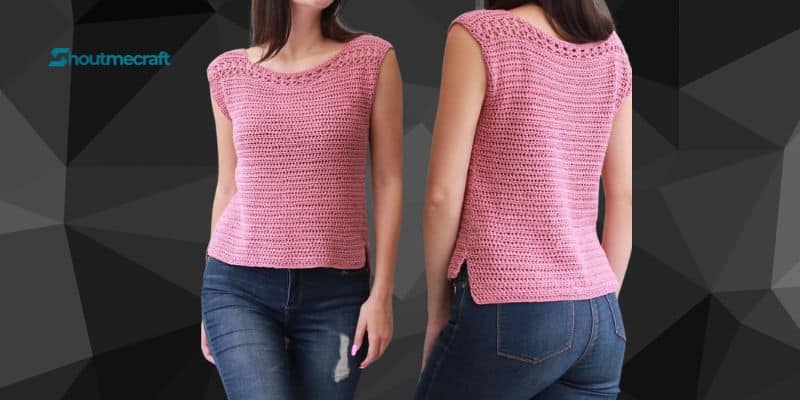
ROSE is a basic design for a shirt that is purely feminine.
- This newbie stylish summer top’s design is unlike anything you’ve seen before!
- The Rose top fits all body types well thanks to its appealing fit and beautiful neckline.
- This is the ideal project if you’re looking for a fresh, simple pattern to work on for spring or summer.
You’ll like how simple it is to crochet this cozy yet stylish shirt. The ROSE Top is a seductive addition to your wardrobe, whether you wear it in the morning or the evening, at the beach or in the city.
ROSE: This straightforward design is a great option for summers and beyond. It’s all about being simple to sew and fashionable to wear.
- Using the most simple textures and forms
- Basic stitches are used
- Neither a rise nor a fall.
- The length may be changed.
You’ll like how simple it is to crochet this cozy yet stylish shirt.
Materials needed:
- Sport yarn: 590[650, 720, 790, 850, 920]yds.
- I recommend: Premier Yarns-Cotton Fair or Ice Yarns-Lorena I9-5.5mm crochet hook and a tapestry needle.
Gauge: 14HDC = 4”/10 cm. Take time to check gauge and adjust if necessary. If it takes you fewer stitches to make your swatch, try using a smaller size hook. If more stitches, try a larger size hook.
- Ch=chain
- St(s) =stitch(es)
- R=row
- SC=single crochet
- SlSt=Slip stitch
- SM=stitch marker
- HDC= half double crochet
- HDC2tog= half double crochet 2 together ( decrease)
- DC= double crochet
DC3tog = DC 3 together: * Work 1 DC, but wait with the last yarn over and pull-through *, work from
*-* a total of 3 times (= 4 loops on the hook), make 1 yarn over and pull it through all loops on the hook.


Info:
*For size XS work pattern as written. Counts in brackets ([]) are for size S, M, L, XL, 2XL.
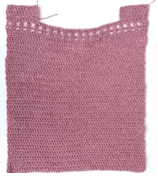
** This top is crochet in two pieces. Each piece is worked from the bottom up.
***The back are 2 inches longer than the front. The two pieces are seamed together.
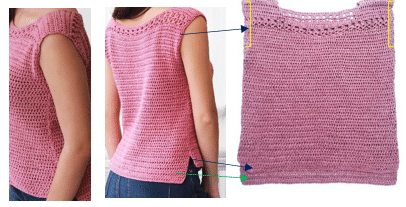
**** For a looser fit on the hips, I include vents on the sides.
Please verify your gauge and read the info before start

So let’s get started!
Measure your bust to choose the size:
Sizes: XS [S, M, L, XL, XXL]
Bust: 31″ [34″, 37″, 40″, 43″, 47″] – 78 [86, 94, 101, 110, 120]cm
Top Measurements (pre-blocking):
- XS = 16.8″ (42 cm) Width across back X 19″ (48.2cm) Length
- S = 18.6″ (46 cm) Width across back X 19.75″ (50 cm) Length
- M = 20.3″ (50.5 cm) Width across back X 20.5″ (52 cm) Length
- L = 22″ (55 cm) Width across back X 21.25″ (54 cm) Length
- XL = 23.7″ (59 cm) Width across back X 22.00″ (55.8 cm) Length
- XXL = 25.4″ (63.5 cm) Width across back X 22.25″ (56.5 cm) Length
The FRONT piece
Chain loosely 61[67, 73, 79, 85, 91] stitches.
R1: Starting with 3th ch from hook, 1 HDC in each ch across. <59[65, 71, 77, 83, 89]HDC> Ch2.Turn.
*note-The Ch2 do not count as a stitch. In next rows, the 1st HDC will be made in the same st as Ch2.
R2: 1 HDC in each ch across. <59[65, 71, 77, 83, 89]HDC> Ch2. Turn.
R3- R40[42, 44, 46, 48, 50]: repeat R2
The rounded shape (only on the front piece)
In the next 4 rows, you will work SC in the middle of the rows, in order to form a slightly rounded neckline.

R1: 26[28, 30, 32, 34, 36]HDC, 7[9, 11, 13, 15, 17]SC, 26[28, 30, 32, 34, 36]HDC. <59[65, 71, 77, 83, 89]> Ch2.Turn.
R2: 24[26, 28, 30, 32, 34]HDC, 11[13, 15, 17, 19, 21]SC, 24[26, 28, 30, 32, 34]HDC. <59[65, 71, 77, 83, 89]> Ch2.Turn.
R3: 22[24, 26, 28, 30, 32]HDC, 15[17, 19, 21, 23, 25]SC, 22[24, 26, 28, 30, 32]HDC. <59[65, 71, 77, 83, 89]> Ch2.Turn.
R4: 20[22, 24, 26, 28, 30]HDC, 19[21, 23, 25, 27, 29]SC, 20[22, 24, 26, 28, 30]HDC. <59[65, 71, 77, 83, 89]> Ch3.Turn.
The lace band
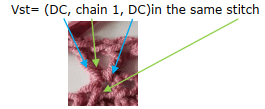
R1: DC in the same st as Ch3, skip 1 st, in the next st make Vst,
*skip 2 stitches, in the next st make Vst*, repeat from *-* until 2 sts remaining, skip 1 st, DC in the last st. Ch3.Turn. < 2DC (at the beginning and at the end of the R), 19[21, 23, 25, 27, 29]Vst>

R2: DC in the same st as Ch3, Ch1, *skip first DC from Vst, DC3tog around the chain space from the Vst, Ch2, skip the second DC from Vst*, repeat from *-* until the last Vst,
skip first DC from Vst, DC3tog around the chain space from the Vst, Ch1,skip the second DC from Vst, DC in the last st. Ch2.Turn.

R3: HDC in the same st as Ch2, HDC around Ch1, HDC in next st, *2HDC around Ch2, HDC in next st* repeat from *-* until the last Ch1, HDC around Ch1, HDC in the last st. <59[65, 71, 77, 83, 89]>Ch2.Turn.

Split Neckline
-Left Shoulder
R1: work 15[17, 19, 21, 23, 25]HDC, 1 SC (leave remaining sts unworked). <16[18, 20, 22, 24, 26]> Ch2.Turn.
R2: skip the first st ( means skip the SC from the previous R), HDC in each HDC across. <15[17, 19, 21, 23, 25]> Ch2.Turn.
R3: 12[14, 16, 18, 20, 22]HDC, HDC2tog, SC in last st <14[16, 18, 20, 22,24]> Ch2. Turn.
R4: skip the first st ( means skip the SC from the previous R), HDC in each HDC across. <13[15, 17, 19, 21, 23]>.

Tie off, leave a long tail for seaming shoulder.
-Right shoulder –Lay front panel out in front of you, right side up.
R1: skip 27[29, 31, 33, 35, 37]sts, add yarn into next stitch, then Ch1. HDC in each of the next 15[17, 19, 21, 23, 25]sts across. <15[17, 19, 21, 23, 25]> Ch2.Turn.
R2: HDC in each HDC across, skip the last st (means skip the SC from the previous R). <15[17, 19, 21, 23, 25]>Ch1. Turn.
R3: skip the first st, HDC2tog, 12[14, 16, 18, 20, 22]HDC. <13[15,17,19,21,23]>Ch2.Turn.
R4: HDC in each HDC across. <13[15, 17, 19, 21, 23]>.
Tie off, leave a long tail for seaming shoulder.

The BACK piece – it is 1.5” longer than the front piece.
Chain loosely 61[67, 73, 79, 85, 91] stitches.
R1: Starting with 3th st from hook, 1 HDC in each ch across. <59[65, 71, 77, 83, 89]HDC> Ch2.Turn.
*note-The Ch2 do not count as a stitch. In next rows, the 1st HDC will be made in the same st as Ch2.
R2: 1 HDC in each ch across <59[65, 71, 77, 83, 89]HDC> Ch2.Turn.
R3-R52 [54, 56, 58, 60, 62]: repeat R2
Continue with the lace band – repeat Rows 1-3 of the lace band from the front piece.
Split Neckline
Left Shoulder
R1: work 14[16, 18, 20, 22, 24]HDC, (leave remaining sts unworked) < 14[16, 18, 20, 22, 24]> Ch2.Turn.
R2: skip the first st, HDC in each HDC across. <13[15, 17, 19, 21, 23]>.Tie off.
Right Shoulder –lay front panel out in front of you, right side up.
R1: skip 31[33, 35, 37, 39, 41]sts, add yarn into next st, Ch2 (here Ch2 count as a HDC) , HDC in each of 13[15, 17, 19, 21, 23] sts across. < 14[16, 18, 20, 22, 24]> Ch2.Turn.
R2: HDC in each HDC until the Ch2 from previous R <13[15, 17, 19, 21, 23]>Tie off.
Join shoulders
Place your panels right side facing and using the tail of yarn from the front panel, sew 13[15, 17, 19, 21, 23]sts of the front and back panel together at the shoulder seam. Be sure your sts are lined up correctly and that you are not skipping any as you go. Use mattress stitch or whichever method you prefer to sew. Repeat on other shoulder.

Join sides
Place your top in front of you, right sides facing.
Arm opening: measure from the shoulder seam down the side of your top a total of 7[7.5, 8, 8.5, 9, 9.5]”, place a SM. Repeat on other side. Make sure your SM was placed on the same row on both sides.
Start sewing from SM down, leaving the arms opening unworked, making sure that your rows on both panels are aligned correctly. Stop the seam when there is 1 1/2” left of the front, leaving a split in each side. Fasten off and weave the ends.
Congratulations