Crochet Pattern Ripple Bikini Bottom – English and US terms are used in the crochet design. With the use of a made-to-measure design, you may customize the garment to precisely fit your body.
There is no specific weight of yarn required; the number of stitches and rows depends on your body weight. You can refer to the testers’ remarks for various body kinds at the conclusion of the pattern.
Since the top fits close to the body, I recommend using yarn with a delicate touch, which I did for my creation made entirely of cotton.
Materials / Tools
- Any category #3 yarn.
- 4mm hook
- Elastic Cord (1.5mm)
- Stitch marker
- Yarn needle
- Scissors
- Tape Measure
Skill Level : Advanced Beginner
Construction of This Pattern
A. Bikini Bottom
- Crotch and Front
- Back
- Edging
- Straps
Gauge 4” x 4”
16 Single Crochet Herringbone Stitch x 14 rows
- This is a made-to-measure pattern, which means the instructions below won’t be base on stitch counts. The gauge provided here is just a reference to make sure the yarn weight is right for the proportions we’d like to achieve for our stitches.
Size Guide
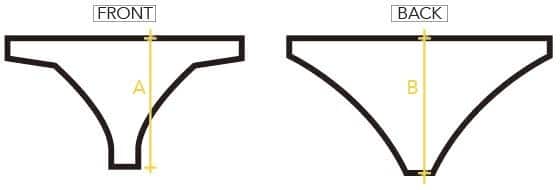
* Measurement A and B are the few things we need to determine before started. I suggest to get the flat-lay measurements from a pair of panties or a bathing suite bottom that you like.
Abbreviations (US)
- CH – Chain Stitch
- SP – Space
- ST – StitchSL
- ST – Slip Stitch
- SC – Single Crochet
- DC – Double Crochet
- SCH – Single Crochet Herringbone
- StitchSC2tog – Single Crochet 2 together
- DC2tog – Double Crochet 2 together
- SK – Skip
- REP – Repeat
- RS – Right Side
- WS – Wrong Side
- SCH2tog – Single Crochet Herringbone Stitch 2 together
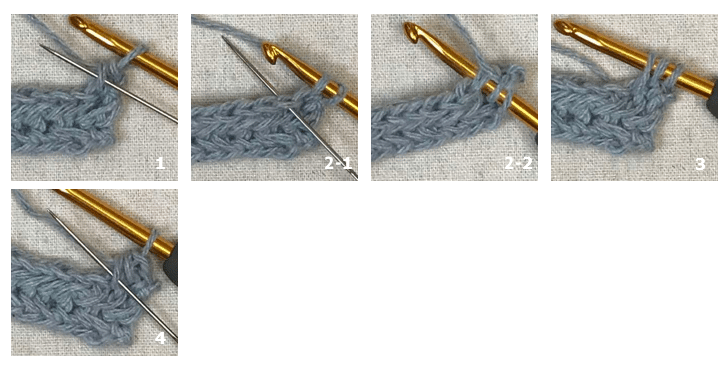
Single Crochet Herringbone ST (SCH):
When working on the right side:
1. Insert the hook into the left leg of the previous ST. (see the needle)
2. Insert the hook again into the next ST. (see the needle)
3. Yarn over and pull up a loop.
4. Yarn over and pull through all three loops on the hook.
5. Start the next SCH stitch from inserting the hook in the left leg of the previous ST just made (see the needle in pic.4) and REP form step 2.
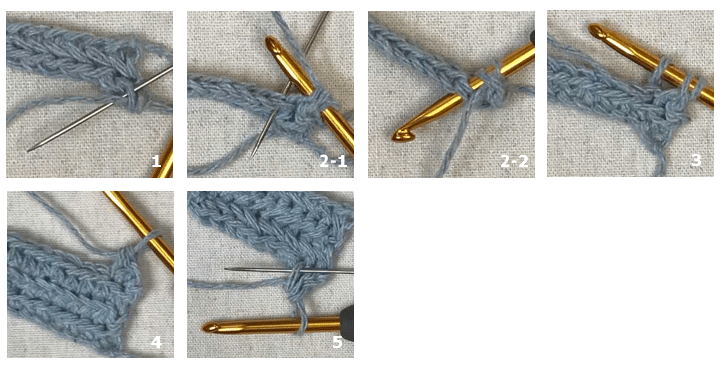
When working on the wrong side:
1. Insert the hook into the left leg of the previous ST (from right to left as shown with the needle).
2. Insert the hook again into the next ST (from back to front as shown with the needle).
3. Yarn over and pull up a loop.
4. Yarn over and pull through all three loops on the hook.
5. Start the next SCH stitch from inserting the hook in the left leg of the previous ST just made (from right to left as shown with the needle) and REP form step 2.
I learnt the stitch from the video tutorial . Check out the link if you need more information for this stitch.
Instructions (The beginning CH never count as a ST. )

Crotch and Front
CH up 9 +1.
Row 1 : SC in the 2nd. CH from the hook and each of the next CHs. Turn. [9]
Row 2 : CH1. SC into each ST until the end. Turn. [9]
Row 3 to 9 : REP Row 2. [9]
*The crotch part done. We should have a rectangular panel in size around 2” x 2.5”.
*From here, we are going to work on the front part and start to INC in every other row.
Row 10 : CH1, 2SC in thest. ST. SC in each ST across until 1ST left. 2SC into the last ST. Turn. [11]
Row 11 : CH1, SC in each ST across to the end. Turn. [11]
REP Row 10 and Row 11 until your panel reaches 3/5 (0.6) of your measurement A.
*For example, my measurement A is 7.5”. I stoped after Row 26 to reach the length of 4.5” (7.5 x 0.6 = 4.5).
*From here, we will start the SCH rows and begin decreasing. Remember to alternate the ST between the RS and the WS.
SCH Row 1 (RS) : For the first 2STs, SC2tog. 1SCH in each stitch across until 2ST left. SCH2tog. Turn.
*To do the SCH2tog, insert the hook into the left leg of the previous ST, insert the hook into the next ST, yarn over and pull up a loop (3 loops on the hook). Insert the hook again into the next ST, yarn over and pull up a loop (4 loops on the hook). Yarn over and pull through all four loops on the hook.
SCH Row 2 (WS) : CH1, 1backward SC in the 1st. ST. 1SCH in each stitch across to the end. Turn.
*To make a backward SC, insert the hook into the ST from back to front. Yarn over and pull up a loop. Yarn over and pull through both loops on the hook.
SCH Row 3 (RS) : For the first 2STs, SC2tog. 1SCH in each stitch across until 2STs left. SCH2tog. Turn.
SCH Row 4 (WS) : CH1, 1backward SC in the 1st. ST. 1SCH in each stitch across to the end. Turn.
SCH Row 5 (RS) : 1SC in the 1st. ST. 1SCH in each stitch across to the end. Turn.
*We won’t be mentioning it for the rest of the pattern. But keep in mind that the beginning SC of the SCH rows, we always work the SC from back to front when working on the WS.

*To make a backward SC2tog, insert the hook into the ST from back to front. Yarn over and pull up a loop (2 loops on the hook). Insert the hook into the next ST from back to front. Yarn over and pull up a loop (3 loops on the hook). Yarn over and pull through all 3 loops on the hook.
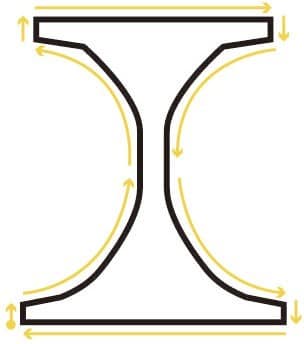
REP from Row 1 to Row 5 until the panel reaches your measurement A. (see diagram 2↑)
*DO NOT cut the yarn after the last row.
*From here, we are going to work on the Box Mesh on the side of the bikini bottom.
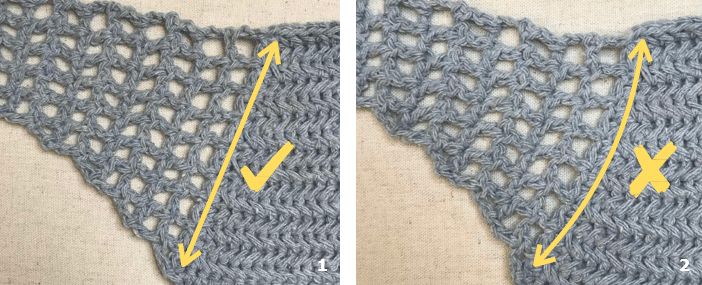
Row 1 : CH1. Turn your work to the side and put SCs evenly down in the SCH rows. Add one extra SC in the last SC row you worked so that geometrically we reach the widest point in the panel. Turn.
*Make sure that you have and odd number and just enough SC STs here so that your panel doesn’t twist or become curved after adding the box rows. (see picture1, 2 ↓)
Row 2 : CH2, 1DC into the 5th CH (third ST) from the hook. *CH1, SK the 1st ST, 1DC into the next ST. REP from * to the end. After putting the last DC in the last SC ST and turn.
Row 3 : CH4 (count as 1DC, CH1). SK the CH SP. 1DC into the DC. *CH1, SK the CH SP, 1DC into the next ST. REP from * until there is 1 DC left. (See picture 3↓) CH1, SK the CH SP, 1DC into the last DC. Turn.
Row 4 : CH2, 1DC into the 5th CH from the hook. *CH1, SK the next ST, 1DC into the next ST. REP from * to the end. Put the last DC in the 3rd CH of the turning CH and turn.

REP Row 3 and Row 4, finish at one of the odd number rows when you have 3 boxes left (See picture 4↑) (or any of your desire width for the side mesh. Make sure you have a gap around your waist for the corset lacing to adjust the fit. ) CH1, cut the yarn and fasten off.
SL ST to attach the yarn on the other side of the last SCH row (See picture 5↑). Make the same number of SC evenly and REP above steps.
Back
Turn the work up-side-down. Reattach the yarn to the foundation CH of the crotch section.
Row 1 : CH1, 2SC into the first ST. 1SC in each ST across to the end until 1 ST left. 2SC into the last ST. Turn.
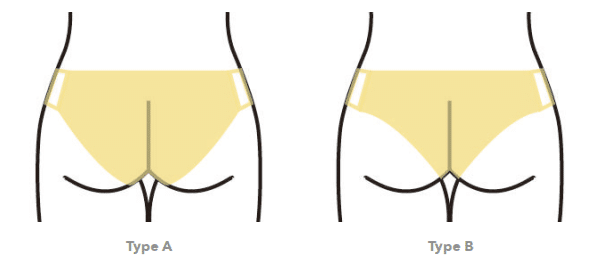
To make the bottom with fuller coverage (see type A↓), REP from Row 1 until the total length of the back panel reaches 3/5 (0.6) of your measurement B and forward to the SCH rows. To make the bottom in a more cheeky cut (Type B↓), continue with the steps below.
Row 2 and Row 3 : CH1, 1SC in the 2nd CH from the hook. 1SC in each ST across to the end. Turn.
REP from Row 1 to Row 3 (stop at any row REP) until the total length of the back panel reaches
1/4 (0.25) of your measurement B.
*For example, my measurement B is 8”. I stoped after Row 15 to reach the length of 2” (8 x 0.25= 2).
Continue REP from Row 1 to Row 2 until the total length of the back panel reaches 3/5 (0.6) of your measurement B and forward to the SCH rows.
*I stoped after Row 28 to reach the length of 4.8” (8 x 0.6 = 4.8).
*From here, we will start the SCH rows and begin decreasing. Beware of the RS and WS base on the side of the front panel.
SCH Row 1 : CH1, SC in the 1st. ST. 1SCH in each ST across to the end. Turn.
SCH Row 2 : CH1, For the first 2 ST, SC2tog. 1SCH in each ST across until 2 ST left. SCH2tog and turn.
SCH Row 3 : CH1, 1SC in the first ST. 1SCH in each ST across to the end and turn.
REP from Row 2 to Row 3 until the total length of the back panel reaches your measurement B.
*DO NOT cut the yarn after the last row.
*From here, we are going to work on the Box Mesh stitches. Go back to page 6 for the same steps.
DO NOT cut the yarn after the box mesh rows of the second side. We are going to continue to work on the edge.
Edging
Lay flat your work and measure the total length around your bikini bottom.( My measurement is 45.5” )
Take a piece of elastic cord in the length of your measurement minus 3”. ( My elastic cord length is 45.5 – 3 = 42.5″)
Tie a knot to make your elastic cord a loop.
Rnd 1: CH1, insert the hook into the last DC of the box mesh row, 1SC and wrap the elastic cord in the same ST. Wrap the elastic cord with 2 SC into each of the mesh space. Continue add SC and wrap the elastic cord nicely all around your work.
*When working on the side of the box mesh, put 3 SC on top of the DC, 2 SC in the CH2 SP.(see pictures 4↓) and 5SC into each turning-corner boxes.
*To wrap the elastic cord with the SC, just remember to keep the elastic cord between the hook and the working yarn, and do normal SC. (see pictures 5, 6↓)
*Remember to adjust the elastic cord from time to time to make sure that the stretching tension is distributed evenly around your work.
SL ST into the first SC to finish the Rnd.

Straps
CH up 250 (or any preferable length) to make a strap. Criss-cross between the 3 boxes at the end of both the front and back panel to connect them. REP the same for the other side.
Lining
It is not necessary but strongly recommended to add lining for this project. I am not a sewing expert so I won’t be giving tips for this part. But you can find lots of helpful tutorials online searching “add lining for crochet pieces” if you are not familiar with the method.
*Upcycling would be a good idea here. I always cut a piece from a soft old t-shirt for my lining.
Here it is, you just finished your Ripple Bikini Bottom!