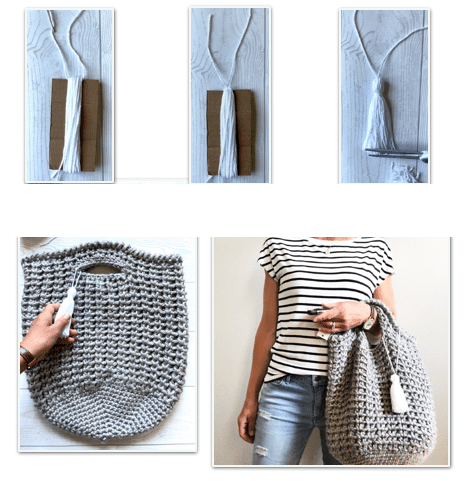
Crochet Bag Pattern – Ideal for the market, swimming pool, beach, or pretty much anything… This elastic purse comes together quickly and is quite simple to make. Included is a YouTube video to assist with trimming. Several step-by-step pictures are also provided.
Skill Level: Easy Terminology: American
Yarn: Super Bulky, Size 6, Lion Brand Hometown USA (5 oz, 81 yds, 100% Acrylic)
- Small Tote: Approximately 185 yards
- Large Tote: Approximately 275 yards
Crochet Hooks: US M/ 9 mm and US N/10 mm
Other Materials
- Yarn needle
- Stitch marker
- Scissors
- Small amount of worsted weight, size 4 yarn in a contrasting color for making the tassel
- 3” x 5” piece of cardboard for making the tassel
Gauge: In the pattern with a M/9 mm hook, the piece should measure about 3” across at the end of round 4
Sizing and Finished Measurements With The Bag Laid Flat
| Length from top center to bottom center | Width at middle | |
| Small Tote | 14.5” | 13” |
| Large Tote | 17” | 15.5” |
Stitch Guide and Abbreviations
- Slip Stitch (ss): insert hook into the next stitch, yarn over, pull through work
- Single Crochet (sc): insert hook into the next stitch, yarn over and pull through work (2 loops on hook), yarn over and pull through 2 loops
- Half-Double Crochet (hdc): yarn over, insert your hook into the next stitch, yarn over and pull through your work, yarn over and pull through 3 loops
- Reverse Single Crochet: Work a single crochet stitch into the next stitch to your right if you are right-handed. Work a single crochet stitch in he next stitch to your left if you are left-handed.
This will create a thick border around the top edge of the bag. For help making this stitch, please click directly on the link below to view my Youtube tutorial.
Notes
The bag can be made in 2 sizes, small and large. The pattern is written for both sizes with instructions for each size in parenthesis, for example: (Small Bag, Large Bag). Refer to the stitch guide in the pattern as needed. This bag is made in a continuous round beginning at the bottom and working up to the top. Place a stitch marker in the first stitch of each round. DO NOT begin each round with a chain. DO NOT join at the end of each round.

The Pattern
Place a stitch marker in the first stitch of each round.
Round 1: with a M/9 mm hook, make a magic ring, chain 1, work 6 sc into the ring, DO NOT JOIN (6, 6)
Alternate Method for Round 1: with a M/9 mm hook, chain 4, slip stitch in the first chain made to form a ring, chain 1, work 6 sc into the ring, DO NOT JOIN (6, 6)
Round 2: work 2 sc in each stitch around (12, 12)
Round 3: {sc in the next stitch, 2 sc in the next stitch} repeat around (18, 18)
Round 4: {sc in the next 2 stitches, 2 sc in the next stitch} repeat around (24, 24)
Round 5: {sc in the next 3 stitches, 2 sc in the next stitch} repeat around (30, 30)
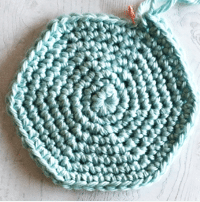
Round 6: {sc in the next 4 stitches, 2 sc in the next stitch} repeat around (36, 36)
Round 7: {sc in the next 5 stitches, 2 sc in the next stitch} repeat around (42, 42)
Round 8: {sc in the next 6 stitches, 2 sc in the next stitch} repeat around (48, 48)
At the end of round 8, the piece should measure about 6” across (see photo to right). Small Bag instructions continue below. Large Bag Instructions continue on page 5.
Small Bag
Round 9: sc in each stitch around (48) Round 10: repeat round 9
Round 11: switch to a N/10 mm hook, {skip the next stitch, 2 hdc in the next stitch} repeat around (48)
Round 12: work 2 hdc in the center space of the first hdc cluster, {work 2 hdc in the center space of the next hdc cluster} repeat around (48)
See photos on next page.
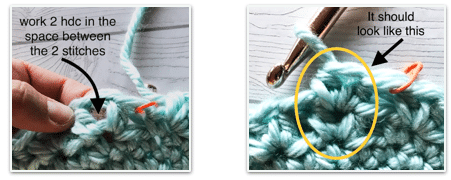
Rounds 13 – 25: repeat round 12
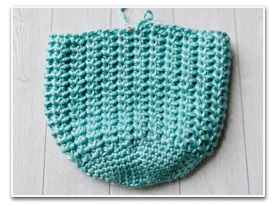
Switch to a M/9 mm hook
Round 26 (Making the 2 Handles): {work 2 hdc in the center space of the next hdc cluster} 4 times, chain 8, skip 8 stitches or 4 hdc clusters, {work 2 hdc in the center space of the next hdc cluster} 8 times, chain 8, skip 8 stitches or 4 hdc clusters, {work 2 hdc in the center space of the next hdc cluster} 4 times (48)

Round 27: {work 2 hdc in the center space of the next hdc cluster} 4 times, hdc in the next 8 chains, {work 2 hdc in the center space of the next hdc cluster} 8 times, hdc in the next 8 chains, {work 2 hdc in the center space of the next hdc cluster} 4 times (48)
Round 28: {work 2 hdc in the center space of the next hdc cluster} 4 times, {skip the next stitch, 2 hdc in the next stitch} 4 times, {work 2 hdc in the center space of the next hdc cluster} 8 times, {skip the next stitch, 2 hdc in the next stitch} 4 times, {work 2 hdc in the center space of the next hdc cluster} 4 times (48)
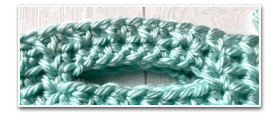
Round 29: sc in each stitch around (48)
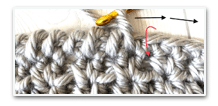
If you do not want to add the reverse sc trim, slip stitch in the next stitch and fasten off leaving a 4” – 6“ tail for weaving in.
Round 30: remove the stitch marker and place the stitch marker in the last sc made in round 29, skip the same stitch, working in the opposite or reverse direction, sc into each space directly below each sc made in round 29, work the last reverse sc in the marked stitch, fasten off and weave in loose ends (48)
See handle finishing instructions on page 7. For help making the reverse sc trim, click directly on the link below to view my Youtube tutorial.
Large Bag
Round 9: {sc in the next 7 stitches, 2 sc in the next stitch} repeat around (54)
Round 10: {sc in the next 8 stitches, 2 sc in the next stitch} repeat around (60)
At the end of round 10, the piece should measure about 8” across
Round 11: sc in each stitch around (60) Rounds 12 and 13: repeat round 11
Round 14: switch to a N/10 mm hook, {skip the next stitch, 2 hdc in the next stitch} repeat around (60)
Round 15 (see photos below): work 2 hdc in the center space of the first hdc cluster, {work 2 hdc in the center space of the next hdc cluster} repeat around (60)
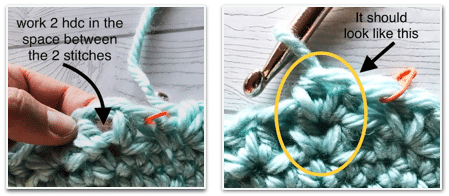
Rounds 16 – 30: repeat round 15
Switch to a M/9 mm hook
Round 31 (making the 2 handles): {work 2 hdc in the center space of the next hdc cluster} 5 times, chain 10, skip 10 stitches or 5 hdc clusters, {work 2 hdc in the center space of the next hdc cluster} 10 times, chain 10, skip 10 stitches or 5 hdc clusters,{work 2 hdc in the center space of the next hdc cluster} 5 times (60)
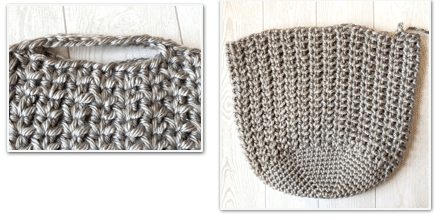
Round 32: {work 2 hdc in the center space of the next hdc cluster} 5 times, hdc in the next 10 chains, {work 2 hdc in the center space of the next hdc cluster} 10 times, hdc in the next 10 chains, {work 2 hdc in the center space of the next hdc cluster} 5 times (60)
Round 33: {work 2 hdc in the center space of the next hdc cluster} 5 times, {skip the next stitch, 2 hdc in the next stitch} 5 times, {work 2 hdc in the center space of the next hdc cluster} 10 times, {skip the next stitch, 2 hdc in the next stitch} 5 times, {work 2 hdc in the center space of the next hdc cluster} 5 times (60)
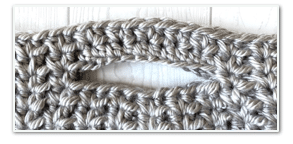
Round 34: sc in each stitch around (60)
If you do not want to add the reverse sc trim, slip stitch in the next stitch and fasten off leaving a 4” – 6“ tail for weaving in.
Round 35: remove the stitch marker and place the stitch marker in the last sc made in round 34, skip the same stitch, working in the opposite or reverse direction, sc into each space directly below each sc made in round 34, work the last reverse sc in the marked stitch, fasten off and weave in loose ends (60)
For help making the reverse sc trim, click directly on the link below to view my Youtube tutorial. See handle finishing instructions below.
Handle Finishing (all sizes)
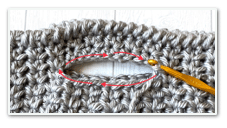
With the right side of the bag facing, use a M/9 mm hook to attach yarn with a slip stitch at the inside corner of the handle.
Round 1: chain 1 (does not count as a stitch), sc in the same stitch and in each stitch around the inside edge of the handle, slip stitch in the first stitch to join, fasten off leaving a 4” – 6” tail for weaving in
Tassel (optional)
Cut a piece of cardboard to measure about 3” x 5”. Wrap your worsted weight, size 4 yarn lengthwise around the cardboard about 30 times. For a thicker tassel, wrap the yarn around a few more times. Cut the end of the yarn that is attached to the yarn roll. Cut a 10” strand of yarn and thread it under the wrapped yarn at the top of the tassel. Make a tight knot. Slide the yarn off of the cardboard. Working about an inch below where you just tied the knot, tightly wrap the yarn around the tassel a few times. Cut the yarn and thread the loose end into the tassel with a yarn needle. Trim the loops of yarn at the other end so the ends of the tassel are even. Attach the tassel to your bag. Your bag should now be finished.
