It is a very fun and easy project that requires the use of at least two different yarn colors (or even scrap yarns!) to emphasize the wave pattern. The size and colors are easily customizable and you can even use your own preferred yarn weight and hook size!
Material
*The hook size and yarn weight stated below were the ones I used but since this is a made-to-measure pattern, you can use your ownpreferred hook size and yarn weight
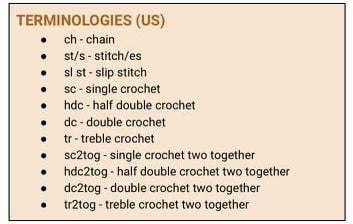
Tip: If you do not want large spaces in between your stitches, I suggest using a thicker yarn or a smaller hook.
- Hook 3.0mm
- Sport weight/ weight 2 yarn
- XS – S – 120 -150g
- M – L – 150 – 200g
- XL -XXL – 200 – 250g
- Stitch markers
- Tape measure
- Scissors
PATTERN GUIDE & OVERVIEW
- All texts including photos are to be read from left to right.
- This pattern is divided into two parts:
- Part 1 – Body
- Part II – Back Closure and Straps
- This pattern provides instructions for 3 different types of back closure:
- Straps are separate from the corset closure ties
- The strap is continuous and is also used as the corset closure ties.
- Buttons
- The top is worked from the bottom going up. Row 1 is the first row at the bottom of the top.
- Chains made at the beginning of each row do NOT count as a stitch.
- If you are working with a stretchable yarn, always consider the yarn stretch when measuring your work against your body.
- No gauge is included in this pattern as the number of stitches will depend on your own measurements. However, you may want to make a test swatch just to see how your yarn will stretch and to also help you visualize your desired color layout.
MEASUREMENTS NEEDED
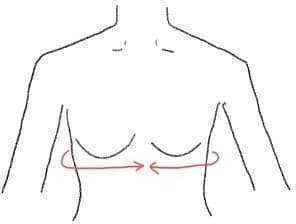
Measurement A = your underbust measurement minus 2 to 3 inches
For example: My underbust is 27”
27” – 2” = 25”
My measurement A is 25”
*Decrease 1-2 inches only if you want to add buttons for the back closure instead of the corset closure ties.
*If you are using a stretchable (acrylic) yarn or you want a more open back, decrease 5-6 inches instead of 2-3 only.
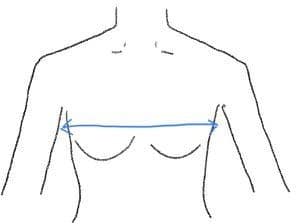
Measurement B = the distance from the side of your breast area to the other
divided by 2
For example: Mine is 14”
14”/2 = 7”
My measurement B is 7”
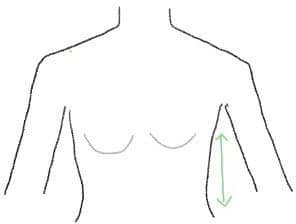
Measurement C = your desired height of the top from just below your underarms where you feel comfortable to wear the top up to where you want it to end
For example: Mine is 6.5”
COLOR LAYOUT
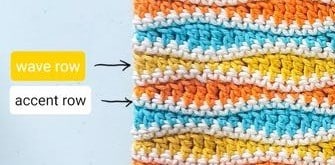
Before starting, it is important to plan your color layout first. Depending on your preferences, you can use at least 2 different colors. One for the accent, and the second one for the waves. You can use multiple colors for the accent and/or for the waves if you want to!
In this sample top, I used a white yarn for the accent row, and blue, yellow, orange for the wave rows.
CHANGING COLORS
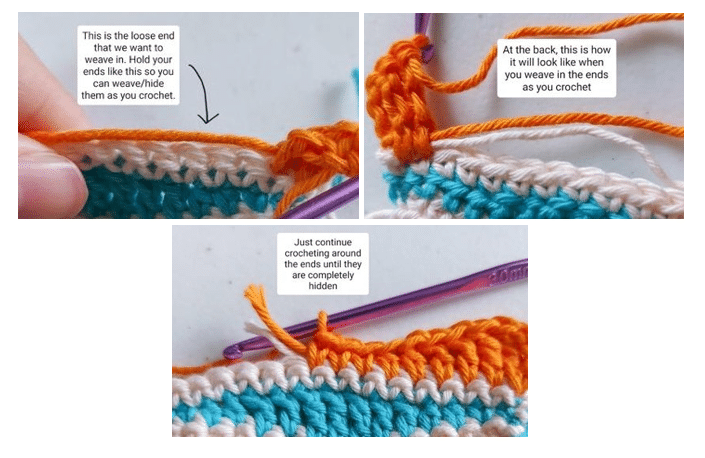
The top is composed of alternating/different colors per row so you will need to cut your yarn after every row and then insert the new yarn color for the next row through a sl st. Then continue working according to the steps in this pattern.
Note: If you have a different technique when changing colors, feel free to use it.

Tip: To avoid having several yarn ends to weave in at the end of the project, you may weave/hide the yarn ends as you crochet using the new yarn color.
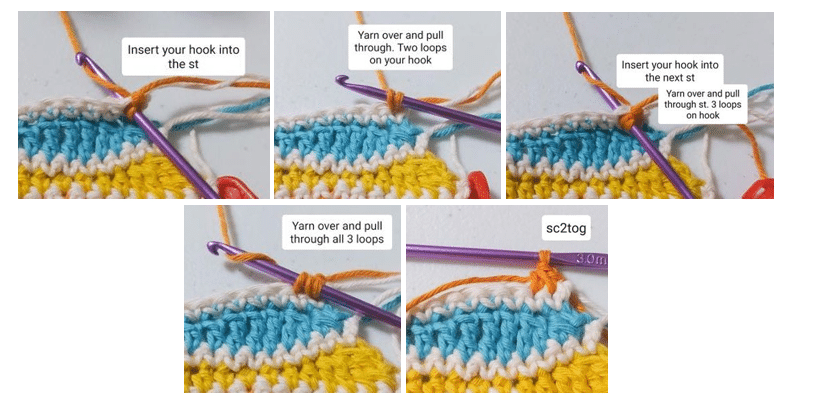
HOW TO DO THE SC2TOG
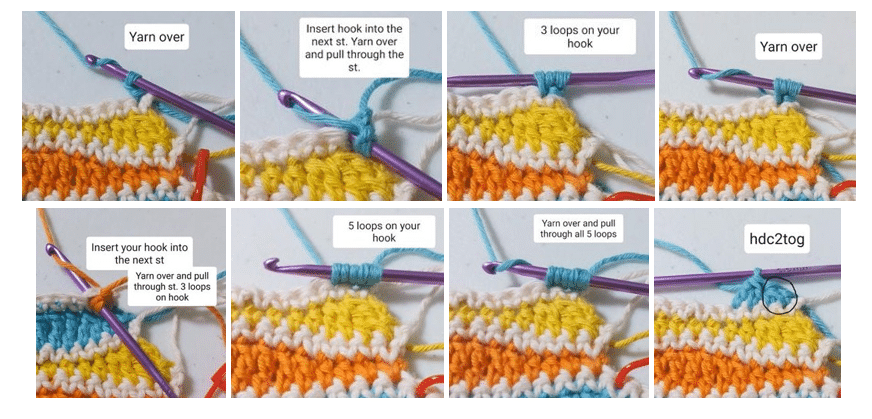
HOW TO DO THE HDC2TOG
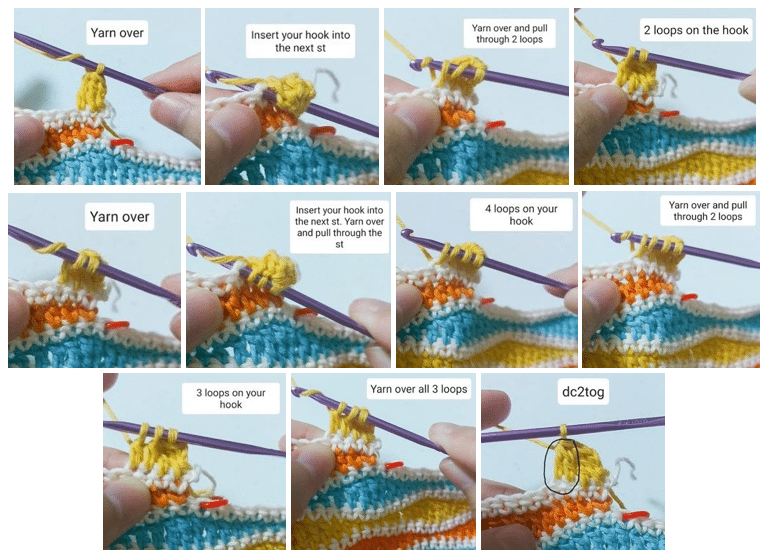
HOW TO DO THE DC2TOG
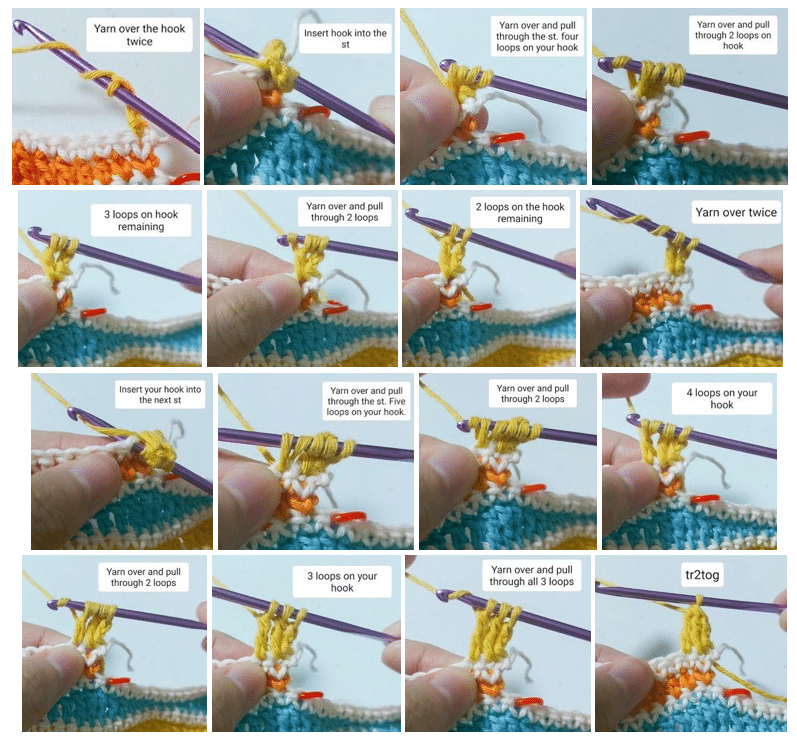
HOW TO DO THE TR2TOG
PART I. BODY
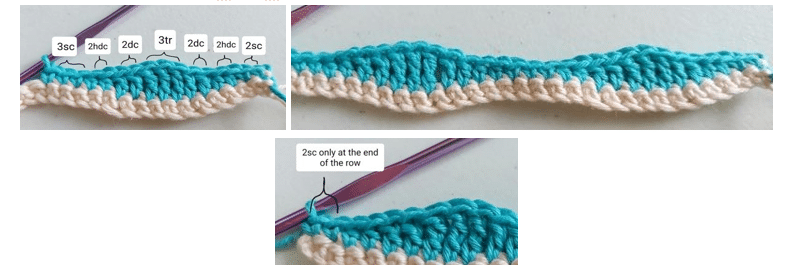
The body is worked by making alternating rows of sc for the accent and a series of sc-hdc-dc-tc-dc-hdc-sc for the waves.You will be using alternating/ different colors per row so you will need to cut your yarn per row and insert your new yarn color per row at the st where you previously ended.
Step 1. Using your desired yarn color for the accent, make a slip knot. Ch in multiples of 14 until you reach the measurement closest to your measurement A then add ch2. Make sure you do not chain too tightly. Sc on the second ch from the hook until you reach the end of the row. Ch 1, cut the yarn and fasten off.
Step 2. Using your desired yarn color for the wave, ch 1. Sc on each of the 1st 2 sts. For the next 14 sts, make the following: *2hdc – 2dc- 3tr – 2dc – 2hdc – 3sc*. Repeat ** until you reach the end of the row where you should end up with 2sc only instead of 3. You will notice that both ends of your row should have 2 sc only. Ch 1, cut the yarn and fasten off.
Step 3. Using your desired yarn color for the accent, ch1. Sc on each st until you reach the end of the row. Ch 1, cut the yarn and fasten off.
Step 4. Using your desired yarn color for the wave, ch3. Tr on each of the 1st 2 sts. For the next 14 sts, make the following: *2dc – 2hdc – 3sc – 2hdc – 2dc – 3tr*. Repeat ** until you reach the end of the row where you should end up with 2tr only instead of 3. You will notice that both ends of your row should have 2 tr only. Ch 1, cut the yarn and fasten off.

Step 5. Repeat Step 3.
Repeat Steps 2-5 until you reach your measurement C. Your last row at this step should be an accent row.
For reference, I repeated the steps until I had 27 alternating rows of accents and waves.
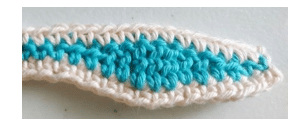
Step 6. For the next steps, you will be working on the diagonal part of the top for your underarms and neckline. To start, fold your work in the middle as shown in the photo. From the middle fold of the top, mark the part of your work that has a distance equal to your measurement B. From this, select the outer tr closest to your measurement B and place a st marker. Do the same for the other side of the fold. This is where you will be working for the diagonal part. If your measurement falls closer in between the wave pattern (for example, on an sc), choose the tr where you want to start (tip: some prefer to start on the tr closer to the outer edge to give them more coverage).
Note: What is the outer tr? Remember that except for the ends of each row, each wave pattern has 3 consecutive tr. The outer tr means the tr from these 3 that is closest to the outer edge of the top as shown in the photo.
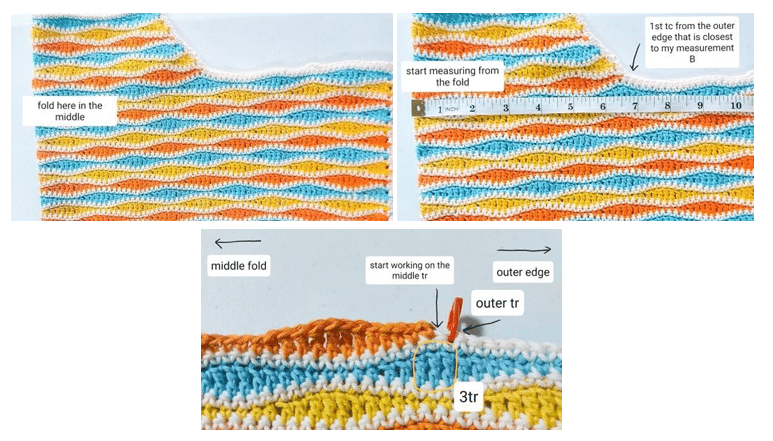
Step 7. Once you have placed your st markers on the outer tr, insert your desired yarn color for the wave on the next tr (middle tr), sc on the same st. Sc on the next st. For the next 14 sts, make the following: *2hdc – 2dc – 3tr – 2dc – 2hdc – 3sc*. Repeat ** until you reach the next st marker where you should end up with 2sc just before the st marker. Ch 1, cut the yarn and fasten off.
Step 8. Using your desired yarn color for the accent, ch1. Sc on each st until you reach the end of the row. Ch 1, cut the yarn and fasten off.
From this point on, you will start working on a series of decreases for the wave rows while the accent rows will be the non-decrease rows. For easier and faster readability, this pattern will use summarized notes.
For example: Ch2, tr2tog – dc2tog – 2hdc – 3sc – repeat *2hdc – 2dc – 3tr – 2dc – 2hdc – 3sc* until you reach the last 4 sts, dc2tog – tr2tog
This means that using your desired yarn color for the wave, ch2. Tr2tog on the 1st 2 sts. Dc2tog on the next 2 sts. Then 2hdc – 3sc on the next sts. For the next 14 sts, make the following: *2hdc – 2dc – 3tr – 2dc – 2hdc – 3sc*. Repeat ** until you reach the last 4 sts.
Dc2tog – tr2tog on these sts. Ch 1, cut the yarn and fasten off.
To avoid confusion, you may notice that your last repeat from * to * may not be a complete series as you need to stop before your last 4 sts (or as specified in the step) to make the decreases.
Note: If you need step by step instructions on how to do the sc2tog, hdc2tog, dc2tog and tr2tog, please refer to pages 4-6.
Step 9. Ch2, tr2tog – dc2tog – 2hdc – 3sc – repeat *2hdc – 2dc – 3tr – 2dc – 2hdc – 3sc* until you reach the last 4 sts, dc2tog – tr2tog

Step 10. Repeat Step 8.
Step 11. Ch1, hdc2tog – dc2tog – 3tr – repeat: *2dc – 2hdc – 3sc – 2hdc – 2dc – 3tr* until you reach the last 4 sts, dc2tog – hdc2tog

Step 12. Repeat Step 8.
Step 13. Ch1, sc2tog – sc2tog – sc – repeat *2hdc – 2dc – 3tr – 2dc – 2hdc – 3sc* until you reach the last 4 sts, sc2tog – sc2tog

Step 14. Repeat Step 8
Step 15. Ch2, tr2tog – tr – dc2tog – 2hdc – 3sc – repeat *2hdc – 2dc – 3tr – 2dc – 2hdc – 3sc* until you reach the last 5 sts, dc2tog – tr – tr2tog
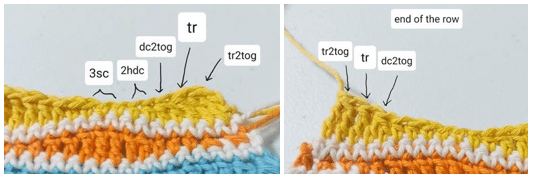
Step 16. Repeat Step 8
Step 17. Ch1, sc2tog – hdc2tog – dc – 3tr – repeat: *2dc – 2hdc – 3sc – 2hdc – 2dc – 3tr* until you reach the last 4 sts, hdc2tog – sc2tog
From this point on, you may want to check how the top fits you so far and if you want additional rows. In my case, with a 32″bust, I stopped at this row. Make sure you end at a wave row. For those who want to have a higher neckline, feel free to continue with the following steps. Once you are happy with the fit of your top, proceed to Part II.
Step 18. Repeat Step 8.
Step 19. Ch2, dc2tog – hdc2tog – sc – sc – repeat *2hdc – 2dc – 3tr – 2dc – 2hdc – 3sc* until you reach the last 4 sts, hdc2tog – dc2tog
Step 20. Repeat Step 8.
Step 21. Ch2, dc2tog – tr2tog – repeat: *2dc – 2hdc – 3sc – 2hdc – 2dc – 3tr* until you reach the last 4 sts, tr2tog – dc2tog
Step 22. Repeat Step 8.
Step 23. Ch2, sc2tog – hdc2tog – 2dc – 3tr – repeat: *2dc – 2hdc – 3sc – 2hdc – 2dc – 3tr* until you reach the last 4 sts, hdc2tog – sc2tog
Step 24. Repeat Step 8.
Step 25. Ch2, dc2tog – hdc2tog – 3sc – repeat *2hdc – 2dc – 3tr – 2dc – 2hdc – 3sc* until you reach the last 4 sts, hdc2tog – dc2tog
Step 26. Repeat Step 8.
Step 27. Ch2, tr2tog – tr2tog – tr – repeat *2dc – 2hdc – 3sc – 2hdc – 2dc – 3tr* until you reach the last 4 sts, tr2tog – tr2tog
Step 28. Repeat Step 8.
Step 29. Ch2, sc2tog – sc2tog – hdc – 2dc – 3tr – repeat *2dc – 2hdc – 3sc – 2hdc – 2dc – 3tr* until you reach the last 4 sts, sc2tog – sc2tog
Step 30. Repeat Step 8.
Step 31. Ch2, tr2tog – dc2tog – hdc – 3sc – repeat *2hdc – 2dc – 3tr – 2dc – 2hdc – 3sc* until you reach the last 4 sts, dc2tog – tr2tog
Step 32. Repeat Step 8.
Step 33. Ch1, hdc2tog – dc2tog – 2tr – repeat: *2dc – 2hdc – 3sc – 2hdc – 2dc – 3tr* until you reach the last 4 sts, dc2tog – hdc2tog
Step 34. Repeat Step 8.
Step 35. Sc2tog – sc2tog – repeat *2hdc – 2dc – 3tr – 2dc – 2hdc – 3sc* until you reach the last 4 sts, sc2tog – sc2tog
Step 36. Repeat Step 8.
Step 37. Ch2, tr2tog – dc2tog – 2hdc – 3sc – repeat *2hdc – 2dc – 3tr – 2dc – 2hdc – 3sc* until you reach the last 4 sts, dc2tog – tr2tog
Step 38. Repeat Step 8.
Step 39. Ch1, hdc2tog – dc2tog – 3tr – repeat: *2dc – 2hdc – 3sc – 2hdc – 2dc – 3tr* until you reach the last 4 sts, dc2tog – hdc2tog
Repeat steps 13 to 39 if you want to continue until you reach your desired neckline and fit. Proceed to Part II.
PART II. BACK CLOSURE AND STRAPS
Before you continue, identify the type of back closure that you want.
- Straps are separate from the corset closure ties (proceed below)
- The straps are continuous and also used as the corset closure ties (proceed below)
- Buttons (proceed to page 15)
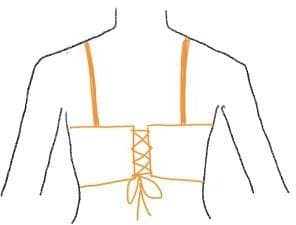
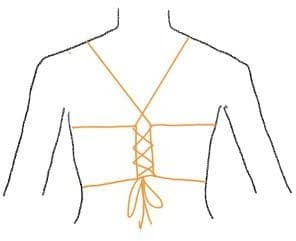
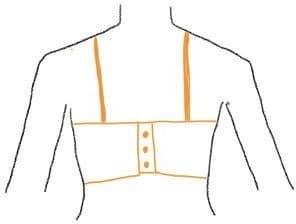
1. For back closure A and B, follow below steps:

Step 1. Using your desired yarn color, insert your hook into the 1st sc post of your row 1 (1st sc row that you did at the bottommost part of the top). Make sure you are facing the correct side of the top. Place 1sc on each sc and hdc post, 2sc on each dc and tr post.
Continue until you reach the last post.
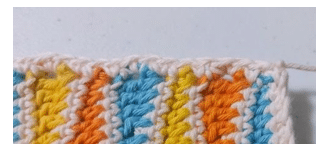
Step 2. Ch2, flip your work. Hdc on each st until you reach the end of the row
Step 3. Repeat Step 2.
Step 4. Ch2, flip your work. For the next row, you will now place the holes for the straps which will be made by making ch2 and skipping 2 sts. Depending on your own preferences, mark the sts where you will be adding the holes. The number of holes will depend on how long your top is. For the part in between holes, continue adding hdc. Make sure you have 2hdc at both ends of the row before you place your 1st and last holes.

Step 5. Ch1, flip your work. Sc on each st and place 2sc on each ch2 space until you reach the end of the row.
- For back closure A only: Before you proceed to step 6, place a st marker on the part of the top where you want to connect the straps.
- For back closure B only: Proceed to step 6.
Step 6. Ch1. You will now work around the top. Sc on the same sc post you just created. For the next hdc posts, add alternating 2sc and 1 sc. Once you reach the accent row, sc on each st until you reach the last st before the diagonal part of the top.
For back closure A only: Once you reach the st marker. Ch2, then sc on the next st (you don’t skip any st, the goal is just to create a small loop for the straps) then continue sc until you reach the end of the row.

Step 7. For the diagonal part, continue adding 1sc on each sc and hdc post, and 2sc on each dc and tr post until you reach your last row
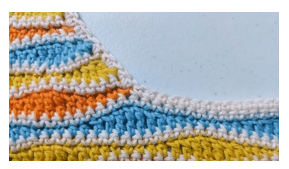
Step 8. From your last row, you will now work on the straps.
- For back closure A only: Make a chain with a length suficient to connect the strap to the ch2 slot you prepared on Step 6. Add 2 more inches to this length to allow you to tie the strap on that ch2 slot.
- For back closure B only: Make a chain with a length suficient to cross the holes you made in your back closure and make a ribbon tie.

Step 9. Once you reach your desired length, sc on the 2nd ch from the hook. Sc in each st until you reach the body of your top. Note: If you want thicker straps, you can also make an hdc instead of sc.
Step 10. Sc on the same st where you started the ch. Sc on each st until you reach the other side.
Step 11. Repeat Step 8-9 for the second strap.
Step 12. Once you reach the body of the top, continue adding 1sc on each sc and hdc post, and 2sc on each dc and tr post until you reach the accent row.
Step 13. For the accent row, sc on each st until you reach the last st of the row.
For back closure A only: Once you reach the st marker. Ch2, then sc on the next st (you don’t skip any st, the goal is just to create a small loop for the straps) then continue sc until you reach the end of the row.
Step 14. Once you reach the end of the row, Place 1sc on each sc and hdc post, 2sc on each dc and tr post. Continue until you reach the last post.
Step 15. Ch2, flip your work. Hdc on each st until you reach the end of the row.
Step16. Repeat Step 15.
Step 17. Repeat Step 4 for the holes part.
Step 18. Ch1, flip your work. Sc on each st and place 2sc on each ch2 space until you reach the end of the row. Ch1, cut the yarn and fasten off.
For back closure A only: Make a ch with a length suficient to cross the holes that you made in your back closure and make a ribbon tie. If you are using a thin yarn, It helps to make a ch with 2-3 yarns together to make a thicker and sturdier tie for the back. For reference, I made a chain using 3 different yarn colors together to make it thicker..
2. For back closure C, follow below steps:
Before you proceed, fit the top around your body and measure how much more you need to add in the back closure in order to close the gap. Add 1 inch as you need this extra inch for the back closure to overlap in order to fit the buttons into the buttonholes.Place the st
marker on where you want to attach your straps.
For example: The final length of my top is 25”. When I fit the top around my body, I still need 2” to close the gap to fit my body. Then I add 1” for the buttons and buttonholes. This means that I need to add a total of 3” into the length of my top. Since there are two sides for the back closure, I will add 1.5” each. Let us call the number you computed here as Measurement Z.
Step 1. Using your desired yarn color, insert your hook into the 1st sc post of your row 1 (1st sc row that you did at the bottommost part of the top). Make sure you are facing the correct side of the top (photos of the correct and wrong side of the top on page 12). Place 1sc on each sc and hdc post, 2sc on each dc and tr post. Continue until you reach the last post
Step 2. Ch2, flip your work. Hdc on each st until you reach the end of the row
Step 3. Repeat Step 2 until the measurement of your added back closure is equal to measurement Z.
Step 4. Once you reach your desired measurement, add an sc row. Make sure your sc row ends up on the upper part of the top. Ch1. Sc on the last sc post you created for the back closure. For the next hdc posts, add alternating 2sc and 1 sc. Once you reach the accent row, sc on each st until you reach the st marker. Ch2, then sc on the next st (you don’t skip any st, the goal is just to create a small loop for the straps) then continue sc until you reach the last st of the row just before the diagonal part starts.

Step 5. For the diagonal part, continue adding 1sc on each sc and hdc post, and 2sc on each dc and tr post until you reach your last row
Step 6 From your last row, you will now work on the straps. Make a chain with a length sufficient to connect the strap to the ch2 slot you prepared on Step 4. Add 2 more inches to this length to allow you to tie the strap on that ch2 slot

Step 7. Once you reach your desired length, sc on the 2nd ch from the hook. Sc on each st until you reach the body of your top.
Step 8. Sc on the same st where you started the ch. Sc on each st until you reach the other side.
Step 9. Repeat Step 6-7 for the second strap.
Step 10. Once you reach the body of the top, continue adding 1sc on each sc and hdc post, and 2sc on each dc and tr post until you reach the accent row.
Step 11. For the accent row, sc on each st until you reach the st marker. Ch2, then sc on the next st (you don’t skip any st, the goal is just to create a small loop for the straps) then continue sc until you reach the end of the row.
Step 12. Once you reach the end of the row, Place 1sc on each sc and hdc post, 2sc on each dc and tr post. Continue until you reach the last post.
Step 13. Ch2, flip your work. Hdc on each st until you reach the end of the row.
Step14. Repeat Step 13 for a similar number of times as you did for the other side. Fit the top as you go so you can determine when you need to put the buttonholes. Usually the buttonholes should be made before the last 2-3 rows. To make the buttonholes, get your
desired buttons and place them over the part of the top where you want to add them. Mark these spots with a st marker. Now, on those spots, you need to add the holes which you will create by making a ch, and skipping the sts below that ch. The length of your ch for the buttonhole should be slightly smaller than the size of your buttons. For example, with a 0.75mm button, I usually ch 2 and skip 2 sts.
The number of holes will depend on how long your top is. For the part in between holes, continue adding hdc. Make sure you have 2hdc at both ends of the row before you place your 1st and last holes.
*The photos below are from a different project with sc instead of hdc but aside from that it shows how to add buttons and buttonholes to your top.

Step 16. Once you have added the buttonholes and completed the same number of rows as you did for the other side, do not forget to add the similar sc row you added on the other side. Ch1, cut the yarn and fasten off.
Step 17. Add the buttons by sewing them on the back closure space you have created on the other side. Make sure you match the placement of the buttons with the buttonholes you have created.