Tee Knitting Pattern – A white tee and jeans would be my recommendation for the most traditional wardrobe pairing should you ask me. Simply said, a clean white tee and tough denim have something about them.
SKILL LEVEL : Easy+
MATERIALS
4, (4, 5, 5, 6), (7, 7, 8, 8) balls / 420, (490, 545, 620, 685), (765, 830, 915, 985) yards Lion Brand LB Collection Mako Cotton Yarn in White
Size US 10 (6.0 mm) 24” or longer circular knitting needles Stitch Holder or scrap yarn to hold live stitches
Tapestry Needle to weave in ends
GAUGE
14 stitches and 24 rows = 4 inches in garter stitch on size 10 needles.
CONSTRUCTION NOTES
This tee is constructed flat, beginning at the bottom, working up the front and shaping both shoulders, and then down the back. Sleeves and neckband will be added at the end by picking up stitches.
DIMENSIONS
XS, (S, M, L, XL), (2X, 3X, 4X, 5X)
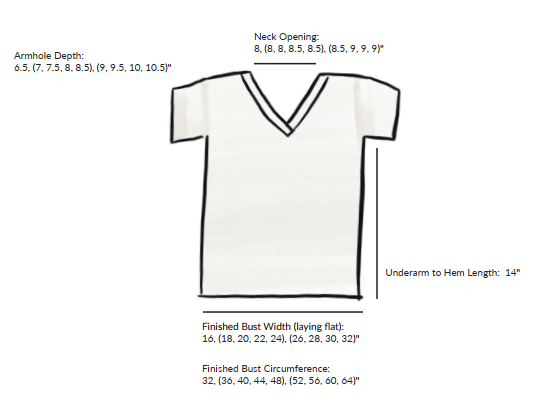
Finished Bust/Chest Circumference: 32, (36, 40, 44, 48), (52, 56, 60, 64)”
Finished Length: 20.5, (21, 21.5, 22, 22.5), (23, 23.5, 24, 24.5)” Pattern is written for smallest size with changes for larger sizes in parenthesis. When only one number is given, it applies to all sizes. To keep track of your size, you may highlight or circle all numbers for your chosen size before you begin.

HELP CHOOSING SIZE
This tee is designed to be worn with 2-4″ of positive ease at your bust. Model is 6” tall, has a 33” bust, and is wearing a size Small with 3” of positive ease. For best fit, choose a size that gives you 2-4” of pos- itive ease around your bust. For example, if your bust measurement is 40”, you would wear a size L.

PATTERN INSTRUCTIONS
Cast on 56 (64, 70, 78, 84) (92, 98, 106, 112) sts using long tail cast on method.
Work even in garter stitch (knitting all rows) until piece measures 14” from cast on edge. You may work more or less at this point if you want the body of your top to be longer or shorter.
Row 1 (RS): Bind off 2 sts, k to end of row. [54, (62, 68, 76, 82), (90, 96, 104, 110) sts].
2 (WS): Bind off 2 sts, k to end of row. [52, (60, 66, 74, 80), (88, 94, 102, 108) sts].
Left Front:
You will work flat over the first 26 (30, 33, 37, 40) (44, 47, 51, 54) sts to shape the left front shoulder.
3 (RS): sl1 p-wise, k23 (27, 30, 34, 37) (41, 44, 48, 51), k2tog, turn. [25, (29, 32, 36, 39), (43, 46, 50, 53) sts].
4 (WS): sl1 p-wise, k to end of row.
5: sl1 p-wise, k to last 2, k2tog. [24, (28, 31, 35, 38), (42, 45, 49, 52) sts].
6: sl1 p-wise, k to end of row.
Repeat rows 5-6 ten more times. [14, (18, 21, 25, 28), (32, 35, 39, 42) sts].
7-8: sl1 p-wise, knit to end of row.
9: sl1 p-wise, k to last 2, k2tog. [13, (17, 20, 24, 27), (31, 34, 38, 41) sts].
10: sl1 p-wise, knit.
Repeat rows 7-10 2 (2, 2, 3, 3), (3, 4, 4, 4) more times. [11, (15, 18, 21, 24), (28, 30, 34, 37) sts].
Knit 4 (6, 10, 8, 12) (14, 14, 16, 20) rows even.
11: sl1 p-wise, knit to last st, M1R, k1. [12, (16, 19, 22, 25), (29, 31, 35, 38) sts].
12: sl1 p-wise, knit.
Repeat rows 11-12 five more times. [17, (21, 24, 27, 30), (34, 36, 40, 43) sts].
Set these 17, (21, 24, 27, 30), (34, 36, 40, 43) sts aside on stitch holder or scrap yarn and begin working the 26 (30, 33, 37, 40) (44, 47, 51, 54) sts set aside to work for right front.
Right Front:
Begin working the 26 (30, 33, 37, 40) (44, 47, 51, 54) sts for the right front with RS facing.
3 (RS): sl1 p-wise, knit.
4 (WS): sl1 p-wise, knit to last 2, k2tog. [25, (29, 32, 36, 39), (43, 46, 50, 53) sts].
Repeat rows 3-4 eleven more times. [14, (18, 21, 25, 28), (32, 35, 39, 42) sts].
5-7: sl1 p-wise, knit.
8: sl1 p-wise, k to last 2, k2tog. [13, (17, 20, 24, 27), (31, 34, 38, 41) sts].
Repeat rows 5-8 2 (2, 2, 3, 3) (3, 4, 4, 4) more times. [11, (15, 18, 21, 24), (28, 30, 34, 37) sts].
Knit 4 (6, 10, 8, 12) (14, 14, 16, 20) rows even.
9: sl1 p-wise, M1L, k to end. [12, (16, 19, 22, 25), (29, 31, 35, 38) sts].
10: sl1 p-wise, knit.
Repeat rows 9-10 five more times. [17, (21, 24, 27, 30), (34, 36, 40, 43) sts].
Break yarn leaving a tail to weave in later.
Join for Back:
Adjust your work so that you have RS facing you to join left and right shoulders. This will mean you will work the sts for the left shoulder first, cast on for the back of neck, and then work the right shoulder.
13 (RS): sl1 p-wise, k16 (20, 23, 26, 29) (33, 35, 39, 42) sts from left shoulder, CO 18 (18, 18, 20, 20) (20, 22, 22, 22) sts for the back of the neck, k17 (21, 24, 27, 30) (34, 36, 40, 43) sts from right shoulder. This will now be one row. [52, (60, 66, 74, 80), (88, 94, 102, 108) sts].
14: sl1 p-wise, k to end of row.
Repeat row 14 until piece measures 4.5 (5, 5.5, 6, 6.5) (7, 7.5, 8, 8.5)” from the CO sts at back of neck.
15: CO 2, knit across. [54, (62, 68, 76, 82), (90, 96, 104, 110) sts].
16: CO 2, knit across. [56, (64, 70, 78, 84), (92, 98, 106, 112) sts].
Work even in garter stitch until piece measures 14” from underarm CO sts. If you worked more or less to make your top longer or shorter for the front body, work the same amount here.
Bind off in knit.
NOTE: At this point, the RS and WS of your work will look the same so choose a side that you want to be the RS. This is important because the stitch- es around the sleeves and the neckline are picked up with the WS facing to give a visible seam on the RS of the shirt.
Sleeves:
With WS facing you, pick up 44 (46, 50, 52, 56)
(58, 62, 64, 68) sts along the side of the shoul- der. This will be 2 sts picked up at each underarm space and about one stitch picked up in each sel- vage stitch along the side of the shoulder.
NOTE: If you cannot get the exact stitch number picked up this is OK, aim for this number but if your stitch count is a couple sts off, that is fine.
The differences in the stitch count may vary based on how you measured after repeating row 14 at the back of neck.
Row 1: sl1 p-wise, k across.
Repeat this row until sleeve measures 4”. You may work more or less at this point to make your sleeves longer or shorter. Bind off.
Repeat for second sleeve.
Neckband:
With WS facing you, begin picking up sts at the front center of the neckline.
Pick up 27 (28, 30, 31, 33) (34, 36, 37, 39) sts
along the left side of the neckline and shoulder, 19 (19, 19, 21, 21) (21, 23, 23, 23) sts across the back of neck, and 27 (28, 30, 31, 33) (34, 36, 37, 39) sts
down the right side of shoulder back to the front center. [73, (75, 79, 83, 87), (89, 95, 97, 101) sts].
The neckline will be worked flat across these 73 (75, 79, 83, 87) (89, 95, 97, 101) sts. Turn so that the RS is facing you.
1 (RS): (k1, p1) to end of row. Turn
2 (WS): (p1, k1) to end of row. Turn. Repeat rows 1-2 twice more.
BO using the tubular bind off method.
Finish the neckline by laying one side of the neck- line on top of the other side and sew each neck- band edge to the edge of the neckline.
Finishing:
Sew the side seams closed using mattress stitch Weave in all ends to secure.
To block, soak in warm water and lay flat to dry. Enjoy!