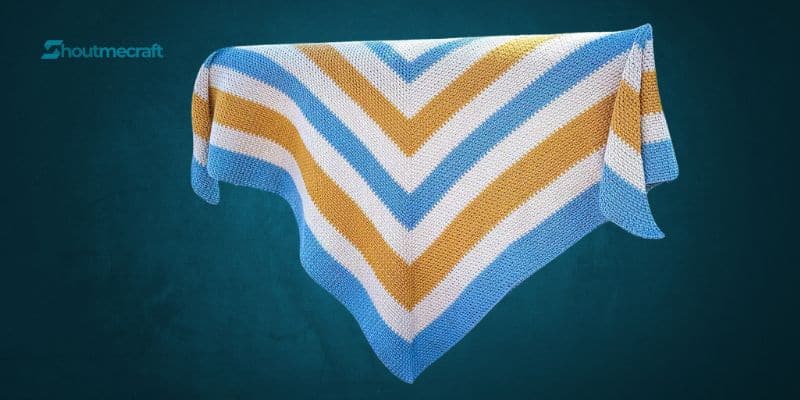
Moss Stitch Crochet Shawl Pattern – Perfect for the change to fall weather and chilly evenings is the Thursday Shawl, a crochet triangle shawl. Gorgeous long lines of color blocking captivate the eye and create a charming illusion by broadening with each repetition. Using the Moss Stitch in this crochet shawl design produces a lovely woven texture that remains a little mushy and flexible.
All about comfort is this crochet shawl. This crochet shawl is versatile from the yarn to the simplicity of knitting to wearing it while curled up watching a movie.
Skill Level: Advanced Beginner
Yarn Requirements
- You will needSport (2 – Fine) weight yarn in 3 colors.
You will need approximately:
- Color A: 6.2 ounces/175 grams/ 485 yards
- Color B: 3.6 ounces/100 grams/103 yards
- Color C: 5 ounces/140 grams/387 yards
Yarn Used
- Yarn Bee’s Yarntopia in Ivory (CA), Gold (CB) and Cerulean Sea (CC).
Tools & Notions
- 4.5 mm (7) hook Tapestry needle Scissors
- Stitch markers
Size
- Wingspan (width): Approx 64 inches.
- Length (at longest point): Approx 28 inches.
Pattern Notes
- This triangle shawl is worked from the
- Pattern is written to a specific size however, if you want to make your shawl more or less wide, you can include or omit row repeats as instructed in the pattern.
- Chain 3 to start a row always counts as a single crochet and a chain 1 space.
- This pattern utilizes the Moss (or Linen) stitch. This stitch is a sequence of a chain 1, skip 1 and single crochet in the next.
- You will always chain 1 to skip a single crochet and place a single crochet in a chain 1 space.
- To change color when instructed, finish your last stitch of the row with your new color.
- This shawl is written to use Sport (Fine
- 2) weight yarn which gives the finished piece a beautiful drape while remaining warm and squishy. You can use any weight of yarn you prefer.
- Keep in mind, the shawl’s dimensions will be larger if you decide to use a heavier weight yarn.
- Yarn requirements are listed for Sport (Fine – 2) weight. If you use a different yarn weight, your usage will be different.
Abbreviations
Abbreviations are in Standard US terms.
- Ch – Chain
- Sc – Single Crochet
- St(s) – Stitch(es)
- Sk – Skip
- Spc(s) – Space(es)
- CA – Color A
- CB – Color B
- CC – Color C
- […] – Repeats are listed inside brackets
- (…) – Instructions within the pattern listed in parenthesis ( ) indicate to work all stitches in the same space.
- (…) – Stitch counts are listed at the end of row in ( ) and bold italics.
Gauge
Matching gauge perfectly isn’t a requirement for this pattern as you can work the shawl to your desired size. However, you can check your gauge after completing Row 8. Your work should be approximately 4 inches wide along the wingspan.
NOTE: I am a tight crocheter, so my tension is usually tighter than others. Learn more about gauge and what this means here.
Special Stitch – Magic Circle
This pattern is written to use a magic circle. You can use the magic circle or you can chain 3 and slip stitch to the first chain made to create a circle to work into. Your choice! If you’d like a video tutorial of this technique.
Moss Stitch Tutorial
I have both a photo and a video tutorial for the Moss Stitch. If you haven’t worked this stitch before, I recommend checking out the tutorial. While the tutorial creates a square instead of a triangle, it will still help with identifying chain 1 spaces and provide understanding of how the stitch works so you can feel confident moving forward.
Stitch Count Note
This pattern is a one row repeat after Row 4, so you will be instructed to repeat the row a certain number of times with the specified color. This means that there won’t be specific stitch counts throughout the written pattern unless the row is specifically written out (not a repeat row). At the end of this PDF, I have included a table which shows the stitch count for each row, if you need it.
Special Note – Stitch Markers
If you have never worked the Moss stitch before, I highly recommend using stitch markers to mark your first and last chain 1 space as well as your chain 2 space. This will help ensure that your triangle increases properly.
Especially in the first couple of rows, the chain 1 spaces can be difficult to identify if you are not familiar with this stitch. After a few rows, the stitch pattern will look much more obvious and these spaces will be easier to find.
Pattern Instructions
Beginning with CA, create a Magic Circle or chain 3, slip stitch to first chain made to form a circle.
Row 1 – In magic circle, ch 3 (counts as sc and ch 1 spc here and throughout). Place 1 sc, ch 2, 1 sc, ch 1, 1 sc in circle. Pull tail tight. (4 sc, 2 ch 1 spcs, 1 ch 2 spc)
*Chain spaces might be difficult to see, I recommend marking each with a stitch marker as you make the chain space if you haven’t worked Moss stitch before.
Row 2 – Ch 3, turn. Sk 1st sc, place sc in ch 1 spc. Ch 1, sk 1, (sc, ch 2, sc) in ch 2 spc. Ch 1, sk 1, (sc, ch 1, sc) in last ch 1 spc (created by ch 3 in Row 1). (6 sc, 4 ch 1 spcs, 1 ch 2 spc)
Row 3 – Ch 3, turn. Sk first sc, place sc in ch 1 spc. Ch 1, sk 1, sc next ch 1 spc. Ch 1, sk 1, (sc,ch 2, sc) in ch 2 spc. Ch 1, sk 1, sc in ch 1 spc.
Ch 1, sk 1 (sc, ch 1, sc) in last ch 1 spc. (8 sc, 6 ch 1 spcs, 1 ch 2 spc)
Row 4 – Ch 3, turn. [Sk sc, place sc in ch 1 spc, ch 1] across side to the ch 2 spc. Sk sc, (sc, ch 2, sc) in ch 2 spc. Ch 1, [sk sc, place sc in ch 1 spc, ch 1] across side until 1 ch 1 space remains. In the last space, (sc, ch 1, sc). (10 sc, 6 ch 1 spcs, 1 ch 2 spc)
Rows 5 through Row 10 – Repeat Row 4. Finish last st of Row 10 with CB.
Rows 11 through Row 16 – Repeat Row 4 using CB. Finish last st of Row 16 with CA.
Rows 17 through 26 – Repeat Row 4 using CA. Finish last st of Row 26 with CC.
Rows 27 through 32 – Repeat Row 4 using
CC. Finish last st of Row 32 with CA.
Rows 33 through 42 – Repeat Row 4 using CA. Finish last st of Row 42 with CB.
Rows 43 through 52 – Repeat Row 4 using CB. Finish last st of Row 52 with CA.
Rows 53 through 62 – Repeat Row 4 using CA. Finish last st of Row 62 with CC.
Rows 63 through 72 – Repeat Row 4 using
CC. Finish last st of Row 72 with CA.
Rows 73 through 82 – Repeat Row 4 using CA. Finish last st of Row 82 with CB.
Rows 83 through 96 – Repeat Row 4 using CB. Finish last st of Row 96 with CA.
Rows 97 through 106 – Repeat Row 4 using CA. Finish last st of Row 106 with CC.
Rows 107 through 120 – Repeat Row 4 using CC.
Trim yarn, weave ends. Add fringe or tassels, if preferred. You’re done!
Picture Tutorial – Rows 1 through 4
This picture tutorial will walk you through Rows 1 through 4 to help you get started and identify the chain spaces.
The pattern instructions will be listed and then the information will be written in full detail.
The pictures include highlighted stitches and/or arrows to help identify certain areas.
Row 1 – In magic circle, ch 3 (counts as sc and ch 1 spc here and throughout). Place 1 sc, ch 2, 1 sc, ch 1, 1 sc in circle. Pull tail tight. (4 sc, 2 ch 1 spcs, 1 ch 2 spc)
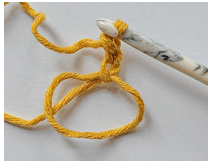
To begin, we create a magic circle and chain 3.
A video tutorial for the magic circle is linked above in “Special Stitch – Magic Circle”.
Keep in mind, you can instead chain 3 and slip stitch to the first chain made, if you prefer.
This chain 3 counts as both a single crochet and a chain 1 space.
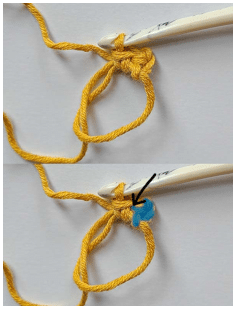
Next, we will place 1 single crochet into the circle.
The picture above shows two versions of the same image. This shows the first single crochet made. The chain 3 is highlighted with blue and a black arrow points to what is now considered a chain 1 space.
If you prefer to mark your space, place a stitch marker there. Next we chain 2 and place another single crochet in the circle. This chain 2 space controls the point of the triangle. Without this chain 2 space, a triangle would not be formed.
This is what the work looks like with the steps completed so far.
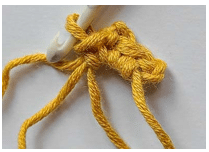
This image highlights the chain 2 space and has an arrow pointing to it. Now would be a good time to mark this chain 2 space, if you prefer to.
Next we will chain 1 and place 1 more single crochet into the circle.
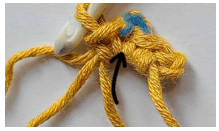
The chain 1 space is highlighted with blue. If you wish to mark this space, place a stitch marker there.
Row 1 is now complete. Pull your magic circle tail tight so that the loop is now closed.
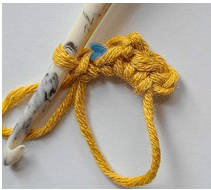
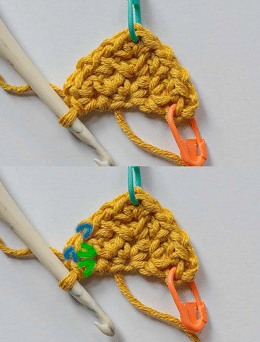
With the tail pulled tight, this is how your work should look. Both images have only Row 1 completed; the top image shows without stitch markers and the bottom shows with stitch markers.
You now have 4 single crochet, 2 chain 1 spaces and 1 chain 2 space. (Remember, the chain 3 counts as both a single crochet and a chain 1 space).
Row 2 – Ch 3, turn. Sk 1st sc, place sc in ch 1 spc. Ch 1, sk 1, (sc, ch 2, sc) in ch 2 spc. Ch 1, sk 1, (sc, ch 1, sc) in last ch 1 spc (created by ch 3 in Row 1). (6 sc, 4 ch 1 spcs, 1 ch 2 spc)
To begin Row 2, we chain 3 and turn.
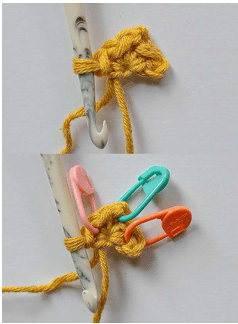
We will skip the first single crochet of the row and place a single crochet in the first chain 1 space. In the previous picture, you can see the chain 1 space marked with the light pink stitch marker.
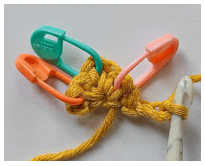
This image shows the completed single crochet in the chain 1 space and has the chain 3 highlighted with blue. Place your stitch marker around these chains to mark the chain 1 space.
Next, we will chain 1, skip the single crochet in the row below and work 1 single crochet, chain 2 and 1 single crochet in the chain 2 space. The chain 2 space is marked with the teal stitch marker in the image above.
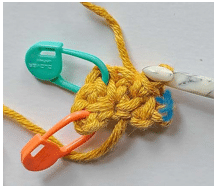
A black arrow points to the new chain 2 space created. Place your stitch marker here, if you’re using one.
Next, we will chain 1, skip the single crochet below which will bring us to the last chain 1 space.
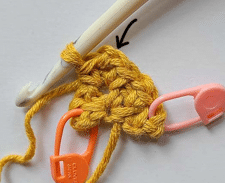
This image shows the chain 1 highlighted in blue and the single crochet we will skip highlighted in green.
*The last chain 1 space is created by the chain 3 from the previous row. This space is marked with the orange stitch marker in the image above.
In the last chain 1 space, we will work 1 single crochet, chain 1 and 1 single crochet.
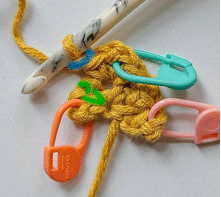
Row 2 is now complete. The previous image shows Row 2 completed. The pictures are the same however the bottom picture shows the two single crochets highlighted in green and the chain 1 highlighted in blue.
You now have 6 single crochet, 4 chain 1 spaces and 1 chain 2 space. (Remember, the chain 3 counts as both a single crochet and a chain 1 space).
Row 3 – Ch 3, turn. Sk first sc, place sc in ch 1 spc. Ch 1, sk 1, sc next ch 1 spc. Ch 1, sk 1, (sc,
ch 2, sc) in ch 2 spc. Ch 1, sk 1, sc in ch 1 spc.
Ch 1, sk 1 (sc, ch 1, sc) in last ch 1 spc. (8 sc, 6ch 1 spcs, 1 ch 2 spc)
We begin Row 3 the same as we began Row
2. We chain 3, turn, skip the first single crochet and place a single crochet in the first chain 1 space.
This image shows the chain 3 highlighted with blue. Place your stitch marker here.
Next, we chain 1, skip the single crochet and place 1 single crochet in the chain 1 space.
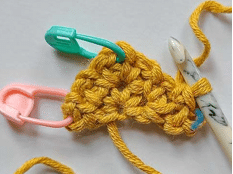
This image shows the new chain 1 space highlighted in blue.
Now, we will chain 1, skip the single crochet below and, in the chain 2 space, we will place 1 single crochet, chain 2 and 1 single crochet. The chain 2 space is marked with the teal stitch marker in the previous image.
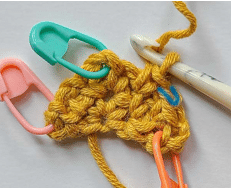
The new chain 2 space is highlighted with blue in the image above.
Next, we chain 1, skip the single crochet below and place a single crochet in the next chain 1 space.
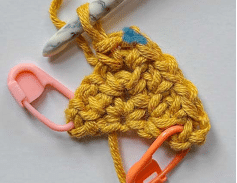
The new chain 1 space is highlighted with blue in the image above.
Now we have reached the last chain 1 space, so we will chain 1, skip the single crochet and place 1 single crochet, chain 1 and 1 single crochet all in the last chain 1 space.
This last space is marked with the pink stitch marker in the image above.
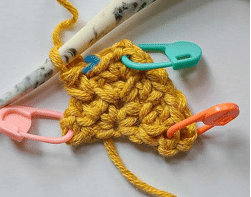
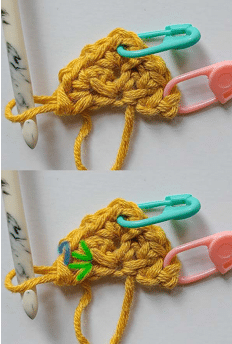
This is how your work should look after completing Row 3. These are the same image however, the bottom image is highlighted.
The green highlights show the two single crochets in the last chain 1 space.
The blue highlight between the two green highlights shows the chain 1 space created between them.
You now have 8 single crochet, 6 chain 1
spaces and 1 chain 2 space.
Remember, the chain 3 counts as both a single crochet and a chain 1 space.
Row 4 – Ch 3, turn. [Sk sc, place sc in ch 1 spc, ch 1] across side to the ch 2 spc. Sk sc, (sc, ch 2, sc) in ch 2 spc. Ch 1, [sk sc, place sc in ch 1 spc, ch 1] across side until 1 ch 1 space remains. In the last space, (sc, ch 1, sc). (10 sc, 6 ch 1 spcs, 1 ch 2 spc)
Begin Row 4 as we did Rows 2 and 3. We chain 3 and turn.
We are now introducing the pattern repeat, which allows this pattern to be a one row repeat as opposed to being written out row by row.
For Row 4 (and each row following), you will now repeat the pattern section within the brackets […] as instructed.
So, with a chain 3 and turn complete, we will now [Skip the single crochet, place a single crochet in the chain 1 space and then chain 1].
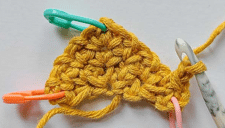
This image shows the repeat completed once. Now, we will work the instructions within the bracket until instructed to stop.
So, [Skip the single crochet, place a single crochet in the chain 1 space and then chain 1] until the next chain space is the chain 2 space.
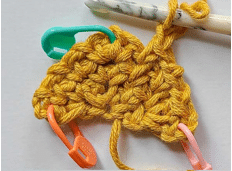
This image shows the repeat completed two times.
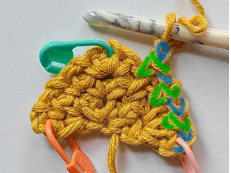
In this image, the single crochets are highlighted in green and the chain 1 spaces are highlighted in blue.
Now, we will skip the last single crochet of this side and work 1 single crochet, chain 2 and 1 single crochet all in the chain 2 space which is marked with the teal stitch marker in the previous image.
Now we will chain 1 and begin the repeat as instructed.
We will [Skip the single crochet, place 1 single crochet in the chain 1 space and then chain 1].
Repeat this until only 1 chain 1 space remains.
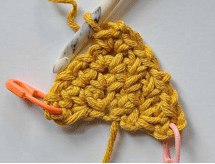
This image shows the repeat completed two times.
The single crochets and chain 1 spaces are highlighted as they have been throughout this tutorial.
We have reached the last chain 1 space, which is marked with the orange stitch marker.
To finish this row, we will place 1 single crochet, chain 1 and 1 single crochet all in the last space.
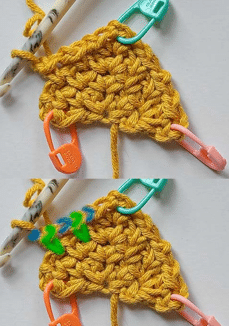
This completes Row 4 of the pattern.
The beginning and ending chain 1 spaces are marked with stitch markers, as well as the chain 2 space which makes the work a triangle.
You now have 10 single crochet, 6 chain 1
spaces and 1 chain 2 space.
Remember, the chain 3 counts as both a single crochet and a chain 1 space.
Here is what Row 4 looks like without the stitch markers:
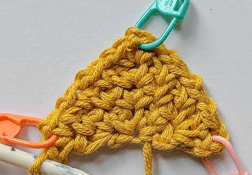
After a couple of rows are completed, the chain 1 spaces become more obvious and easier to find.
Once you’re used to looking for the chain 1 spaces, this stitch pattern should be a somewhat mindless and relatively easy one to work up.
When in doubt, use stitch markers. I would recommend marking the first and last chain 1 space as well as the chain 2 space in the middle to ensure that your triangle increases properly and doesn’t become wonky while you get used to the pattern.
After a few rows, the stitch work really begins to shine and show off it’s woven look:
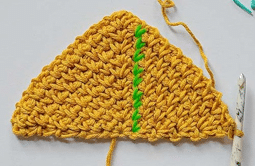
This is the pattern worked through Row 10.
I’ve highlighted a line of the single crochets so you can see their placement as they move over into the chain 1 spaces in each new row.
From here, all rows are a repeat of Row 4 worked in the specified color as per the written pattern.
These photos should help you work through the entirety of the pattern.
Thank you! Enjoy!
This table references the stitch counts for every row. These stitch counts read as: “R1 – 4 sc, 2 ch 1”. This means you will have 4 sc and 2 ch 1 spcs in Row 1. Every row has 1 ch 2 spc, so is not included in this table.
| R1 – 4 sc, 2 ch 1 | R25 – 52 sc, 50 ch 1 | R49 – 100 sc, 98 ch 1 | R73 – 148 sc, 146 ch 1 | R97 – 196 sc, 194 ch 1 |
| R2 – 6 sc, 4 ch 1 | R26 – 54 sc, 52 ch 1 | R50 – 102 sc ,100 ch 1 | R74 – 150 sc, 148 ch 1 | R98 – 198 sc, 196 ch 1 |
| R3 – 8 sc, 6 ch 1 | R27 – 56 sc, 54 ch 1 | R51 – 104 sc, 102 ch 1 | R75 – 152 sc, 150 ch 1 | R99 – 200 sc, 198 ch 1 |
| R4 – 10 sc, 8 ch 1 | R28 – 58 sc, 56 ch 1 | R52 – 106 sc, 104 ch 1 | R76 – 154 sc, 152 ch 1 | R100 – 202 sc, 200 ch 1 |
| R5 – 12 sc, 10 ch 1 | R29 – 60 sc, 58 ch 1 | R53 – 108 sc, 106 ch 1 | R77 – 156 sc, 154 ch 1 | R101 – 204 sc, 202 ch 1 |
| R6 – 14 sc, 12 ch 1 | R30 – 62 sc, 60 ch 1 | R54 – 110 sc, 108 ch 1 | R78 – 158 sc, 156 ch 1 | R102 – 206 sc, 204 ch 1 |
| R7 – 16 sc, 14 ch 1 | R31 – 64 sc, 62 ch 1 | R55 – 112 sc, 110 ch 1 | R79 – 160 sc, 158 ch 1 | R103 – 208 sc, 206 ch 1 |
| R8 – 18 sc, 16 ch 1 | R32 – 66 sc, 64 ch 1 | R56 – 114 sc, 112 ch 1 | R80 – 162 sc, 160 ch 1 | R104 – 210 sc, 208 ch 1 |
| R9 – 20 sc, 18 ch 1 | R33 – 68 sc, 66 ch 1 | R57 – 116 sc, 114 ch 1 | R81 – 164 sc, 162 ch 1 | R105 – 212 sc, 210 ch 1 |
| R10 – 22 sc, 20 ch 1 | R34 – 70 sc, 68 ch 1 | R58 – 118 sc, 116 ch 1 | R82 – 166 sc, 164 ch 1 | R106 – 214 sc, 212 ch 1 |
| R11 – 24 sc, 22 ch 1 | R35 – 72 sc, 70 ch 1 | R59 – 120 sc, 118 ch 1 | R83 – 168 sc, 166 ch 1 | R107 – 216 sc, 214 ch 1 |
| R12 – 26 sc, 24 ch 1 | R36 – 74 sc, 72 ch 1 | R60 – 122 sc, 120 ch 1 | R84 – 170 sc, 168 ch 1 | R108 – 218 sc, 216 ch 1 |
| R13 – 28 sc, 26 ch 1 | R37 – 76 sc, 74 ch 1 | R61 – 124 sc, 122 ch 1 | R85 – 172 sc, 170 ch 1 | R109 – 220 sc, 218 ch 1 |
| R14 – 30 sc, 28 ch 1 | R38 – 78 sc, 76 ch 1 | R62 – 126 sc, 124 ch 1 | R86 – 174 sc, 172 ch 1 | R110 – 222 sc, 220 ch 1 |
| R15 – 32 sc, 30 ch 1 | R39 – 80 sc, 78 ch 1 | R63 – 128 sc, 126 ch 1 | R87 – 176 sc, 174 ch 1 | R111 – 224 sc, 222 ch 1 |
| R16 – 34 sc, 32 ch 1 | R40 – 82 sc, 80 ch 1 | R64 – 130 sc, 128 ch 1 | R88 – 178 sc, 176 ch 1 | R112 – 226 sc, 224 ch 1 |
| R17 – 36 sc, 34 ch 1 | R41 – 84 sc, 82 ch 1 | R65 – 132 sc, 130 ch 1 | R89 – 180 sc, 178 ch 1 | R113 – 228 sc, 226 ch 1 |
| R18 – 38 sc, 36 ch 1 | R42 – 86 sc, 84 ch 1 | R66 – 134 sc, 132 ch 1 | R90 – 182 sc, 180 ch 1 | R114 – 230 sc, 228 ch 1 |
| R19 – 40 sc, 38 ch 1 | R43 – 88 sc, 86 ch 1 | R67 – 136 sc, 134 ch 1 | R91 – 184 sc, 182 ch 1 | R115 – 232 sc, 230 ch 1 |
| R20 – 42 sc, 40 ch 1 | R44 – 90 sc, 88 ch 1 | R68 – 138 sc, 136 ch 1 | R92 – 186 sc, 184 ch 1 | R116 – 234 sc, 232 ch 1 |
| R21 – 44 sc, 42 ch 1 | R45 – 92 sc, 90 ch 1 | R69 – 140 sc, 138 ch 1 | R93 – 188 sc, 186 ch 1 | R117 – 236 sc, 234 ch 1 |
| R22 – 46 sc, 44 ch 1 | R46 – 94 sc, 92 ch 1 | R70 – 142 sc, 140 ch 1 | R94 – 190 sc, 188 ch 1 | R118 – 238 sc, 236 ch 1 |
| R23 – 48 sc, 46 ch 1 | R47 – 96 sc, 94 ch 1 | R71 – 144 sc, 142 ch 1 | R95 – 192 sc, 190 ch 1 | R119 – 240 sc, 238 ch 1 |
| R24 – 50 sc, 48 ch 1 | R48 – 98 sc, 96 ch 1 | R72 – 146 sc, 144 ch 1 | R96 – 194 sc, 192 ch 1 | R120 – 242 sc, 240 ch 1 |