A stylish addition that may boost your look and give you a confident, amazing sensation is the Metro bag. Although this houndstooth crochet pattern bag looks complicated, it can be made with just simple crochet stitches. Regardless of your level of experience, you may successfully make this bag by following the clear and straightforward directions.
Using a typical color-changing method, you must crochet with the working yarn and carry the contrast yarn around, concealed behind the stitches until you need it, to get this lovely design! There are no ends to weave in, the work is tidy, and the color shift is quite smooth! Hooray!
Don’t worry if you are unfamiliar with this color work; I’ve provided links to video lessons, a comprehensive written instruction sheet that goes over each step, and a high-quality photo instructional. Additionally, I’ve included written instructions that break down the color changes into specific stitches.
For more experienced crocheters, you can count your rows and stitches, follow the colored chart, and adjust the color where the chart indicates.
Ideal yarn for crocheting the Metro Bag design
I made this stunning wrist bag out of Lion Brand 24/7 mercerized cotton because it’s easy to work with, comes in a gorgeous array of colors, and provides the completed bag a smooth, polished, and sophisticated look. Of course, you may also use any worsted-weight cotton yarn, like
Metro bag measurements
With dimensions of 7.25″ in height and 10″ in width, the bag is roomy enough to accommodate your phone, wallet, keys, and a few snacks.
The nicest thing is that you can quickly change the size to create a wide range of bags, including coverings for electrical devices, wrist-shoulder-crossbody bags, and cosmetics bags. I decided on a wristlet that could also be used as a crossbody purse. It functions flawlessly! The pattern includes directions for making both wrist and crossbody bags.
lining the container
There is a zipper closing and the bag is lined, so don’t worry—no stitching is required!🙂 I just had to sew up the edges of a prefabricated, affordable, and easily assemble canvas pouch with a zipper that was the exact size of the bag. Simple as that
In conclusion
- The pattern is straightforward, thorough, tested, and comprehensive.
- composed using Standard American terminology
- Intermediate Skill Level
- Crafted from worsted weight mercerized cotton; crochet hook measures 3.5 mm; dimensions: H = 7.25″ / W = 10″ (alternative sizes are easily customizable).
The pattern comes with both detailed written instructions and a full-photo tutorial in high definition.
A comprehensive guide on color-shifting photos A colorful graphic with textual instructions broken down by row
Finished Approximate Dimensions:
H= 7 ¼ “ (to the base to the handles)/ W= 10”
What you will need
- Lion Brand 24/7 mercerized cotton, worsted weight yarn, 100% cotton
- Colors:- Black (B)
- White (W)
- Red (R)
- Yardage: 280 yards [160 (B) and 120 (W)]
- Crochet hook: 3.5 mm. I used a 3.5 mm hook from this hook set.
- Gauge: 4”square= 17 rows and 19 SC
- Canvas pouch: I used Hobby Lobby Canvas Wristlet
- Stitch markers
- Metal tag
- Tapestry needle to weaving in ends
- Sewing needle
- Black thread
Abbreviations
CH: Chain, ST: Stitch, SL ST: Slip stitch, SC: Single crochet, BLO: Back loop only, YO: Yarn over, Rnd: Round, Rep: Repeat,
Design specifics
- This pattern is worked continuously in rounds, from the bottom up and entirely in SC BLO.
- This pattern uses tapestry technique for color changing. If you are not familiar with it, I have included a full tutorial and I suggest that you practice until you get comfortable with color changing.
- This pattern uses 3 colors:
- The working yarn: black, I will refer to it as (B).
- The contrast yarn: white, I will refer to it as (W).
- The accent yarn: red, I will refer to it as (R)
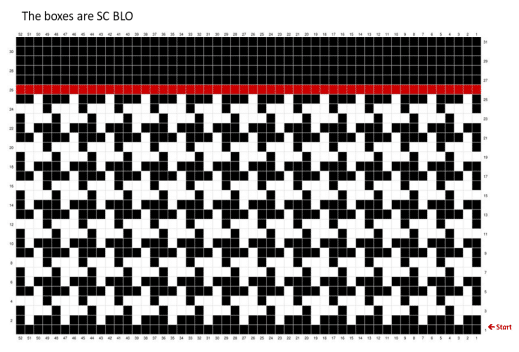
- The easy way to make the pattern is to follow the colored chart. Start from the bottom right.
- Follow it carefully counting the stitches and rows and apply the color change where it’s indicated on the chart. All the square are SC BLO.
- I also included row-by-row instructions for color changing.
- Keep your tension even
Tapestry crochet- tutorial
Before beginning this project, you will need to become familiar with color changes. This tutorial will guide you through the basic techniques. Read through this thoroughly and practice if needed.
Step 1: Introducing the contrast yarn
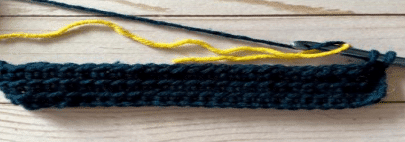
You will crochet in your working yarn, add the contrast yarn where the pattern suggest to add it even if you are not using it immediately:
Insert the hook into the 1st SC BLO, add the contrast yarn as shown in first image, making sure you place the crochet hook under the contrast yarn, YO with the working yarn and pull up a loop, YO and pull up through the 2 loops. Carry the contrast yarn behind the stitches (crochet over it) until you need to use it.

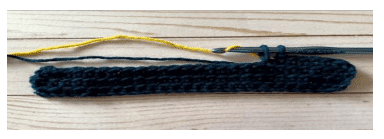
Step 2: Changing colors
When switching to color B, insert your hook into the last stitch of color A and pull up a loop with color A, YO with color B and complete the stitch by pulling through both loops with color B. Continue crocheting with color B and keep color A hidden behind the stitches until you need to use it.

Additional resources:
Tapestry crochet
Tapestry Crochet Basics Guide
Step 1- crochet the bag
With the working yarn (B), CH 52 (or a multiple of 4) to make a foundation chain.
- Rnd 1: 2 SC in the second CH from the hook, SC in next 49 ST, 3 SC in the last CH. Continue crocheting along the back unused loops of the foundation chain, SC in next 49 ST (crochet over the tail to hide it), SC in the last CH already holding 2 SC, join with a SC into the 1st SC (use a stitch marker here). From now on you will work continuously making SC BLO. Change colors according to the chart or follow the instructions below.
- Rnd 2: SC BLO in next ST (add (W) here), SC BLO in every ST around and change colors as follow (B) x 2, * (W) x 1, (B) x 3,* rep to 25 times, finish with (W) x 1, (B) x 1
- Rnd 3: SC BLO in every ST around and change colors as follow: (W) x 3, (B) x 1, rep to 26 times.
- Rnd 4 : SC BLO in every ST around and change colors as follow: (B) x 1, (W) x 3 Rep to 26 times.
- Rnd 5 : SC BLO in every ST around and change colors as follow: (B) x 1,*(W) x 1, (B) x 3 * Rep to 25 times, finish with (W) x 1, (B) x 2
For the pattern, repeat Rnd 2-5 X 5 more times, add (R) in the last ST of Rnd 25, drop (W) and (B), you will pick up (B) later.
- Rnd 26 : With (R), SC BLO in every ST around, pick up (B) in the last ST and drop (R).
- Rnd 27- 31: With (B) SC BLO in every ST around, finish last Rnd with a SL ST. crochet the edging next.


Step 2- crochet the edging
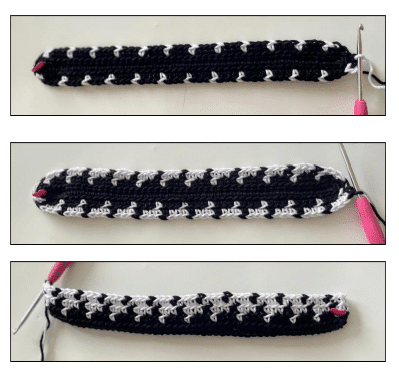
I used a reverse single crochet stitch or Crab ST to crochet the border skipping one ST between the reverse single crochets. Instead of working from right to left, you work from left to right.
Edging:* Insert the hook to the right into the next SC, then yarn over and draw the loop back to the front, yarn over again, and draw that loop through the two loops already on the hook, skip next ST,* rep to around, finish with a SL ST into the last SC, fasten off.

Additional resources:
How to crochet a reverse single crochet border:
Step 3- crochet the strap
To make a crossbody bag:
Layout the bag on a smooth surface, then place 2 ST markers in corners
- Slip Knot then SL ST in the 1st marked ST (in the left corner), CH 200 (or to the desired length ) to make a foundation chain, SL ST into the 2nd marked ST, in the right corner. Make sure the foundation chain is not twisted
- SC in every ST of the foundation chain, finish with a SL ST into the 1st marked ST, CH1.
- Crochet the reverse single crochet border: * Skip next ST to the right, reverse SC in next ST * rep, to across join with a SL ST into the 2nd marked ST. Fasten off
- Next, you will crochet a 2nd border using in the unused loops of the foundation chain.
- SL ST into the 2nd marked ST, in the right corner. Turn you work slightly * reverse SC in next ST, Skip next ST to the right,* rep to across, finish with a SL ST into the 1st marked ST. Fasten off.

Step 4- finish the bag
- Weave in and cut all ends then attach the tag.
- Insert the canvas pouch with zipper inside the bag then attach it with pins, making sure the corners are aligned.
- With a black thread and from the inside of the bag, stitch up the crocheted bag to the canvas pouch making sure you don’t sew too close to the zipper so you can open it.
For a wristlet: (optional)
Cut the existing canvas strap and make a crocheted strap
- CH 30 to make a foundation chain then pull the foundation CH through the zipper ring.
- SL ST into the first ST to close the circle (make sure the foundation CH is not twisted) then SC in the same ST,
- SC in every ST around, finish with a SLST in the 1 st SC, CH1.
- Reverse SC border (Step 2), finish with a SL ST then fasten off.
If you prefer Lining and adding a zipper

Additional resources: How to sew a lining into a crochet bag
Congratulations!
You just finished the Metro Bag. I hope you enjoyed making it and are pleased with the results! D