The pattern has TWO different colourways – the MAY BLOSSOM based on Spring colours, and the AUTUMN GOLD based on Fall colours, so effectively you get two for the price of one.
As in all my patterns, the colour is the most important element, and there are lots of grids to show the sequence of colours used.
It is suitable for any ability as the stitches used are simple Granny Squares and Granny Stripes, but combined in a fresh and innovative way to produce a real showstopper of a blanket.
You may already know how much I love Granny Squares, but I had to come up with a way of designing them so that they didn’t clash with the bold checks of the carpet. So, I decided to make the blanket in rows, or Strips as I call them of different Granny Squares, interspersed with rows of Granny Stripes, to give it an overall striped effect.
This made a reasonable contrast to the checks of the carpet. The golds, sage greens and terra cotta colours give it a distinctly Autumn feel, so I called it the Autumn Gold blanket.
There were quite a few requests for a pattern for this blanket, so a year or two later I decided to make a new version, this time in Spring colours, in order to write it up as I was making it and the May Blossom Blanket was born.
This pattern is for the May Blossom, but it also gives you the option to make the Autumn Gold version as well, as both colourways are listed for you. So, you have two blanket patterns in one!
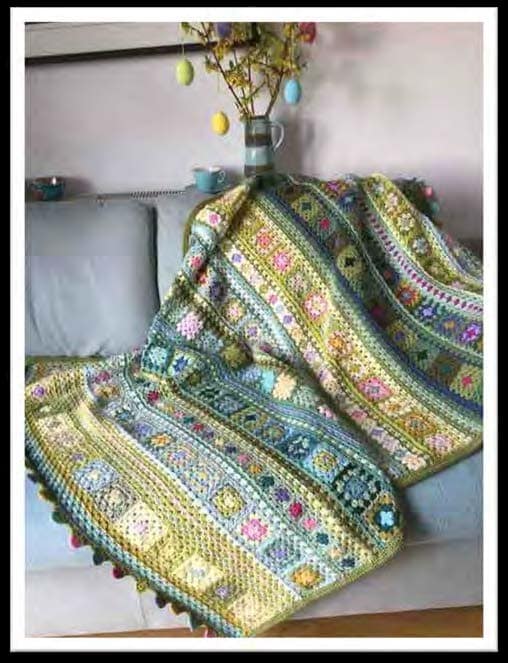
The image on the left shows the springtime colours of the May Blossom blanket, and throughout the pattern the photo tutorials show these colours, but both the Autumn Gold and May Blossom use the same stitches, so you just need to decide which you want to make.
There are yarn lists below for each version. The May Blossom uses just one type of yarn, Stylecraft Special DK (SS), while the Autumn Gold uses a selection of different yarns -Stylecraft Special (SS), Stylecraft Batik (SB) and King Cole Comfort DK (KC).
All the yarns come in 100g balls with the exception of SS Batik, whichcomes in 50g balls.
The yarn in the main, is premium acrylic which means it is easily machine washable, is hard wearing and doesn’t need blocking, making it an ideal choice for large blankets/afghans.
MAY BLOSSOM YARN LIST
| 1 | SS MEADOW | 3 BALLS |
| 2 | SS LINCOLN | 2 BALLS |
| 3 | SS DUCK EGG | 2 BALLS |
| 4 | SS PISTACHIO | 2 BALLS |
| 5 | SS SAGE | 2 BALLS |
| 6 | SS POWDER | 1 BALL |
| 7 | SS FONDANT | 1 BALL |
| 8 | SS POMEGRANATE | 1 BALL |
| 9 | SS WIATERIA | 1 BALL |
| 10 | SS LAVENDER | 1 BALL |
| 11 | SS VIOLET | 1 BALL |
| 12 | SS STORM BLUE | 1 BALL |
| 13 | SS SHERBERT | 1 BALL |
| 14 | SS CLOUD BLUE | 1 BALL |
| 15 | SS CREAM | 1 BALL |
| 16 | SS BUTTERMILK | 1 BALL |
| 17 | SS SAFFRON | 1 BALL |
| 18 | SS MUSTARD | 1 BALL |
| 19 | SS LIME | 1 BALL |
| 20 | SS CYPRESS | 1 BALL |
| 21 | SS ASPEN | 1 BALL |
| 22 | SS LEMON | 1 BALL |
| 23 | SS KHAKI | 1 BALL |
AUTUMN GOLD YARN LIST
| 1 | SB BISCUIT | (50g balls) | 6 BALLS |
| 2 | SB OLD GOLD | “ | 2 BALLS |
| 3 | SB PISTACHIO | “ | 1 BALL |
| 4 | SS MEADOW | 2 BALLS | |
| 5 | SS MOCHA | 2 BALLS | |
| 6 | SS GINGERBREAD | 2 BALLS | |
| 7 | SS WALNUT | 1 BALL | |
| 8 | SS CAMEL | 1 BALL | |
| 9 | SS MUSTARD | 1 BALL | |
| 10 | SS KHAKI | 1 BALL | |
| 11 | SS COPPER | 1 BALL | |
| 12 | SS TOMATO | 1 BALL | |
| 13 | SS SPICE | 1 BALL | |
| 14 | SS LIME | 1 BALL | |
| 15 | SS BUTTERMILK | 1 BALL | |
| 16 | SS PISTACHIO | 1 BALL | |
| 17 | SS CREAM | 1 BALL | |
| 18 | KC COMFORT BASIL | 2 BALLS | |
NOTE: There are fewer colours used in the Autumn Gold Blanket than the May Blossom, so they are not a ‘one for one’ comparison. As you work through the pattern, you will see different colour charts for each of the versions.
PATTERN NOTES:
- The blanket measures 143 x110cms. It’s large enough to use as a throw on a three seater sofa, but the way it is constructed in stripes means that it is easy to alter the size if you want it smaller or larger.
- I suggest you READ THROUGH the pattern first to get acquainted with the different sections.
- TURN YOUR GRANNY! I’ll talk more about this in the pattern, but I really recommend this way of making granny squares – turning your work after every round. I love how neat and straight it makes your square.
- TACKLE THE ENDS AS YOU GO ALONG! Because of the number of colours, there will be a LOT of ends to deal with. Don’t let it get you down though. Get into the habit of having your needle handy to weave them in them as you go. I like to tidy up each square as I make it, and before it’s joined to the blanket. It’s much easier to sew the ends in on a little square than on a huge blanket! There will be quite a few ends which will need to be sewn in on the blanket as well though, but honestly, I ENJOY sewing in the ends. It gives me a great sense of achievement! Be sure to carefully weave them in on the back, in at least two directions, to make sure they don’t unravel.
- IDENTIFY THE FRONT of the blanket. It can be easy to get mixed up because you are turning it all the time, but the front is when your joining stitch has a small, slightly raised ridge. To make it easy to identify, pop a stitch marker in the front somewhere, and check for it whenever you are going to be working on the front side.
- All the joining stitches (JAYG) are done in HALF TREBLES in this pattern, not the usual trebles. This is because I find the slightly smaller stitch makes a neater join, and all JAYG is worked on the FRONT of the blanket.
- The pattern has been written in UK TERMS. There is a Conversion Table below for US TERMS.
| UK TERMS | US TERMS |
| Double Crochet (DC) | Single Crochet (SC) |
| Half Treble (HTR | Half Double (HDC) |
| Treble (TR) | Double Crochet (DC) |
| Treble2Together (TR2TOG) | Double2 Together (DC2TOG) |
| Chain Stitch (CH) | same |
| Slip Stitch (SL ST | same |
The Stitches:
Treble –
Yarn over. Insert hook. Pull through loop. Yarn over pull through two loops on hook, yarn over pull through remaining two loops.
Half Treble –
Yarn over. Insert hook. Pull through loop. Yarn over, pull through three loops on hook.
Treble2together –
Yarn over. Insert hook. Pull through loop. Yarn over. Pull through two loops, leaving two loops on the hook. Yarn over. Insert hook again. Pull through loop. Yarn over, pull through two loops. Yarn over. Pull through three loops.
Double Crochet –
Insert hook. Yarn over and pull through loop. Yarn over and pull through two loops on hook.
The pattern is made up of basic crochet stitches which are easy to master if you are a complete beginner, and relaxing to do if you are already familiar with crochet.
The basis of the pattern is a variety of different stripes, or STRIPS. There are Strips of Granny Squares of different sizes, interspersed with areas of Granny Stripe again in varying widths. This creates areas of interesting colour combinations which aren’t repeated anywhere in the blanket, so making a crochet piece which is fascinating to look at and equally fascinating to work on.
Once you are familiar with the basic techniques, it will become an adventure in colour as you move on through each strip.
The first pages are given over to tutorials for each of the main aspects of the pattern. You will be referred back to them when you are working that part of the pattern.
They cover the Basic Granny Square, the Granny Stripe, Simple Join as you Go and Continuous Join as you Go. Once you are familiar with these techniques, they will become helpful additions to your crochet skills.
The rest of the pattern takes you through all the Colour Charts for each STRIP, with step by step guides all the way.
TUTORIAL NUMBER 1 – GRANNY SQUARE
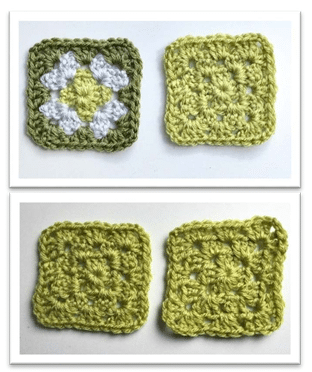
The granny square can be made in multiple colours or a single colour and depending on that, the way they are worked differs very slightly.
This photo shows a three round square, which starts with a centre round and is worked outwards with two following rounds. Different crocheters will have different ideas about how to make the granny square – there is not really one definitive way – this is how I do it.
One point to note is that I TURN the square over after each round. This is a way to avoid the tendency that a granny square has, to twist out of shape as you work it. In the second photo, there is a turned square on the left and one which hasn’t been turned on the right, to show you what I mean. The right one is beginning to look more like a parallelogram than a square.
In this blanket, there are strips of granny squares with four colours, some with two or just one, and also some strips of what I call MINI GRANNIES, which are just the centre round plus the joining round.
(Please Note: to avoid confusion, the yarn colours in the photo tutorials in the next two pages do not correspond to any of the colours in the May Blossom Blanket. I’ve ‘borrowed’ the images from another of my patterns).
Multiple Coloured Granny Square
Round 1 (Centre Round)
Start with a slipknot on your hook, CH4 (pic 1).
Form a loop by slip stitching into the first chain. Now CH2. This will be classed as the first TR (pic 2).
TR2 into the circle. Then *CH2, TR3. Repeat from * three more times. CH2 and finish off by slip stitching into the top of the first CH2. Fasten off (pic 3).
TURN your work over to the other side ready to start Round 2 (pic 4)

Round 2
Select the second colour and attach to any corner space. CH2. This will be classed as the first TR. TR2 in the same corner space (pic 5).
Continue around the square TR3, CH2, TR3 in each of the next three corner spaces. Then TR3, CH2 in the same corner where you started and SL ST to the top of the first CH2 to finish. Fasten off (pic 6)

Round 3
As you can see from pic 6, you are starting to accumulate quite a lot of ends. Don’t do anything about them yet. Remember to turn your work over again (pic 7).
Attach the colour for this round in any corner space and CH2 (counts as the first TR), TR2 in the same space, TR3 in the next space, which is in the middle of the side, and TR3, CH2, TR3 in the next corner space. Continue all the way round the square, finishing with TR3, CH2 in the first corner space and slip stitch into the top of the first CH2 to finish. Fasten off (pic 8).
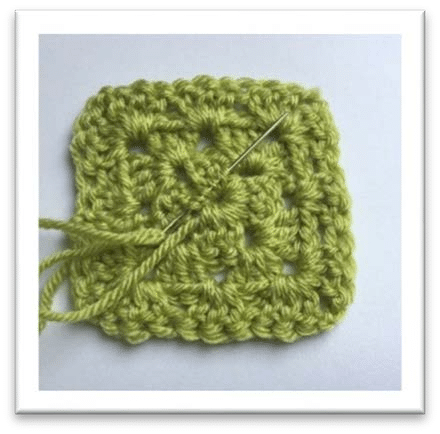
Once these rounds are finished, take a few minutes to neaten the square by dealing with the ends. I start by sewing in the end in the very centre first. It needs to be pulled nice and tight to close the hole in the middle and then needs to be firmly woven in, so that the hole doesn’t open up again.
I recommend weaving it through the stitches in first one direction, and then back in the other direction, keeping a firm tension (pic on left)
Single Coloured Granny Square
Round 1
This square is worked in the same way as the other granny square, apart from when you move from one round to the next. You won’t, of course be fastening off one colour and attaching the next, so when you get to the end of Round 1 simply CH2, which will be the equivalent of the first TR in the next round, and then turn the square over (pic 9).

Round 2
You will now see that the CH2 has landed at the extreme right of the corner space, where my needle is pointing in pic
9. So, you will go ahead and make the complete corner at this stage, which is TR2, CH2, TR3, (pic 10) rather than the half corner you made for the other square, and then continue round the square. When you get back to where you started you will now be slip stitching to the top of the first CH2 at the point in pic 11.
Round 3
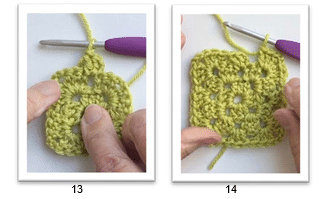
CH2 and turn. You will see from pic 12 that you are now closer to the middle space rather than either of the corners, so this is where you will work first. With the CH2 counting as the first TR, TR2 into the middle space (pic 13). Move on and work the corner as usual, then continue around the square. When you have worked all the way round, you will finish by making the final corner, and you can now SL ST to the top of the first CH2 and fasten off (pic 14)
TUTORIAL NUMBER 2 – SIMPLE JOIN as YOU GO
Please note – In this blanket, all the Strips are created separately from the blanket. The squares are joined to each other first in one long line, and then the Strip is attached to the blanket.
Simple JAYG is a method of joining the granny squares to each other and is done while you are crocheting Round 4 of the Granny Square. Unlike the Continuous Join as You Go (later) each square is worked on all four sides before moving on to the next one.
It means they are joined to each other without an obvious border and looks rather like a patchwork quilt. What’s more round 4 of each square can be in a different colour, as you are fastening off after each square.
My preference is for the joining stitch to be HALF TREBLES instead of Trebles, as I feel it makes a neater and less bulky join.
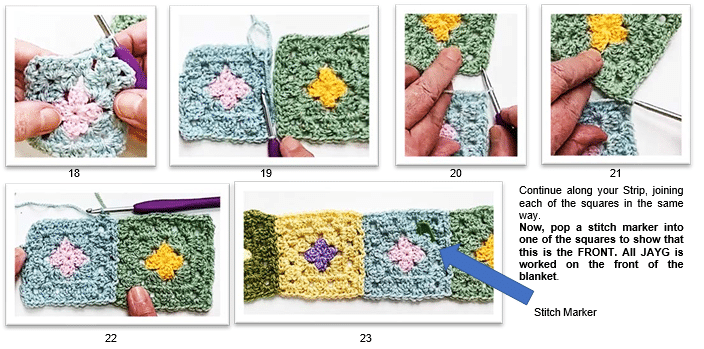
In pic 15, I’ve laid out the first four squares of Strip One with reverse side of Round 3 uppermost. I made all four as far as Round 3 first, leaving the yarn still attached, as the joining round is the same colour as the previous two.

- For the first square there is nothing to attach it to, being the first one, so just work a complete Round 4 in Half Trebles. If you’re picking up the attached working yarn (as in Strip One), CH2, HTR2 in the nearest space and continue round the square (pic 16). When you get back to where you started, SL ST to the first CH2 and fasten off (pic 17).
- Take the second square, pick up the attached yarn and CH2 (or start a new colour in any corner (if it’s not Strip One). HTR2 in the nearest space (pic18) and work the rest of that side plus the next side, stopping when you’ve reached the bottom left corner. HTR3 in that corner. Swing the square round to match up with the bottom corner of square one (pic 19, then swing both squares round to make it easier to work, as in pic 20. SL ST from the second square into the corner of the first (pic 21). Now come back to complete the corner of square two with HTR3. (Note – there is no CH2 in this corner – the SL ST replaces that). SL St into the next space along on square one, HTR3 in the next space along in square two. Continue up the sides with SL ST and HTR3. At the corner, HTR3 in square two, SL ST into the corner of square one, and HTR3 back in the square two corner to complete it (pic 22). HTR3 along the top of square two. HTR3, CH2, HTR3 in the next corner (Note – there is a CH2 in this corner). Work around square two until you are back where you started and SL ST into the top of the first CH2. Fasten off.
TUTORIAL NUMBER 3 – GRANNY STRIPES and ATTACHING THE STRIPS TO THE BLANKET
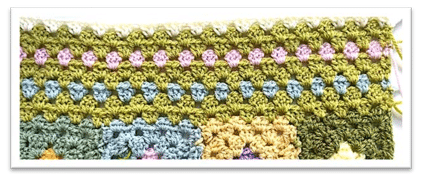
Granny stripes are rows made up of clusters of three Treble stitches. The fact that they are worked row by row in two directions means that like the turned granny squares, there is no wrong and right side. One of the simplest stitches to do, they are a great way of shading colour.
Working Granny Stripes with the Granny Square Strips
When you’ve made your first strip of Granny Squares, you will be adding the Granny Stripe rows both above and below this Strip. After that, all the Granny Stripes are worked above the Strips.
First, turn Strip One of Granny Squares to the reverse side, which means that the stitch marker you put in earlier will be underneath. You will be working upwards from the Strip.
Row 1 – Attach the yarn for the first Granny Stripe to the corner of the first square and CH 2. TR1 into the same space (pic 24).
Move along to the next space, TR3 (pic 25). Repeat twice more, and you will then reach the join between the squares. There are two corner spaces right next to each other because of this join, and if you were to put three Trebles into each space you would end up with too many stitches (pic 26)

So, to avoid this and have just one cluster of stitches over the two spaces, TR1 in the first corner space (pic 27), then
start another Treble in the same space but only work half of it. In other words –
Yarn over, insert hook, pull through, yarn over and pull through two loops then stop, leaving two loops on the hook (pic 28). Now yarn over, insert the hook into the next corner space, yarn over and pull through – four loops on the hook (pic29), yarn over and pull through two loops. Three loops left on the hook. Yarn over again and pull through all three loops. That is a TR2TOG stitch (pic 30).
Finish with TR1 in the second corner space, and you can move on to the next space (pic 31).
Work all the way along to the last space, remembering to TR1, TR2TOG, TR1 where each of the squares meet. In the last space, TR2 (pics 32 & 33), then CH2 and turn if you are not changing colour (pic 34).
The first row can be identified as having two stitches at the beginning and end of the row. This will also apply to rows 3,5,7 etc.

Row 2 – The CH2 counts as the first TR (pic35) Yarn over, insert hook in the first space and TR3 (pic 36). Work all the way along, being careful to treat each group of stitches over the joins as one group.
At the end of the row, you will have worked three Trebles in the last space, but you also need to make one more Treble between the TR1 and CH2 of the first row (pic 37).
Chain 2 and turn if not changing colour. (See Note below for how to change colours at the end of a row) (pic 38). This row differs from Row 1 as it has only one stitch at either end.
Row 3 – Repeat Row 1, missing out the instructions for working over joins.
Row 4 – Repeat Row 2.
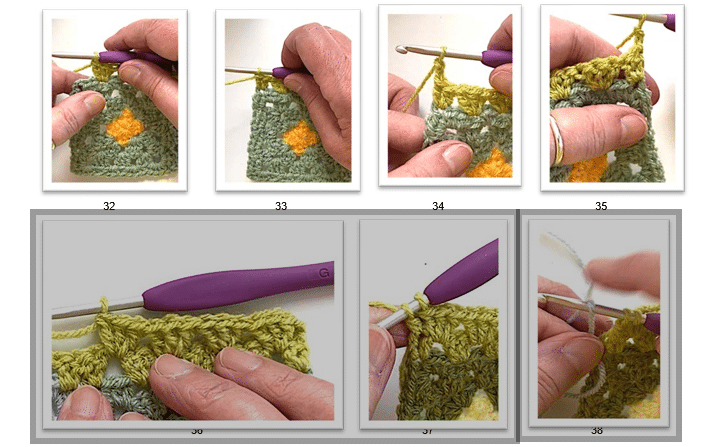
NOTE – When changing colours, attach your new colour while you are making the last treble stitch of the row. Work the TR as far as the point where there are still two loops on the hook. Pick up the new colour and loop it over the hook (pic 38). Pull it through the last two loops on the hook and you are ready to make the CH2 before the turn in the new colour. Cut the previous yarn now, leaving a short tail and I like to tie a knot in in the two short ends just to make the new colour nice and secure. CH2 and turn.
Attaching the Granny Square Strip to the blanket
Lay the Granny Square Strip above the last row of Granny Stripes. Make sure that both the Strip and blanket are right sides up, so that the front of the JAYG rounds on the Strips are ‘ridge side’ uppermost, and the stitch markers are on the front.

Attach the joining colour in between the first two stitches in the Granny Stripe side, CH2, then SL ST into the corner of the Granny Square (pic 39).
Come back down to the Granny Stripe and TR3 in the next space. Move up to the Granny Square again and SL ST in the next space along (pic 40).
Alternate TR3 in the Stripe and SL ST in the Square (pic 41) until you reach the point where the first two Granny Squares meet. SL ST into the first corner, and then also SL ST into the second corner, and then back to the next space on the Stripe and TR3.
When you reach the end of the row, TR3 in the last space in the Stripe, SL ST into the corner of the last Granny Square, then come back to the Granny Stripe and work one last TR in the space between the last two stitches (pic 42). Fasten off.
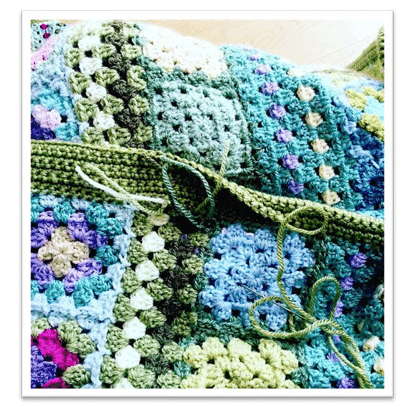
NOTE – Good News! The ends all the way up the sides of blanket do not need to be sewn in, as they will be tucked away in the double border, later.
TUTORIAL NUMBER 4 – CONTINUOUS JOIN as YOU GO
This is a way of joining the squares to each other in a way that works around all the squares without having to fasten off and restart after each square. You therefore have only two ends to weave in at the end. You will be making the fourth round of each Granny Square while you do the joining, but this time they will all be in the same colour, effectively creating a border around the squares. The method is similar to the Simple JAYG, but the direction of travel is a little different
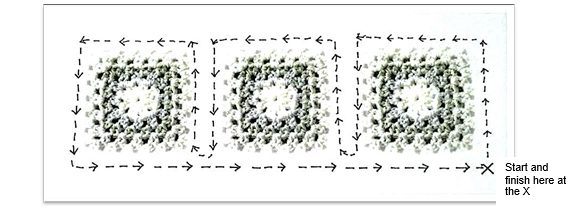
The diagram on the previous page shows the route you will take, starting at the bottom right corner, working up and around three sides of the first square, then working up the side of the second square, without going on to complete the bottom row of the first square. Once the whole row is joined, you will come back along the bottom edge of all the squares at once.
Although this method commonly uses a Treble Stitch, again I believe the HALF TREBLE is neater and less bulky.

Take the top square from the pile of squares you’ve made for the Strip you’re working on, and make sure that round 3
of each square is reverse side uppermost (pic 43), then attach your yarn in the bottom right corner. CH2 (counts as the first HTR), HTR2 in the same corner.
Work up the side of the square with HTR3 in each of the next two spaces.
HTR3, CH2, HTR3 in the corner space showing, HTR3 in the next two spaces. Repeat down the third side of square one, HTR3 in the bottom left square, and stop (pic 44).
Take the second square and match it up to the corner. Move over to square two and HTR3 in the corner space (pic 45). Move up to the next space on square one and SL ST into it. HTR3 in the next space on square two. Repeat for the next spaces up the side. At the corner, HTR3 in square two, SL ST into the corner of square one, and HTR3 back in the corner of square two (pic 46)

Attach all the squares in this way, so that when you reach the end of the Strip, all the squares will have been joined on three of their sides (pic 47). The bottom of each of the squares has to be completed now, as you work all the way back to the beginning.
Swing the Strip all the way round, so that the bottom edge is now at the top (pic 48). If you have just done half of the corner, complete it now with CH2 and HTR3.
HTR3 in each of the next three spaces.
Now you are at the point where the two squares were attached to each other. Notice that the two adjoining corner spaces only have three HTR’s in them, so need to be completed.
To do that, HTR3 in the first corner space, where my needle is pointing in pic 49. Then CH1. Now pull apart the join a little and SL ST into the space that opens up (pic 50). CH1 and then HTR3 in the next corner space.
Repeat all the way along the edge of the Strip until you reach the corner where you started. HTR3 in that corner, CH2 and SL ST into the top of the first CH2. Fasten off (pic 51).
It’s probably a good idea to pop another stitch marker into the front of this Strip as well, just to keep you right.

And now that you’ve read through all the tutorials, you are ready to make a start on the blanket!
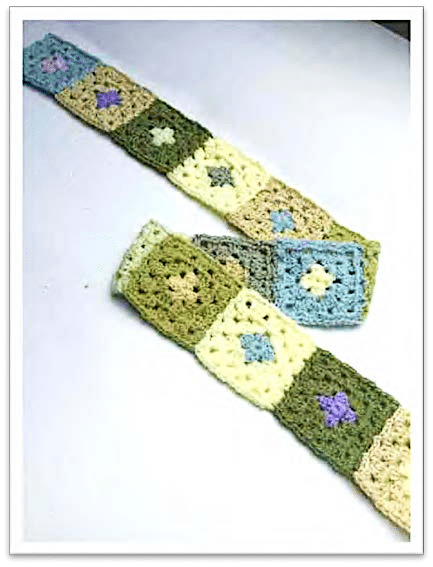
The first STRIP you are going to make is one of Granny Squares in two colours, but it’s not right at the edge of blanket where you would normally start. There will be some rows of granny stripes both above and below it, but they will be made after the Strip of granny squares.
There’s a good reason for that, of course.
I want the blanket to be fourteen granny squares wide. If I started right at the lower edge with the granny striped area, I would have had to do some maths and work out how many stitches to chain, in order to make these squares fit. Then I would have had to actually chain that number and work the first row into the chains – not a favourite job of mine!
So, by making the first strip of squares, I can then add the granny rows above it, up to the top edge, and also the granny rows below it, moving down the blanket. And all without having to do any counting or chaining, which seems perfectly sensible to me!
STRIP ONE – Granny Squares in Two Colours
The image above shows the first Strip. The squares have the centre done in one colour, then two rounds in a different colour, and finally a fourth (joining) round in the that same colour. You can opt to make up all fourteen squares as far as Round Three first, and then do the Fourth Round as you are attaching them or make and join each square at the same time. See the Simple JAYG tutorial on page 7.
The following Chart shows the colours needed for each square, numbered 1 – 14, for both the May Blossom and Autumn Gold versions.
The first colour listed is for Round 1 and the next one is for Rounds 2 – 4 of each square.
Remember, the abbreviations before each colour mean – SS Stylecraft Special, SB Stylecraft Batik and KC King Cole Comfort.
MAY BLOSSOM BLANKET
| 1 | SS Saffron | SS Lincoln |
| 2 | SS Powder Pink | SS Duck Egg |
| 3 | SS Wisteria | SS Buttermilk |
| 4 | SS Lemon | SS Meadow |
| 5 | SS Lincoln | SS Lemon |
| 6 | SS Duck Egg | SS Buttermilk |
| 7 | SS Wisteria | SS Pistachio |
| 8 | SS Lemon | SS Duck Egg |
| 9 | SS Buttermilk | SS Lincoln |
| 10 | SS Powder Pink | SS Lemon |
| 11 | SS Saffron | SS Pistachio |
| 12 | SS Duck Egg | SS Lemon |
| 13 | SS Wisteria | SS Meadow |
| 14 | SS Lemon | SS Buttermilk |
AUTUMN GOLD BLANKET
| 1 | SS Cream | SB Pistachio |
| 2 | SS Mocha | SS Camel |
| 3 | KC Basil | SS Buttermilk |
| 4 | SS Copper | KC Basil |
| 5 | SS Spice | SB Biscuit |
| 6 | SS Buttermilk | SS Mocha |
| 7 | SS Meadow | SS Buttermilk |
| 8 | SS Cream | SS Spice |
| 9 | SB Pistachio | SS Mocha |
| 10 | SS Copper | SB Old Gold |
| 11 | SS Buttermilk | SS Meadow |
| 12 | SS Cream | SS Camel |
| 13 | SB Biscuit | SS Gingerbread |
| 14 | SS Gingerbread | SS Spice |
Go ahead and make the fourteen granny squares, following the tutorial on page 4, joining them together with the Simple Join as You Go technique on page 6.
At this point it’s an important tip to mark the FRONT of the blanket by popping a stitch marker into one of the squares. The front is the side on which you worked the 4th round of the granny square and can be identified by the slightly raised ridge of the SJAYG.
Every joining stitch should be worked on the front of the blanket, and it helps greatly to have the marker to show which is the right side and keep you right. You can refer to it every time you join a Strip.
Granny Stripes below and above Strip One –
Once the first strip is complete, it’s time to work the Granny Stripe rows down to the bottom edge of the blanket. Turn the Strip to the reverse side, and following the instructions on page 7, work six rows in the following colours –
MAY BLOSSOM BLANKET
| 1 | SS Lime |
| 2 | SS Lime |
| 3 | SS Lincoln |
| 4 | SS Aspen |
| 5 | SS Meadow |
| 6 | SS Violet |
AUTUMN GOLD BLANKET
| 1 | SS Gingerbread |
| 2 | SS Gingerbread |
| 3 | SS Copper |
| 4 | SS Lime |
| 5 | SS Walnut |
| 6 | SS Khaki |
Once all six rows are complete, you will have now reached the bottom edge of the blanket. You can leave that for the moment and go to the top edge of STRIP 1 to continue more Granny Stripes. This is now called the blanket.
Turn the blanket to the reverse side to start (stitch marker underneath), and work 9 rows in the following colours –
MAY BLOSSOM BLANKET
| 1 | SS Pistachio |
| 2 | SS Pistachio |
| 3 | SS Duck Egg |
| 4 | SS Pistachio |
| 5 | SS Pistachio |
| 6 | SS Powder Pink |
| 7 | SS Pistachio |
| 8 | SS Pistachio |
| 9 | SS Cream |
AUTUMN GOLD BLANKET
| 1 | SB Biscuit |
| 2 | SB Biscuit |
| 3 | SS Lime |
| 4 | SB Biscuit |
| 5 | SB Biscuit |
| 6 | SS Tomato |
| 7 | SB Biscuit |
| 8 | SB Biscuit |
| 9 | SS Cream |
The photo on the left shows STRIP ONE with the rows of Granny Stripes above and below.
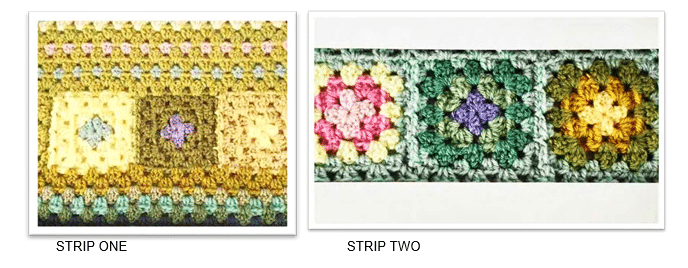
STRIP TWO – Multi coloured Granny Squares
This is a Strip of fourteen granny squares once more. The first three rounds of each square are a different colour, and in the fourth round you will be joining the squares together and attaching them to the blanket at the same time, with the CONTINUOUS Join as you Go method, explained on pages 11 & 12. See below for the joining colours.`
The following table gives the colours for each square, up to round 3.
MAY BLOSSOM BLANKET
| 1 | SS Saffron | SS Mustard | SS Meadow |
| 2 | SS Wisteria | SS Lincoln | SS Sage |
| 3 | SS Powder P | SS Fondant | SS Lemon |
| 4 | SS Lemon | SS Pistachio | SS Lincoln |
| 5 | SS Saffron | SS Sherbert | SS Buttermilk |
| 6 | SS Cloud B | SS Powder P | SS Pistachio |
| 7 | SS Mustard | SS Saffron | SS Sage |
| 8 | SS Wisteria | SS Cloud B | SS Lincoln |
| 9 | SS Cloud B | SS Sage | SS Lemon |
| 10 | SS Powder P | SS Wisteria | SS Meadow |
| 11 | SS Lemon | SS Mustard | SS Buttermilk |
| 12 | SS Fondant | SS Lincoln | SS Powder P |
| 13 | SS Sage | SS Sherbert | SS Pistachio |
| 14 | SS Pistachio | SS Cloud B | SS Saffron |
AUTUMN GOLD BLANKET
| 1 | SB Pistachio | SS Camel | SS Buttermilk |
| 2 | SSGingerbread | SS Meadow | SS Cream |
| 3 | SS Mustard | SS Buttermilk | SSGingerbread |
| 4 | SS Buttermilk | SB Pistachio | KC Basil |
| 5 | SB Old Gold | SSGingerbread | SS Pistachio |
| 6 | SS Cream | KC Basil | SS Buttermilk |
| 7 | SS Mocha | SS Mustard | SS Cream |
| 8 | SS Meadow | SB Pistachio | SS Buttermilk |
| 9 | SB Old Gold | SSGingerbread | KC Basil |
| 10 | KC Basil | SS Cream | SB Pistachio |
| 11 | SS Buttermilk | SS Mocha | KC Basil |
| 12 | SS Cream | SS Mustard | SSGingerbread |
| 13 | SB Pistachio | SS Meadow | SS Cream |
| 14 | SB Biscuit | SSGingerbread | SS Buttermilk |
Make up all fourteen squares as far as Round Three.
Put them in order with the reverse side of Round Three uppermost. A knitting needle makes a good way of storing them in order. Just spear them on the knitting needle starting with number fourteen and ending with number one. You can then simply pull them off one by one as you join them.
The CJAYG colour for the May Blossom blanket is SS DUCK EGG, and for the Autumn Gold it is SB BISCUIT.
Once the Strip is made up, it will be attached to the blanket with a row of Treble clusters in the same colour as the CJAYG colours. See pic below.
Full tutorial on attaching the Granny Square Strips to the blanket on page 10.
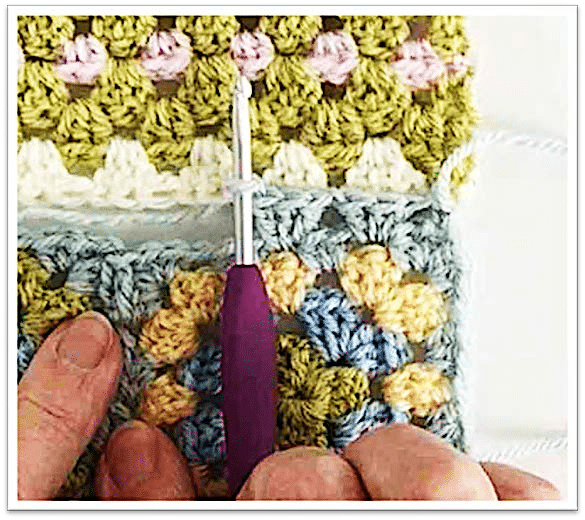
Once joined, and working on the reverse side of the blanket for the first row, work three rows of Granny Stripes in the following colours
MAY BLOSSOM BLANKET
| SS Duck Egg |
| SS Cream |
| SS Sage |
AUTUMN GOLD BLANKET
| SB Biscuit |
| SS Cream |
| SS Lime |
STRIP THREE – Mini Grannies
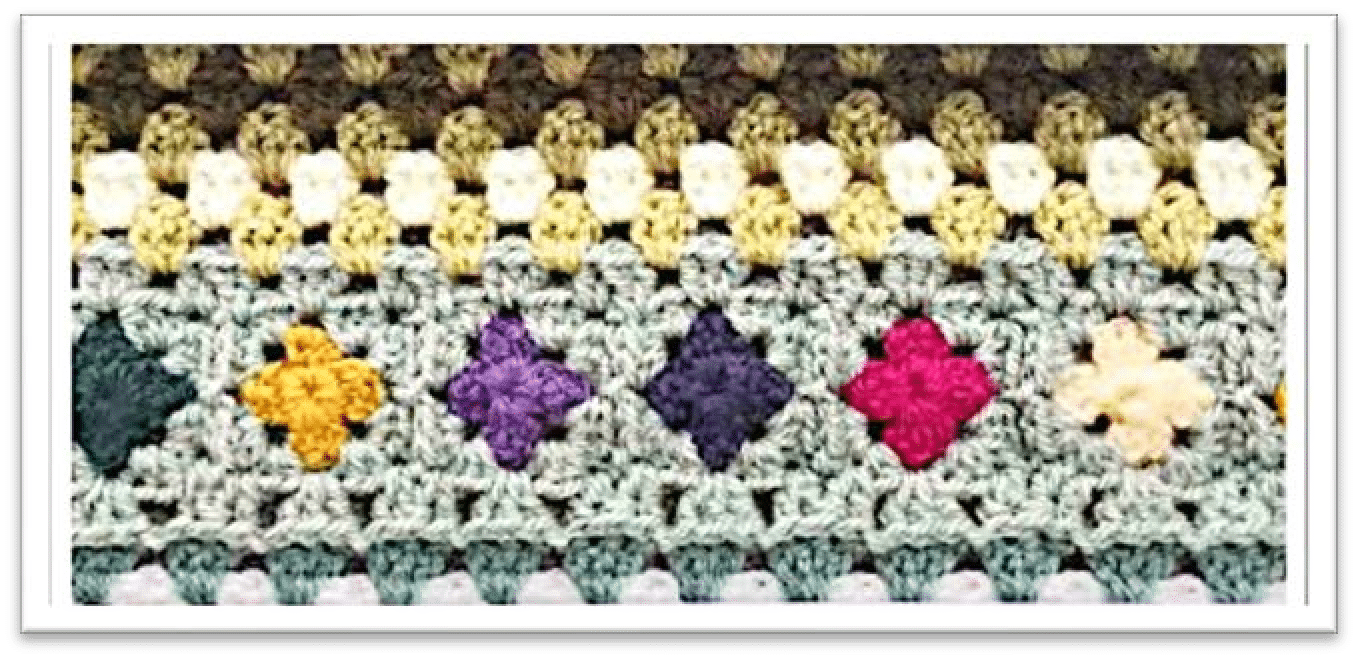
This Strip is made up of ‘Mini Grannies’. These are little squares which are half the size of the regular granny squares, being made up of just two rounds – the first, centre round plus the second, joining round
As this is a CJAYG strip joined with one colour, you should make up the little centres first. There are twenty-eight of them.
The joining colour for the May Blossom blanket is SS LINCOLN and for the Autumn Gold blanket, KC BASIL.
MAY BLOSSOM BLANKET
| 1 | SS Violet |
| 2 | SS Saffron |
| 3 | SS Storm Blue |
| 4 | SS Fondant |
| 5 | SS Pomegranate |
| 6 | SS Lavender |
| 7 | SS Storm Blue |
| 8 | SS Mustard |
| 9 | SS Fondant |
| 10 | SS Violet |
| 11 | SS Saffron |
| 12 | SS Lavender |
| 13 | SS Pomegranate |
| 14 | SS Storm Blue |
| 15 | SS Fondant |
| 16 | SS Mustard |
| 17 | SS Saffron |
| 18 | SS Pomegranate |
| 19 | SS Violet |
| 20 | SS Lavender |
| 21 | SS Mustard |
| 22 | SS Storm Blue |
| 23 | SS Saffron |
| 24 | SS Fondant |
| 25 | SS Lavender |
| 26 | SS Pomegranate |
| 27 | SS Mustard |
| 28 | SS Storm Blue |
AUTUMN GOLD BLANKET
| 1 | SS Copper |
| 2 | SS Buttermilk |
| 3 | SS Gingerbread |
| 4 | SS Khaki |
| 5 | SS Mustard |
| 6 | SS Tomato |
| 7 | SS Walnut |
| 8 | SS Copper |
| 9 | SS Buttermilk |
| 10 | SS Gingerbread |
| 11 | SS Khaki |
| 12 | SS Mustard |
| 13 | SS Copper |
| 14 | SS Walnut |
| 15 | SS Tomato |
| 16 | SS Buttermilk |
| 17 | SS Gingerbread |
| 18 | SS Khaki |
| 19 | SS Tomato |
| 20 | SS Buttermilk |
| 21 | SS Mustard |
| 22 | SS Tomato |
| 23 | SS Walnut |
| 24 | SS Copper |
| 25 | SS Khaki |
| 26 | SS Gingerbread |
| 27 | SS Buttermilk |
| 28 | SS Tomato |
Turn each of the little, one round motifs on to the reverse side, and make sure your blanket is on the front when you do the joining round.
The CJAYG is worked in the same way as for the regular Granny Squares, using the second round of the Granny Square Pattern as a guide, but of course as it’s the join, you will work in HALF TREBLES.
Once the long strip of mini grannies is made up, join it to the blanket with a row of Granny Stripe using SS Lincoln again for the May Blossom and KC Basil for the Autumn Gold. Remember to have the blanket and the Strip both front uppermost.
Another block of Granny Stripes next, starting on the reverse side as usual, in the following colours –
MAY BLOSSOM BLANKET
| 1 | SS Lincoln |
| 2 | SS Pistachio |
| 3 | SS Lemon |
| 4 | SS Meadow |
| 5 | SS Khaki |
AUTUMN GOLD BLANKET
| 1 | KC Basil |
| 2 | SS Mustard |
| 3 | SS Buttermilk |
| 4 | SS Gingerbread |
| 5 | SS Khaki |
Remember to turn the blanket on to the reverse for the first of these rows and turn after each one.
STRIP FOUR – BASIC GRANNY SQUARES
This is back to a Strip of fourteen Basic Granny Squares again. Each round of the square is a different colour, and as the fourth, joining colour is also a different colour for each square, you will be joining with the SIMPLE JAYG method.
Turn each square after Round Three so it is showing reverse side up.
Once the Strip has been made up, join it to the blanket with SS SAGE for the May Blossom, and SS MOCHA for the Autumn Gold, using Granny Stripe Treble Clusters.
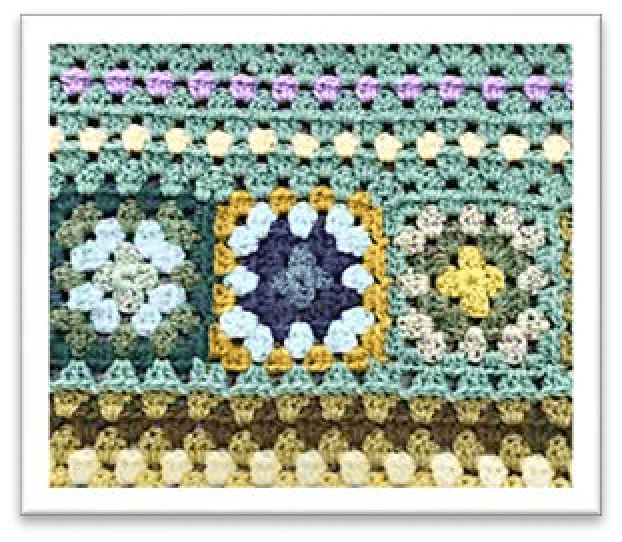
| MAY BLOSSOM BLANKET | JAYG Colour | |||
| 1 | SS Sherbert | SS Violet | SS Lime | SS Lincoln |
| 2 | SS Sage | SS Storm Blue | SS Lincoln | SS Cypress |
| 3 | SS Lincoln | SS Lime | SS Cloud Blue | SS Aspen |
| 4 | SS Violet | SS Lincoln | SS Sage | SS Storm Blue |
| 5 | SS Sherbert | SS Mustard | SS Storm Blue | SS Cloud Blue |
| 6 | SS Cypress | SS Aspen | SS Meadow | SS Lime |
| 7 | SS Meadow | SS Cloud Blue | SS Sage | SS Violet |
| 8 | SS Lincoln | SS Cypress | SS Aspen | SS Meadow |
| 9 | SS Pistachio | SS Meadow | SS Lincoln | SS Sage |
| 10 | SS Lavender | SS Storm Blue | SS Sherbert | SS Mustard |
| 11 | SS Lincoln | SS Sherbert | SS Meadow | SS Cypress |
| 12 | SS Cloud Blue | SS Lincoln | SS Storm Blue | SS Pistachio |
| 13 | SS Storm Blue | SS Sage | SS Lime | SS Aspen |
| 14 | SS Mustard | SS Pistachio | SS Cypress | SS Meadow |
| AUTUMN GOLD BLANKET | JAYG Colour | |||
| 1 | SS Copper | SS Lime | SB Biscuit | SS Khaki |
| 2 | SB Pistachio | SS Spice | SS Tomato | SS Gingerbread |
| 3 | SS Mustard | SB Old Gold | SS Meadow | SS Walnut |
| 4 | SS Tomato | SS Lime | SS Mocha | KC Basil |
| 5 | SS Lime | SS Khaki | SS Gingerbread | SS Tomato |
| 6 | SB Old Gold | SS Copper | KC Basil | SS Lime |
| 7 | SS Khaki | SB Old Gold | SS Gingerbread | SS Copper |
| 8 | SB Pistachio | SS Meadow | SS Spice | SS Khaki |
| 9 | SS Tomato | KC Basil | SS Camel | SS Meadow |
| 10 | SB Old Gold | SS Mocha | SS Copper | KC Basil |
| 11 | SS Lime | KC Basil | SS Gingerbread | SS Lime |
| 12 | SS Walnut | SS Lime | SB Old Gold | SS Tomato |
| 13 | SS Mustard | SS Meadow | SS Mocha | SS Walnut |
| 14 | SS Khaki | SS Gingerbread | SB Old Gold | SS Copper |
And now another block of Granny Stripes in the following colours –
| MAY BLOSSOM BLANKET | AUTUMN GOLD BLANKET | ||
| 1 | SS Sage | 1 | SS Mocha |
| 2 | SS Sage | 2 | SS Mocha |
| 3 | SS Saffron | 3 | SS Tomato |
| 4 | SS Sage | 4 | SS Mocha |
| 5 | SS Sage | 5 | SS Mocha |
| 6 | SS Wisteria | 6 | SS Copper |
| 7 | SS Sage | 7 | SS Mocha |
STRIP FIVE – Plain Granny Squares
This Strip is made up of fourteen plain Granny Squares. Each square has three rounds of one colour.
They are joined together with Continuous Join as You Go in SS Cypress for the May Blossom Blanket and SS Gingerbread for the Autumn Gold Blanket.
The colours for the squares are below –
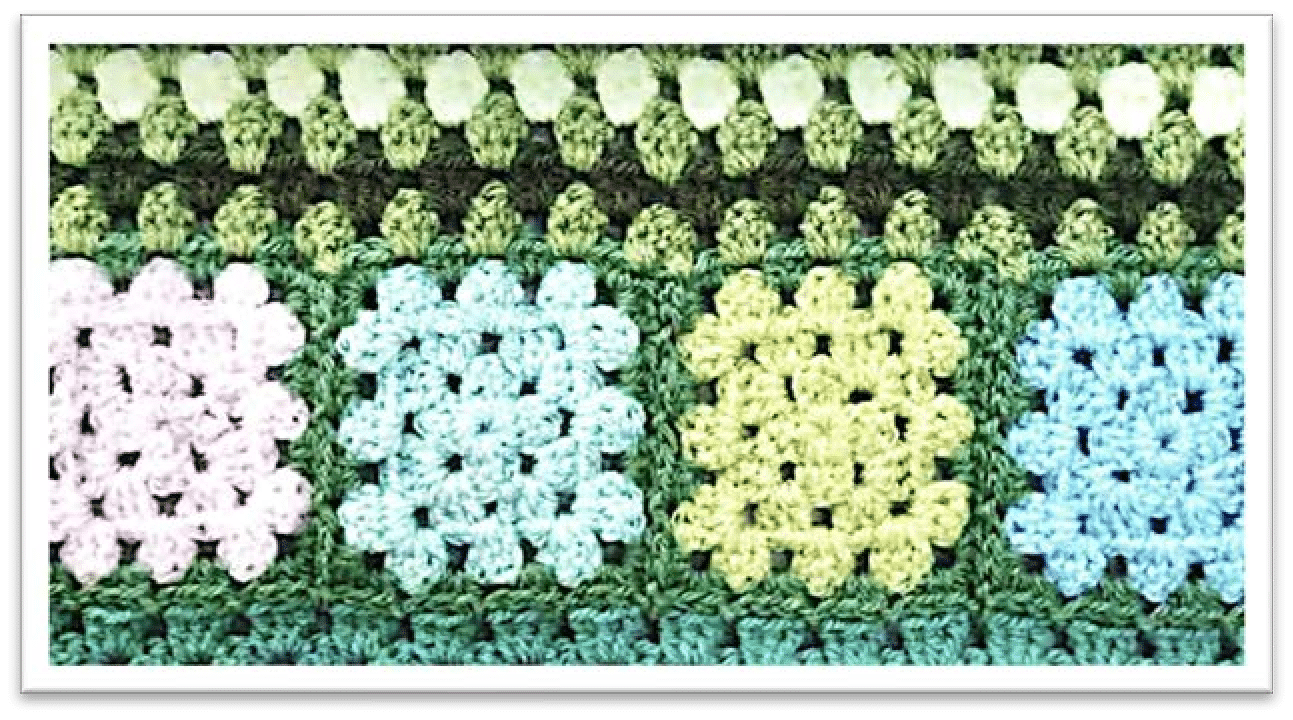
| MAY BLOSSOM BLANKET | AUTUMN GOLD BLANKET | ||
| 1 | SS Cloud Blue | 1 | SS Camel |
| 2 | SS Pistachio | 2 | SS Tomato |
| 3 | SS Duck Egg | 3 | SS Walnut |
| 4 | SS Powder Pink | 4 | SS Meadow |
| 5 | SS Lincoln | 5 | SS Copper |
| 6 | SS Buttermilk | 6 | SS Lime |
| 7 | SS Aspen | 7 | SB Old Gold |
| 8 | SS Cloud Blue | 8 | SS Mocha |
| 9 | SS Pistachio | 9 | SS Tomato |
| 10 | SS Duck Egg | 10 | SS Meadow |
| 11 | SS Powder Pink | 11 | SS Walnut |
| 12 | SS Lincoln | 12 | SS Camel |
| 13 | SS Buttermilk | 13 | SS Copper |
| 14 | SS Aspen | 14 | SS Lime |
Once the Strip is made, attach it to the blanket in the usual way of treble clusters, with SS Cypress for the May Blossom and SS Gingerbread for the Autumn Gold.
Of course, there are now another few rows of Granny stripes to do next, five in total this time, in the following colours –
| MAY BLOSSOM BLANKET | AUTUMN GOLD BLANKET | ||
| 1 | SS Meadow | 1 | SS Khaki |
| 2 | SS Khaki | 2 | SS Gingerbread |
| 3 | SS Meadow | 3 | SS Buttermilk |
| 4 | SS Lemon | 4 | SS Mustard |
| 5 | SS Meadow | 5 | KC Basil |
STRIP SIX – Multi Coloured Granny Squares once more
Make up the Granny Squares as far as Round Three, and store them on your knitting needle with number 14 first, and with the third round reverse side up.
The join is the Continuous JAYG in SS Duck Egg for the May Blossom blanket and KC Basil for the Autumn Gold blanket.
The colours for each square are as follows –
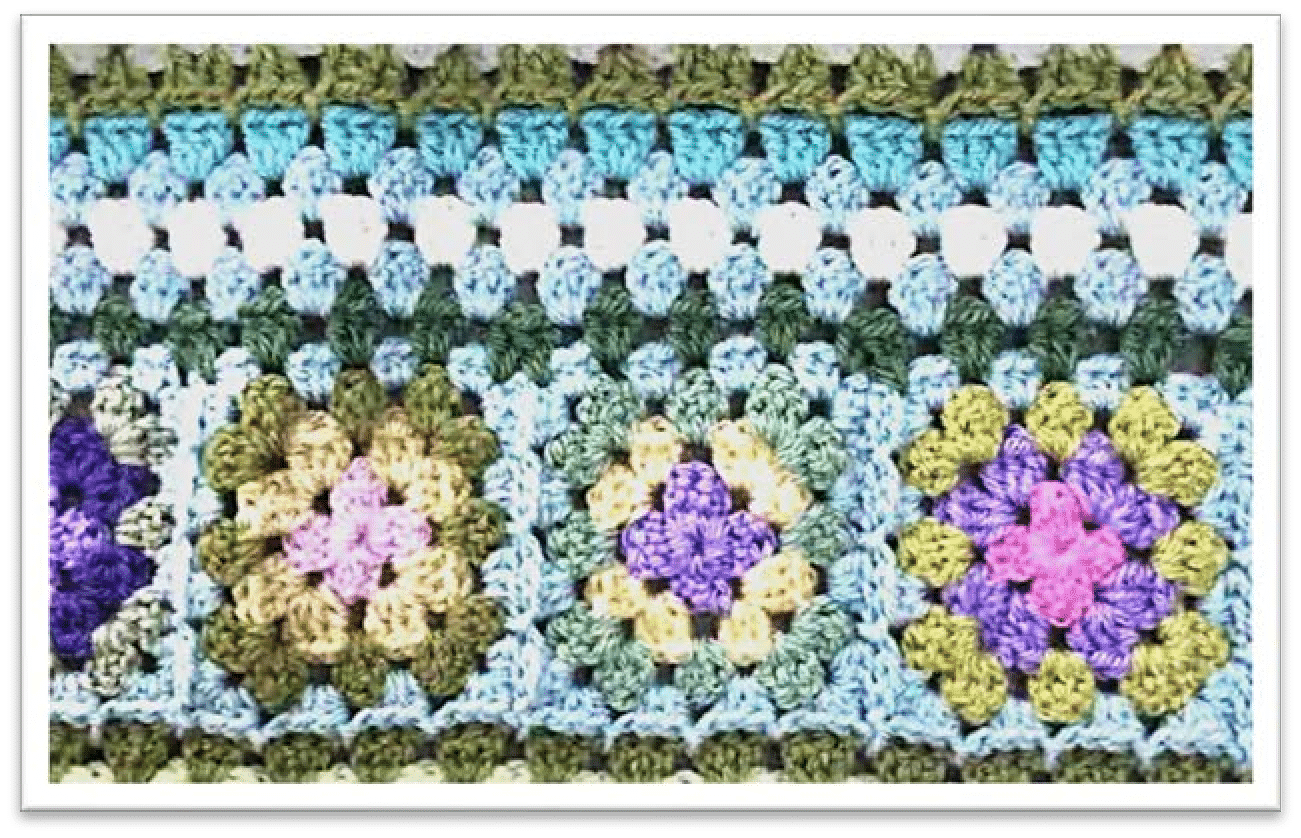
| MAY BLOSSOM BLANKET | AUTUMN GOLD BLANKET | ||||||
| 1 | SS Saffron | SS Wisteria | SS Sage | 1 | SS Walnut | SSGingerbread | SS Tomato |
| 2 | SS Violet | SS Pomegranate | SS Meadow | 2 | SS Lime | SS Khaki | SS Mocha |
| 3 | SS Saffron | SS Powder Pink | SS Lincoln | 3 | SS Tomato | SS Spice | SS Meadow |
| 4 | SSPomegran | SS Fondant | SS Cypress | 4 | SS Cream | SB Pistachio | SS Lime |
| 5 | SS Violet | SS Powder Pink | SS Aspen | 5 | SB Old Gold | SS Lime | SS Copper |
| 6 | SSButtermilk | SS Fondant | SS Lincoln | 6 | SB Pistachio | SS Khaki | SS Camel |
| 7 | SSPomegran | SS Buttermilk | SS Sage | 7 | SS Copper | SS Buttermilk | SS Lime |
| 8 | SS Fondant | SS Wisteria | SS Pistachio | 8 | SS Spice | SSGingerbread | SB Old Gold |
| 9 | SS Wisteria | SS Saffron | SS Lincoln | 9 | SS Walnut | SS Mustard | SS Tomato |
| 10 | SS Powder P | SS Buttermilk | SS Meadow | 10 | SS Copper | SSGingerbread | SS Khaki |
| 11 | SS Wisteria | SS Violet | SS Lincoln | 11 | SS Lime | SS Buttermilk | SS Mocha |
| 12 | SS Saffron | SS Pomegranate | SS Pistachio | 12 | SB Pistachio | SS Spice | SS Copper |
| 13 | SS Fondant | SS Saffron | SS Aspen | 13 | SS Mocha | SS Meadow | SS Buttermilk |
| 14 | SS Powder P | SS Violet | SS Cypress | 14 | SS Tomato | SS Buttermilk | SS Khaki |
Once the Strip is made, attach it to the blanket in the usual way with SS Cypress for the May Blossom blanket, and
KC Basil for the Autumn Gold blanket.
Nine rows of Granny Stripe next –
| MAY BLOSSOM BLANKET | AUTUMN GOLD BLANKET | ||
| 1 | SS Cypress | 1 | SS Khaki |
| 2 | SS Duck Egg | 2 | KC Basil |
| 3 | SS Duck Egg | 3 | KC Basil |
| 4 | SS Cream | 4 | SS Buttermilk |
| 5 | SS Duck Egg | 5 | KC Basil |
| 6 | SS Duck Egg | 6 | KC Basil |
| 7 | SS Aspen | 7 | SS Copper |
| 8 | SS Duck Egg | 8 | KC Basil |
| 9 | SS Duck Egg | 9 | KC Basil |
STRIP SEVEN – Mini Grannies
Another Strip made up of ‘Mini Grannies’. These are little squares which are half the size of the regular granny squares, being made up of just two rounds – the first, centre round plus the second, joining round.
As this is a CJAYG strip joined with one colour, you should make up the little centres first. There are twenty-eight of them.
The joining colour for the May Blossom blanket is SS CREAM and for the Autumn Gold blanket, SB BISCUIT.
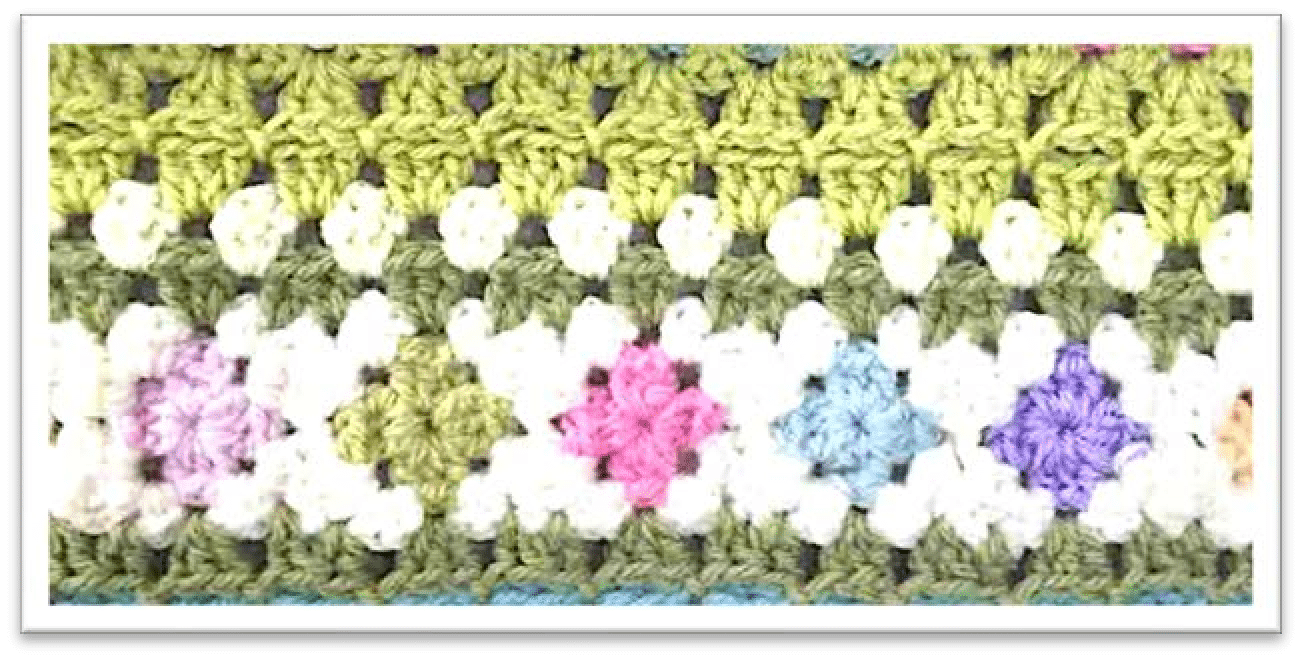
| MAY BLOSSOM | AUTUMN GOLD | ||
| 1 | SS Saffron | 1 | SS Meadow |
| 2 | SS Cloud Blue | 2 | SS Mustard |
| 3 | SS Powder Pink | 3 | SS Copper |
| 4 | SS Wisteria | 4 | SS Mocha |
| 5 | SS Buttermilk | 5 | SS Cream |
| 6 | SS Fondant | 6 | SS Lime |
| 7 | SS Pistachio | 7 | SS Khaki |
| 8 | SS Cloud Blue | 8 | SS Mustard |
| 9 | SS Saffron | 9 | SS Mocha |
| 10 | SS Fondant | 10 | SS Copper |
| 11 | SS Wisteria | 11 | SS Meadow |
| 12 | SS Buttermilk | 12 | SS Cream |
| 13 | SS Powder Pink | 13 | SS Lime |
| 14 | SS Pistachio | 14 | SS Khaki |
| 15 | SS Saffron | 15 | SS Mustard |
| 16 | SS Wisteria | 16 | SS Mocha |
| 17 | SS Cloud Blue | 17 | SS Meadow |
| 18 | SS Fondant | 18 | Ss Cream |
| 19 | SS Pistachio | 19 | SS Copper |
| 20 | SS Powder Pink | 20 | SS Lime |
| 21 | SS Buttermilk | 21 | SS Khaki |
| 22 | SS Wisteria | 22 | SS Mustard |
| 23 | SS Pistachio | 23 | SS Cream |
| 24 | SS Cloud Blue | 24 | SS Mocha |
| 25 | SS Powder Pink | 25 | SS Copper |
| 26 | SS Buttermilk | 26 | SS Khaki |
| 27 | SS Fondant | 27 | SS Meadow |
| 28 | SS Saffron | 28 | SS Lime |
Once the Strip is made, attach it to the blanket with SS Meadow for the May Blossom blanket and SB Biscuit for the Autumn Gold blanket.
You know what’s coming next – more Granny Stripes, this time just five rows.
| MAY BLOSSOM BLANKET | AUTUMN GOLD BLANKET | ||
| 1 | SS Meadow | 1 | SB Biscuit |
| 2 | SS Lemon | 2 | SS Cream |
| 3 | SS Meadow | 3 | SB Biscuit |
| 4 | SS Pistachio | 4 | SS Mocha |
| 5 | SS Meadow | 5 | SB Biscuit |
STRIP EIGHT – Multicoloured Granny Squares
Make up the Granny Squares as far as Round Three and store them on your knitting needle with number 14, first and with the third round, reverse side up.
The join is the Continuous JAYG in SS PISTACHIO for the May Blossom blanket and SB Biscuit for the Autumn Gold blanket.
The colours for each square are as follows –
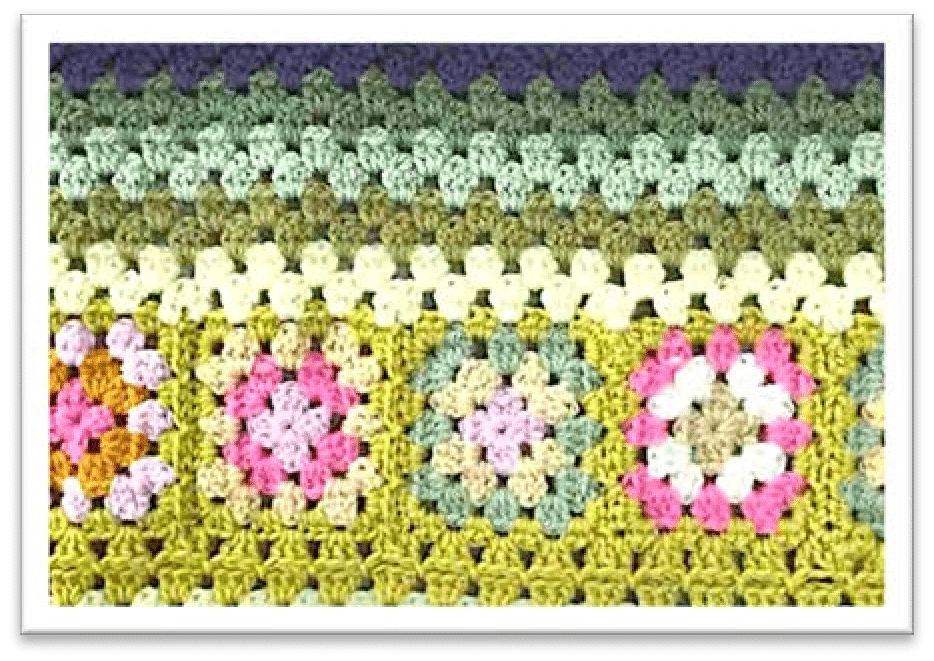
| MAY BLOSSOM BLANKET | AUTUMN GOLD BLANKET | ||||||
| 1 | SS Cream | SS Powder Pink | SS Saffron | 1 | KC Basil | SS Mocha | SS Cream |
| 2 | SS Lincoln | SS Buttermilk | SS Mustard | 2 | SS Pistachio | SS Cream | SS Lime |
| 3 | SS Mustard | SS Saffron | SS Cream | 3 | SS Mocha | SB Old Gold | KC Basil |
| 4 | SS Lincoln | SS Powder Pink | SS Fondant | 4 | SB Old Gold | SS Lime | SS Camel |
| 5 | SS Mustard | SS Cream | SS Buttermilk | 5 | SS Buttermilk | SS Mocha | SS Pistachio |
| 6 | SS Cream | SS Saffron | SS Sage | 6 | SS Pistachio | SS Cream | SS Mustard |
| 7 | SSButtermilk | SS Cream | SS Fondant | 7 | SS Camel | SS Meadow | SS Cream |
| 8 | SS Powder P | SS Buttermilk | SS Sage | 8 | SB Old Gold | SSGingerbread | SS Pistachio |
| 9 | SS Cream | SS Fondant | SS Buttermilk | 9 | SS Pistachio | SS Cream | SS Mustard |
| 10 | SS Fondant | SS Mustard | SS Powder P | 10 | SS Lime | SS Meadow | SS Buttermilk |
| 11 | SS Saffron | SS Sage | SS Mustard | 11 | SS Mocha | SS Pistachio | SS Mustard |
| 12 | SSButtermilk | SS Fondant | SS Cream | 12 | SS Camel | SS Buttermilk | SSGingerbread |
| 13 | SS Fondant | SS Sage | SS Saffron | 13 | SS Lime | SS Pistachio | SS Cream |
| 14 | SS Saffron | SS Mustard | SS Powder P | 14 | SS Buttermilk | SS Mustard | SS Lime |
The Strip will be attached to the blanket in SS PISTACHIO for the May Blossom blanket, and SB BISCUIT.
No prizes for guessing what comes next. You got it – Granny Stripes! There are nine rows of them this time.
| MAY BLOSSOM BLANKET | AUTUMN GOLD BLANKET | ||
| 1 | SS Lemon | 1 | SS Buttermilk |
| 2 | SS Lemon | 2 | SS Buttermilk |
| 3 | SS Meadow | 3 | SS Camel |
| 4 | SS Meadow | 4 | SS Camel |
| 5 | SS Lincoln | 5 | SS Mocha |
| 6 | SS Lincoln | 6 | SS Mocha |
| 7 | SS Cypress | 7 | SS Gingerbread |
| 8 | SS Cypress | 8 | SS Gingerbread |
| 9 | SS Violet | 9 | SS Cream |
Strip Nine – Two Colour Granny Squares
This is the same as Strip One. It’s a Basic Granny Square in just two colours, and each square is joined separately with Simple JAYG which is the same colour as the Rounds Two and Three of each square.
The difference with Strip One is that this one uses an altogether deeper set of colours to provide a good contrast.
The Colour Chart is on the following page –
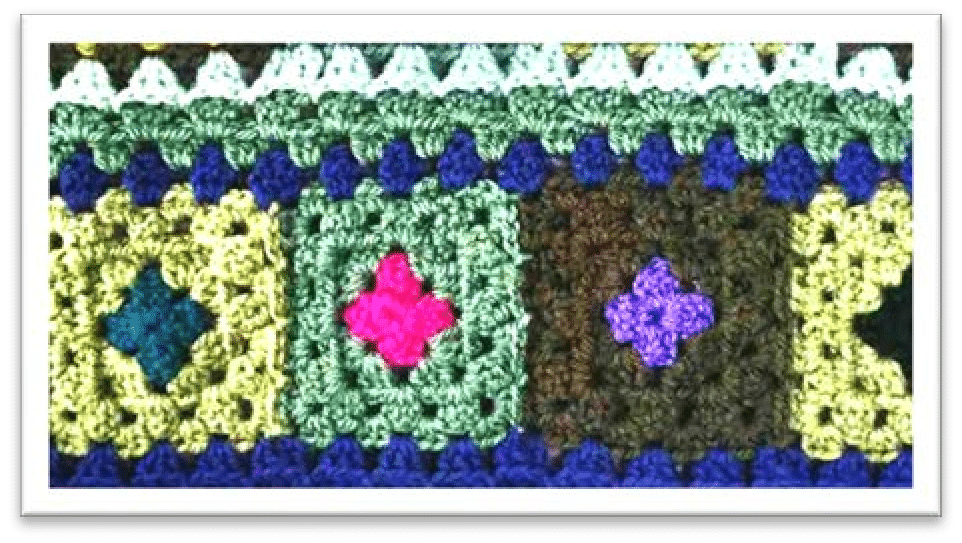
| MAY BLOSSOM BLANKET | AUTUMN GOLD BLANKET | ||||
| 1 | SS Violet | SS Cypress | 1 | SS Spice | SS Mocha |
| 2 | SS Pomegranate | SS Meadow | 2 | SS Buttermilk | SS Lime |
| 3 | SS Sage | SS Khaki | 3 | KC Basil | SS Camel |
| 4 | SS Storm Blue | SS Cypress | 4 | SS Tomato | SB Biscuit |
| 5 | SS Violet | SS Meadow | 5 | SS Mocha | SS Buttermilk |
| 6 | SS Pomegranate | SS Khaki | 6 | SS Copper | KC Basil |
| 7 | SS Sage | SS Cypress | 7 | KC Basil | SS Mocha |
| 8 | SS Storm Blue | SS Meadow | 8 | SS Meadow | SS Spice |
| 9 | SS Violet | SS Khaki | 9 | SS Buttermilk | SS Meadow |
| 10 | SS Pomegranate | SS Cypress | 10 | SS Tomato | SB Biscuit |
| 11 | SS Sage | SS Meadow | 11 | SB Pistachio | SS Buttermilk |
| 12 | SS Storm Blue | SS Khaki | 12 | SB Biscuit | SS Lime |
| 13 | SS Violet | SS Cypress | 13 | SS Copper | KC Basil |
| 14 | SS Pomegranate | SS Meadow | 14 | SS Buttermilk | SS Spice |
The colour for attaching this Strip to the blanket is SS Violet for the May Blossom blanket and SS Gingerbread for the Autumn Gold blanket.
The next set of Granny Stripes are –
| MAY BLOSSOM BLANKET | AUTUMN GOLD BLANKET | ||
| 1 | SS Violet | 1 | SS Tomato |
| 2 | SS Cypress | 2 | SS Walnut |
| 3 | SS Cypress | 3 | SS Walnut |
Strip Ten – More Basic Granny Squares
These fourteen granny squares have four different colours for each one this time, and are joined with Simple JAYG, allowing the fourth (joining round) to be a different colour for each one
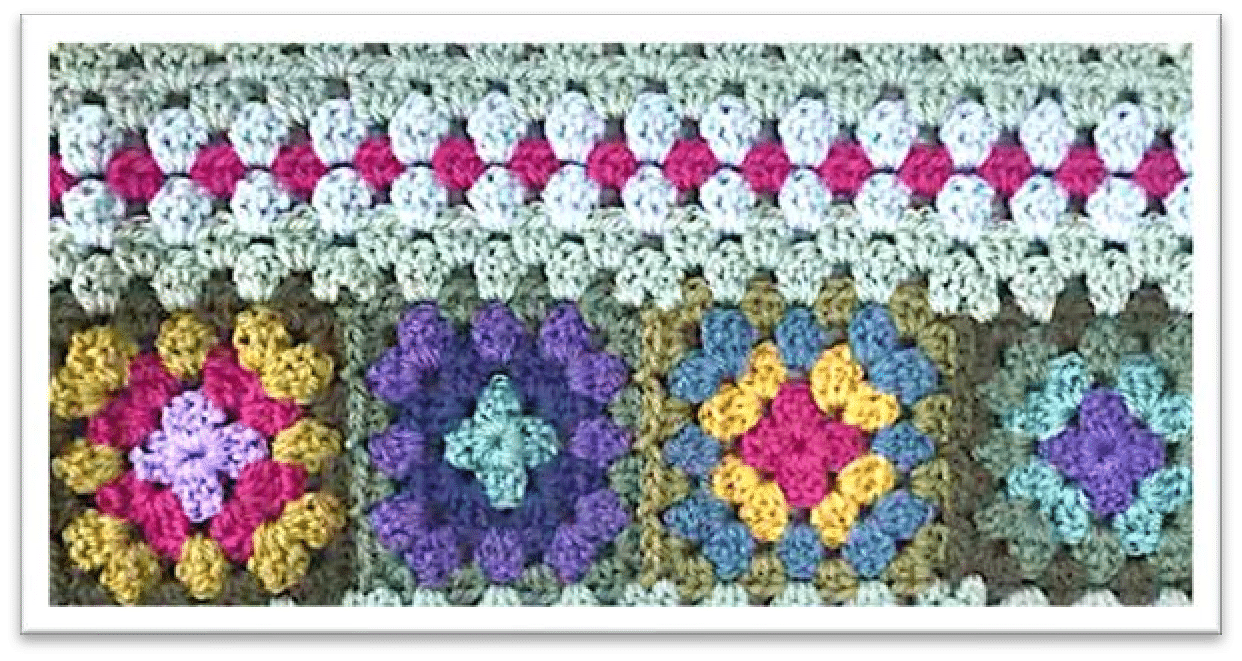
| MAY BLOSSOM BLANKET | JAYG Colour | |||
| 1 | SS Cypress | SS Pomegranate | SS Sage | SS Cypress |
| 2 | SS Sage | SS Mustard | SS Meadow | SS Khaki |
| 3 | SS Pomegranate | SS Wisteria | SS Violet | SS Meadow |
| 4 | SS Mustard | SS Violet | SS Sage | SS Cypress |
| 5 | SS Wisteria | SS Storm Blue | SS Meadow | SS Khaki |
| 6 | SS Sage | SS Pomegranate | SS Lime | SS Meadow |
| 7 | SS Mustard | SS Violet | SS Storm Blue | SS Cypress |
| 8 | SS Violet | SS Sage | SS Cypress | SS Khaki |
| 9 | SS Pomegranate | SS Mustard | SS Sage | SS Meadow |
| 10 | SS Sage | SS Storm Blue | SS Violet | SS Cypress |
| 11 | SS Wisteria | SS Pomegranate | SS Lime | SS Khaki |
| 12 | SS Mustard | SS Sage | SS Storm Blue | SS Meadow |
| 13 | SS Pomegranate | SS Violet | SS Meadow | SS Cypress |
| 14 | SS Lime | SS Wisteria | SS Sage | SS Khaki |
| AUTUMN GOLD BLANKET | JAYG Colour | |||
| 1 | SB Old Gold | KC Basil | SS Mocha | SS Gingerbread |
| 2 | SS Copper | SS Lime | SB Old Gold | SS Walnut |
| 3 | SS Gingerbread | SS Walnut | SS Lime | SB Old Gold |
| 4 | SB Old Gold | SS Tomato | SS Spice | SS Lime |
| 5 | SS Meadow | SS Mocha | SS Gingerbread | SS Copper |
| 6 | SS Copper | SS Mustard | KC Basil | SS Khaki |
| 7 | SB Old Gold | SS Copper | SS Lime | SS Mocha |
| 8 | SS Gingerbread | SS Meadow | SS Mustard | KC Basil |
| 9 | KC Basil | SS Lime | SS Mocha | SS Walnut |
| 10 | SS Walnut | SS Tomato | SS Camel | SS Gingerbread |
| 11 | SS Camel | SB Pistachio | SS Copper | SS Meadow |
| 12 | SB Pistachio | SS Mustard | SS Tomato | SS Camel |
| 13 | SS Mustard | SS Meadow | SB Pistachio | SS Khaki |
| 14 | SS Mocha | SS Copper | KC Basil | SS Lime |
Once the strips are made, the colour to attach them to the blanket is SS LINCOLN for the May Blossom blanket, and
SS Gingerbread for the Autumn Gold blanket. The next set of seven Granny Stripes are –
| MAY BLOSSOM BLANKET | AUTUMN GOLD BLANKET | ||
| 1 | SS Pistachio | 1 | SS Camel |
| 2 | SS Pistachio | 2 | SS Camel |
| 3 | SS Duck Egg | 3 | SS Meadow |
| 4 | SS Pomegranate | 4 | SS Violet |
| 5 | SS Duck Egg | 5 | SS Meadow |
| 6 | SS Pistachio | 6 | SS Camel |
| 7 | SS Pistachio | 7 | SS Camel |
Strip Eleven – Basic Granny Squares
You can see from the image on the left that we are ringing the changes again, and this time the squares all have the same colour for the third round. The join is CJAYG, since each square is edged in the same colour.
The CJAYG colour for the May Blossom Blanket is SS PISTACHIO, and for the Autumn Gold blanket it’s SS GINGERBREAD.
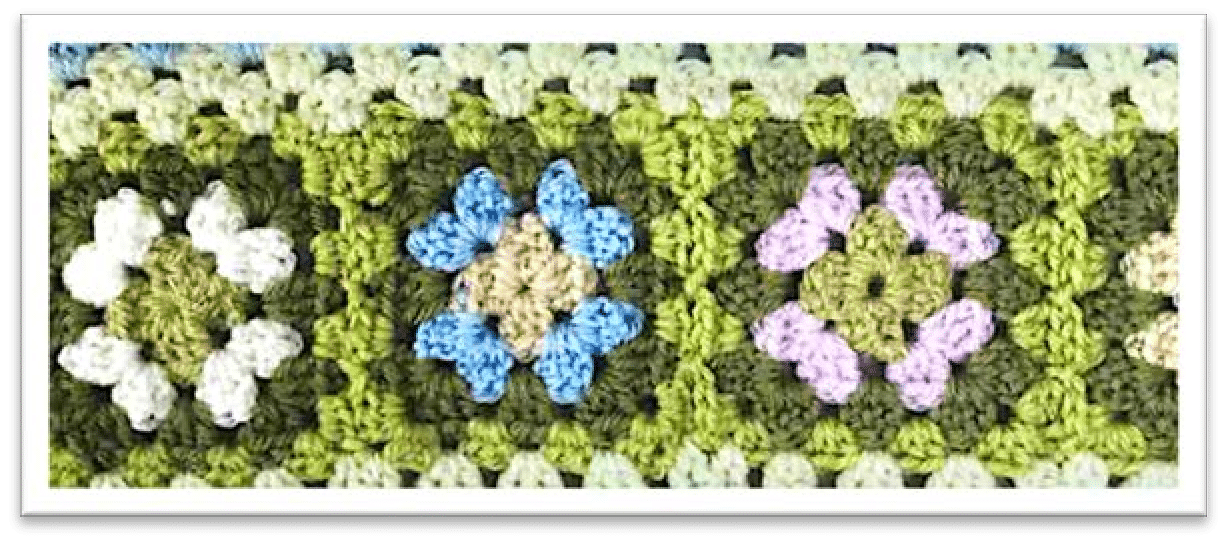
| MAY BLOSSOM BLANKET | AUTUMN GOLD BLANKET | ||||||
| 1 | SS Cream | SS Duck Egg | SS Meadow | 1 | SS Cream | SS Camel | SS Lime |
| 2 | SS Duck Egg | SS Buttermilk | SS Meadow | 2 | SS Buttermilk | SS Pistachio | SS Lime |
| 3 | SS Powder P | SS Cloud Blue | SS Meadow | 3 | SB Biscuit | SS Mustard | SS Lime |
| 4 | SS Lincoln | SS Aspen | SS Meadow | 4 | KC Basil | SS Mocha | SS Lime |
| 5 | SS Cream | SS Powder Pink | SS Meadow | 5 | SS Pistachio | SS Cream | SS Lime |
| 6 | SSButtermilk | SS Pistachio | SS Meadow | 6 | SS Mocha | KC Basil | SS Lime |
| 7 | SS Aspen | SS Cream | SS Meadow | 7 | SS Mustard | SB Biscuit | SS Lime |
| 8 | SS Duck Egg | SS Buttermilk | SS Meadow | 8 | SS Camel | SS Buttermilk | SS Lime |
| 9 | SS Pistachio | SS Powder Pink | SS Meadow | 9 | SS Cream | SS Pistachio | SS Lime |
| 10 | SSButtermilk | SS Cloud Blue | SS Meadow | 10 | SS Buttermilk | SS Mocha | SS Lime |
| 11 | SS Cream | SS Lincoln | SS Meadow | 11 | SS Pistachio | KC Basil | SS Lime |
| 12 | SS Powder P | SS Duck Egg | SS Meadow | 12 | SS Camel | SS Cream | SS Lime |
| 13 | SS Lincoln | SS Pistachio | SS Meadow | 13 | SS Mustard | SS Pistachio | SS Lime |
| 14 | SSCloudBlue | SS Duck Egg | SS Meadow | 14 | SB Biscuit | SS Camel | SS Lime |
The colour for the Granny Clusters to attach the Strip to the blanket is SS LEMON for the May Blossom blanket and
SB BISCUIT for the Autumn Gold blanket.
Just three rows of Granny Stripes next –
| MAY BLOSSOM BLANKET | AUTUMN GOLD BLANKET | ||
| 1 | SS Lemon | 1 | SB Biscuit |
| 2 | SS Lemon | 2 | SB Biscuit |
| 3 | SS Duck Egg | 3 | SS Mustard |
STRIP TWELVE – Final Strip of Mini Grannies
This is the last Strip of the blanket before the last few rows of Granny Stripes. It is made up of twenty-eight Mini Granny Squares as you’ve done before.
This time, four colours are used for the centre rounds, and are repeated six times along the row.
So, you will be making six each of the following colours –
Once they are made, turn them all to the reverse before joining.
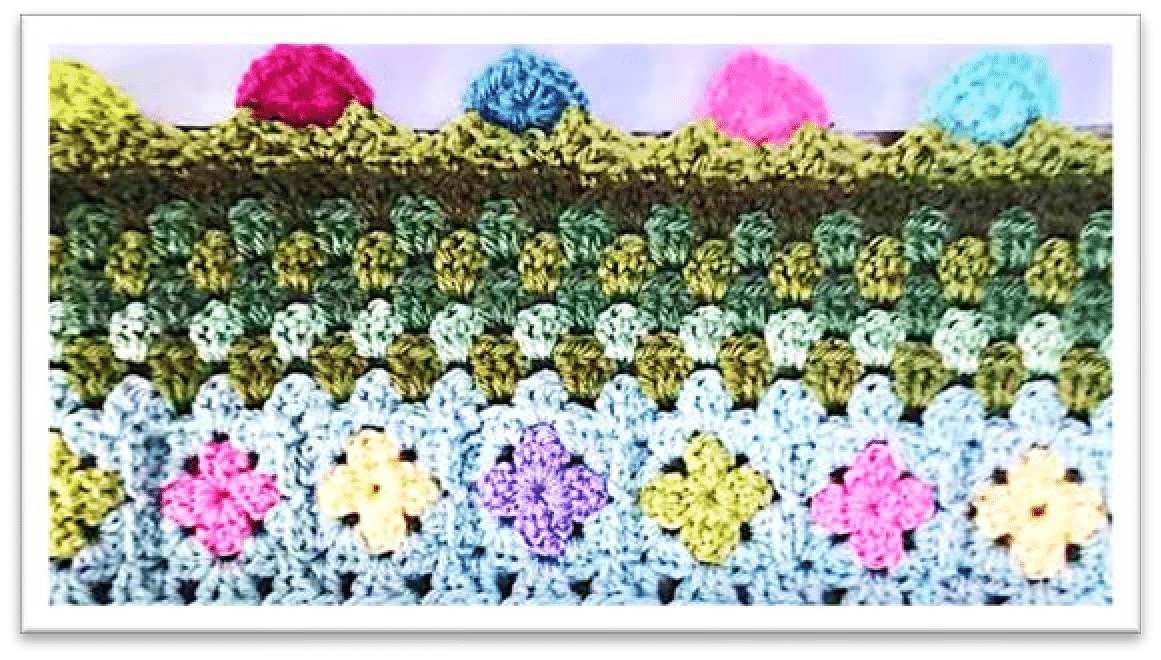
| MAY BLOSSOM | AUTUMN GOLD | ||
| 1 | SS Fondant | 1 | SS Copper |
| 2 | SS Pistachio | 2 | SS Cream |
| 3 | SS Wisteria | 3 | SS Khaki |
| 4 | SS Saffron | 4 | SS Tomato |
They are joined with CJAYG in SS Duck Egg for the May Blossom blanket, and SS Camel for the Autumn Gold blanket. And then of course the Strip will need to be attached to the blanket with SS Duck Egg for the May Blossom blanket and
SS Camel for the Autumn Gold blanket.
Now you are on to the very last section of Granny Stripes.
| MAY BLOSSOM BLANKET | AUTUMN GOLD BLANKET | ||
| 1 | SS Duck Egg | 1 | SB Biscuit |
| 2 | SS Meadow | 2 | SS Cream |
| 3 | SS Duck Egg | 3 | SB Biscuit |
| 4 | SS Cypress | 4 | KC Basil |
| 5 | SS Meadow | 5 | SS Mocha |
| 6 | SS Cypress | 6 | KC Basil |
| 7 | SS Khaki | 7 | SS walnut |
And yay – you’ve reached the other end of the blanket!
I really, really hope you’ve been good and made sure that your ends were all neatly sewn in as you went along, except of course for the ends down the side edges as they will be hidden in the envelope border.
If you haven’t been good, well, see you back here in a while once the job’s done!! For all the good girls and boys though, it’s now time to make the border.
THE BORDER for the LONG SIDES
Please read through this page before you start.
The two long sides are to be worked first. I’ve used SS MEADOW for the May Blossom blanket, and SS GINGERBREAD
for the Autumn Gold blanket. You will need practically a full ball for this, so make sure you have enough.
Attach the yarn in a corner of the right side of the blanket, and CH1. DC1 into the base of the CH1, and then DC1 into each stitch all the way along the side.
This first row is the trickiest, especially where you come upon the sections of Granny Stripes where it’s not particularly easy to see where to put your hook.
A rule of thumb is to try to put in approx five DC stitches for every inch along the side. It’s easy when you are working along the side of one of the Granny Square Strips, and if you can keep that even spacing when you’re working along the side of the Granny Stripes, the border will stay nice and flat.
Problems can arise if you put in too many stitches as the border will start to become rippled
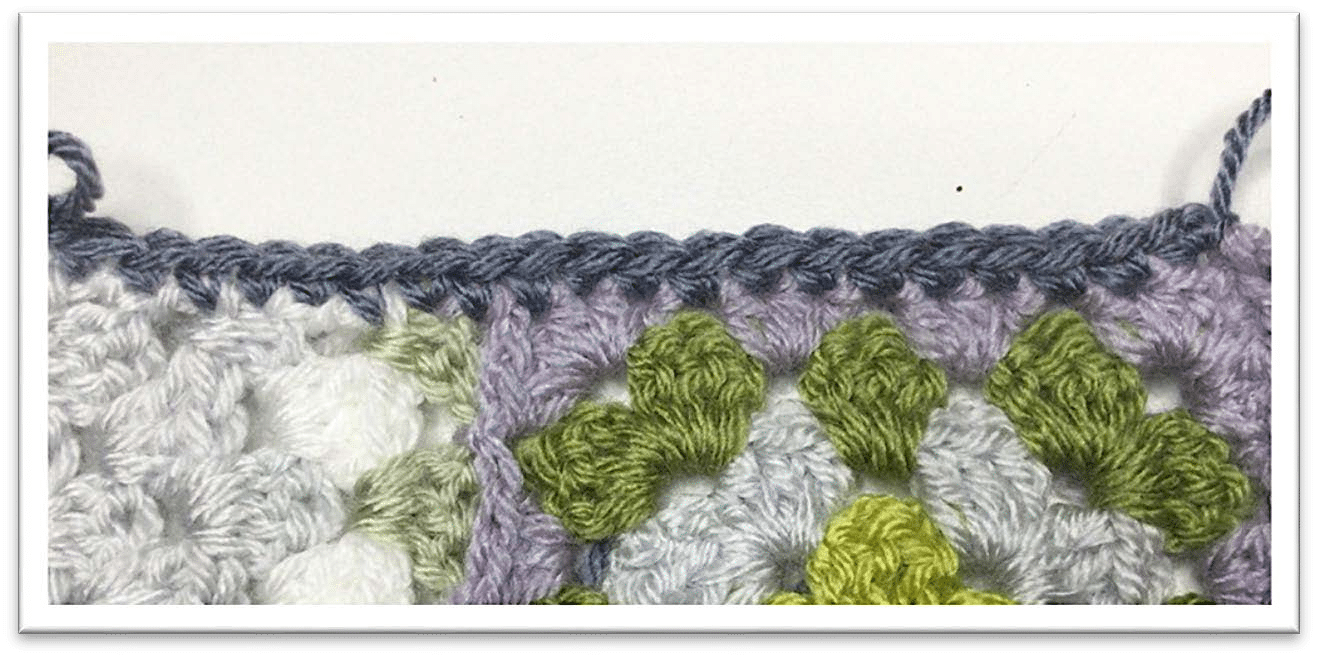
Try to avoid working into those big spaces in the Granny Stripes as that will make your DC too big. I counted approx. 272 stitches in this first row. It doesn’t matter if you are a stitch or two different.
Tip –
Fold the blanket in half to find the midway of the long side. Put a stitch marker in each side at this halfway point. Now fold it from the top edge to the middle and put a stitch marker into the crease on each side. Do the same for the other end, and you will have the long sides sectioned off into quarters. By dividing 272 by four, you will be aiming to have approx. 68 DC stitches in each quarter.
When you reach the end of the first row, CH1 and turn. DC1 in the stitch at the base of the CH1, then DC1 in each stitch along the side. This second, and the subsequent rows, although a bit of a slog, are much easier to work.
Work 8 rows in total, importantly making sure that all those straggly ends at the sides are kept behind the border as you crochet.
Work the other long side in the same way.
Now you can trim all those ends down to approx. 3cms.
Fold the border neatly in half to the back, trapping the ends safely inside. Thread a length of border yarn on to your needle and sew the border down at the back with a neat hem stitch. Try to keep your hem stitches quite even, although they do obligingly sink into the crochet and disappear.
The TOP and BOTTOM BORDERS
This is an adaptation of a pretty triangle border by Tamara Kelly, which I found on Google.
I changed it slightly to incorporate the crochet ‘buttons’. They’re not really buttons of course. I just like to call them that.
They are in fact just the first round of a granny square (like the Mini Grannies).
You will need 22 buttons for each side. I made 3 each of six colours, and 4 each of two more. You can pick any of the yarns you have left over, and I’ll leave it up to you.
The colour for the triangular base of the border is SS Meadow for the May Blossom
blanket, and SS Gingerbread for the Autumn Gold blanket.
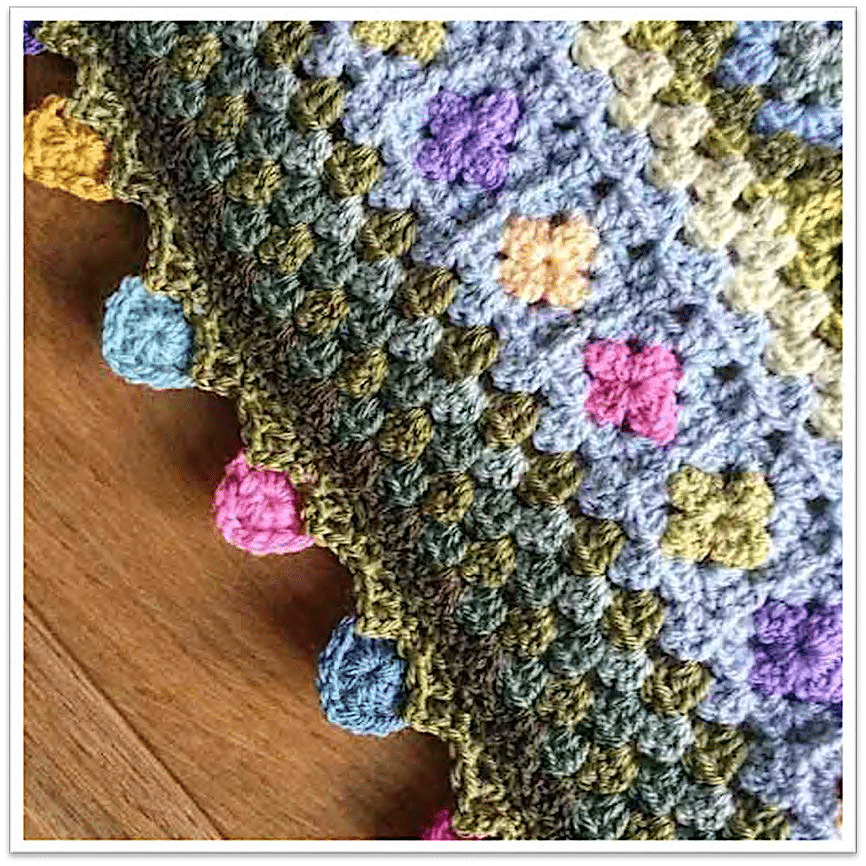
To start the border, work a row of Double Crochet along the edge. This will firm up the edge and make a neat foundation for the rest of the border.
ROW 1 – With the right side of the blanket uppermost, CH1 into the top of the first stitch, DC1 in the same stitch, then make 3 more DC stitches along the top of the doubled over border.
This is a little tricky as you will be having to force your hook into a quite dense double fabric, but it’s worth it.
Continue all the way along the edge, with DC1 in each stitch and working another 4 along the top of the doubled over border once you reach the end. Fasten off.
Now make the triangular border, with the same colour, as follows –
ROW 2 – CH1, DC1 into the same stitch. * Skip 2 stitches, TR2 into 3rd stitch. Pick up the first button and SL ST into one of its corner spaces. Now work 2DC around the post of the 2nd Treble. DC1 into next stitch, SL ST into the next corner of the button, DC1 in same stitch. Skip 2 stitches. (The post is the long part of the stitch rather than the top).
TR2 in 3rd stitch along. SL ST into the 3rd corner of the button (the button will now be anchored on three sides and will be sitting neatly between the triangles, forming a diamond shape), DC2 around the post of the 2nd Treble and finally DC2 in the next stitch. Repeat from * along to the end.
Once you have completed one end of the blanket, do the same for the other end.
And there you are. Your Green Shoots Blanket is complete. Check over the whole blanket for any ends which have still to be sewn in, including those on the scalloped edge, remove any stitch markers and you are ready to freshen it up with a pamper wash.
These yarns are all easily machine washable, so you can pop your blanket into the washing machine. I use a standard laundry pod and some fabric conditioner and set it to a minimum cool wash. On my machine, that is 30 degrees for 15 minutes and I set a spin speed of 1000rpm. It comes out only slightly damp. I then lay it out on my spare bed, on top of a large sheet or blanket. It won’t need to be blocked, but you can pull out any parts here and there which could be stretched slightly into shape. Take a few minutes to make sure the triangle button edging is tweaked a little to show itself off. Then just leave it overnight to dry. I hope you have enjoyed making this blanket.