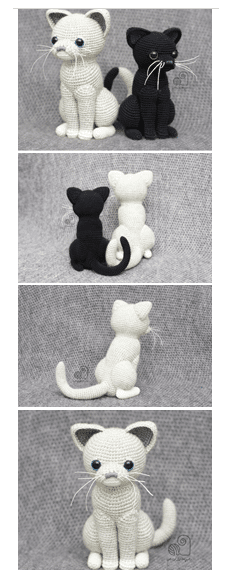
In this pattern you will find detailed instructions and variety of pictures explaining how to make this toy. If you have any questions, you can always contact me. I will do my best to help you.
Height of the finished toy is about 15 – 17 cm (5.9 – 6.7 inch) if using indicated yarn and hook.
Materials you will need to make this toy:
- DK (3 or light worsted) weight 100% cotton yarn in colours gray, dark gray and white
- The exact weight of the yarn is 260m in 100g ball (3,53Oz – 274 yds)
- White lace weight crochet thread
- 2.5 mm (B-1) crochet hook
- Fiberfill for stuffing
- Sewing needle and scissors
- 12 mm safety eyes
- Yarn needle
- 1.2 mm galvanized wire (I needed about 20 cm. Other types of wire would also work.)
- Tape
- Pliers
- Pins and stitch markers
- Yarn stiffener or cornstarch
Abbreviations used on the pattern:
- st – stitch
- sl – slip stitch
- ch – chain
- sc – single crochet
- hdc – half double crochet
- dc – double crochet
- inc – increase (2 single crochets in one stitch)
- dec – invisible decrease (2 stitches together working in front loops only)
- hdcdec – invisible decrease made with hdc stitches
- (..) – repeat between () number of times indicated
- [..] – total number of stitches in the round or row
Crochet in continuous rounds. Do not join, slip stitch or turn unless otherwise stated in the pattern.
Yarn info
DK weight yarn used for the gray cat:
- Scheepjes STONE WASHED Gray – 814
- Scheepjes CATONA Dark gray – 242 White – 105
DK weight yarn used for the black cat:
- Scheepjes CATONA Black – 110
- Dark gray – 242
Changing the yarn colour
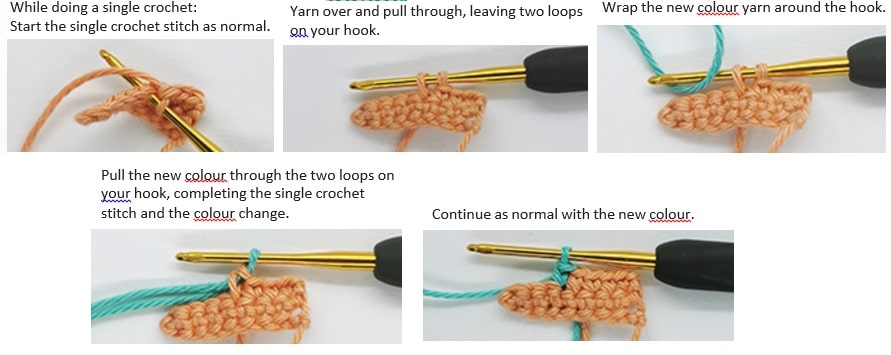
If you need to start a round with a new colour,do these steps on the last stitch of the previous round.
Head

Work in rounds.
Use gray colour yarn.
- 1 – sc 6 in a magic ring [6]
- 2 – (inc) repeat 6 times [12]
- 3 – (sc 1, inc) repeat 6 times [18]
- 4 – (sc 1, inc, sc 1) repeat 6 times [24]
- 5 – (sc 3, inc) repeat 6 times [30]
- 6 – (sc 2, inc, sc 2) repeat 6 times [36]
- 7 – (sc 5, inc) repeat 6 times [42]
- 8 – (sc 3, inc, sc 3) repeat 6 times [48]
- 9 – (sc 7, inc) repeat 6 times [54]
- 10 – (sc 4, inc, sc 4) repeat 6 times [60] 11 – 19 – sc 60 [60]
- 20 – (sc 4, dec, sc 4) repeat 6 times [54]
- 21 – (sc 7, dec) repeat 6 times [48]
- 22 – (sc 3, dec, sc 3) repeat 6 times [42]
Insert safety eyes between rounds 14 and 15 with an interspace of 9 stitches and start stuffing the head.
- 23 – (sc 5, dec) repeat 6 times [36]
- 24 – 25 – sc 36 [36]
- 26 – (sc 5, inc) repeat 6 times [42]
- sl 1, fasten off and leave a long tail for sewing – Finish stuffing the head
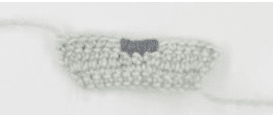
Add the nose:
- Take a strand of dark gray yarn and a yarn needle. Embroider the nose around the 4 stitches in the middle of the last round as shown in the picture below.
Snout
Start around a foundation chain and work in rounds.
Use white colour yarn.
Leave a yarn tail at the beginning
- 1 – ch 6 [6]
- 2 – Start in second ch from hook: inc, sc 3, 4 sc in next st, continue on the opposite side of the foundation chain, sc 3, inc [14]
- 3 – (inc) repeat 2 times, sc 3, (inc) repeat 4 times, sc 3, (inc) repeat 2 times [22]
Take a yarn needle and weave the starting yarn tail through the foundation chain to hide the stitch gaps.
- 4 – 5 – sc 22 [22]
- 6 – hdc 1, 2 hdc in next st, dc 8, 2 hdc in next st,hdc 1, sc 1, leave the remaining stitches unworked [15]
Fasten off and leave a tail for sewing.

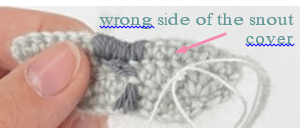
Snout cover
Work in rows.
Use gray colour yarn.
- 1 – ch 13 [13]
- 2 – Start in second ch from hook: sc 12 [12] 3 – ch 1, turn, sc 12 [12]
- 4 – ch 2, turn, 3 dc in first st, dc 3, hdc 1, sc 2, hdc 1, dc 3, 3 dc in last st [16]
- 5 – ch 1, turn, sc 7, sl 2, sc 7 [16] Fasten off and leave a tail for sewing.
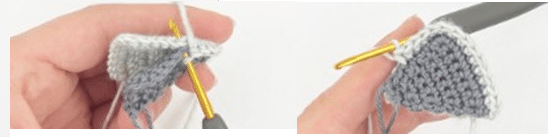
Add the whiskers:
- Prepare 4 strands of white lace weight thread with a length of about 15 cm.
- Attach 2 strands on each side of the snout cover by tying them up to the wrong side.
- Going through different stitch holes, pull each strand to the right side of the snout cover.
Ears (make 2)
Inner part
Work in rows.
Use dark gray colour yarn.
- 1 – ch 2 [2]
- 2 – Start in 2nd ch from hook: inc [2]
- 3 – ch 1, turn, sc 1, inc [3]
- 4 – ch 1, turn, sc 2, inc [4]
- 5 – ch 1, turn, sc 3, inc [5]
- 6 – ch 1, turn, sc 4, inc [6]
- 7 – ch 1, turn, sc 5, inc [7]
- 8 – ch 1, turn, sc 6, inc [8]
- 9 – ch 1, turn, sc 7, 3 sc in last st, continue on the side: sc 7 [17]
- Fasten off.
Outer part
Work in rows.
Use gray colour yarn.
- 1 – 9. repeat rows 1 – 9 of inner part, but do not fasten off.
Join both parts together:
- 10 – ch 1, turn, place the inner part on the outer part right side up and crochet through both parts: inc, sc 15, inc [19]
- 11 – ch 1, turn, sc 19 [19]
Fasten off and leave a tail for sewing. Take a yarn needle and close the open side using the remaining yarn tail.
Eyelids (make 2)
Use gray colour yarn.
ch 5, fasten off and leave a yarn tail for sewing.
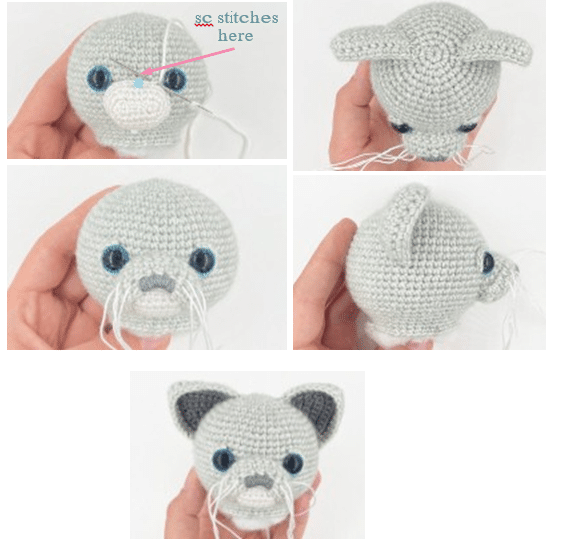
Assemble the head :
- Place the snout between the safety eyes. Sc stitches should appear on the upper side and dc stitches on the lower side of the snout. Pin it in place and sew around using the remaining yarn tail. Stuff firmly before closing.
- Place the eyelids around the eyes like shown in the scheme below and attach them using the remaining yarn tails.
- Place the snout cover on the upper part of the snout, pin it in place and sew around using the remaining yarn tail.
- Place the ears on the sides of the head. The upper edges of the ears should appear on round 4, while the lower edges should appear on round 14. Pin the ears in place and sew them using the remaining yarn tails.
Body

Work in rounds.
Use gray colour yarn.
- 1 – sc 6 in a magic ring [6]
- 2 – (inc) repeat 6 times [12]
- 3 – (sc 1, inc) repeat 6 times [18]
- 4 – (sc 1, inc, sc 1) repeat 6 times [24]
- 5 – (sc 3, inc) repeat 6 times [30]
- 6 – (sc 2, inc, sc 2) repeat 6 times [36]
- 7 – (sc 5, inc) repeat 6 times [42]
- 8 – (sc 3, inc, sc 3) repeat 6 times [48] 9 – 15. sc 48 [48]
- 16 – hdc 18, sc 30 [48]
- 17 – sc 1, hdc 16, sc 1, (sc 4, dec, sc 4) repeat 3 times [45]
- 18 – sc 2, hdc 14, sc 2, (sc 6, dec, sc 1) repeat 3 times [42]
- 19 – sc 3, hdc 12, sc 3, (sc 2, dec, sc 4) repeat 3 times [39]
- 20 – sc 4, hdc 10, sc 4, (sc 4, dec, sc 1) repeat 3 times [36]
- 21 – hdc 18, sc 18 [36]
- 22 – sc 28, mark the side of the last stitch with a stitch marker, sc 8 [36]
- 23 – 37. sc 36 [36]
- 38 – (sc 2, dec, sc 2) repeat 6 times [30]
- 39 – (sc 3, dec) repeat 6 times [24]
- 40 – (sc 1, dec, sc 1) repeat 6 times [18] Stuff the body firmly.
- 41 – (sc 1, dec) repeat 6 times [12]
- 42 – (dec) repeat 6 times [6]
Fasten off and weave the remaining yarn tail through the front loops of the last round. Pull tight to close the opening completely and weave in the remaining tail. Take a different colour thread and make a vertical line that goes from the stitch marker to the centre of the magic ring to mark the centre of the belly. This will help you to assemble the cat.
Front legs (make 2)
Work in rounds.
Start with white colour yarn.
- 1 – sc 6 in a magic ring [6]
- 2 – (inc) repeat 6 times [12]
- 3 – (sc 1, inc) repeat 6 times [18] 4. sc 18 [18]
- 5 – sc 3, dec, (hdcdec) repeat 4 times, dec, sc 3 change the yarn colour to gray [12]
- 6 – 7. sc 12 [12]
- 8 – sc 11, inc [13]
- 9 – sc 6, inc, sc 6 [14]
- 10 – sc 13, inc [15]
- 11 – sc 7, inc, sc 7 [16] 12. sc 15, inc [17]
- 13 – sc 8, inc, sc 8 [18] 14 – 17. sc 18 [18]
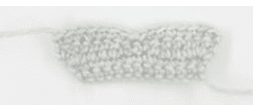
- 18 – sc 16, leave the remaining 2 stitches unworked [16]
Stuff the leg firmly. The following part of the leg does not need stuffing.
- 19 – ch 11, skip 7 stitches, sc 11 [22]
- 20 – Work in ch stitches: sc 11, continue on the leg: sc 11 [22]
- 21 – (sc 5, inc, sc 5) repeat 2 times [24] 22. sc 24 [24]
23 – (sc 1, dec, sc 1) repeat 6 times [18]
24 – (sc 1, dec) repeat 6 times [12]
25 – (dec) repeat 6 times [6]
Fasten off and weave the remaining yarn tail through the front loops of the last round. Pull tight to close the opening completely and leave a remaining tail for sewing. Flatten the upper part of the leg as shown in the picture below.
Hind legs (make 2)
Upper part
Work in rounds.
Start with gray colour yarn.
- 1 – sc 6 in a magic ring [6]
- 2 – (inc) repeat 6 times [12]
- 3 – (sc 1, inc) repeat 6 times [18]
- 4 – (sc 1, inc, sc 1) repeat 6 times [24]
- 5 – (sc 3, inc) repeat 6 times [30]
- 6 – (sc 2, inc, sc 2) repeat 6 times [36]
- 7 – (sc 5, inc) repeat 6 times [42] 8 – 14. sc 42 [42]
- 15 – (sc 5, dec) repeat 6 times [36]
- 16 – (sc 2, dec, sc 2) repeat 6 times [30]
- 17 – (sc 3, dec) repeat 6 times [24]
- 18 – (sc 1, dec, sc 1) repeat 6 times [18]
- 19 – (sc 1, dec) repeat 6 times, change the yarn colour to white [12]
- 20 – sc 3, hdc 2, dc 2, mark the last st with a stitch marker, hdc 2, sc 3 [12]
- sl 1 and fasten off. Leave a yarn tail for sewing. Stuff the leg lightly. It should have some volume but still remain flat.
Foot
Work in rounds.
Use white colour yarn.
- 1 – sc 6 in a magic ring [6]
- 2 – (inc) repeat 6 times [12]
- 3 – (sc 5, inc) repeat 2 times [14] 4 – 17. sc 14 [14]
- 18 – (sc 5, dec) repeat 2 times [12] Stuff the foot firmly.
- 19 – (dec) repeat 6 times [6]
Fasten off and weave the remaining yarn tail through the front loops of the last round. Pull tight to close the opening completely and weave in the remaining end.
Assemble the leg
Place the upper part on the last rounds of the foot. The stitch marker should be facing the heel. Pin it in place and sew around using the remaining yarn tail.
Bend the upper part a little bit towards the front and secure the position with another few stitches.
Tail
Work in rounds.
Use gray colour yarn.
- 1 – sc 6 in a magic ring [6]
- 2 – (sc 1, inc) repeat 3 times [9]
- 3 – (sc 1, inc, sc 1) repeat 3 times [12]
- 4 – (sc 5, inc) repeat 2 times [14] 5 – 9. sc 14 [14]
- 10 – sc 13, inc [15]
- 11 – 15. sc 15 [15]
- 16 – sc 7, inc, sc 7 [16] 17. sc 16 [16]
Take a long piece of wire (I used about 20 cm for the tail, but you might need more if you use a different weight of yarn or another crochet hook size). Bend its end using the pliers and
wrap some tape around the end of the wire.
Insert the wire into the tail and stuff it as you go.
- 18 – 42. sc 16 [16]
- 43 – sc 4, hdc 2, dc 4, hdc 2, sc 4 [16]
Fasten off and leave a tail for sewing. Cut the wire, bend the end using pliers and wrap it with tape.
Assemble the cat
- Place the front legs on the front side of the body next to each other. The centre of the belly (marked line) should be in the middle between them. The upper edges should appear on round 11 of the body. Pin them in place and sew around using the remaining yarn tails. Add some stuffing before closing up the seam if needed.
- Place the hind legs on the sides of the body. Pin them in place and try placing the cat on a flat surface to check if it sits properly. Adjust the position if needed and sew using the gray colour yarn.
- Place the tail on the back side of the body. Dc stitches should appear on the upper side of the cat. Insert the remaining wire end into the body through a stitch hole. Pin the tail in place and sew around using the remaining yarn tail. Add some stuffing before closing the seam if needed
- Place the head on the top of the body. The cat’s snout should be aligned with the centre of the belly. The front edge of the neck should appear on the round 4 of the body. Pin it in place and sew around using the remaining yarn tail.
- Stiffen the whiskers:
- In a small saucepan, combine one tablespoon of cornstarch with six tablespoons of cold water.
- Stir till the cornstarch dissolves.
- Heat over medium heat until it thickens slightly.
- Soak the whiskers in the mixture and shape them as they are drying. You may use a hairdryer or a hair straightener to speed up the drying process.
- Cut the whiskers to the desired length.