I hope you enjoy making it as much as I did! If you have any questions about this pattern, I am happy to assist you.
Finished Approximate Dimensions:
H= 9“ (to the base to the handles)/ W= 12”
What you will need
- Hobby Lobby I Love This Cotton Yarn, worsted weight yarn, 100% cotton
Color options: – Antique cream, I will refer to this color as color (A) - Aubergine, I will refer to this color as color (B)
- Yardage: Yardage: 360 yds total [90 yds (B), 270 yds (A)]
- Crochet hook: 3 mm
- Gauge: 4” square = 17 rows and 18SC
- Fabric: 14” x 20” square
- Tapestry needle: to weave in ends.
- Thread and darning needle: to sew the fabric
Abbreviations
CH: Chain _ ST: Stitch _ SL ST: Slip stitch _ SC: Single crochet _ DC: Double crochet BLO: Back loop only _ YO: Yarn over _ Rnd: Round _ SP: Space _ Rep: Repeat.
Note: Various yarns, even though worsted may change slightly the measurement of this pattern. I suggested that you do a gauge swatch.
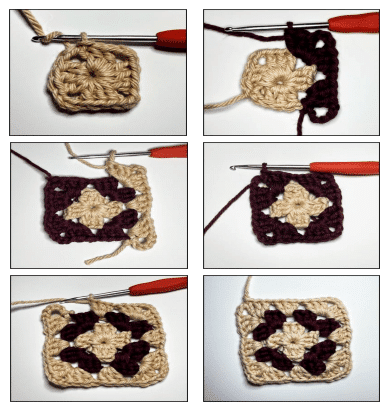
Step 1- Crochet the granny squares
Make 24 squares.
With yarn (A), CH 4 and then SL ST into the 1st CH to make circle,
- Rnd 1: CH 6 (counts as a DC + CH3), (3DC, CH3) X 3 times in the circle , 2DC in the circle, join with a SL ST into the 3rd CH of CH6, fasten off.
- Rnd 2: With yarn (B), Slip knot, SL ST into any CH3 space, (CH6, 3DC, CH1) in the same space, * (3DC, CH3, 3DC, CH1) in next CH3 space,* rep to 2 more times, 2DC in last CH3 space, join with a SL ST into the 3rd CH of CH6, fasten off.
- Rnd 3: With yarn (A), Slip knot, SL ST in any CH3 space, (CH6, 3 DC, CH1) in the same space, 3DC in next CH 1 space, CH1, (3DC, CH3, 3DC, CH1) in the next CH3 space, rep to 2 more times, 3DC in next CH 1 space, CH1, 2 DC in last CH3 space, join with a SL ST into the 3rd CH of CH6, fasten off. Weave in and cut all ends.
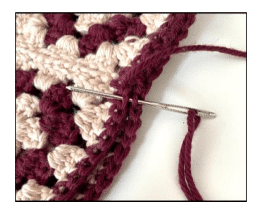
Step 2- Assemble the panels
In this step, you will organize the 24 squares in 2 panels and join them with an invisible seam.
Use yarn (A) and a tapestry needle to sew the squares.
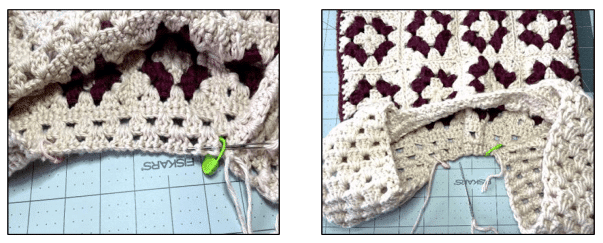
- Hold 2 squares together, the wrong sides facing outward. (see pictures)
- Start in the corner of the bottom square, draw the yarn through the middle CH of CH3 and the middle CH of CH3 of the opposite corner of the top square, making sure to pull the entire length all the way through.
- * Draw the yarn through the next ST BLO of bottom square and the opposite ST BLO of top square*, repeat *to * across.
- Finish by attaching the corner’s stitches (middle CH of CH3).
- Continue attaching the squares one by one to form 2 panels referring to pictures and video in the link below.
Note: It is easier to attach the squares in columns first then sew the rows.
Additional resources:

How to Join Granny Squares with Invisible Seam
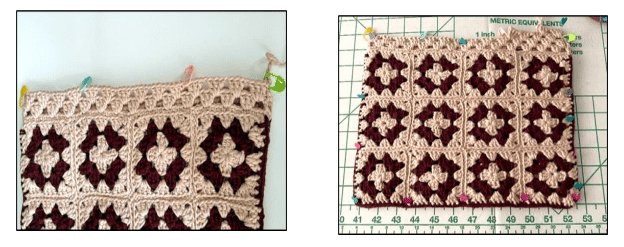
Step 3 – Crochet the border
In this step, you will crochet a border on 3 sides only of the panels leaving the top sides, where you will crochet the handles without a border.
With the panel right side facing you, Slip knot with yarn (B) then SL ST in the top left corner, SC in the same ST, * SC in every ST across ( make a 1 SC in each seam), 3 SC in the corner’s CH3*, rep *to* 2 times , SC in every ST across ( make a 1 SC in each seam), finish with a SC in the right top corner, fasten off, cut the yarn and leave a long tail for sewing.
Crochet the border for the 2nd panel the same way you did with the 1st panel.

Step 4- Join the panels
Use the long tail and a tapestry needle.
Place one panel on top of the other one, with the wrong sides facing outwards then join them with an invisible seam the same way you joined the squares, leaving the top side only unsewed.
Step 5- Crochet the top part
Use yarn (A).
- Rnd 1: SL ST in the corner, SC BLO in every ST around including the seams (1 SC in the seam), join with a SL ST into the 1st SC BLO. (112)
- Rnd 2: CH4 ,Skip next 3 ST, 3 DC in next ST, CH1, rep to around, join with a SL ST into the 3 rd CH of CH4, CH3. 28 (3 DC groups)
- Rnd 3: CH3,3 DC in next space, CH1, rep to around, join with a SL ST into the top of CH3. Do not cut the yarn, crochet the handles next.
Note: For best results you may want to block the bag before crocheting the handles. Pin it to a cardboard, spray it with water then air dry
Step 6- Crochet the handles
Lay the bag on a smooth surface then place a ST marker in each corner. Place 2 other ST markers 4 (3DC groups) apart from the corner’s ST markers (see pic). The handles are crocheted in rows.
The long handle (about 11” long)
- Row 1: With the yarn still on your hook, (CH3, 1DC) in the corner’s marked ST, CH1,* 3DC in next CH1 space, CH1,* rep to 2 more times, finish with (2DC, CH1, DC) in next CH1 space, turn.
- Row 2: SL ST in every ST across, turn. ( 20 SL ST)
- Rnd 3: Ignore the SL ST row working directly in the low below it. CH3,* 3DC in next CH1 space, CH1,* rep to 3 more times, finish with a DC in the last CH1 space (between 2DC and DC of last 3DC group), turn.
- Row 4: SL ST in every ST across, turn. (20 SL ST)
- Row 5: Ignore the SL ST row working directly in the low below it. (CH3, 1DC) in same ST, CH1, 3DC in next CH1 space, CH1 rep to 2 more times, finish with (2DC, CH1, DC) in last CH1 space, turn.
- Rep Row 2-5 until you have 23 (3DC group) rows. Fasten off and leave a long tail for sewing.
The short handle ( about 7” long)
Crochet the 2nd handle the same way you did with the 1st handle starting with a SL ST in the marked Stitch in middle of the front panel instead of the corner ST.
Rep Row 2-5 until you have 15 (3DC group) rows. Fasten off and leave a long tail for sewing.

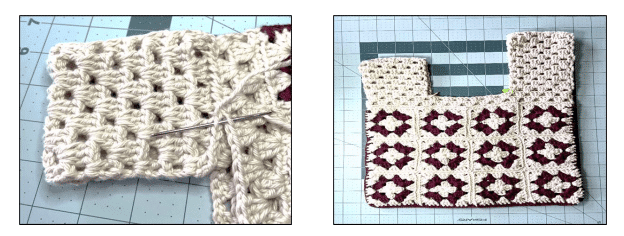
Step 7- Line the bag
Lining the bag is easy and doesn’t require major sewing skills (you can hand sew). You will make a pouch with the fabric, the same size as the crocheted bag then insert it inside your bag and stitch it up at the top. It’s easier to line the bag before sewing the handles.
- Iron the fabric you are planning to use.
- Lay your fabric out on a smooth surface, fold it in half.
- Place your bag on top of it. The bottom of the bag should be on top of the folded side of the fabric.
- Fold the handles (see pic).
- Trace around the bag leaving roughly 1/2-inch extra fabric along the sides and top of the bag.
- Cut out your fabric.
- Sew the lateral sides of the fabric leaving the top side only unsewed. You just made a pouch!
- Place the pouch inside of the bag. Keeping the right side of the fabric facing outward.
- Adjust the lining carefully, fold down the fabric roughly 1/2 inch at the top and clip or pin to the crochet bag.
- Use a needle and thread to stitch around the top of the bag, sewing the lining and crochet together.
- Optional: stitch up the bottom of the bag to the liner.
Additional resources:

How to line a crocheted bag.
Step 8- Finish the bag
Sew the handles:
- With the right side of the bag facing outward, fold the handle in half, then align it with last Rnd of the back panel.
- With a tapestry needle and the long tail, sew the handle to the last round of the body, grabbing the back loops only, one stitch at the time. Fasten off.
- Sew the 2nd handle the same way you did with the 1st handle.
- Pull the long handle trough the short handle to close the bag.
Reduce the opening of the bag: (optional)
Front Panel:
- Turn the bag inside out.
- With a tapestry needle and the yarn, attach the yarn to the base of the handle (in the 1 st marked stitch with a couple of stiches.
- Thread the yarn through the last round of the body, one stitch at the time, until you get to the 2 nd marked ST (the base of the other handle).
- Pull the yarn tight to close the opening then secure it with a couple of stitches.
Back Panel:
Repeat the same steps to narrow the back panel’s opening.
Congratulations!
You just finished the Granny Square Knot Bag. I hope you enjoyed making it and are pleased with the results!