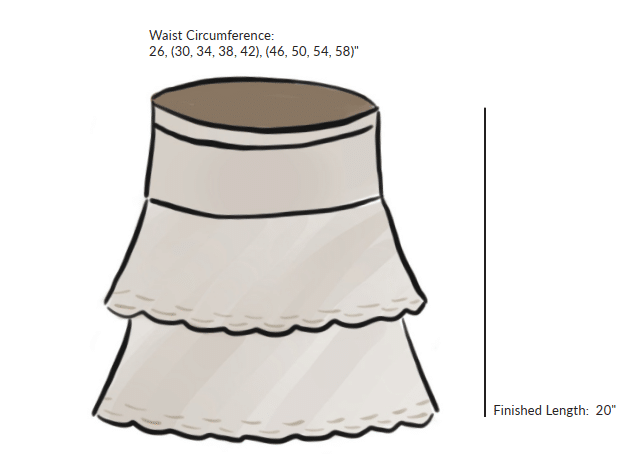
This skirt is something I didn’t realize I wanted until I got it. I’m quite proud of the various embellishments on this skirt. The fit is fantastic, and it feels great. I envision this being a classic piece in any wardrobe that can be dressed up or down.
SKILL LEVEL : Intermediate
MATERIALS
5, (5, 6, 6, 7), (7, 8, 8, 9) balls / 1090, (1210, 1340, 1470, 1600), (1750, 1860, 1990, 2150) yards Bernat
Softee Baby Cotton in Feather Gray Size G-6 (4.0 mm) Crochet Hook
1” elastic for waistband cut to waist measurement and sewn closed at the end to create a loop Tapestry Needle to weave in ends
GAUGE
16 stitches and 20 rows = 4” in Single Crochet on G-6 (4.0 mm) crochet hook
CONSTRUCTION NOTES
This skirt is constructed in the round, beginning at the waist and working down. You will first make the waist, the under-layer, and the bottom lace section. Then, you will add the top lace section. Short rows will be worked on the under-layer at the back of the skirt to add a bit of shaping and a better fit.
This skirt is designed to be 20” from waistband to hem. There will be sections noted in this pattern where you can make your skirt longer based on your preference. It is recommended to make your skirt longer in 2” increments. This is so that the two lace layers are equal length.
NOTE: Ch stitches at the end of each round do NOT count as your first stitch of the following row.
DIMENSIONS
XS, (S, M, L, XL), (2X, 3X, 4X, 5X)
Waist Circumference: 26, (30, 34, 38, 42), (46, 50, 54, 58)”
Length: 20”
Pattern is written for smallest size with changes for larger sizes in parenthesis. When only one number is given, it applies to all sizes. To keep track of your size, you may highlight or circle all numbers for your chosen size before you begin.

HELP CHOOSING SIZE
This skirt is designed to be worn above your hips at your waist with 0-4” of positive ease. Model is 6” tall, has a 28” waist, and is wearing a size Small with 2” of positive ease. For best fit, choose a size that gives you 0-4” of positive ease around the place on your waist that you want your skirt to sit. For ex- ample, if your waist measurement 40”, you would wear a size XL. In the pattern, you will add an elastic waistband that is your exact waist measurement for a perfect fit.

PATTERN INSTRUCTIONS
Ch 104 (120, 136, 152, 168) (184, 200, 216, 232) slst in first ch sp to join in round.
Round 1: SC in the same ch sp as the slst, SC in each ch sp around. slst with first SC to join, ch1. [104, (120, 136, 152, 168), (184, 200, 216, 232) sts].
2: SC in each st around, slst to join, ch1. Continue working as round 2 until piece measures 2” from ch edge.
Waistband:
On the next round you will work a foldover waist- band. To do this, cut a piece of elastic that fits comfortably but secure around your waist where you want the skirt to sit. Sew the ends together to create a loop.
3: With the waistband elastic held behind your work, pull your work under and around to secure the elastic. Insert your hook into the next stitch to be worked, insert your hook into the the founda- tion chain from the first st, SC these 2 sts together to secure elastic. Continue across for each st., slst to join, ch1.
4: [SC in next 25 (29, 33, 37, 41) (45, 49, 53, 57) sts, 2 SC in the next st] 4x. [108, (124, 140, 156, 172), (188, 204, 220, 236) sts].
5-8: as round 2.
9: SC in next 13 (15, 17, 19, 21) (23, 25, 27, 29) sts, 2 SC in next st, [SC in next 26 (30, 34, 38, 42) (46, 50, 54, 58) sts, 2 SC in next st] 3x, SC in each st to end of round, slst to join, ch1. [112, (128, 144, 160, 176), (192, 208, 224, 240) sts].
10-13: as round 2.
14: [SC in next 27 (31, 35, 39, 43) (47, 51, 55, 59) sts, 2 SC in next st] 4x, slst to join, ch1. [116, (132, 148, 164, 180), (196, 212, 228, 244) sts].
15-18: as round 2.
19: SC in next 14 (16, 18, 20, 22) (24, 26, 28, 30) sts, 2 SC in next st, [SC in next 28 (32, 36, 40, 44) (48, 52, 56, 60) sts, 2 SC in next st] 3x, SC in each st to end of round, slst to join, ch1. [120, (136, 152, 168, 184), (200, 216, 232, 248) sts].
20-23: as round 2.
24: [SC in next 29, (33, 37, 41, 45) (49, 53, 57, 61) sts, 2 SC in next st] 4x, slst to join, ch1. [124, (140, 156, 172, 188), (204, 220, 236, 252) sts].
25: SC in each st around, slst to join, ch2.
Skirt Lining:
You are now to the point on your skirt that will be the under-layer. You will begin working HDC.
26: HDC BLO in each st around, slst to join, ch1. The next few rows will be “short rows” to add some length to the back of your skirt. Don’t worry if you can tell the RS and WS of these rows, they will be covered by the over-layer and not visible.
27: HDC in next 56 (64, 72, 80, 88) (96, 104, 112, 120) sts, SC in next st, ch1, turn.
28: HDC in next 51 (59, 67, 75, 83) (91, 99, 107, 115) sts, SC in next st, ch1, turn.
29: HDC in next 41 (49, 57, 65, 73) (81, 89, 97, 105) sts, SC in next st, ch1, turn.
30: HDC in next 31 (39, 47, 55, 63) (71, 79, 87, 95) sts, SC in next st, ch1, turn.
31-32: HDC in each st to end of round, slst to join, ch1.
33: HDC in next 15 (17, 19, 21, 23) (25, 27, 29, 31 sts, 2 HDC in next st, [HDC in next 30 (34, 38, 42, 46) (50, 54, 58, 62) sts, 2 HDC in next st) 3x, HDC in each st to end of round, slst to join, ch1. [128, (144, 160, 176, 192), (208, 224, 240, 256) sts].
34-36: HDC in each st to end of round, slst to join, ch1.
37: [HDC in next 31 (35, 39, 43, 47) (51, 55, 59, 63) sts, 2 HDC in next st) 4x, slst to join, ch1. [132, (148, 164, 180, 196), (212, 228, 244, 260) sts].
38-40: as 34-36.
41: HDC in next 16 (18, 20, 22, 24) (26, 28, 30, 32 sts, 2 HDC in next st, [HDC in next 32 (36, 40, 44, 48) (52, 56, 60, 64) sts, 2 HDC in next st] 3x, HDC in each st to end of round, slst to join, ch1. [136, (152, 168, 184, 200), (216, 232, 248, 264) sts].
42-44: as 34-36.
45: [HDC in next 33 (37, 41, 45, 49) (53, 57, 61, 65) sts, 2 HDC in next st] 4x, slst to join, ch1. [140, (156, 172, 188, 204), (220, 236, 252, 268) sts].
46-48: as 34-36.
49: HDC in next 17 (19, 21, 23, 25) (27, 29, 31, 33 sts, 2 HDC in next st, [HDC in next 34 (38, 42, 46, 50) (54, 58, 62, 66) sts, 2 HDC in next st] 3x, HDC in each st to end of round, slst to join, ch1. [144, (160, 176, 192, 208), (224, 240, 256, 272) sts].
50-52: as 34-36.
53: [HDC in next 23 (31, 43, 63, 103) (55, 79, 127, 67) sts, 2 HDC in next st] 6 (5, 4, 3, 2) (4, 3, 2, 4) times, slst to join, ch2. [150, (165, 180, 195, 210), (228, 243, 258, 276) sts].
NOTE: If you plan on making your skirt longer, you may work additional rows at this point. Work these rows even (as row 34). Work half of the additional length you want to add. For example; if you are wanting to make your skirt 2” longer, work 1” addi- tional at this point. 4” longer, work 2” more at this point.
Bottom Lace Layer:
You will now begin working the bottom lace layer of the skirt.
54: (2 DC, ch1, 2 DC) all in the 1st st, skip next 2 sts, * (2 DC, ch1, 2 DC) in the next st, skip 2 sts. Rep from * to end of round, slst to join, ch2. [250, (275, 300, 325, 350), (380, 405, 430, 460) sts].
55: skip the first 2 sts, * (2 DC, ch1, 2 DC) in the ch1 sp, skip 4 sts. Rep from * to end of round, slst to join, ch2.
Repeat row 55 nine more times. (11 lace rows total).
NOTE: If you plan on making your skirt longer, you may work additional rows at this point. Work these rows even (as row 55). Work half of the additional length you want to add. For example; if you are wanting to make your skirt 2” longer, work 1” addi- tional at this point. 4” longer, work 2” more at this point.
56: skip the first 2 sts, * 3 SC in ch1 sp, ch3, skip 4. Rep from * until 2 sts remain, skip these 2 sts, slst to join, ch1. [300, (330, 360, 390, 420), (456, 486, 516, 552) sts].
57: skip the first st, SC1, skip the next st, 5 DC in ch3 sp, * (skip 1, SC in next st, skip 1, 5 DC in the ch3 sp. Rep from * to end of round, slst to join, ch1.
58: skip the first 2 sts, SC in next 3 sts, ch3, * skip the next 3 sts, SC in next 3, ch3. Rep from * to end of round, slst to join, ch1.
59: as 57.
Pull the last stitch all the way through to secure, cut yarn leaving a tail to weave in.
Top Lace Layer:
You will now work the top lace layer by working into the 124, (140, 156, 172, 188), (204, 220, 236, 252) sts you worked BLO in row 26 as a guide. For each stitch you work into, be sure to pick up both loops of the stitch so your lace is secure. (See Fig. 1).
Set Up Row: ch2 into the 1st st to join (this does not count as the first st), (2 DC, ch1, 2DC) into the 2nd (3rd, 1st, 2nd, 3rd) (1st, 2nd, 3rd, 1st) st, skip next 2 sts, *(2 DC, ch1, 2 DC) in the next st, skip 2 sts. Rep from * to end of round, slst to join, ch2. [205, (230, 260, 285, 310), (340, 365, 390, 420)].
Repeat rows 55-59 as done for bottom lace layer. NOTE: If you are making your skirt longer, work the same number of additional rows as done for the bottom lace layer.
Finishing:
Weave in all ends to secure.
To block, soak in warm water and lay flat to dry. Enjoy!