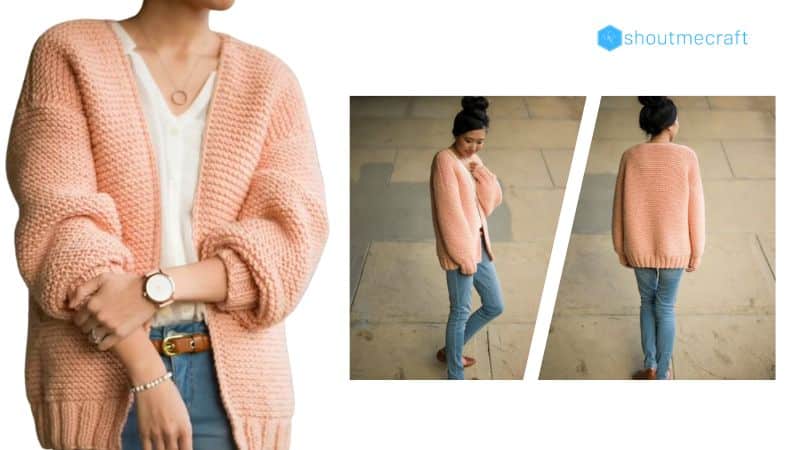
Knit this gorgeous slouchy cardigan using bulky yarn and the relaxing garter stitch! The Downtown Cardigan is a chunky cardigan that looks so chic with its baggy sleeves, bold ribbing and well-defined stitches.
This statement cardigan works up very quickly and is perfect for beginners! Bulky level 5 yarn called “Color Made Easy” by Lion Brand Yarn is used (note that this yarn has now been discontinued, but you can substitute any bulky level 5 yarn such as “Hue + Me”).
Sizing is included for Extra Small/Small, Medium/Large, XL/2X and 3X/4X and final dimensions are as follows:
- Width across back: 24″/61 cm (XS/S), 27″/69 cm (M/L), 30″/76 cm (XL/2X), 33″/84 cm (3X/4X)
- Length: 24″/61 cm (XS/S), 25″/63.5 cm (M/L), 26″/66 cm (XL/2X), 27″/69 cm (3X/4X)
- Sleeves: 19″/48 cm (stays the same as panels bend down to become part of sleeve)
The Downtown Cardigan
Materials
- Color Made Easy Yarn (bulky level 5) in “Millennial”- see approximate yardage and number of skeins required below; you can substitute other bulky yarns such as “Hue + Me” and “Woolspun” yarn
- Clover Takumi 8 mm 29” circular needles; 48″ cord for picking up stitches along collar
- Yarn needle
- Lock ring stitch markers
Sizing Chart (in inches)
| XS/S | M/L | XL/2X | 3X/4X | |
| Back Panel | 24 | 27 | 30 | 33 |
| Front Panel | 8 | 9.5 | 11 | 12 |
| Cardigan Bust | 48 | 54 | 60 | 66 |
| Actual Bust | 28-34 | 36-42 | 44-50 | 52-58 |
| Cardigan Length | 24 | 25 | 26 | 27 |
| Arm hole height | 7.5 | 8.5 | 9.5 | 10.5 |
| Arm hole circumference | 15 | 17 | 19 | 21 |
| Sleeve Length | 19 | 19 | 19 | 19 |
Approximate Yardage/# of Skeins Required
- Extra Small/Small: 4 skeins, ~ 780 g/965 yds
- Medium/Large: 5 skeins, ~ 905 g/1120 yds
- Extra Large/2X: 6 skeins, ~ 1050 g/1300 yds
- 3X/4X: 6 skeins, ~ 1200 g/1480 yds
Notes:
- Gauge: 11 stitches and 20.5 rows = 4 inches
- KFB = Knit Front and Back Increase: Step 1: Knit the first stitch on your main needle. Step 2: Before taking the stitch off the main needle, insert the tip of your working needle into the backside of the loop and knit it through the back loop. Then pull the stitch off the needle.
- One back panel and two fronts panels are knitted in garter stitch and seamed together at the top and sides, leaving space for the arm holes. These panels are worked from the bottom up starting with the ribbing.
- The sleeves are worked from the bottom up (starting from the ribbing as well), whip stitched along the edge, and then attached to the arm holes.
- Stitches are picked up along the collar and casted off for a simple and clean edging (collar variations are offered).
Sizing Notes
- This drop sleeve cardigan is oversized, relaxed, loose, and slouchy (14-20” of positive ease built into the design). For example, if my actual bust is 32”, the bust of the cardigan is 48” (48” – 32” = 16”). The cardigan is 16” wider than my actual bust. The sleeves are designed to be long and baggy with plenty of drape.
- Part of the front and back panels become part of the sleeve as they bend past the shoulders. The sleeve
Sizing Notes cont’d
- Length remains the same for all sizes, but the increased width in the front and back panels help lengthen the sleeves of the larger sizes. The width of the sleeve varies by size.
- If you would like the cardigan to be wider, increase the number of stitches you cast on for the front and back panels.
- If you would like the cardigan to be narrower, decrease the number of stitches you cast on for the front and back panels.
- If you would like the cardigan to be longer, increase the number of rows for the back and front panels. If you would like the cardigan to be shorter, decrease the number of rows for the back and front panels.
- There are three increase rows for the sleeves (Sleeve row numbers 12, 16 and 26). If you do not want the sleeves to be as baggy and voluminous, you can do fewer increase rows (for example, omit the last increase row and continue with the same stitch count). You can also try knitting a smaller size sleeve if you do not want the sleeve to be as baggy (e.g. follow the XS/S sleeve size for the M/L cardigan).
- Be sure to follow the sleeve pattern for your specific size as the Increase rounds vary for Rows 12, 16 and 26 for each size.
- If you do not want your cardigan to be as oversized, go down a size (e.g. if you normally wear a Medium, you can knit the XS/S size).
- I am wearing a size Extra Small/Small. I am 5’6 for height reference.
Pattern
Back Panel
We will begin with the ribbing.
Cast on 66 (74, 82, 90) stitches using long tail cast-on.
Row 1: *Purl 2, Knit 2* across and Purl the last two stitches. (66, 74, 82, 90) Row 2: *K2, P2* across and Knit the last two stitches. (66, 74, 82, 90)
Row 3-11: Repeat Rows 1 and 2. Ribbing is now complete! We will now move into the garter section.
Row 12-123: Knit all stitches. (66, 74,
82, 90)
Cast off all stitches for Size XS/S. Row 124 – 128: Knit all stitches. Cast off all stitches for Size Medium/Large.
Row 129 – 133: Knit all stitches. Cast off all stitches for Size Extra Large/2X.
Row 134– 138: Knit all stitches.
Cast off all stitches for Size 3X/4X.
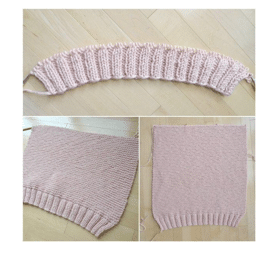
Front Panels (make 2)
We will begin with the ribbing.
Cast on 22 (26, 30, 34) stitches using long tail cast-on.
Row 1: *Purl 2, Knit 2* across and Purl the last two stitches. (22, 26, 30, 34) Row 2: *K2, P2* across and Knit the last two stitches. (22, 26, 30, 34)
Row 3-11: Repeat Rows 1 and 2. Ribbing is now complete! We will now move into the garter section.
Row 12-123: Knit all stitches. (22, 26,
30, 34)
Cast off all stitches for Size Extra Small/Small.
Row 124 – 128: Knit all stitches. Cast off all stitches for Size Medium/Large.
Row 129 – 133: Knit all stitches. Cast off all stitches for Size Extra Large/2X.
Row 134 – 138: Knit all stitches. Cast off all stitches for Size 3X/4X.
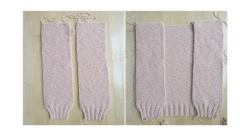
Sleeves (make 2)
We will begin with the ribbing.
Cast on 24 (28, 32, 36) stitches using long tail cast-on.
Row 1: *Purl 2, Knit 2* across. (24, 28, 32,
36)
Row 2-11: Repeat Row 1.
Ribbing is now complete! We will now move into the garter section.
Row 12 (Increase row #1): Size XS/S: *Knit 3, KFB*, rep 6 times. (30) Size M/L: Knit 2. *Knit 3, KFB*, rep 6 times. Knit 2. (34) Size XL/2X: *Knit 3, KFB*, rep 8 times. (40) Size 3X/4X: K3. *Knit 2, KFB*, rep 10 times. K3. (46)
R13-15: Knit all stitches. (30, 34, 40, 46)
R16 (Increase row #2):
- Size XS/S: *Knit 4, KFB*, rep 6 times. (36) Size M/L: K2. *Knit 4, KFB*, rep 6 times. K2. (40)
- Size XL/2X: K2. *Knit 5, KFB*, rep 6 times. K2. (46)
- Size 3X/4X: K2. *K6, KFB*, rep 6 times. K2. (52)
R17-25: Knit all stitches. (36, 40, 46, 52)
R26 (Increase row #3):
- Size XS/S: *Knit 5, KFB*, rep 6 times. (42)
- Size M/L: K2. *Knit 5, KFB*, rep 6 times. K2. (46)
- Size XL/2X: K2. *Knit 6, KFB*, rep 6 times. K2. (52)
- Size 3X/4X: K2. *Knit 7, KFB*, rep 6 times. K2. (58)
R27-97: Knit all stitches. (42, 46, 52, 58) Cast off all stitches.
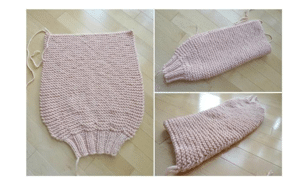
Assembly
- When seaming pieces together, always join wrong sides together to make the seams less visible, then flip inside out at the end.
- Fold each sleeve in half lengthwise and whip stitch sides together.
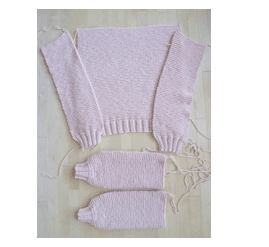
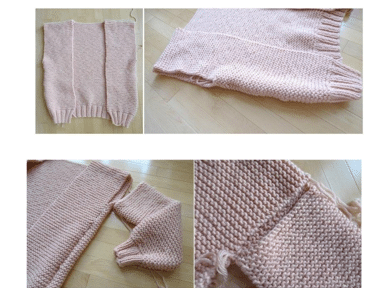
- Whip stitch tops of front panels to back panel. Whip stitch sides of front panels to back panel, making sure to leave an arm hole. Place sleeve towards top of panels and see how much space is needed for arm holes.
- Whip stitch top of sleeve to arm hole.
Collar
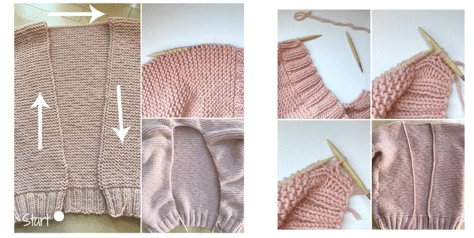
Using 8 mm needles (or smaller to make it easier),
- Starting from bottom left corner, pick up stitches by placing them on needle without using working yarn. Pick up stitches along front panel, across the back panel, and down the front panel. When picking up stitches along vertical edge of garter stitch, pick up one stitch between each ridge OR pick up one bump for every garter ridge. Once all stitches have been picked up around the collar, we will begin working from the bottom left corner by adding the working yarn. Use working yarn to begin casting off stitches for a simple clean edge.
Collar Alternatives
- Using 8 mm crochet hook, slip stitch around collar to work a similar edging as described above.
- Pick up stitches around collar with working yarn and work *P2, K2* around (same ribbing as panels). Knit desired number of rows for wider and bolder collar. Note that more yarn may be required depending on number of rows added.
- Pick up stitches around collar with working yarn and work *P1, K1* around for a more delicate collar. Note that more yarn may be required depending on number of rows added.
- Pick up stitches around collar with working yarn and alternate rows of knit stitches and purl stitches for a rolled stockinette collar.
- To pick up stitches using working yarn, insert your needle into the first stitch along the edge. Yarn over, then pull up a loop. You keep inserting your needle into the next stitch, yarning over, and pulling up a (tutorial and video available in Midtown Cardigan blog post)
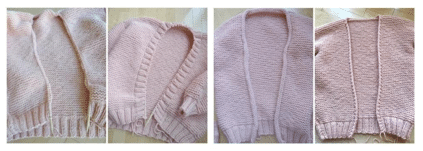
Congratulations, your gorgeous chunky Downtown Cardigan is now complete! Enjoy wearing it throughout the seasons, and don’t forget to share your finished projects