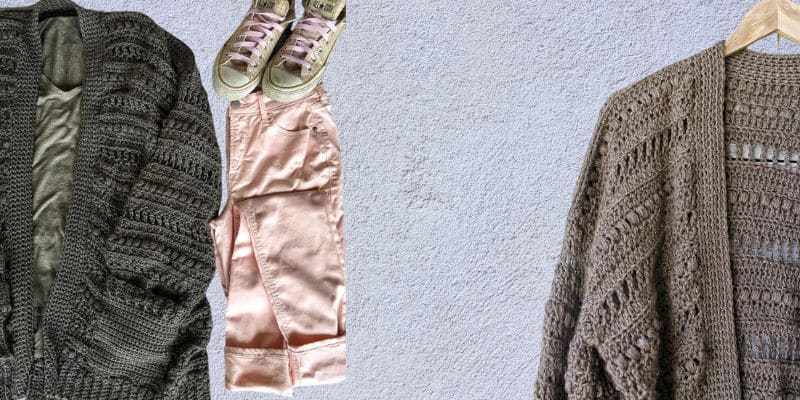
This is a crochet pattern for the Haven Cardigan, a roomy, breezy spring cardigan that will look great with everything you own.
Simple half double crochet, double crochet, and puff stitches make up this design’s overall distinctive bohemian appeal.
Crochet Pattern , Crochet Cardigan Pattern , Easy Cardigan , Womens Sweater Pattern , The HAVEN Cardi
Finished Sizes
This Crochet Cardigan is made to be oversized with approximately 10” of positive ease. The measurements are Finished garment sizes. When choosing your size, find the bust measurement that equals approximately 10” larger than your actual bust measurement and make that size.
| Size | XS | S | M | L | XL | 2X | 3X | 4X | 5X |
| Bust | 39” | 43” | 47” | 51” | 55” | 59” | 63” | 67” | 71” |
| Length | 30” | 30” | 31” | 31” | 32” | 32” | 32” | 32” | 32” |
Materials
- Size 4 Worsted weight yarn. Example uses Lion Brand Basic Stitch Yarn.
- XS– Approximately 1100-1200 yards
- S– Approximately 1200-1300 yards M– Approximately 1300-1400 yards L– approximately 1400-1500 yards XL– Approximately 1600-1700 yards
- 2XL– Approximately 1700-1800 yards 3XL– Approximately 1800-1900 yards 4XL– Approximately 1900-2000 yards 5XL– Approximately 2000-2100 yards
- Size K (6.5 mm) hook
- Yarn needle
Gauge
13 St and 6 rows in Extended Hdc in the BLO = 4”
Abbreviations Used
- St- Stitch Ch- Chain
- Yo- Yarn Over
- Sl St- Slip Stitch Sc- Single Crochet
- Blo- Back Loop Only
- Ehdc- Extended Half Double Crochet Edc- Extended Double Crochet
- Ps- Puff Stitch
Pattern Notes
- Pattern is worked from the bottom up in one piece and then divided for the armholes
- Sleeves are worked in turned rounds. After you have joined with a slip stitch to end each round, Turn your work so that the next round is worked in the opposite direction.
- Sweater is worked in a 6 row repeat; The row repeat is as follows- Ehdc, Ehdc, Ps, Ehdc, Ehdc, Edc
- All stitches are worked in the Back loop only EXCEPT for the Ps rows which are worked through both loops
- Total Stitches are indicated between [ ].
- The sizing guide follows size XS(S, M, L, XL, 2X, 3X, 4X, 5X). E.g. “Sc 9(10, 11, 12, 14, 15, 16, 17, 18)” means Sc 9 for XS, Sc 10 for Small, Sc 11 for Medium, Sc 12 for Large, Sc 14 for XL, Sc 15 for 2X, Sc 16 for 3X, Sc 17 for 4X, Sc 18 for 5X. If there is only one number, it applies to all sizes.
Special Stitches
Extended Half Double Crochet
- Yo, insert hook into the next St. Draw up a loop (3 loops on hook).
- Yo, pull through one loop.
- Yo, pull through remaining 3 loops.
Extended Double Crochet
- Yo, insert hook into the next St. Draw up a loop (3 loops on hook).
- Yo, pull through one loop. Yo, pull through 2 loops.
- Yo, then pull through remaining 2 loops.
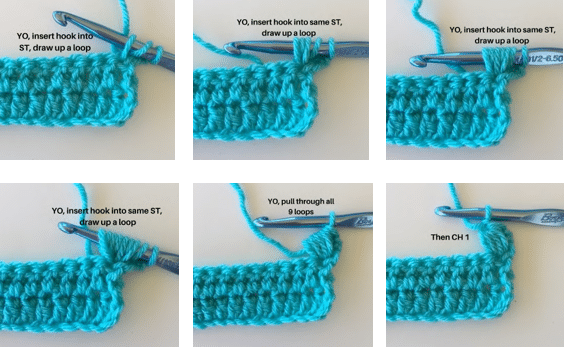
Puff Stitch
- Yo, insert hook into next stitch and bring up a loop, you now have 3 loops on your hook.
- Yo, insert hook back into the same stitch, and bring up a loop, you now have 5 loops on your hook. Repeat this 2 more times (4 times total) ending with 9 loops on your hook.
- Yo, pull through all the loops, and finish with a Ch 1.
Pattern
Starting with the ribbing.
Ch 11
Row 1: Sc in the 2nd Ch from the hook and in each Ch across. Turn. [10 Sc] Row 2: Ch 1. Sc in the Blo of the first St and each St across. Turn. [10 Sc]
Repeat row 2 until you have a total of 103(115, 129, 141, 155, 167, 181, 193, 207) rows of ribbing.
Do not Fasten Off
You will now be working into the top of your ribbing.
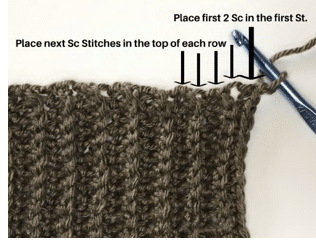
Rotate ribbing to work across the row ends. Starting in the very first open space, 2 Sc, then
*Sc in the next 9 (10, 11, 12, 14, 15, 16, 17, 18) St, then 2 Sc in the next St * a total of 10 times
ending with a Sc in the remaining 2 (4, 8, 10, 4, 6, 10, 12, 16) stitches. Turn. [114(126, 140,152, 166, 178, 192, 204, 218) Sc]
Row 1: Ch 1. Skip the first St. (where the Ch 1 is) *Ps next, don’t forget your Ch 1 to secure the Ps after each one, skip the next St*. Repeat from * to * across ending with a Ps in the last St. Turn. [57(63, 70, 76, 83, 89, 96, 102, 109) Ps]
Row 2: Ch 2. Working in the Blo, Ehdc in the first St and each St across. Turn. [114(126, 140, 152, 166, 178, 192, 204, 218) Ehdc]
Row 3: Ch 2. Working in the Blo, Ehdc in the first St and each St across. Turn. [114(126, 140, 152, 166, 178, 192, 204, 218) Ehdc]
Row 4: Ch 3. Skip the first St (where the Ch 3 is). *Edc in the Blo of the next St, Ch 1. Skip the next St.* Repeat from * to* across ending with an Edc in the last St. Turn. [57(63, 70, 76, 83, 89, 96, 102, 109) Edc]
Size 2XL ONLY- When working your Edc rows on the body only, you will Skip the first St (where the Ch 3 is) AND skip the next St. *Edc in the Blo of the next St, Ch 1. Skip the next St.* Repeat from *to* across ending with an Edc in the last St. Turn. [89 Edc]
Row 5: Ch 2. Working in the Blo, Ehdc in the first St and each St across ending with an Ehdc in the top of the Ch 3 turning Ch. Turn. [114(126, 140, 152, 166, 178, 192, 204, 218) Ehdc]
Row 6: Ch 2. Working in the Blo, Ehdc in the first St and each St across. Turn. [114(126, 140, 152, 166, 178, 192, 204, 218) Ehdc]
***Reminder- All rows are worked in the BLO with the exception of the Ps rows which are worked through both loops.***
Repeat rows 1- 6 until you have a total of 26 rows.
***If you would like your sweater to be shorter or longer simply add or omit rows before you divide for your arm holes and continue working in the pattern row repeat***
Do Not Finish Off. This is where we will divide for arm holes. Row numbers will restart for simplicity.
Panels will be divided as follows
| Size | Left Front | Back | Right Front |
| XS | 26 | 60 | 26 |
| S | 28 | 68 | 28 |
| M | 32 | 74 | 32 |
| L | 36 | 78 | 36 |
| XL | 40 | 84 | 40 |
| 2XL | 42 | 92 | 42 |
| 3XL | 46 | 98 | 46 |
| 4XL | 50 | 102 | 50 |
| 5XL | 52 | 112 | 52 |
With working yarn still attached begin your first front panel.
First Front Panel
Row 1: Ch 2. Ehdc in the Blo of the first 26(28, 32, 36, 40, 42, 46, 50, 52) Stitches. Turn. [26(28, 32, 36, 40, 42, 46, 50, 52) Ehdc]
Row 2: Ch 3. Skip the first St (where the Ch 3 is). *Edc in the Blo of the next St, Ch 1. Skip the next St.* Repeat from * to* across ending with an Edc in the last St. Turn. [13(14, 16, 18, 20, 21, 23, 25, 26) Edc]
Row 3: Ch 2. Ehdc in the Blo of the first St and each St across ending with an Ehdc in the top of the Ch 3 turning Ch. Turn. [26(28, 32, 36, 40, 42, 46, 50, 52) Ehdc]
Row 4: Ch 2. Ehdc in the Blo of the first St and each St across. Turn. [26(28, 32, 36, 40, 42, 46,50, 52) Ehdc]
Row 5: Ch 1. Skip the first St. *Ps next, don’t forget your Ch 1 to secure the Ps after each one, skip the next St*. Repeat from * to * across ending with a Ps in the last St. Turn. [13(14, 16, 18, 20, 21, 23, 25, 26) Ps]
Row 6: Ch 2. Ehdc in the Blo of the first St and each St across. Turn. [26(28, 32, 36, 40, 42, 46,50, 52) Ehdc]
Repeat rows 1-6 until you have a total of 12(12, 13, 13, 15, 15, 16, 16, 18) rows in the panel.
***Each size should finish off on an Ehdc row***
Finish off leaving long tail to seam shoulders
Back Panel
With your first front panel done and on your right side, skip the first open stitch from row 26. Attach yarn in the next stitch.
Row 1: Ch 2. Ehdc in the Blo of the next 60(68, 74, 78, 84, 92, 98, 102, 112) stitches. Turn. [60(68, 74, 78, 84, 92, 98, 102, 112) Ehdc]
Row 2: Ch 3. Skip the first St (where the Ch 3 is). *Edc in the Blo of the next St, Ch 1. Skip the next St.* Repeat from * to* across ending with an Edc in the last St. Turn. [30(34, 37, 39, 42, 46, 49, 51, 56) Edc]
Row 3: Ch 2. Ehdc in the Blo of the first St and each St across ending with an Ehdc in the top of the Ch 3 turning Ch. Turn. [60(68, 74, 78, 84, 92, 98, 102, 112) Ehdc]
Row 4: Ch 2. Ehdc in the Blo of the first St and each St across. Turn. [60(68, 74, 78, 84, 92, 98,102, 112) Ehdc]
Row 5: Ch 1. Skip the first St. *Ps next, don’t forget your Ch 1 to secure the Ps after each one, skip the next St*. Repeat from * to * across ending with a Ps in the last St. Turn. [30(34, 37, 39, 42, 46, 49, 51, 56) Ps]
Row 6: Ch 2. Ehdc in the Blo of the first St and each St across. Turn. [60(68, 74, 78, 84, 92, 98,102, 112) Ehdc]
Repeat rows 1-6 until you have a total of 12(12, 13, 13, 15, 15, 16, 16, 18) rows in the panel.
Finish Off
Second Front Panel
With your first front panel and back panel done and on your right side, skip the first open stitch from row 26. Attach yarn in the next stitch.
Row 1: Ch 2. Ehdc in the Blo of the last 26(28, 32, 36, 40, 42, 46, 50, 52) Stitches. Turn. [26(28, 32, 36, 40, 42, 46, 50, 52) Ehdc]
Row 2: Ch 3. Skip the first St (where the Ch 3 is). *Edc in the Blo of the next St, Ch 1. Skip the next St.* Repeat from * to* across ending with an Edc in the last St. Turn. [13(14, 16, 18, 20, 21, 23, 25, 26) Edc]
Row 3: Ch 2. Ehdc in the Blo of the first St and each St across ending with an Ehdc in the top of the Ch 3 turning Ch. Turn. [26(28, 32, 36, 40, 42, 46, 50, 52) Ehdc]
Row 4: Ch 2. Ehdc in the Blo of the first St and each St across. Turn. [26(28, 32, 36, 40, 42, 46,50, 52) Ehdc]
Row 5: Ch 1. Skip the first St. *Ps next, don’t forget your Ch 1 to secure the Ps after each one, skip the next St*. Repeat from * to * across ending with a Ps in the last St. Turn. [13(14, 16, 18, 20, 21, 23, 25, 26) Ps]
Row 6: Ch 2. Ehdc in the Blo of the first St and each St across. Turn. [26(28, 32, 36, 40, 42, 46,50, 52) Ehdc]
Repeat rows 1-6 until you have a total of 12(12, 13, 13, 15, 15, 16, 16, 18) rows in the panel.
Finish off leaving long tail to seam shoulders
Seaming the shoulders
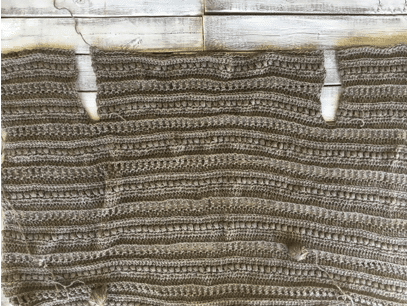
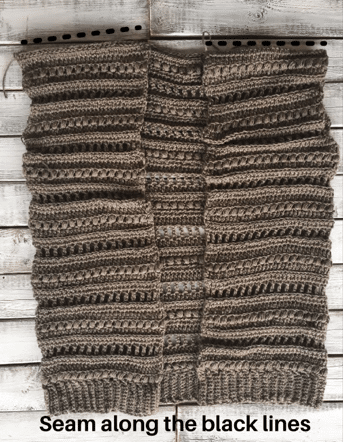
With your sweater laying in front of you, fold the left panel over the back panel and your right panel over the back panel.
***It should be noted that there is no Right Side or Wrong side to this cardi as both sides look the same. So it does not matter which side you do the seam on.***
You should line up your stitches to assure you sew the shoulders evenly.
For example, if your front panel is 22 stitches wide, you will seam up to the 22nd stitch of the back panel on both sides.
Using your yarn needle and yarn tails mattress seam the shoulder pieces to the back piece along the black line.
Sleeves (Make 2)
Cuff
Ch 15
Row 1: Sc in the second Ch and in each Ch across. Turn. [14 Sc] Row 2: Ch 1. Sc in the Blo of each St across. Turn. [14 Sc]
Repeat row 2 until you have a total of 26(26, 26, 26, 31, 31, 31, 31, 36) rows of ribbing.
Do not fasten off.
You will now be connecting the two short ends of the cuff by slip stitching them together.
Fold the cuff with the short sides together (row 1 & row 26(26, 26, 26, 31, 31, 31, 31, 36). Going through both loops on each end of the band, Sl St the edges together. [14 Sl St]
Ch 1 and flip the band to where the seam is now on the inside of the band and turn your cuff to face you.
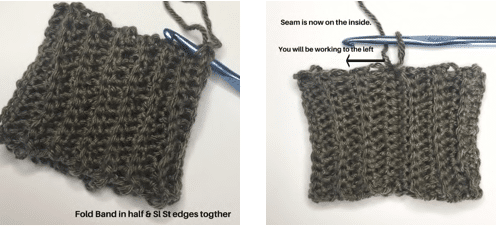
You will now start working the main portion of the sleeves
Row 1: 2 Sc in the first St (where your Ch 1 is) and in each stitch around. Join with a Sl St to first Sc. [54(54, 54, 54, 64, 64, 64, 64, 74) Sc]
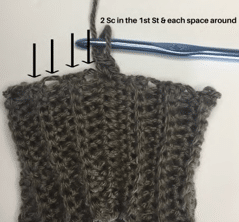
***This portion of the sleeves is worked in TURNED rounds. Join at the end of each round with a Sl St and then TURN your work so that your next round will be worked in the opposite direction.***
Row 2: Ch 1. Ps in the same space as your Ch 1, don’t forget your Ch 1 to secure the Ps after each one, skip the next St, Ps in the following St. Continue around, ending with a Ps in the second to last St, join into your first Ps. Turn. [27(27, 27, 27, 32, 32, 32, 32, 37) Ps]
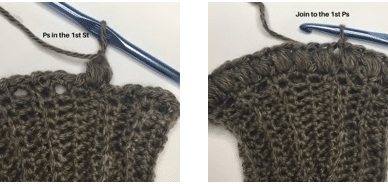
Row 3: Ch 2. Working in the Blo, Ehdc in the first St and around. Join with a Sl St to your first Ehdc. Turn. [54(54, 54, 54, 64, 64, 64, 64, 74) Ehdc]
Row 4: Ch 2. Working in the Blo, Ehdc in the first St and around. Join with a Sl St to your first Ehdc. Turn. [54(54, 54, 54, 64, 64, 64, 64, 74) Ehdc]
Row 5: Ch 3. Working in the Blo, Skip the first St (where the Ch 3 is) *Edc, Ch 1 in the next St, skip the next St*. Repeat from * to * around ending with an Edc in the last St. Join with a Sl St to the top of the Ch 3. Turn. [27(27, 27, 27, 32, 32, 32, 32, 37) Edc]
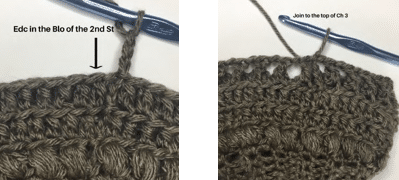
Row 6: Ch 2. Working in the Blo, Ehdc in the first St and around. Join with a Sl St to your first Ehdc. Turn. [54(54, 54, 54, 64, 64, 64, 64, 74) Ehdc]
Row 7: Ch 2. Working in the Blo, Ehdc in the first St and around. Join with a Sl St to your first Ehdc. Turn. [54(54, 54, 54, 64, 64, 64, 64, 74) Ehdc]
Repeat rows 2-7 until you have a total of 23(24, 24, 26, 26, 26, 26, 27, 27) rows.
***If you would like your sleeves to be shorter or longer simply omit or add more rows before you finish off.***
Finish off leaving a long tail to sew the sleeves to your sweater.
Attaching sleeves
Turn your sweater and your sleeves which ever way you choose is wrong side out. Line up your sleeve seam with the under side of the armhole and mattress seam around the arm hole.
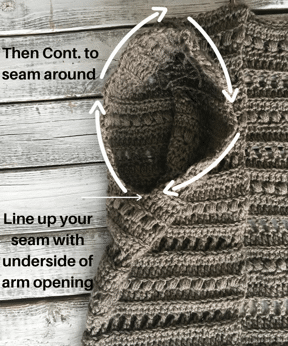
Turn your sweater right side out.
Collar Band
Turn your sweater so that the Right side front panel is facing you. Attach yarn in the bottom right corner of your sweater.
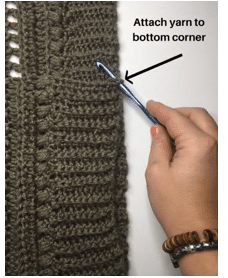
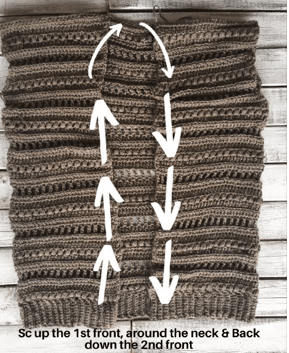
Row 1: Sc evenly around the edges of the first front, around the neckline, and back down the second front. Make sure to use the same amount of Sc on both sides of the sweater. When you reach the bottom corner of the Left front panel, Ch 1 and Turn.
Row 2-7: Sc in each stitch around.
***The amount of Sc stitches around does not matter, a good rule is to place 2 Sc St in the edge of each of the rows. You can also adjust the collar width by doing more or less rows of Sc around. ***
Pockets (make 2)
Ch 6
Row 1: Sc in the second St and in each across. Turn. [5 Sc] Row 2: Ch 1. Sc in the Blo of each St across. Turn. [5 Sc] Repeat row 2 until you have a total of 19 rows of ribbing.
Do Not finish off
You will now be working into the top of your ribbing
Row 1: Starting in the very first open space, Sc 20 evenly across the top of the ribbing. Turn. [20 Sc]
Row 2: Ch 1. Sc in the first St and each St across. [20 Sc]
Repeat row 2 until you have a total of 22 rows.
Finish Off
If you would like your pocket to be wider, add more rows to the ribbing section. Then take the number of rows in the ribbing and add 1 to get the number of Sc stitches you will be using.
Pocket Option #2
Ch 21
Row 1: Ehdc in the 3rd Ch from hook and in each Ch across. Turn. [20 Ehdc] Row 2: Ch 2. Ehdc in the Blo of the first St and each St across. Turn. [20 Ehdc]
Row 3: Ch 3. Skip the first St (where the Ch 3 is). *Edc in the Blo of the next St, Ch 1. Skip the next St.* Repeat from * to* across ending with an Edc in the last St. Turn. [10 Edc]
Row 4: Ch 2. Ehdc in the Blo of the first St and each St across. Turn. [20 Ehdc] Row 5: Ch 2. Ehdc in the Blo of the first St and each St across. Turn. [20 Ehdc]
Row 6: Ch 1. Skip the first St. *Ps next, don’t forget your Ch 1 to secure the Ps after each one, skip the next St*. Repeat from * to * across ending with a Ps in the last St. Turn. [10 Ps]
Row 7: Ch 2. Ehdc in the Blo of the first St and each St across. Turn. [20 Ehdc] Row 8: Ch 2. Ehdc in the Blo of the first St and each St across. Turn. [20 Ehdc]
Row 9: Ch 3. Skip the first St (where the Ch 3 is). *Edc in the Blo of the next St, Ch 1. Skip the next St.* Repeat from * to* across ending with an Edc in the last St. Turn. [10 Edc]
Row 10: Ch 2. Ehdc in the Blo of the first St and each St across. Turn. [20 Ehdc]
Finish off leaving a long tail to attach.
Attaching pockets
Lay your sweater in front of you. Position the pockets where you like them. I lined the bottom of my pocket up with the top of the ribbing section on both front panels about 3 Edc or Ehdc stitches from the collar.
Take a long piece of yarn, start at the top right corner of the pocket and mattress stitch the pocket to the sweater.
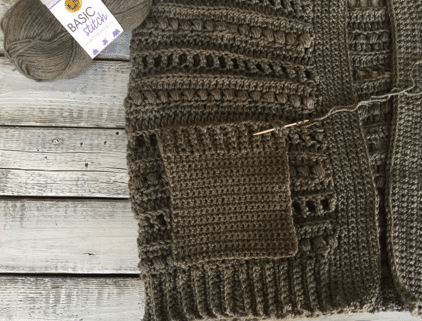
Tie off, tuck in all your loose ends and wrap yourself up in your new favorite sweater!