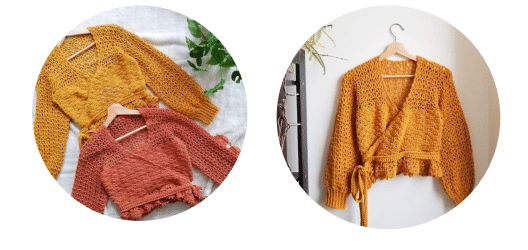
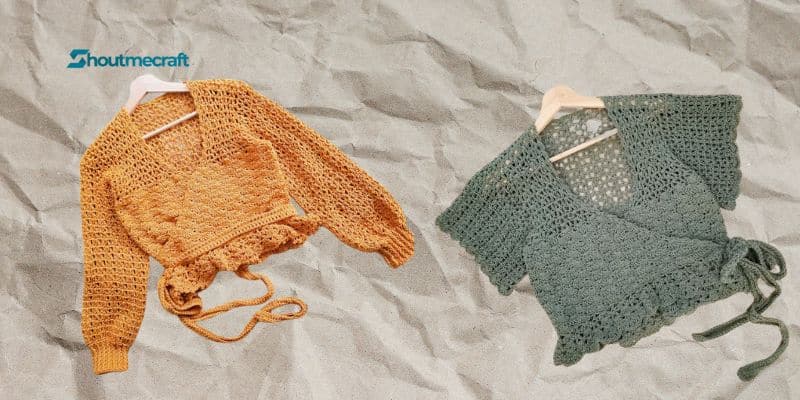
Crochet Pattern Wrap Top Cardigan – With its classy and effortlessly chic silhouette, the Wrap Top is the perfect addition to your autumn and winter wardrobe. This adjustable pattern features a wrap silhouette, peplum hem, lace shoulder panels, and lace bishop sleeves. Its top down, all-in-one- piece construction allows for you to try the garment on as you go, so you can get the perfect fit.
This pattern is written “measure yourself” style- meaning it can be scaled to any size you’d like using your measurements, with any yarn of your choosing. This pattern does not contain specific stitch counts, sizes, or gauges!
This pattern works best with dk weight or finer yarn.
PROJECT DIFFICULTY: INTERMEDIATE
This design requires some skills and knowledge in using stitch patterns, increasing, decreasing, and working in the round. It is recommended to have some experience with making garments!
STITCHES + ABBREVIATIONS (US TERMINOLOGY)
- ch – chain
- sc– single crochet
- dc– double crochet
- fpdc– front post double crochet
- sk-skip lp– loop
- prev– previous
- yo– yarn over
- sc2tog– single crochet 2 together
- inc– increase sl st– slip stitch rnd– round
SPECIAL STITCHES
- v st– *dc, ch 1, dc* in same st
- closed shell st – See page 5
- full shell– 5dc in same st
- half shell– 3dc in same st
- double v st– *2dc, ch 1, 2dc in same st
- picot– *ch 4, insert hook in 4th ch, pull up a lp, yo*
Construction Summary
Wrap Top Cardigan is worked all in one piece, no seaming is required for this project. It is started by creating the back lace panel, then the front panels are directly worked into the foundation row of the back panel to create the shoulders. After completing the front lace panels, a joining round is made to connect the front and back pieces, as well as connect the armholes. The main body is then worked in turned rows, increasing on the outer edges of the front panels every 3 rows to create the wrap silhouette. The ties, eyelets for ties to pass through, and peplum edging are created, then the neckline and ties are finished. The yarn is then reattached to each armhole to create the sleeves. Weave in all ends and enjoy your new top!
MEASUREMENTS YOU’LL NEED
Tip of Shoulder to Tip of Shoulder (shoulder seams) Shoulder to Underarm (armhole)
Underarm to Wrist (sleeve length) Chest Circumference (width of top) Shoulder to Bellybutton (length of top)
WHAT I USED FOR THIS PATTERN :
- 1100 yds (approx) We Are Knitters’ “The Cotton” yarn (dk weight)
- 4.25mm hook
- Scissors
- Tapestry Needle
The finished sample fits a US women’s size small, throughout the tutorial I will have references to the stitch and row counts I used.
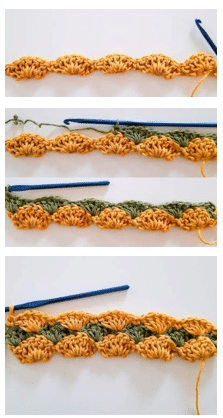
Closed Shell Stitch tutorial
This stitch is quick to work up and easy to master! The shell pattern’s foundation row is made in step 3 of the pattern, so you don’t have to worry about the initial placement of your first shells for this design.
The basic rule of thumb for the Closed Shell Stitch is to simply place shells (5dc in the same st) in the sc sts of the prev row, and
place sc sts on the 3rd dc of each shell from the prev row.
If your previous row starts or ends with a sc, work a half shell into that st. If the previous row starts or ends with a half shell, work a sc into the top of the half shell.
NOTE:
For the purpose of this walkthrough, each row is worked in a different colour to better illustrate the alternating placement of the shells.
TIP:
The only stitches you need to worry about working into (unless otherwise specified during increases) are the 3rd double crochet of each shell stitch, and each single crochet!
Your first row will have alternating sc and shell sts.
In your next row, you’ll place a shell st in each sc from the prev row, and place a sc in the 3rd dc of each shell.
For each row afterward, you will simply alternate between the placement of the shell stitches. If your previous row started and ended with a sc, start with a half shell, and vice versa
Pattern Notes
As mentioned in the overview, this pattern is written as a “measure yourself” style tutorial- this allows for the most inclusivity in terms of both size and yarn selection for this project! There are no stitch counts, gauges, or specific sizes in this pattern. If you have any questions about sizing this piece, please don’t hesitate to contact me!
This project is worked in turned rows, with the exception of the sleeve length and cuffs, which are worked in joined rounds after being shaped.
The ch 3 at the beginning of each row counts as a dc st, unless otherwise specified.
The ch 1 at the beginning of rows starting with a sc does not count as a st.
This project is worked symmetrically! The stitch that your row starts with should be the same as the stitch that your row ends with. (ie if you row starts with a half shell, it should also finish with a half shell on the opposite side.)
For large steps, this pattern will sometimes break up the text in order to match the instructions with a corresponding picture. Each new step will always have a number in front of it!
It is best to use the recommended hook size on the label of your chosen yarn when working the main body of this garment.
If you have any additional questions, please don’t hesitate to contact email me at [email protected] ,and I will do my best to help you out!
PART I: BACK LACE PANEL
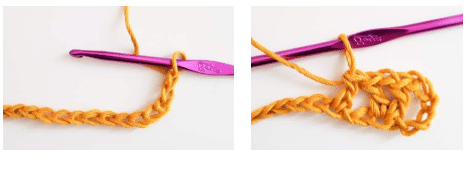
Chain a length that reaches from tip of shoulder to tip of opposite shoulder, ensuring it’s a multiple of 6, plus 1 extra ch.

Ch an additional 3, (counts as dc) v st into 7th st from hook.
Sk 2 sts, dc in next st, *sk 2 sts, v st in next st, sk 2 sts, dc in next st* across, ending on a dc st. Turn.

PART I: BACK LACE PANEL CONTINUED
Ch 3 (counts as dc), *v st in ch sp of v st from prev row, dc in dc st from prev row* across. Turn.
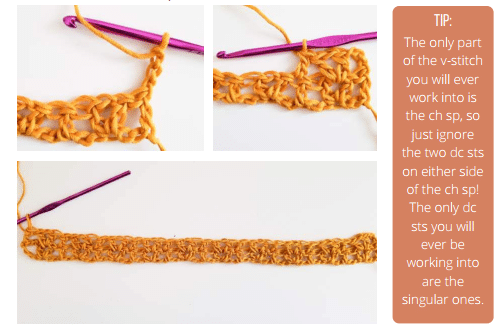
Repeat step 2 until panel measures from top of shoulder to underarm, ensuring you have an even number of rows.
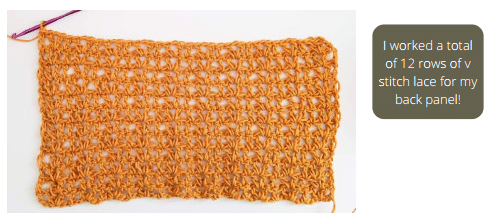
I A: SHAPING BACK ARMHOLES
Closed Shell St Foundation Row: Ch 1, sc in same st. *5dc in ch sp of v st from prev row (shell st made). Sc in dc st from prev row* across. Turn.
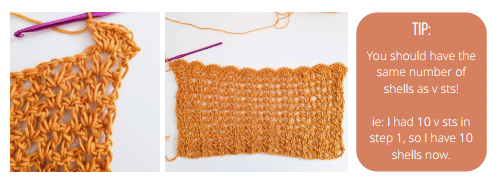
Ch 3 (counts as dc), 4dc in same st (inc made). Sc into 3rd dc of next shell st, Closed Shell St across until reaching final sc of row. 5dc (inc made) into final sc. Turn.
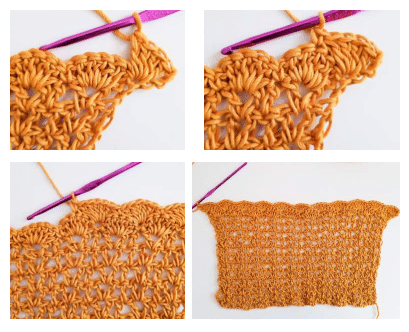
Ch 3 (counts as dc), 2dc in same st (half shell made). Sk 1 st, sc in next st. Closed Shell St across until reaching final shell from prev row.
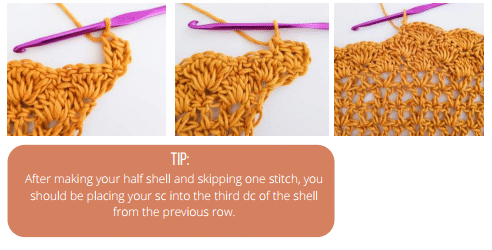
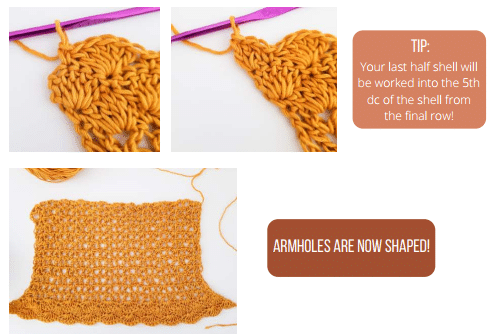
Sc into 3rd dc of final shell, sk 1 st. 3dc (half shell made) into final st. Fasten off.
PART II: FRONT LACE PANEL
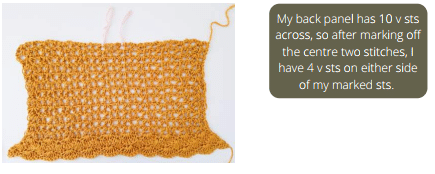
Count how many V sts you have on row 1 of your back panel. Mark off centre 2 v sts (if you had an odd number of v sts, mark off centre 3), ensuring you have an equal number of v sts on either side of your marked sts.
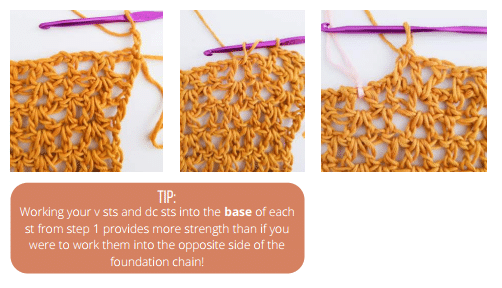
Attach yarn to corner edge of work. We are now working on opposite side of foundation ch made in step 1. Ch 3 (counts as dc), *sk 2 sts, v st into base of v st from step 1, dc into base of dc from step 1* across, until reaching marked v st. Turn, leaving marked st and remainder of sts unworked.
Repeat step 2 of back panel until you have 2 rows less than the total number of v st rows in back panel.
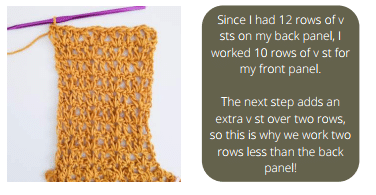
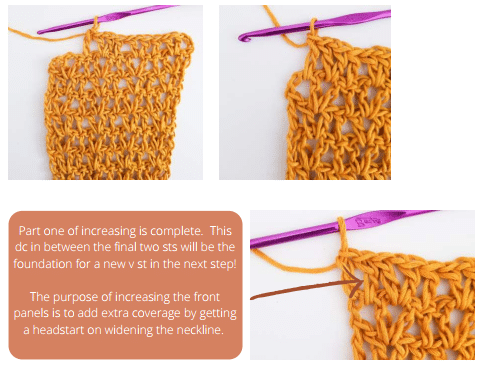
IIA: INCREASING FRONT PANEL
Ch 3 (counts as dc). *V st in ch sp of v st from prev row, dc in dc from prev row* across until reaching final v st of row. V st in ch sp of final v st, dc between final v st and final dc, dc in final dc.
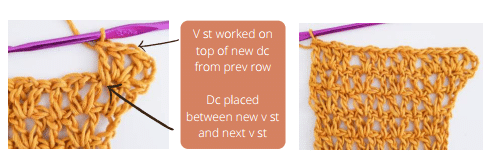
Ch 3 (counts as dc), v st in next st. Dc between next dc and v st. *V st in ch sp o next v st from prev row, dc in next dc from prev row* across.
Repeat steps 3-5, fasten off.
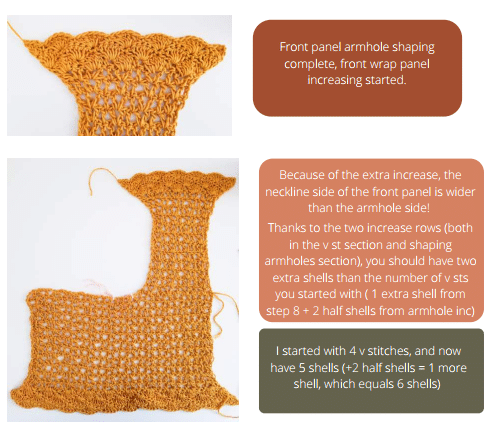
Repeat from step 6 on opposite side of back panel to create left front side, but do not fasten off.
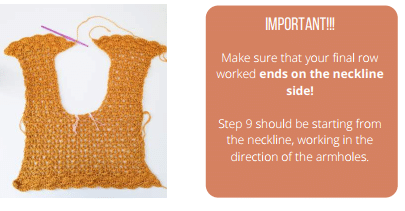
PART III: JOINING SECTIONS + CREATING ARMHOLES
Ch 1, sc in same st. Closed Shell St across until reaching final half shell of left front panel.
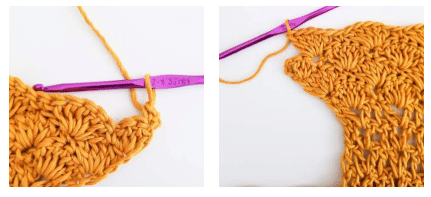
step 9 continued on next page…
*Insert hook into top of half shell, yo, pull up a lp. Insert hook into top of half shell on left side of back panel, yo, pull up a lp. Yo, pull through all 3 lps on hook.* Place a st marker in this st*.
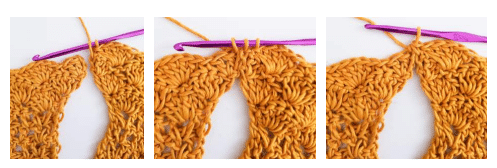
Continue working Closed Shell St until reaching final half shell of back panel. Repeat from * to join the right sides. Closed Shell St across until reaching final half shell of right front panel. Sc into top of half shell, turn.
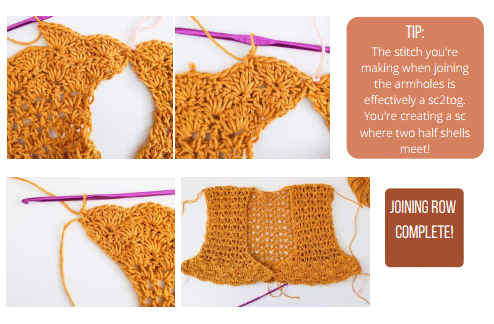
PART IV: WORKING MAIN BODY
Ch 3 (counts as dc), 4dc in same st (inc made). Closed shell st across until reaching final sc from prev row. 5dc in final st (inc made), turn.
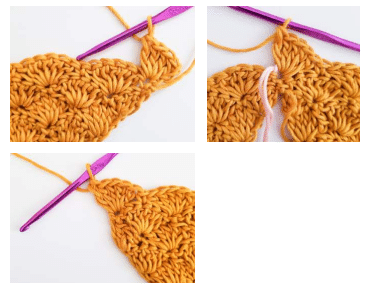
Ch 3 (counts as dc), 2dc in same st (half shell made). Sk 1 st, sc in next st, Closed Shell St across until reaching final full shell from prev row. Sc in 3rd dc of final shell, sk 1 st, 3dc (half shell made) in 5th dc of final shell. Turn.
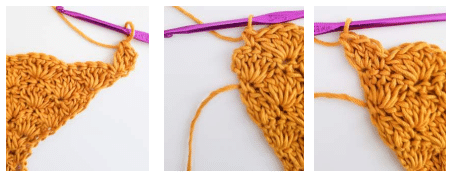
Ch 1, sc in same st. Closed Shell St across. Turn.
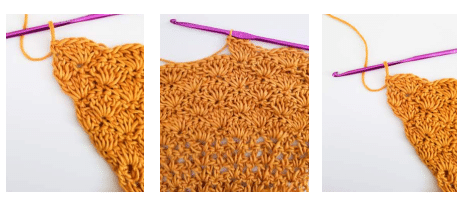
Repeat steps 10-12 until front panels can comfortably and generously overlap, and are long enough to reach your underbust.
If you want a longer top, you can keep working rows 10-12 for a few more inches, before proceeding to step 13. Ensure you end on a step 10 row before proceeding!
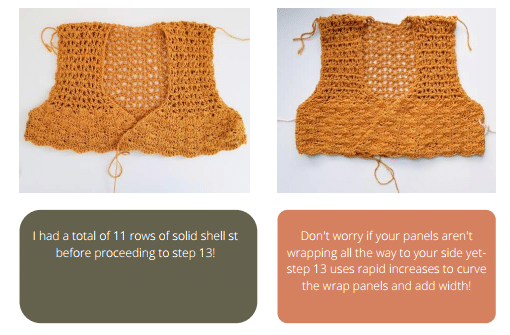
PART V: CURVING WRAP PANELS
Ch 3 (counts as dc), 4dc in same st (full shell inc made). Sk 1 st, sc in next st. Closed Shell St across until reaching final shell of row. Sc into 3rd dc of final shell, sk 1 st, 5dc into 5th dc of final shell (full shell inc made). Turn.
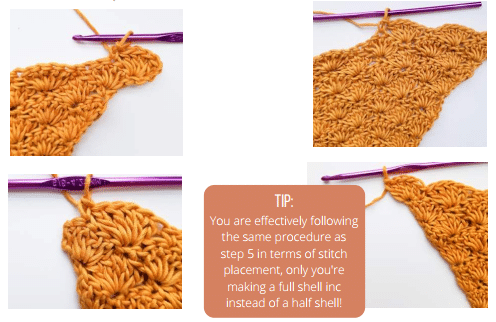
Repeat step 13 until piece is wide enough to comfortably wrap around your bust, with the front panels being wide enough to reach the opposite side.
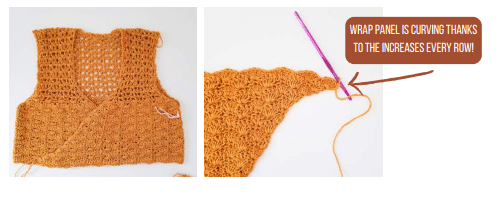
Work as many rows of step 13 as desired, ensuring you have an odd number of total closed shell st rows!
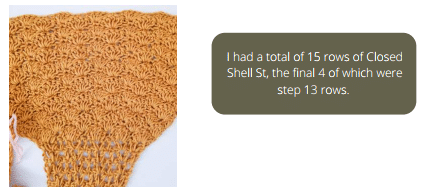
VA: PREPARING EYELET LOCATION
Locating Placement of eyelet holes for straps: Locate marked sts made in step 9 when joining armholes. Count upward to your current row. Each row will alternate between a sc and a shell. Your current row should have a shell aligned up on top of where your marked st is. Place a st marker in the 3rd dc of that shell st.
Repeat for other marked st.
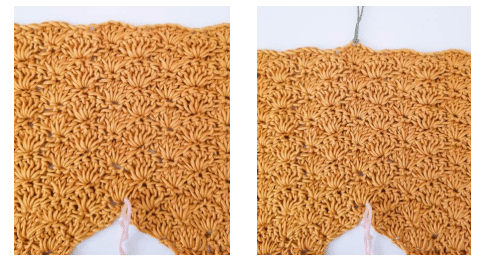
Ch 3 (counts as dc), 2dc in same st (half shell made). Sk 1 st, sc in next st. Closed Shell St across until reaching marked st.
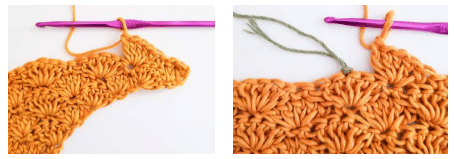
*Sc into marked st, place st marker.*Closed Shell St across until reaching 2nd marker. Repeat from *.
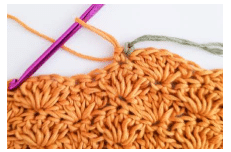
Closed Shell St across until reaching final shell from prev row. Sc into 3rd dc of final shell, sk 1 st ,3dc (half shell made) into 5th dc of final shell. Turn.
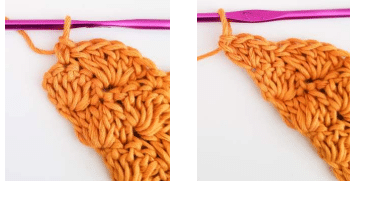
PART VI: CREATING WRAP TIES + EYELET HOLES
Determining length of ties: Count the number of full shells in your most recent row, plus 1 to account for the 2 half shells on either side. Multiply this number by 6. This should be the number of chains it takes for each tie to wrap around your top.
first wrap tie: *Chain your calculated number + 1 additional ch. Sc into 2nd ch from hook and each across, until reaching top of half shell from prev row*.
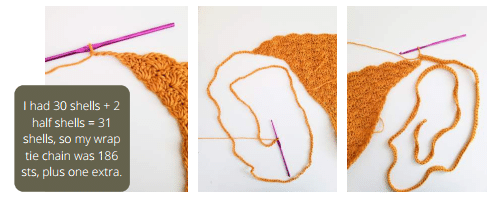
Sc into top of half shell, Closed Shell St across until reaching 1st marked st. **Dc, ch 3, dc** in marked st (eyelet made).
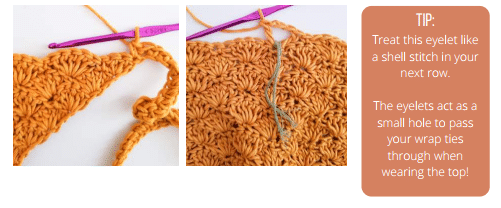
Step 15 continued on next page…
Closed Shell St across until reaching 2nd marked st. Rep from ** to create 2nd eyelet. Closed shell st across until reaching final half shell of row. Sc into final half shell.
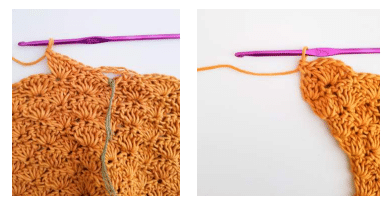
Second Wrap Tie: Repeat from *, sl st into sc worked into top of half shell.
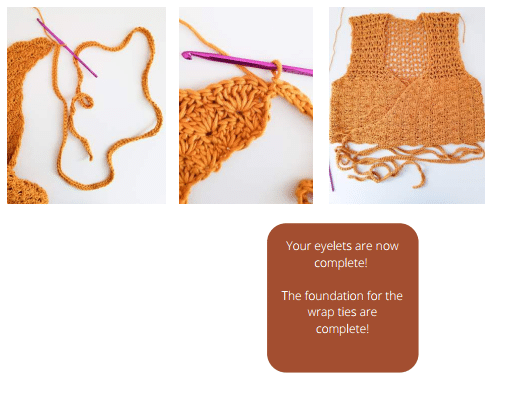
PART VII: CREATING THE PEPLUM HEM
Ch 3 (Counts as dc), *double v st in 3rd dc of next shell from prev row, dc in next sc from prev row* across until reaching end of body. Turn, leaving wrap tie unworked.
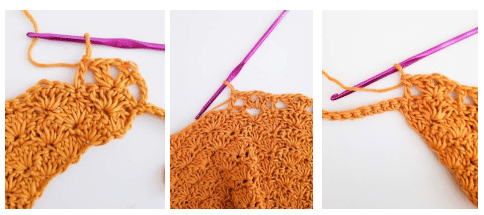
Sl st across until reaching top of ch sp of next double v st from prev row. Ch 3 (counts as dc), *v st in next dc from prev row, double v st in ch sp of next double v st* across until reaching final dc of prev row. V st in final dc, dc in ch sp of final double v st from prev row. Turn, leaving remainder of sts unworked.
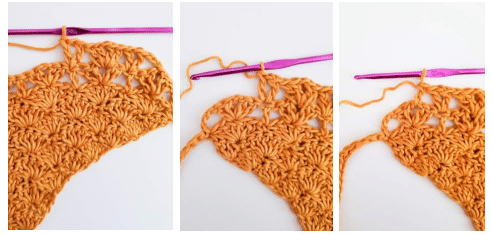
Sl st across until reaching ch sp of next v st. Ch 3 (counts as v st) , *double v st in ch sp of next double v st from prev row*, double v st in ch sp of next v st from prev row* across, until reaching final double v st from prev row. Double v st in next ch sp, dc in ch sp of final v st. Turn, leaving remainder of sts unworked.
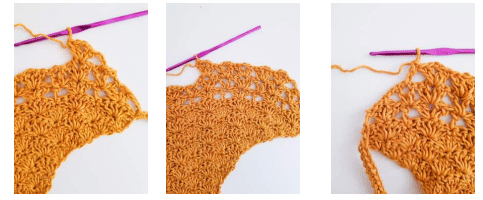
Sl st across until reaching ch sp of next v st. Ch 1, sc in same st. *dc in 1st st of next double v st, picot, dc in next st, picot, dc in ch sp, picot, dc in next st, picot, dc in final st ,sc in ch sp of next double v st.* Repeat from * across remainder of double v sts until reaching end of row. Do not turn!
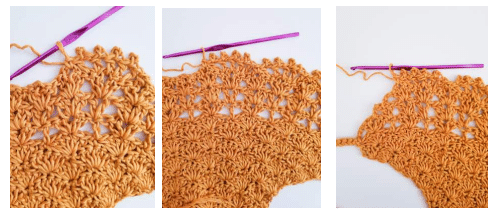
PART VIII: FINISHING FRONT PANELS + WRAP TIES
Working along the side of peplum edging, *sc, ch 3, sc* into each dc post until reaching wrap tie.
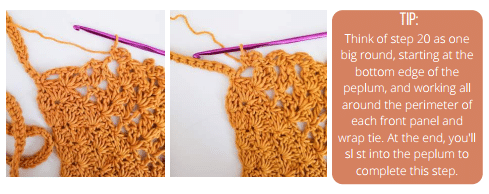
Finishing wrap tie: **Dc into 1st sc of strap and each across until reaching final st. 4dc, ch 1, 4dc in final st. Working along opposite side of wrap tie, dc in next st and each across until reaching end of strap. **
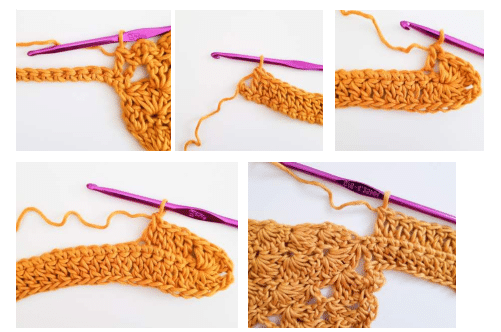
Step 20 continued on next page…
Working along side of front panel, *sc, ch 3, sc* in each dc post until reaching foundation row of back panel.
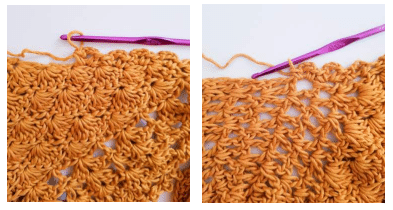
*sc, ch 3, sc* in each ch 2 sp of foundation row until reaching top of opposite front panel.
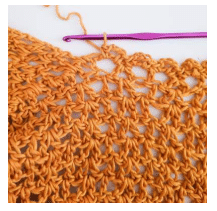
Step 20 continued on next page…
Working along side of front panel starting at the top, *sc, ch 3, sc* in each dc post until reaching second wrap tie.
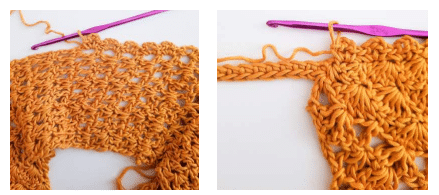
Second Wrap Tie: Repeat from **.
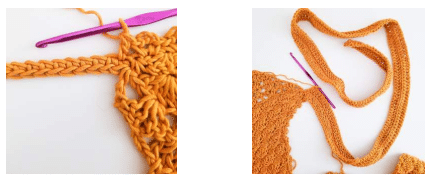
Working along the side of peplum edging, *sc, ch 3, sc* into next dc post and each across until reaching final sc made in step 19. Sl st into sc, fasten off.
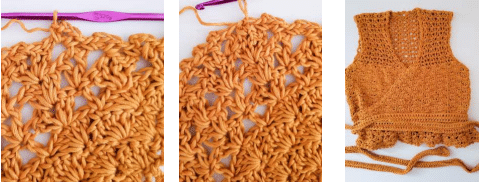
PART IX: SHAPING THE SLEEVE
Attach yarn to post of dc made in final row of v st lace portion of front panel (this should be the row right before Closed Shell St starts!). Ch 3 (counts as dc), working along side of work, v st into next dc post, *dc in next post, v st in next post* until reaching foundation ch of back panel.
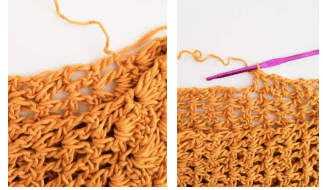
Dc in foundation ch. *V st in next post, dc in next post* until reaching closed shell st foundation row. Sl st into dc post of full shell inc from step 4. Turn.
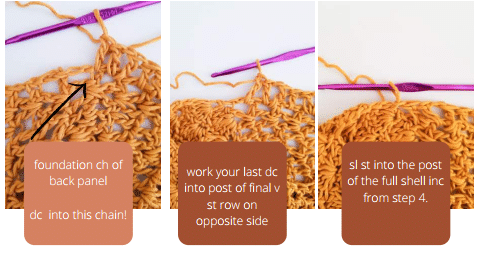
Ch 4 (counts as dc + ch 1), dc in same st (v st made). Dc in next dc st, *v st in ch sp of v st from prev row, dc in next dc from prev row* across until reaching end of row. V st into dc post of full shell inc from step 4. Sl st into dc post of half shell from step 5. Turn.
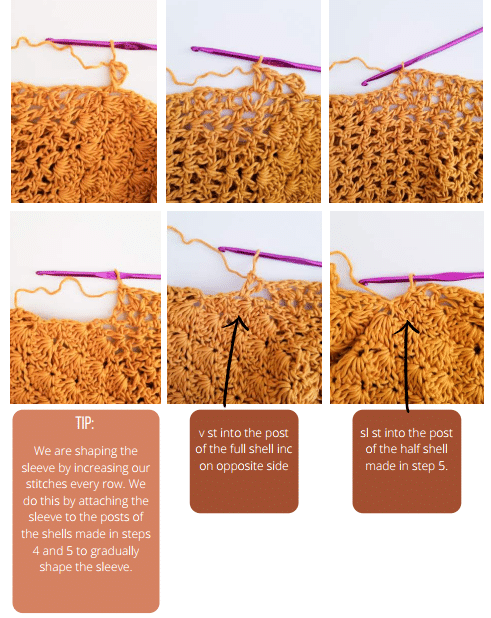
Ch 3 (counts as dc), v st in ch sp of next v st from prev row, *dc in next dc from prev row, v st in next ch sp from prev row* across until reaching end of row. Dc into dc post of half shell from step 5. V st into joining sc2tog made in step 9. Sl st into top of ch 3 made at beginning of row. Turn.
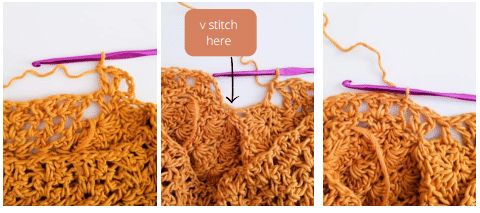
We are now working in joined rows!
PART X: LENGTHENING SLEEVE
Ch 3 (counts as dc), v st in ch sp of next v st from prev rnd, *dc in next dc from prev rnd, v st in next ch sp from prev rnd* around. Sl st into top of ch 3 from beginning of rnd.
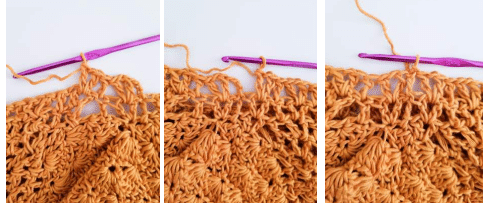
Repeat Step 12 until sleeve is 3 inches shorter than desired length.
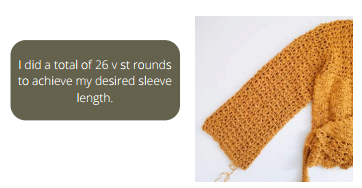
PART XI: MAKING THE CUFF
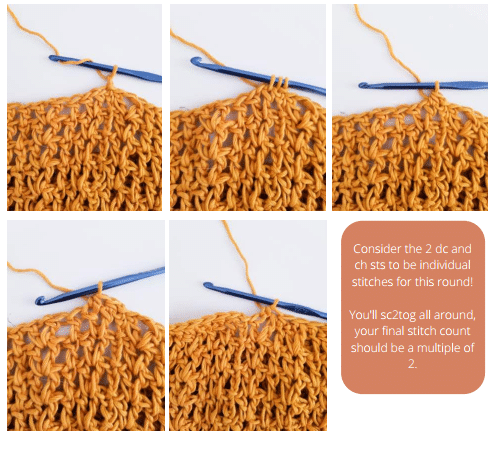
Ch 1, starting in same st, sc2tog around. Sl st into top of 1st sc2tog.
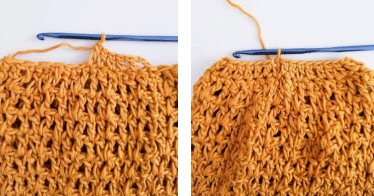
Ch 3 (counts as dc). Dc in next st and each around. Sl st into top of ch 3.
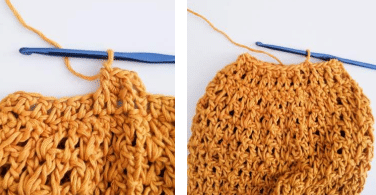
Ch 3 (counts as dc), Fpdc in next st. *dc, fpdc* around. Sl st to top of ch 3.
Continue repeating step 27 until cuff is desired length. Fasten off.
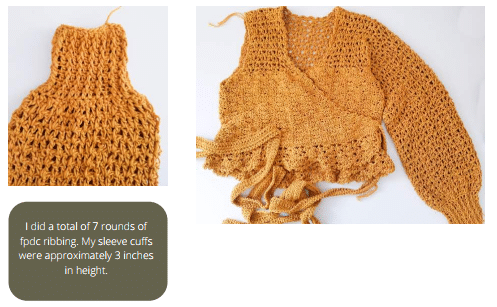
Repeat steps 21-27 on opposite side to create second sleeve.
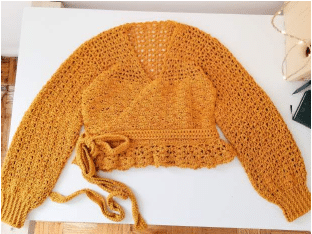
Weave in all ends and enjoy your brand new Wrap Top
PART XII: SHORT SLEEVE VARIATION
Work steps 21-23 as instructed, then repeat step 24 until sleeves are the desired length. For short sleeves, I will work step 24 three to five times for a “t-shirt” length.
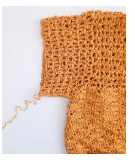
Ch 1, sc in same st. 5dc in ch sp of next v st from prev rnd, *sc in next dc from prev rnd, 5 dc in ch sp of next v st from prev rnd* around until reaching end of rnd. Sl st into first sc made. Fasten off.
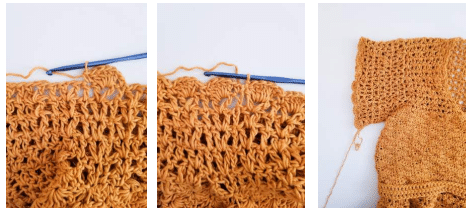
Repeat for other side.
Additional Customization Notes
- Use a larger hook size for the sleeves and peplum to achieve more drape and create a more airy garment.
- Use a smaller hook size for the sleeve cuffs to create a stiffer, more tight cuff.
- For extra full sleeves, you can omit the sleeve shaping and simply work the alternating v st/ dc lace around the armhole.
- For a more exposed neckline, you can omit steps 7-8 and work the front panels exactly as the back.
