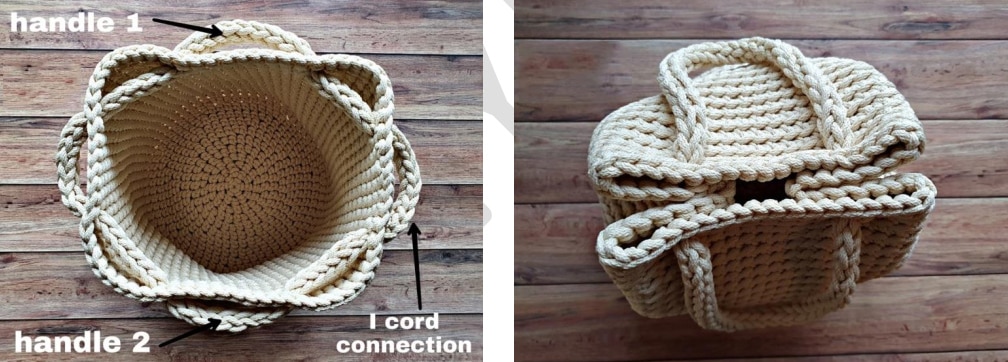
Feel yourself comfortable and fashionable with this exclusive handbag! I named it “Dew Drop”, because of the shape – it reminds me a drop.
This bag is very capacious, because of round bottom, therefore it can hold many essential items for woman: from wallet and makeup, to lunch box with a bottle of water and favorite book, or even a child’s toys. It also can be used as a casual shopping bag or summer beach-bag too.
You can wear it as handbag and shoulder-bag as well. This bag is really sustainable and will be used for a long time, because it‘s made from strong polyester yarn.
Bag do not attract dust, also it can be washed in a washing machine and fully retain form and color after washing.
Material
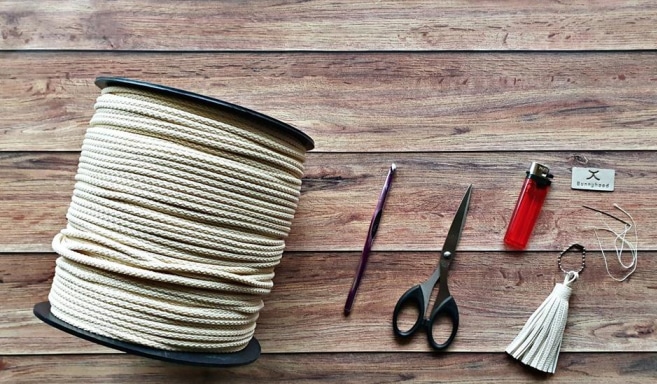
YOU WILL NEED:
- ~200 meters polyester rope 5-6 mm (colorused – light beige).
- 7 mm crochet hook.
- Scissors.
- Lighter (for hiding ends).
- Accessories: label (sewn with needle) and favorite tassel.
FINISHED BAG SIZE:
- Round bottom diameter ~30 cm.
- Height ~ 30 cm.
- Handles ~45 cm.
YARN
This polyester yarn, so called rope, is quite a
unique yarn. It’s made of tubular knit polyester
outer which surrounds polyester yarn core. It’s
very easy to work with it and it’s perfect for lots of
home décor items, such as baskets, coasters,
rugs and etc.
CARE
It can be washed in the washing machine on 30 –
40°C gentle cycle. Do not tumble dry, do not
bleach, do not iron or dry clean
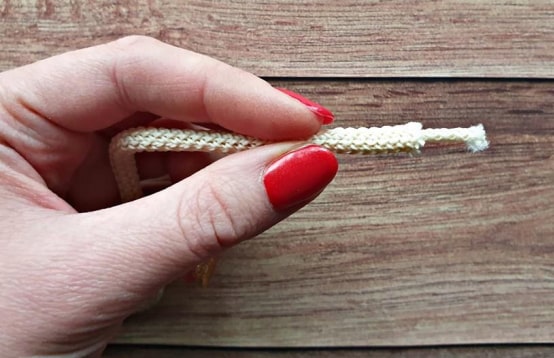
STITCHES USED
- Magic loop
- Chain stitch – ch
- Single crochet – sc
- Single crochet back loops only – sc blo
- Slip stitch – sl
CROCHET THE BAG BODY
PATTERN INSTRUCTIONS
Pattern is worked as one piece in the round, so there’s no joining or turning. Work in a spiral and use a stitch
marker (or a scrap yarn) to help keep your place. There’re a few links to video’s, that will help you.
MAKE THE BASE
Start by making a magic loop.
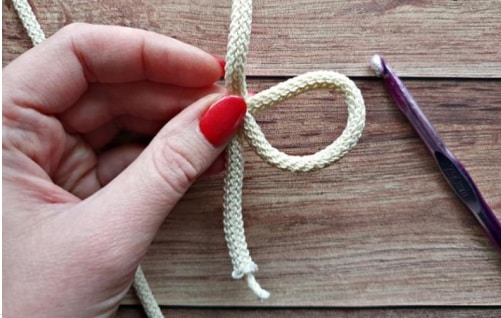
First, make a loop. To the up is the skein of yarn. To the
down is the end of the yarn. Next, catch the top yarn and pull it under and through the loop, and then chain 1. The hardest part is done.
Now work round 1 single crochet over the loop and the
strand of yarn behind the loop together. When all the single crochets are done, pull the loose strand of yarn. The opening will be nice and tight
Here’s video how to make a magic ring
ROUND 1: 6 sc into the magic loop (6).
ROUND 2: 2 sc blo into each stitch (12).
ROUND 3: * 1 sc blo, 2 sc blo into next stitch *, repeat * * till round complete (18).
ROUND 4: * 2 sc blo, 2 sc blo into next stitch *, repeat * * till round complete (24).
ROUND 5: * 3 sc blo, 2 sc blo into next stitch *, repeat * * till round complete (30).
ROUND 6: * 4 sc blo, 2 sc blo into next stitch *, repeat * * till round complete (36).
ROUND 7: * 5 sc blo, 2 sc blo into next stitch *, repeat * * till round complete (42).
ROUND 8: * 6 sc blo, 2 sc blo into next stitch *, repeat * * till round complete (48).
ROUND 9: * 7 sc blo, 2 sc blo into next stitch *, repeat * * till round complete (54).
ROUND 10: * 8 sc blo, 2 sc blo into next stitch *, repeat * * till round complete (60).
ROUND 11: * 9 sc blo, 2 sc blo into next stitch *, repeat * * till round complete (66).
ROUND 12: * 10 sc blo, 2 sc blo into next stitch *, repeat * * two times (24).
Base is done.
If your base is not flat enough – here’s video how make it more flat
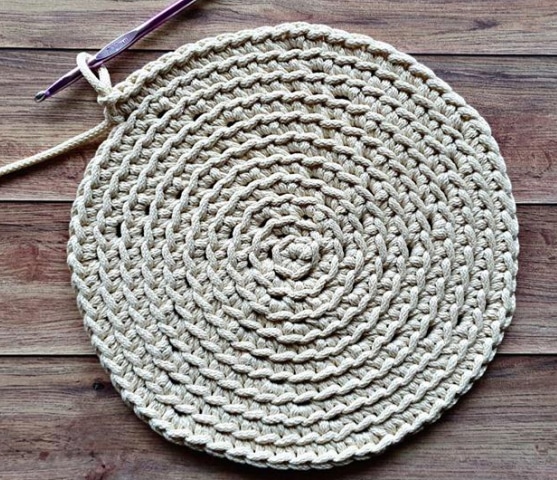
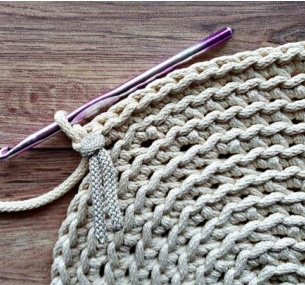
I use scrap yarn to mark the lastsingle stitch of the base – it will let youeasy count rows for the further crocheting.
MAKE THE SIDES
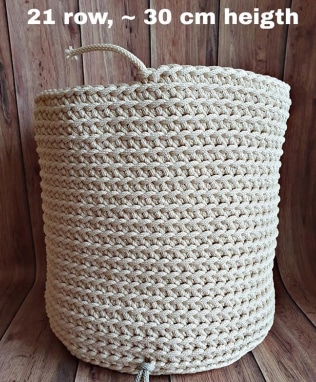
The sides are super easy to make, just crochet all the stitches until the bag is as tall as you like.
Round 13 – 34: sc blo all stitches for 21 row (or till side is ~30 cm tall). Slip 2 last stitches and weave in end*.
*I always try to hide ends, that it would not be noticeable. So I will show you very easy way to finish this end nicely. But you can skip this tip, if you feel you don’t need it
PERFECT ENDING
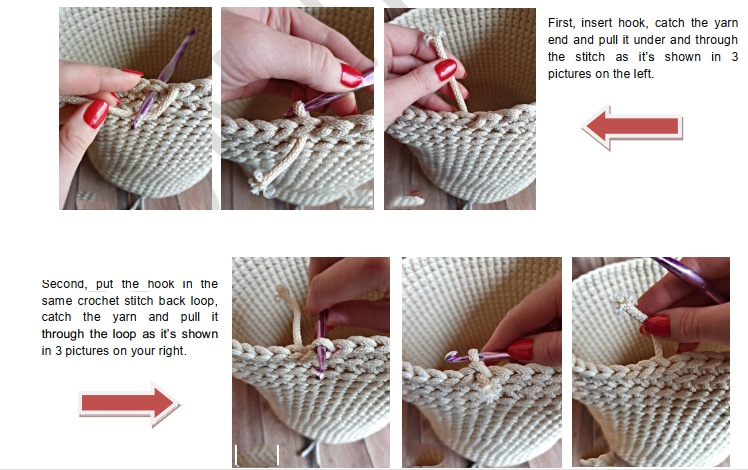
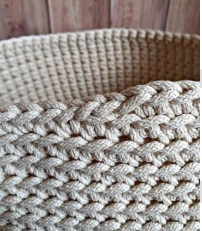
This yarn is 100% polyester, so it’s perfect for hiding ends with lighter, because it can melt. Hide the yarn end a little bit further on your crocheting and cut the rest of the yarn, leaving only very short ending.
Then heat this short ending for a few seconds with a lighter and quickly hide it by pushing it under the nearest yarn with a hook (see pictures below).
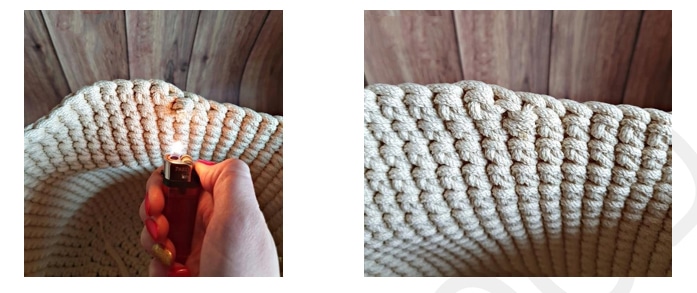
Here’s video how to end the sides nicely
That’s it! The sides are done.
CROCHET THE HANDLES
Handles are made by crocheting I-Cord. Knowing how to make I-Cord is helpful in so many ways! It can be used as a lanyard, drawstrings or any other rope or cord. So follow the tutorial below how to make
I-Cord.I-CORD TUTORIAL
Once you get started, just keep adding rows until you reach your desired length.
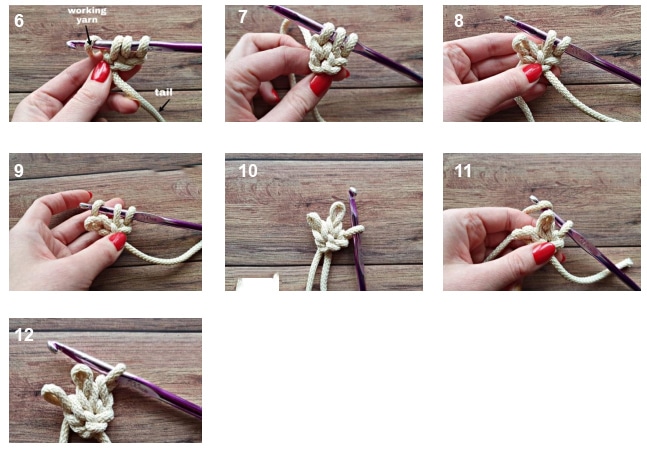
ROW 1: Chain 3. Insert hook into 2nd chain, pull up a loop. Insert hook into 3rd chain, pull up a loop (3 loops on hook). Follow 1 – 5 pictures below.

ROW 2 – desired length: catch the yarn and pull up a loop, then remove it from hook, being careful not to lose it (picture 6-8). I like to pinch the cord with my thumb and finger and it helps me not to lose them.
Then yarn over and pull a loop through the second loop, carefully remove it from the hook too (picture 9-10). Yarn over and pull up a loop catch the yarn and pull a loop (picture 11-12).
To start next row – insert hook into two next (empty) loops (3 loops on a hook).
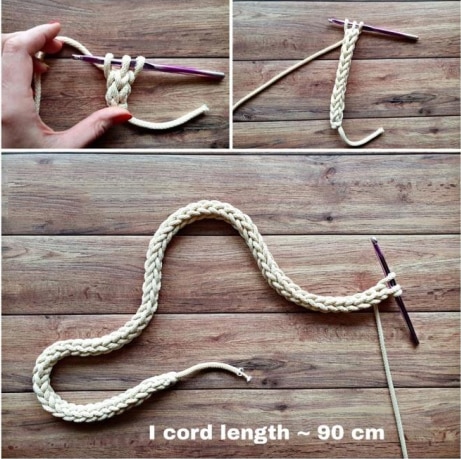
Continue crocheting rows in this manner until the cord is ~90 cm length. Then pull off the hook, cut the yarn (leaving ~ 30 cm ending) and leave it all. Later we will join the ends
ASSEMBLING THE BAG
The crochet fabric is very strong, so there is not chance the bag will tears away or brake.
You may get a little stretching in the stitch gap like this (see the photo on the left) and pull the I-Cord throughout it (picture 1)
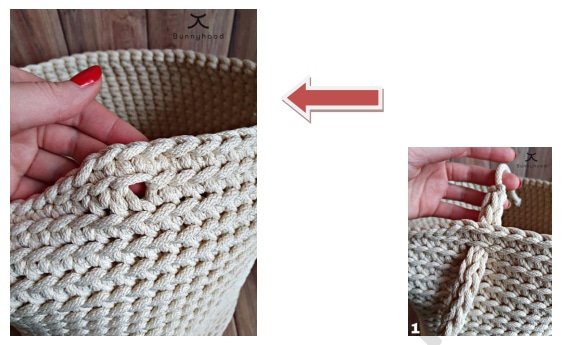
Weave the I-Cord you’ve just crochet in and out of stitches, about two rows down (follow 2 – 8 pictures)
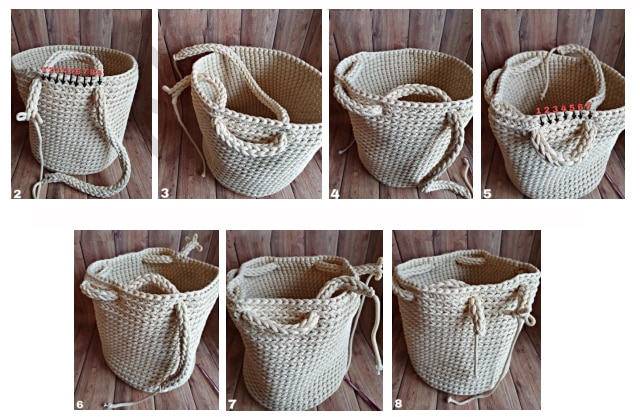
Here’s video how to wave in the handle
JOIN THE ENDS
After you waved the I-Cord, you need to join its endings. This part you can do by ending I-cord (yarn over and pull through all three loops on hook) and tie up both endings together. But I suggest you join the ends nicely, by giving some tips
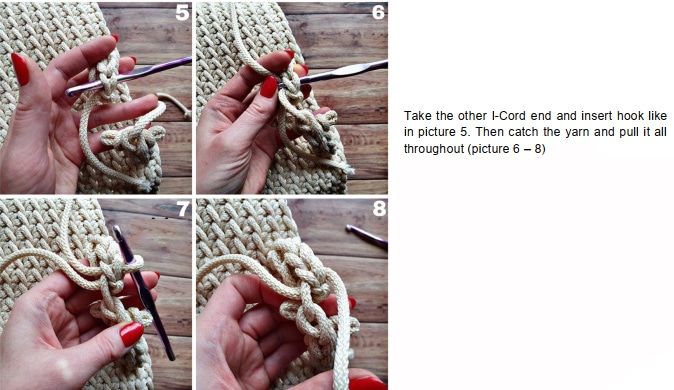
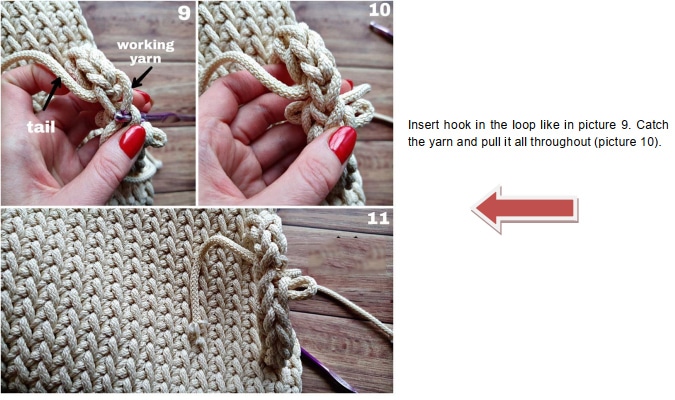
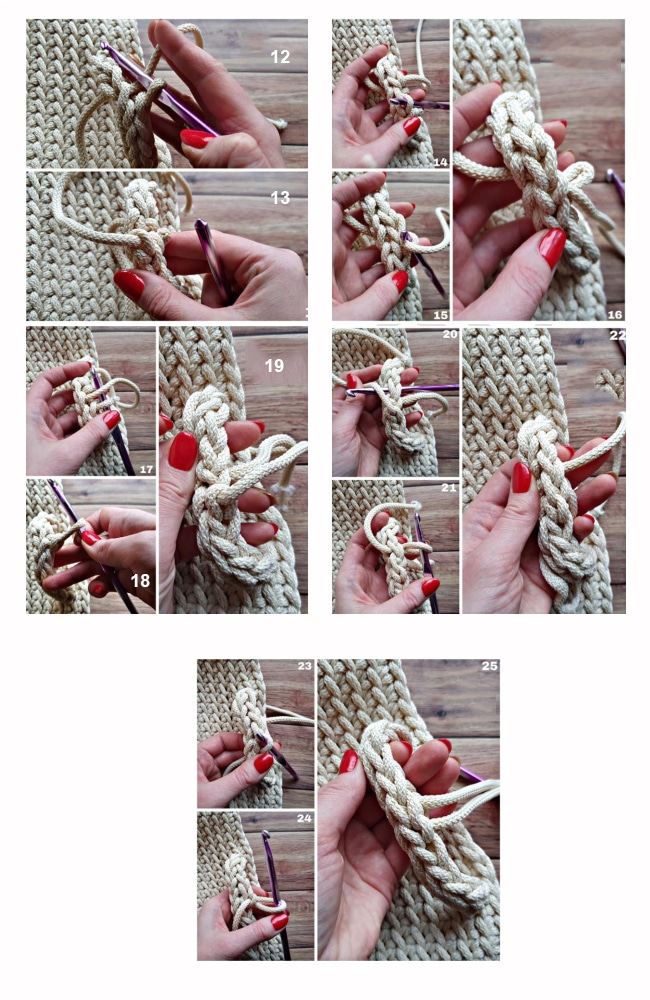
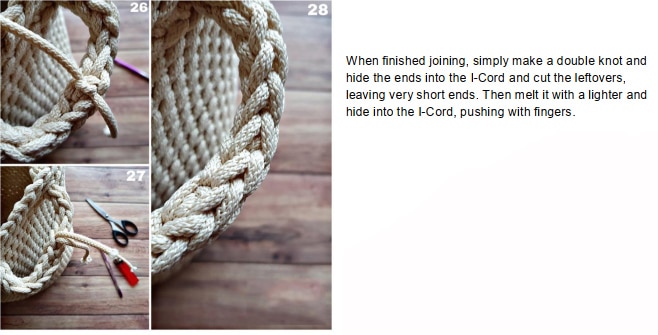
From the first glance it could look complicated, but that is not so hard, just follow the instructions step by step below (pictures 1-28).
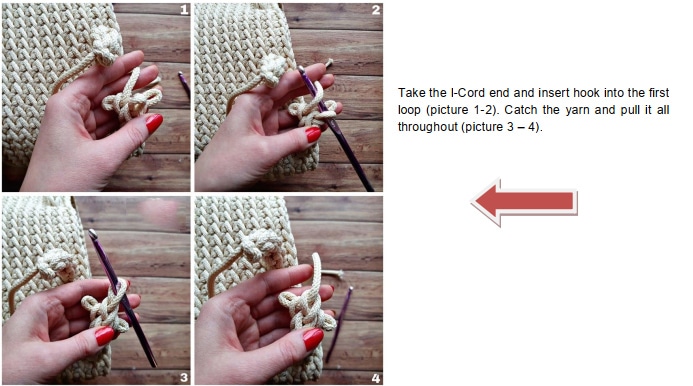
Here’s video how to join the handle and hide the ends
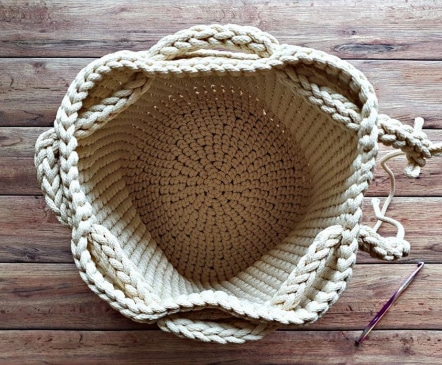
That’s it! Now you need to pull handle 1 and handle 2 (see picture below), put your favorite tassel, sew on a label and it’s ready to wear.
