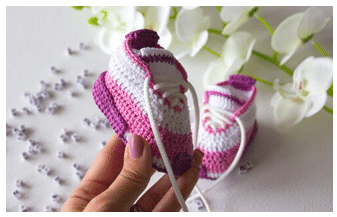
Crochet Pattern Baby Shoes Sneakers – To make things go as smoothly as possible, this pattern contains a link to the video instructional in addition.
Skill Level – Advansed
Materials Needed
- 3 skeins of yarns in 3 different colors (yarn A – white, B – any color and C – any color) Vita cotton Lily 100% mercerized cotton, 1.75oz(50g) each approx 137yds(125m).
You can substitute yarn, just make sure that it matches original proportions.
Suggested substitute yarn Scheepjes Catona, Schachenmayr Catania
- Crochet hook C/2 or D/3 (2.5mm or 3mm), OR SIZE TO OBTAIN GAUGE
- Scissors
- Tapestry needle or smaller crochet hook
- Shoe laces. (I use cord 4mm – 60 cm)
- Measuring tape
Gauge
- 24 dc x 13 rows = 4”(10cm)
- TAKE TIME TO CHECK YOUR GAUGE!
Abbreviations (US terminology)
- ch – chain
- cont – continue
- BOR – beginning of the round
- dc – double crochet
- hdc – half double crochet
- sc – single crochet
- dec – decreases, sc2tog.
- sl st – slip stitch
- rnd(s) – round(s)
- dc2tog – dс 2 together
- RS – right side
- st(s) – stitch(es)
- WS – wrong side
- FLO – front loops only
! Number of stitches is provided below according to the size as follows:
- 0-3months / 3-6 months / 6-9 months / 9-12 months
- 0-3 months – foot length approx 3.5”(9 cm)
- 3-6 months – foot length approx 3.9”(10 cm)
- 6-9 months – foot length approx 4,3″ (11 cm)
- 6-12 months – foot length approx 4.7”(12 cm)
- ! Measure the baby’s foot for better fit.
- ! I recommend you to count the stitches at the end of each row to avoid the mistakes
Instructions
Sole
With B yarn Ch19/21/23/25.
Rnd 1: 2dc in the 4th st from the hook, dc in next 14/16/18/20 sts, 6dc in the last st, cont. to work along the other side of the chain, dc in next 14/16/18/20 sts, 3dc in the last st (pic.1).
Finish with sl st in ch. (pic.2). (40/44/48/52 sts)

Rnd 2: ch1 (do not count as a st), 2sc in the same st, 2sc in next 2 sts, sc in next 4/5/5/5 sts, hdc in next 2 sts, dc in next 8/9/11/13 sts, 2dc in next 6 sts, dc in next 8/9/11/13 sts, hdc in next 2 sts, sc in next 4/5/5/5 sts, 2sc in next 3 sts.
Finish with sl st in sc. (pic.3) (52/56/60/64 sts).
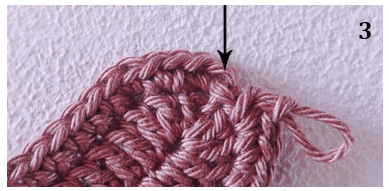
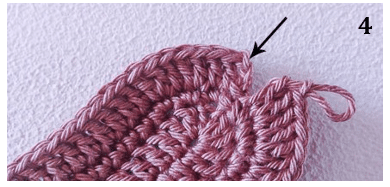
Rnd 3: ch3 (count as a dc), dc in the same st, dc in next st, [2dc in next st, dc in next st] 2 times, dc in next 14/16/18/20 sts, [2 dc in next st, dc in next st] 6 times, dc in next 14/16/18/20 sts, [2 dc in next st, dc in next st] 3 times. Finish with sl st in ch. (pic.4) (64/68/72/76 sts).
Fasten off and cut yarn. The sole is ready.
The upper part and toe
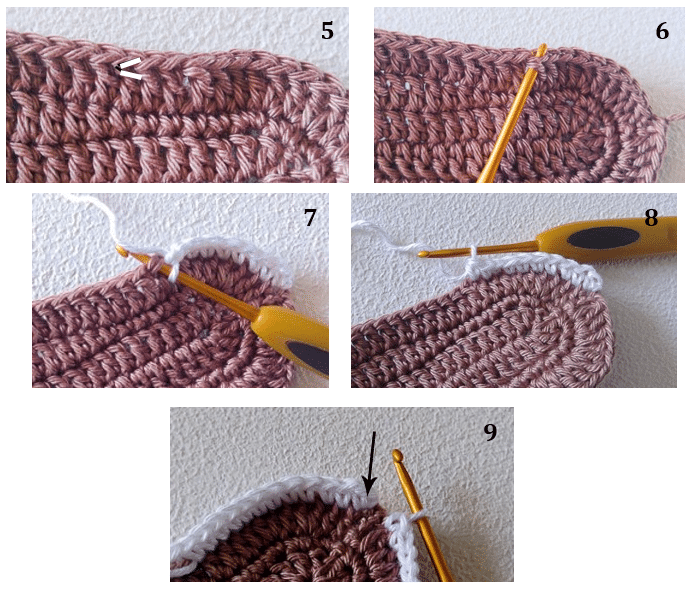
Rnd 1: with A yarn cont to work starting from BOR with RS facing you. Pic.5-6 and pic. 7- 8 shows how to work sc when working rnd 1. RS is inside the bootie.
==> Video Tutorial
ch 1 (do not count as a st), sc in the same stitch, sc in next 63/67/71/75 sts.
Finish with sl st in sc. (pic. 9) (64/68/72/76 sts)
Rnd 2: ch1 (do not count as a st), sc in the same st, sc in next 63/67/71/75 sts.
Finish with sl st in sc. (64/68/72/76 sts).
Rnds 3-4: with C yarn ch1 (do not count as a st), sc in the same st, sc in next 63/67/71/75 sts.
Finish with sl st in sc. (64/68/72/76 sts)
Rnd 5 (DEC): ch1 (do not count as a st), sc in the same st, sc in next 22/24/26/28 sts, [dec, sc in next st] 6 times (see pic.10-11), sc in next 23/25/27/29 sts.
Finish with sl st in sc. (58/62/66/70 sts rem).

Rnd 6 (DEC): ch2 (do not count as a dc), dc in the same st (pic.12), dc in next 19/21/23/25 sts, [dc2tog, dc in next st (see pic.14)] 6 times, dc in next 20/22/24/26 sts.
Finish with sl st in dc (pic.13) (52/56/60/64 sts rem). ==> How To dc2tog

Rnd 7 (DEC): with A yarn ch2 (do not count as a dc), dc in the same st, dc in next 16/18/20/22 sts, [dc2tog, dc in next st] 6 times, dc in next 17/19/21/23 sts.
Finish with sl st in dc. (46/50/54/58 sts rem).
Rnd 8 (DEC): ch2 (do not count as a dc), dc in the same st, dc in next 13/15/17/19 sts, [dc2tog, dc in next st] 6 times, dc in next 14/16/18/20.
Finish with sl st in dc. (40/44/48/52 sts rem). Fasten off and cut yarn.

The upper part decoration
Join A yarn counting 1/3/4/5 st from the first dec of the last rnd. Count the same number of sts from the last dec from the other side and pm or mark this place using CC yarn or marker. Work as follows:
Row 1: ch1 (do not count as a st), sc in the same st where the yarn was joined, sc in next 27/27/29/31 sts. = (28/28/30/32 sts), turn.
Row 1: ch1 (do not count as a st), sc in the same st (pic.17), sc in next 27/27/29/31 sts. = (28/28/30/32 sts). Fasten off and cut yarn.
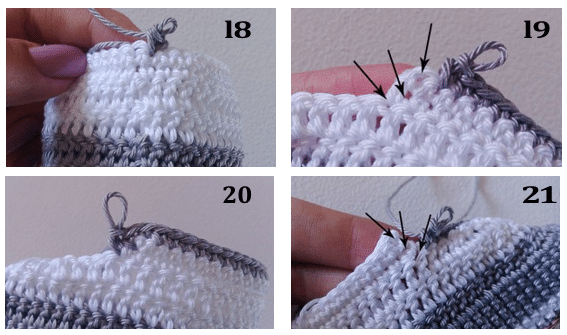
Join C yarn at back bootie and work as follows:
ch1 (do not count as a st), sc in the same st (pic.18), sc in each st around. Pic.19-21 shows how to work sts on the rows’ transition.
Finish with sl st in sc. (44/48/52/56 sts). Fasten off and cut yarn. Top is ready.
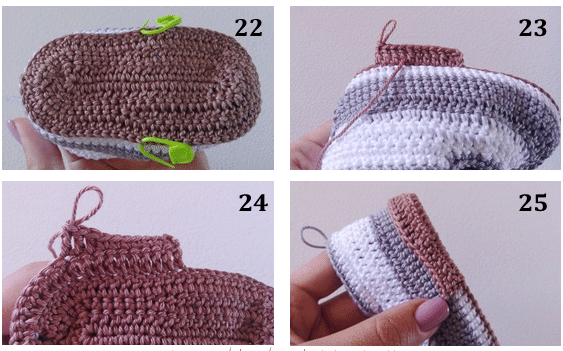
Heel decoration
Count 17/17/19/21 sts from beg of rnd to the left and to the right, place marker or mark these sts using CC yarn.(pic.22).
Join yarn B. Working dc FLO. When working row1, make sure that you work with WS facing you. RS should be inside (pic.25)
Row 1: ch3, dc in next 33/33/37/41 sts, turn.
Row 2: ch1, sc in the same st, sc in next 6/6/6/7 sts, dc in next 20/20/24/26 sts, sc in next 7/7/7/8 sts.
Fasten off and cut yarn, leaving a long tail for sewing.
==> How To sew the heel to the bootie
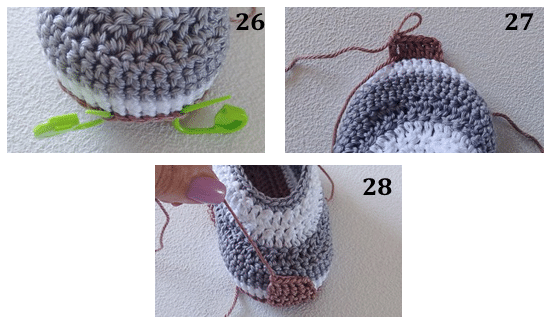
Toe decoration
Toe is worked in the same way as heel. Count 12/14/14/14 sts starting from the marked heel sts. 6 toe sts should remain in the centre. Work these sts as follows:
Row 1: ch3, dc in next 5 sts, turn the piece,
Row 2: ch2, dc in next 3 sts, dc2tog (pic.28).
Fasten off and cut yarn, leaving a tail for sewing. Sew in the same way as it was done for heel, make sure that toe is in the centre.
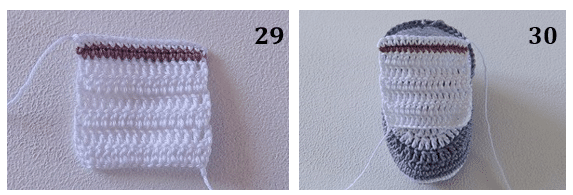
Bootie tongue
With A yarn, leaving a long tail for sewing.
Row 1: ch19, dc in the 5th st from the hook, dc in next 14 sts.
Row 2: ch3, dc in next 15 sts.
- For size 0-3 months work for 3 more rows.
- For sizes 3-6/6-9/9-12 months work for 4 more rows.
Rows 6/7: with yarn B ch1, sc in next 16 sts.
Rows 7/8: with yarn A ch1, sc in next 16 sts.
Fasten off and cut yarn. Tongue is ready. Turn the bootie inside out and sew the tounge

Back label
Row 1: with B yarn ch10, dc in the 5th st from the hook, dc in next 5 sts.
Rows 2-4: ch3, dc in next 6 sts.
Fasten and cut yarn, leaving a tail for sewing. Place the piece to the back part of the bootie, in the center and sew it (pic. 32)

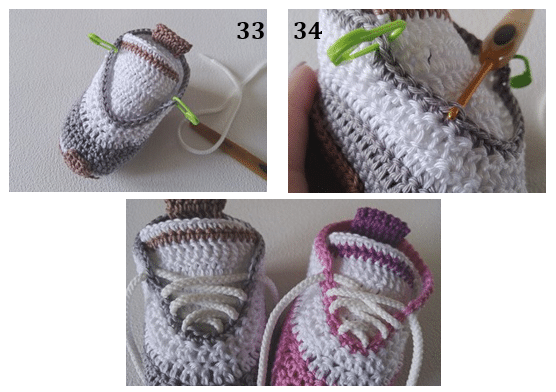
The bootie is ready. Weave all tails. Pic. 33 shows where to place laces. Insert laces between sc (pic.34). You can use a crochet hook for this.
Rep the same for the 2nd bootie. The baby booties are ready!
