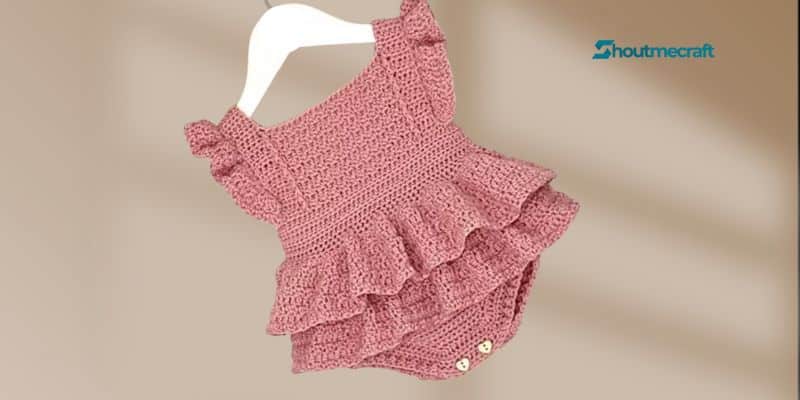
Crochet Pattern Baby Romper – Crochet pattern for beautiful baby romper, ideal for that new baby girl gift.
| Sizes | Hip | Length | Yarn amount |
| 0-3 months | 49cm | 32cm | 150g / 443 metres |
| 3-6 months | 51cm | 36cm | 190g / 560 metres |
| 6-12 months | 53cm | 40cm | 200g/ 590 metres |
| 12-18 months | 55cm | 44cm | 210g/ 620 metres |
| 18-24 months | 57cm | 46cm | 230g/ 680 metres |
| 24-36 months | 59cm | 49cm | 260g/ 770 metres |
Sizes are based on using DK weight yarn (3 weight), 295 mts or 322 yrds per 100g.
My samples were made using Stylecraft Special DK
Measurements above are for the finished romper
You will need a 4.00 mm and 3.00 mm hook, buttons, yarn needle, scissors and stitch markers
Gauge 4 x 4 inches = 18 sts and 22 rows in SC
Abbreviations
- Sl St – Slip stitch
- Ch – Chain
- HDC – Half double crochet (UK Half treble)
- St(s) – Stitch (es)
- SC – Single Crochet (UK Double Crochet)
- Sk – Skip
- DC – Double Crochet (UK Treble)
- RS – Right side
- WS – Wrong side
- BL – Back loops
- FL – Front Loops
Let’s get started…… Using the 4mm hook
Chain 85 89 93 97 101 105
Round 1 – SC into the 2nd chain from hook. SC into each chain. Join with a slip stitch to the first SC to create a ring. Make sure you have no twists in your ring. Ch 1 and turn. 84 88 92 96 100 104 sts
Note: at the end of each row or round we will Ch1, this never counts as a stitch.
Round 2 – (RS) SC into the BL (back loops) of each stitch. Join with a Sl St to the first SC. Ch1 and turn. 84 88 92 96 100 104 sts
Round 3 – SC into each stitch. Join with a Sl St to the first SC. Ch1 and turn. 84 88 92 96 100 104 sts Repeat row 3 until you have completed 9 9 9 11 11 11 rounds. Ch 1 and turn.
Round 10 10 10 12 12 12 – (RS) SC into the BL (back loops) of each stitch. Join with a Sl St to the first SC. Ch1 and turn. 84 88 92 96 100 104 sts
Repeat row 3 until you have completed a total of 17 19 21 23 25 27 rounds. Ch 1 and turn.
We are now going to start our back panel…..
Row 1 – (RS) SC into the first 45 47 49 51 53 55 stitches. Ch 1 and turn.
Row 2 – (WS) SC into the first St. Skip a stitch. SC into the next 41 43 45 47 49 51 stitches. Skip a stitch. SC into the last St. Ch 1 and turn. 43 45 47 49 51 53 stitches.
Row 3 – SC into the first St. Skip a stitch. SC into each stitch until you have 2 sts remaining. Skip a stitch. SC into the last St. Ch 1 and turn. 41 43 45 47 49 51 stitches.
Repeat row 3 (each time reducing your stitches by 2) until you have completed 19 19 20 20 21 22 rows. You will have 9 11 11 13 13 13 stitches. Follow instructions for each size below. 0-3 months – Fasten off.
3-6 months – Row 20 – Ch 1 and turn, SC into each stitch. 11sts. Fasten off.
6-12 months – Row 21 – Ch1 and turn, SC into each stitch. 11sts. Ch 1 and turn.
Row 22 – SC into each stitch. 11 sts. Fasten off.
12-18 months – Row 21 – Ch1 and turn, SC into each stitch. 13 sts Ch 1 and turn
Row 22 and 23 – SC into each stitch. 13 sts. At the end of row 23, fasten off.
18-24 months – Row 22 – Ch1 and turn, SC into each stitch. 13 sts
Row 23, 24 and 25 – SC into each stitch. 13 sts. At the end of row 25, fasten off.
24 – 36 months – Row 23 – Ch1 and turn, SC into each stitch. 13 sts
Row 24, 25 and 26 – SC into each stitch. 13 sts. At the end of row 26, fasten off.
We are now going to start our front panel…..
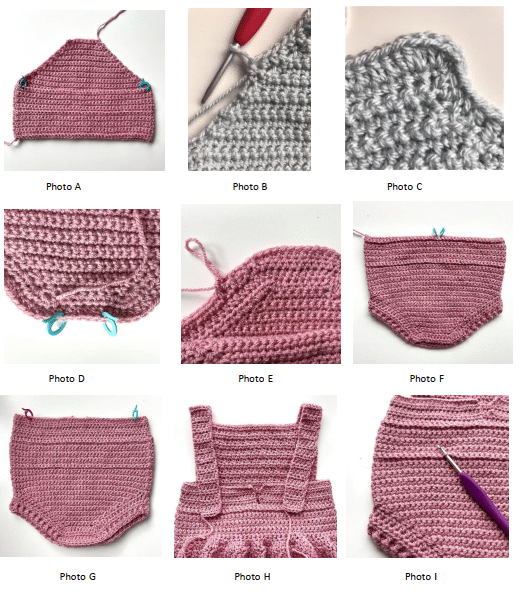
Lay your work flat and place a stitch marker into the right and left side of the front panel leaving a stitch between the back panel and your marker. See Photo A. Including the marked stitches you will have 37 39 41 43 45 47 sts across the front to work into. Working from the right side, attach yarn and Ch 1.
Row 1 – (RS) SC into this stitch and the next 36 38 40 42 44 46 stitches. Ch 1 and turn. 37 39 41 43 45 47 sts.
Row 2 – SC into the first St. Skip a stitch. SC into each stitch until you have 2 sts remaining. Skip a stitch. SC into the last St. Ch 1 and turn. 35 37 39 41 43 45 sts.
Repeat row 2 (each time reducing your stitches by 2) until you have completed 15 15 16 16 17 18 rows. You will have 9 11 11 13 13 13 stitches. Follow instructions for each size below.
0-3 months – Do not fasten off, start to work on the edging rows. See below. 3-6 months – Do not fasten off, start to work on the edging rows. See below.
6-12 months – Row 17 – SC into each stitch. 11 sts. Do not fasten off, start to work on the edging rows. See below.
12-18 months – Row 17 – SC into each stitch. 13 sts. Ch 1 and turn.
Row 18 – SC into each stitch. 13 sts. Do not fasten off, start to work on the edging rows. See below.
18-24 months – Row 18 – SC into each stitch. 13 sts. Ch 1 and turn.
Row 19 – SC into each stitch. 13 sts. Ch 1 and turn.
Row 20 – SC into each stitch. 13 sts. Do not fasten off, start to work on the edging rows. See below.
24 -36 months – Row 19 – SC into each stitch. 13 sts. Ch 1 and turn.
Row 20 – SC into each stitch. 13 sts. Ch 1 and turn.
Row 21 – SC into each stitch. 13 sts. Do not fasten off, start to work on the edging rows. See below.
We are now going to complete the edging rows around the bottom of the romper……
Round 1 – Size 12-18 months and 18-24 months turn your work (so you are working on the RS). All other sizes, stay on the RS. Work Ch 1 and then work 3xHDC (3 HDC all into the same stitch) into the first stitch and then continue to work HDC evenly all along the edges of the front and back. I work a HDC for each row along the sides, the ends of the rows are quite easy to see. Photo B When you arrive at the corners work 3xHDC into a stitch followed by another 3xHDC into the next stitch. Photo C This will give you a total of 6 HDC’s all worked into each corner which may seem like a lot of stitches, but we are not going to increase on the following rounds. Work evenly all around the edge ending with 3xHDC all into the last stitch. Join with a slip stitch to the first HDC. Ch 1 and turn.
Round 2 – (WS) Work a HDC into each stitch all around the edge until the end of the round. Join with a Sl St to the first HDC. Ch 1 and turn.
Round 3 – (RS) With stitch markers, mark the stitches on the bottom of the front panel where you would like to place the buttonholes. Photo D I recommend 2 buttons for sizes up to 12 months and 3 buttons for the larger sizes. Work one HDC into each stitch all around the edge. When you arrive at your marked stitches, Ch1 and skip these stitches. Join with a Sl St to the first HDC. Ch 1 and turn.
Round 4 – Work a HDC into each stitch along the bottom edge of the front flap until you reach the corner and then work FPHDC and then BPHDC alternately Photo E until you reach the corner of the back flap. Work a HDC into the stitches until you reach the next corner and then work FPHDC and then BPHDC alternately until the end of the round. Join with a Sl St to the first HDC. Fasten off.
We are now going to complete the waist band of the romper……. (This is the only section we use the 3mm hook)
Row 1 – Using the 3 mm hook, with the RS and the back of the romper facing you, lay your work flat. Find the 2 central stitches across the top row and attach markers into these stitches. Photo F. Starting in the left-hand side stitch, attach yarn, (3mm hook) Ch 1 and HDC into the same stitch. HDC into each stitch until you reach the second marker. HDC into this stitch, Ch4 (creating a button loop) and turn. 84 88 92 96 100 104 sts
Row 2 – Work a HDC into the first stitch. Place your marker into the top of this first stitch. Work a HDC into each stitch until the end of the round. Ch 1 and turn. 84 88 92 96 100 104 sts
Row 3 – Work a HDC into each stitch until the end of the round. Work your last stitch into the marked stitch, Ch4 (creating a button loop) and turn. 84 88 92 96 100 104 sts
Row 4 – Repeat Row 2
Row 5 – Work a HDC into each stitch until the end of the round. Work your last stitch into the marked stitch. For sizes
0-3 months, 3-6 months and 6-12 months fasten off.
For all larger sizes, Ch4 (creating a button loop) and turn. 96 100 104 sts
Row 6 – Larger sizes only – Repeat Row 2
Row 7 – Larger sizes only – Work a HDC into each stitch until the end of the round. Work your last stitch into the marked stitch. Fasten off.
We are now going to complete the front bib of the romper…
Lay the romper flat with the front facing. Mark out 27 29 31 33 35 37 sts across the top of the romper ensuring you have these central. Photo G
Row 1 – Using the 4mm hook and working from the WS or inside of the romper, attach yarn to the stitch marked on the right. Ch1 and HDC into this stitch. Work a HDC into the next 4 sts. Work a SC into the next stitch and then a DC into the next stitch. Continue to work a SC followed by a DC until you have 6 sts remaining. Work a SC into the first stitch and a HDC into the last 5 sts. Ch 1 and turn. 27 29 31 33 35 37 sts When working the rows on the bib it helps to keep the first and last stitch of the rows marked.
Row 2 – (RS) HDC into the first 4 sts. Work a FPDC around the 5th stitch. Work a HDC into each stitch until you have 5 sts remaining. Work a FPDC around the first stitch. Work a HDC into each of the last 4 sts. Ch1 and turn. 27 29 31 33 35 37 sts
Row 3 – HDC into the first 4sts. Work a BPDC around the 5th stitch. Work a SC into the next stitch and then a DC into the next stitch. Continue to work a SC followed by a DC until you have 6 sts remaining. Work a SC into the first stitch and then a BPDC around the next stitch. Work a HDC into each of the last 4 sts. Ch1 and turn. 27 29 31 33 35 37 sts
Repeat rows 2 and 3 until you have completed a total of 12 12 14 14 16 16 rows. Do not fasten off.
We are now going to create our straps……….
At the end of your last row, Ch 1 and turn. HDC into the first 5 sts. Ch 1 and turn.
HDC in each of the 5 sts, Ch1 and turn. Continue to complete rows of HDC until you have the desired strap length. The straps need to sit above the bib by approx. 3 3 4 4 5 5 cms and they need to be long enough at the back so that they can be sewn to the height of the waistband. Photo H
When you have your strap completed, fasten off leaving a long tail for sewing to the back.
Now for the second strap…..
With the WS facing you, count in 5sts from the left side, and attach yarn. Ch 1 and repeat process as we did for the 1st strap. Ensure you complete the same number of rows on this strap. Fasten off leaving a long tail for sewing to the back. Do not sew down the straps until later.
Now we will add the frills to the body of the romper…
The frills are worked into the back loops of the rows we completed by working into the front loops only. I recommend working the first frill into the row of loops nearest the bottom of the romper. With the bib facing away from you attach yarn into any of the loops on the back of the romper. Photo I
Round 1 – Ch1 and work a SC into the same loop. Continue to work a SC into each loop all the way around and then join with a Sl St to the first SC. Ch 1 and turn. 84 88 92 96 100 104 sts
Round 2 – (RS) Work 2xHDC into each stitch and then join with a Sl St to the first HDC. Ch 1 and turn. 168 176 184 192 200 208 sts
Round 3 – Work a DC into the first stitch and then a SC into the second stitch. Continue to work DC and then SC alternately until the end of the round. Join with a Sl St to the first DC. Ch1 and turn.
Round 4 – (RS) Work a DC into each stitch, join with a Sl St to the first DC. Ch 1 and turn.
Round 5 – Work a DC into the first stitch and then a SC into the second stitch. Continue to work DC and then SC alternately until the end of the round. Join with a Sl St to the first DC. Ch1 and turn.
Repeat round 4 and 5 another 2 2 2 3 3 3 times. Fasten off.
Now repeat this for the second frill which is worked into the row of loops just below the waistband.
Now we will add the frills to the straps …
First of all we need to pin the straps in place and place some markers which will help us to place the frills correctly. Please follow the photo sequence below.
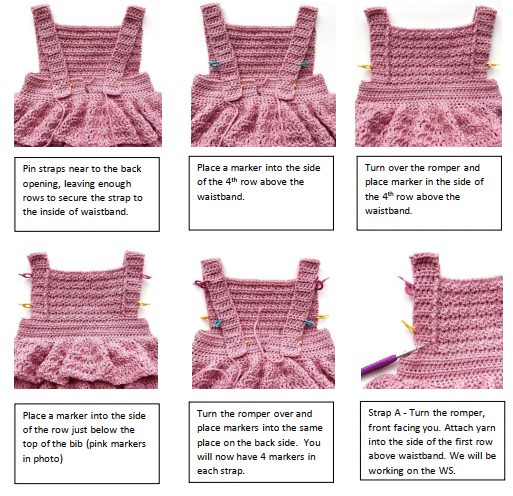
Strap A – (left hand side, front of romper facing you)
Row 1 – Leaving a long tail for sewing later, attach yarn, Ch1 and SC into the same stitch. Work a SC into the side of each row until you reach the last marker (blue markers on photos). When working into your marked stitches remove your marker and replace it when you have completed the stitch. We will need the markers on the next row. Work the last SC into the last marked stitch. (no need to replace this last marker) Ch 1 and turn.
Row 2 – The stitches on this row are all worked into the FL (Front Loop Only) of each stitch, work 2xHDC into each stitch until you reach the first marker. Remove marker, no need to replace it and work 3xHDC into this stitch and each stitch until you reach the next marker. Remove marker, no need to replace it and work 3xHDC into this stitch. Now work 2xHDC into each stitch until you reach your last marker. Remove marker, no need to replace it and work 2xHDC into this last stitch. Ch 1 and turn.
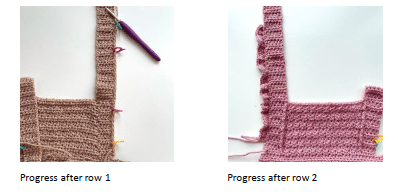
Row 3 – Work a DC into the first stitch followed by a SC into the next stitch. Continue to work a DC and then a SC alternately along the row. Ch 1 and turn.
Row 4 – Work a SC into the first 3 sts. Work a HDC into each of the next 3 sts. Work a DC into each stitch until you have 6sts remaining. Work a HDC into the first 3 sts and then work a SC into the last 3 sts. Ch 1 and turn.
Row 5 – Work a SC into the first stitch followed by a DC into the next stitch. Continue to work a SC and then a DC alternately along the row. Fasten off leaving a long tail for attaching strap.
Now we will complete the second frill and then attach……
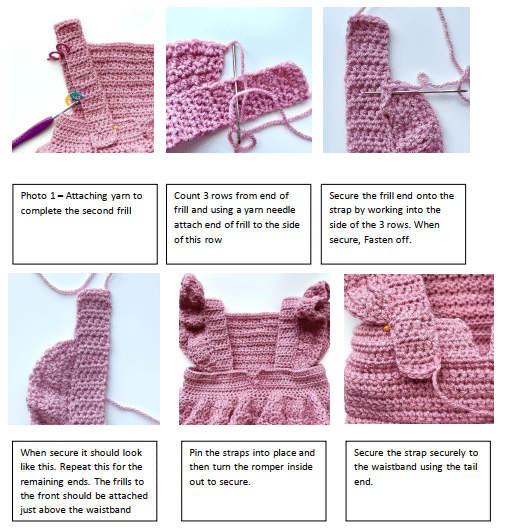
To complete the second frill the yarn is attached into the last marked stitch (Blue marker shown in Photo 1 below)
Row 1 – Working from the wrong side, attach yarn, leave a long tail for later, Ch1 and work a SC into this stitch. Work a SC into the side of each row replacing your markers as you work into these rows. When you reach the last marker work a SC, replace the marker and continue to work a SC into the side of each row until you reac h the last row above the waistband on the front of the romper. Turn your work but do not Ch1. Work a Sl St into each stitch until you reach the first marker. Work 2xHDC (working into the FL only) into this stitch. No need to replace this marker.
You can now follow the instructions for rows 2 to 5 in the same way as you worked the first strap. When you have completed these rows we will attach the frills and straps to the back of the romper. See photos below.
You can now weave in all your ends (if you haven’t already) and sew on your buttons…