Crochet Ocean Animal Patterns – The completed toys, using the same weight yarn and wooden ring, are around 5″/12 cm in height.
Materials Needed
- Vita Lily 100% cotton1.75oz/50g approx 137yds/125m in 2 different colors
- Colors – MC – blue or green, CC – orange or dark green
- Yardage approx – 1/2 hank
- You can substitute yarn just make sure that it matches original proportions.
- Suggested substitute yarn
- “Scheepjes Catona”, “Schachenmayr Catania”
- Crochet hook 2 mm or 2.5 mm
- Rattle approx 5/8”/16 mm or 3/4”/20 mm in diameter
- Wooden ring approx 2-3in/60-70mm in diameter (I recommend beech wooden ring for you)
- Stuffing
- Black embroidery floss or yarn
- Scissors
- Tapestry needle
Abbreviations (US terminology)
- BOR – beginning of round
- ch – chain
- sl st – slip stitch
- st(s) – stitch(es)
- sc – single crochet
- hdc – half double crochet
- dec – decrease (sc2tog)(I recommend to make invisible decreases)
- inc – increase (2sc in one st)
- rnd(s) – round(s)
- foll – follow(ing)(s)
- rep – repeat
- rem – remain(ing)
- cont – continue
- The number in parenthesis at the end of each rnd is the total number of sts in the rnd.
Gauge:
- 26 sc and 25 rows = 4 in(10cm)
- 26 dc and 14 rows = 4 in(10cm)
Notes : All pieces worked in a continuous spiral. Do not join in the rnd, just work sc in the next st. Place marker or use contrasting color yarn to mark BOR. Use hook 2.5 mm or size matching your yarn and obtaining gauge. I recommend to work cross stitch single crochet to get a beautiful toy.
Tail and Body
With MC make a magic ring

Rnd 1 – 6sc in magic ring = 6 sts.
Leave a long end of the thread and pull it to the front side as shown in pic.1.
Rnd 2 – [inc, sc 2] * 2 times = 8 sts.
Rnds 3-14 – sc 8, 12 rounds = 8 sts.
Important! At this stage, mark the beginning of the row with a contrasting thread (pic.2).
Rnd 15 – sc 3, inc 2, sc 3 = 10 sts.
Rnd 16 – sc 2, inc, sc 4, inc, sc 2 = 12 sts.
Rnd 17 – sc 5, inc 2, sc 5 = 14 sts.
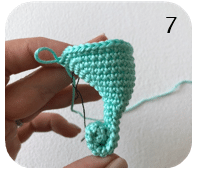
Now we need to twist and sew the tail. At the same time, make sure that the beginning of the round is located as shown in the pic.3.

Rnd 18 – inc, sc 12, inc = 16 sts.
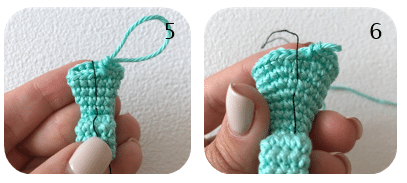
At this stage, you need to check if the beginning of the round has shifted. Pull your contrast thread vertically up as shown in pic.5.
In pic. 5, you can see that the beginning of my round has shifted by one stitch. In this case, you need to make 1 sc and move the marker, this will be a new start of the round. If the beginning of your round has not shifted, then simply ignore the last instructions.
The beginning of the round will always be center on the abdomen of the sea horse.
Rnd 19 – inc, sc 3, inc, sc 6, inc, sc 3, inc = 20 sts.
Rnd 20 – sc 1, inc, sc 16, inc, sc 1 = 22 sts.
Rnd 21 – sc 1, inc, sc 18, inc, sc 1 = 24 sts.
Rnd 22 – sc 2, inc, sc 4, inc, sc 8, inc, sc 4, inc, sc 2 = 28 sts.
At this stage, you need to check if the beginning of the round has shifted (pic.6). If necessary, make 1 sc and reposition the marker.
Rnd 23 – sc 2, inc, sc 22, inc, sc 2 = 30 sts.
Rnd 24 – sc 3, inc, sc 22, inc, sc 3 = 32 sts.
Rnd 25 – sc 3, inc, sc 5, inc, sc 12, inc, sc 5, inc, sc 3 = 36 sts.
Rnd 26 – sc 3, inc, sc 12, dec 2, sc 12, inc, sc 3 = 36 sts.
Rnd 27 – sc 8, inc, sc 18, inc, sc 8 = 38 sts.
Rnd 28 – sc 17, dec 2, sc 17 = 36 sts.
Rnd 29 – sc 16, dec 2, sc 16 = 34 sts.
Rnd 30 – sc 15, dec 2, sc 15 = 32 sts.
Rnd 31 – sc 14, dec 2, sc 14 = 30 sts.
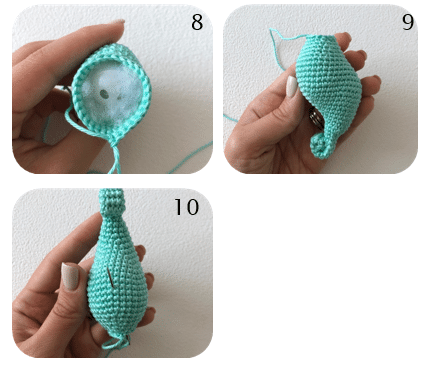
Start to stuff the body and put rattle inside.
Rnd 32 – sc 13, dec 2, sc 13 = 28 sts.
Rnd 33 – dec, sc 5, dec, sc 10, dec, sc 5, dec = 24 sts.
Rnd 34 – sc 24, 1 round = 24 sts.
Rnd 35 – dec, sc 4, dec, sc 8, dec, sc 4, dec = 20 sts. Keep stuff the body.
Rnd 36 – sc 4, dec, sc 8, dec, sc 4 = 18 sts.
Rnd 37 – dec, sc 2, dec, sc 6, dec, sc 2, dec = 14 sts.
Sl st in next st. Fasten off, leaving a tail for sewing. Stuff the body tightly, for your convenience you can use tweezers.
Bring the tip of the thread with a needle to the center of the abdomen of the body, later with this tip we will sew the sea horse to the ring.
The body is ready.
Head
Crochet head from bottom to top. With MC make a magic ring.
Rnd 1 – 6sc in magic ring = 6 sts.
Rnd 2 – [inc] * 6 times = 12 sts.
Rnd 3 – [sc 1, inc] * 6 times = 18 sts.
Rnd 4 – [sc 1, inc, sc 1] * 6 times = 24 sts.
Rnd 5 – [sc 3, inc] * 6 times = 30 sts.
Rnd 6 – [sc 2, inc, sc 2] * 6 times = 36 sts.
Rnds 7-8 – sc 36, 2 rounds = 36 sts.
Rnd 9 – sc 17, ch 2, skip 2 sts, sc 17= 36 sts.
This is how the hole for the snout is made (pic.11- 12).
Rnds 10-12 – sc 36, 3 rounds = 36 sts.
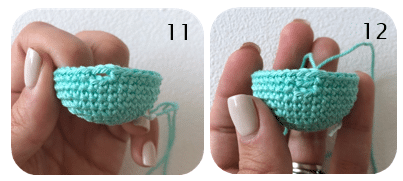
Rnd 13 – [dec, sc 4] * 6 times = 30 sts.
Rnd 14 – sc 30, 1 round = 30 sts.
Start to stuff the head.
Rnd 15 – [dec, sc 3] * 6 times = 24 sts.
Rnd 16 – [dec, sc 2] * 6 times = 18 sts.
Rnd 17 – [dec, sc 1] * 6 times = 12 sts.
Rnd 18 – [dec] * 6 times = 6 sts.
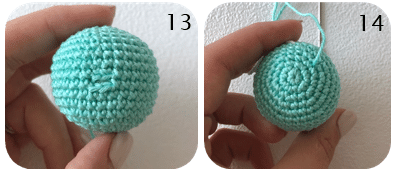
Bind off rem 6 sts and fasten off, leaving a long tail for sewing.
Bring the tip of the thread with a needle to the bottom of the head, later with this tip we will sew the head to the body.
Snout
With MC.
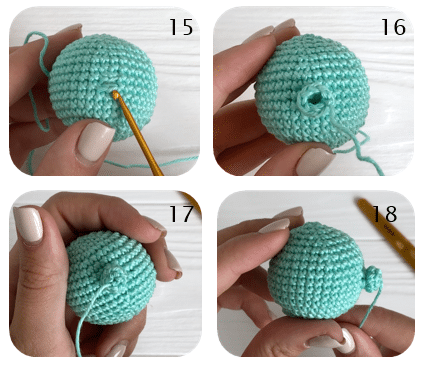
In the snout hole we got 4 sts. Start working with the st indicated in photo 15.
Rnd 1 – sc 2 in each 4 sts = 8 sts.
Rnd 2 – sc 8 = 8 sts.
Sl st in next st. Fasten off, leaving a tail for sewing. Bind off 8 sts with a needle and pull them off while clinging to the back loop
Click Here ==> How to crochet snout
Coronet
With CC.
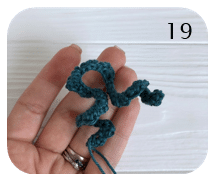
Ch42, in the second ch from the hook sc 1, [sc 3 in next st, sl st, hdc 3 in next st, sl st] * 10 times Fasten off, leaving a tail for sewing.
Dorsal fins (Make 2)
With MC.
Row 1 – Ch5, in the second ch from the hook sc 1, sc 2, hdc 1, turn.
Row 2 – working BLO, ch 2, hdc 1, sc 3, turn.
Row 3 – working BLO, ch 1, sc 3, hdc 1, turn.
Row 4 – working BLO, ch 2, hdc 1, sc 3.
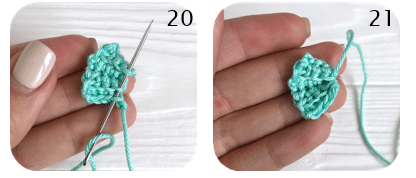
Fasten off, leaving a tail for sewing. Sew the fins as it’s shown on pic.20.
Working around the ring
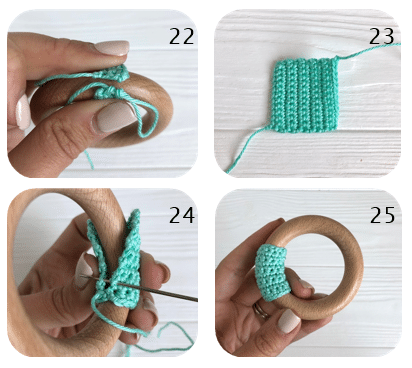
To working around the ring you need crochet a rectangle, working sc.
For my ring size, with hook 2.5 mm ch13 and work for 10 rows of 12 sc with ch1, turn. (Number of sts and rows depends on a specific ring thickness).
After making 2-3 rows, attach the part to the ring to check if the size fits. When the rectangle is finished, fold it over the ring and sew it, the yarn should be tight around the ring. The seam should be inside the ring. Weave in ends using tapestry needle.
Assembly
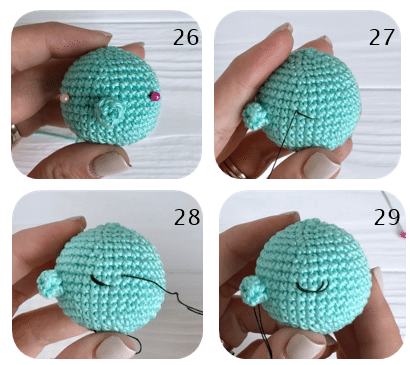
Mark the beginning of the eyes between 10 and 11 rounds at a distance of 4 sts from the snout (pic.26). We embroider in one layer of thread. We embroider the eye on 2 sc (pic.27). Make 3 stitches. For eyelashes, 1 stitch.
Click Here ==> How to embroider eyes
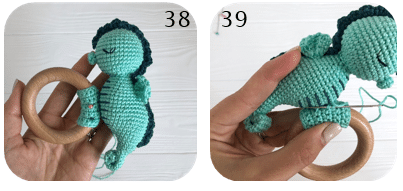
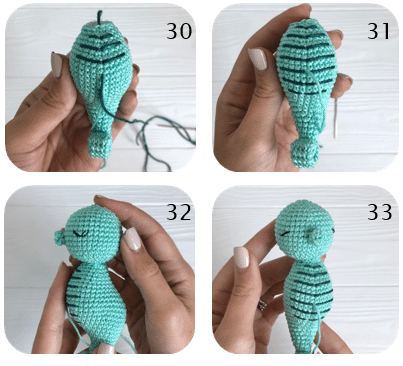
Embroider the keel as shown in the pic.30-31. Then sew the head to the body.
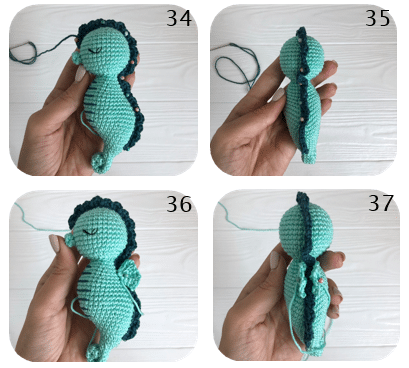
Sew the coronet as shown in the pic.34-35. Now sew on the fins as shown in the pic.36-37.
Sew the sea horse to the wooden ring, making sure it is centered, press it a bit to avoid the sea horse from hanging. I recommend to sew it around twice.
