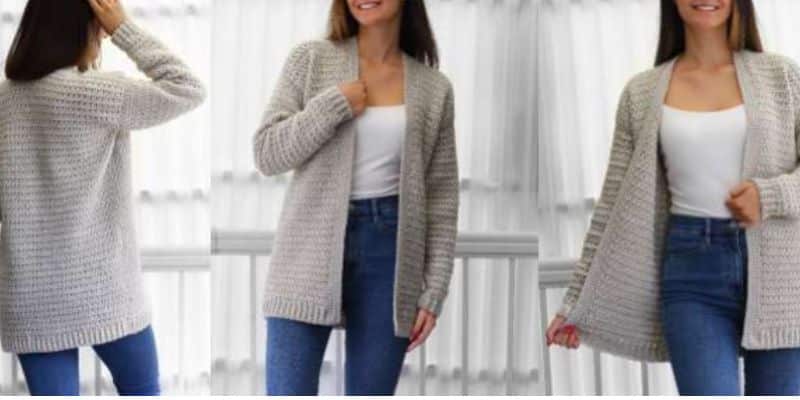
Crochet Cardigan Pattern Top – A fresh design for a stylish cardigan with contemporary texture! This gorgeous cardigan is extremely simple to crochet and looks great on!
Even novices wishing to create their first usable clothing will find this cardigan to be ideal because of its simple construction and basic stitch pattern.
A novice pattern with simple stitches, little seaming, and a loose fit make this cardi all you need for a great and easy project.
It is gorgeous with any clothing and is knitted from worsted weight yarn! 7 sizes of the pattern are available: XS (S, M, L, XL, 2XL, 3XL). 31″ (33″-35″-38″-41″-44″-47″) = 79 (84-89-97-104-112-119)cm are the bust dimensions.
Materials:
Any worsted/medium weight yarn – Red Heart with love, Bernat premium, Vanna’s choice-Lion brand – 1300( 1400, 1490, 1580, 1670, 1760, 1850)yds. Crochet hook size I/9-5.5mm Tapestry needle
Gauge: 14DC= 4inch = 10cm whit U.S. size I/9-5.5mm crochet hook or size needed to obtain gauge.
Legend: Ch-chain, St-Stitch, RS/WS-Right/Wrong side
SC-Single Crochet, BLSC –Back Loop Single Crochet, DC-Double Crochet
Use the bust measurements when choosing the size for your cardigan
Sizes instructions in the pattern: XS ( S – M – L – XL- 2XL- 3XL)
Bust: 31″ (33″-35″-38″-41″-44″-47″) =79 (84-89-97-104-112-120)cm
Finished Cardigan Sizes (after blockage):
Length- 28(28, 28.5, 29, 29.5, 30, 30.5)”
Width- 19.5(20.5, 21.5, 23.5, 25, 27, 29)” To fit bust size 31″ (33″-35″-38″-41″-44″-47″)
The front and back panels are crocheted bottom up Chains at beginning of rows do not count as stitch.
Number within < > shows the total number of stitches you should have after that row.
So, let’s get started!

BACK PANEL
RIBBING
Chain 8(8, 9, 10, 11, 12, 13)
Row 1: 1 SC in second Ch from hook and each Ch across, turn<7(7, 8, 9, 10, 11, 12) SC >
Rows 2-60(62, 66, 70, 76, 82, 88): Ch1, BLSC in each st, turn. <7(7,8,9,10,11,12) SC >
Do not turn after the last row. You will now be working along the top of the ribbing, into the end of each row across, to create the main body of the back panel.
at some ends of the rows you will work 2 DC in the same st ( 2DC), to get more sts than the initial ribbing, as follows:


Row 1 (RS): Ch3, DC in first 3( 3, 5, 3, 5, 2, 6)sts,
- 2DC (increase) in next st, DC in each of next 5( 4, 4, 4, 4, 5, 4) st*
repeat from *-* for 9( 11, 11, 13, 13, 13, 15)times, DC in each of 3( 4, 6, 2, 6, 2, 7)sts,
turn. < 69( 73, 77, 83, 89, 95, 103) DC>
Row 2 ( WS): Ch1, SC in between the first and the second DC ,*chain 1, skip 2DC, SC between DC*, repeat from *-* until 2 sts remaining,

chain 1, skip 2 DC, SC in between the last DC and the chain 3. Turn. < 34(36,38,41,44,47,51) Ch1 and 35(37,39,42,45,48,52)SC>
Row 3 ( RS): Ch3, 2DC in each chain 1 space across, DC in ch1. < 34(36,38,41,44,47,51) groups of 2 DC, 1DC at the end>

Row 4 ( WS): Ch1, SC in between the first and the second DC , *chain 1, skip the 2DC group, SC in between the 2 DC groups*, repeat from *-* until 2 sts remaining, chain 1, skip 2 DC, SC in between the last DC and the chain 3.
Turn. < 34(36,38,41,44,47,51) Ch1 and 35(37,39,42,45,48,52)SC>

Rows 5-76 ( 76, 78, 80, 82, 84, 86) – repeat Rows 3-4. After last row cut the yarn.
– If you want a longer cardigan, repeat one 1-2 more times the Rows 3-4, before tying off.
The FRONT PANEL (make 2 – follow the same instructions for both)
RIBBING
Chain 8(8, 9, 10, 11, 12, 13)
Row 1: 1 SC in second Ch from hook and each Ch across, turn<7(7, 8, 9, 10, 11, 12) SC >
Rows 2-24(24, 26, 28, 30, 32, 36): Ch1, BLSC in each st, turn. <7(7,8,9,10,11,12) SC >
Do not turn after the last row. You will now be working along the top of the ribbing
– at some ends of the rows you will work 2 SC in the same st ( 2SC), to get more sts
Row 1 (RS): Ch3, DC in first 2(2, 2, 3, 1, 2, 1)sts,
- 2DC (increase) in next st, DC in each of next 3( 2, 2, 2, 3, 3, 4)st*
repeat from *-* for 5( 7, 7, 7, 7, 7, 7)times, DC in each of 2 (1, 3, 4, 1, 2, 0)sts, turn.
< 29 ( 31, 33, 35, 37, 39, 43) DC>
Row 2 ( WS): Ch1, SC in between the first and the second DC ,
*chain 1, skip 2DC, SC between DC*, repeat from *-* until 2 sts remaining, chain 1, skip 2 DC, SC in between the last DC and the chain 3.
Turn. < 14( 15, 16, 17, 18, 19, 21) Ch1 and 15( 16, 17, 18, 19, 20, 22)SC>
Row 3 ( RS): Ch3, 2DC in each chain 1 space across, DC in ch1.
< 14( 15, 16, 17, 18, 19, 21) groups of 2 DC, 1DC at the end>
Row 4 ( WS): Ch1, SC in between the first and the second DC ,
*chain 1, skip the 2DC group, SC in between the 2 DC groups*, repeat from *-* until 2 sts remaining, chain 1, skip 2 DC, SC in between the last DC and the chain 3.
Turn. < 14( 15, 16, 17, 18, 19, 21) Ch1 and 15( 16, 17, 18, 19, 20, 22)SC>
Rows 5-76 ( 76, 78, 80, 82, 84, 86) – repeat Rows 3-4. After last row cut the yarn.
SLEEVE (make 2 – follow the same instructions for both)
CUFF
Chain 8(8, 9, 10, 11, 12, 13)
Row 1: 1 SC in second Ch from hook and each Ch across, turn<7(7, 8, 9, 10, 11, 12) SC >
Rows 2-24(26, 28, 30, 32, 34, 36): Ch1, BLSC in each st, turn. <7(7,8,9,10,11,12) SC >
Do not turn after the last row. You will now be working along the top of the ribbing, to create the main body of the sleeve
Row 1 (RS): Ch3, DC in first 3( 4, 1, 2, 3, 1, 5)sts,
- 2DC (increase) in next st, DC in next 1( 1, 2, 2, 2, 2, 1)st*
repeat from *-* for 9( 9, 9, 9, 9, 11, 13) times, DC in each of 3( 4, 0, 1, 2, 0, 5)sts, turn.
< 33(35, 37, 39, 41, 45, 49) DC>
Row 2 ( WS): Ch1, SC in between the first and the second DC ,
*chain 1, skip 2DC, SC between DC*, repeat from *-* until 2 sts remaining, chain 1, skip 2 DC, SC in between the last DC and the chain 3.
Turn. < 16(17, 18, 19, 20, 22, 24) Ch1 and 17( 18, 19, 20, 21, 23, 25)SC>
Row 3 ( RS): Ch3, 2DC in each chain 1 space across, DC in ch1.
< 16(17, 18, 19, 20, 22, 24) groups of 2 DC, 1DC at the end>
In the Rows 4, 10, 16, 22, 28, 34 you will make 2 stitches increase: 1 st increase at the beginning of the row and 1 st increase at the end of the row
Row 4 ( WS): Ch1, SC in between the first and the second DC , (chain 1, 👉 skip 1DC, SC between DC) x2 –here is the first increase
*chain 1, skip 2DC, SC between DC*, repeat from *-* until 2 sts remaining,
(chain 1, 👉 skip 1DC, SC between DC)- here is the second increase, chain 1, skip 1DC, SC in between the last DC and the chain 3. Turn.
< 18(19, 20, 21, 22, 24, 26) Ch1 and 19( 20, 21, 22, 23, 25, 27)SC>

Row 5 ( WS): – repeat Row 3.<18(19, 20, 21, 22, 24,26) groups of 2 DC, 1DC at the end>
Row 6-35: Repeat Row 2-3 and in the same time, in each 6th row do a double increase as you did in row 4. Following the increases, in each 6th row, you will get:
Row 10 –repeat Row 4 <20(21, 22, 23, 24, 26,28)Ch1 and 21( 22, 23, 24, 25, 27, 29)SC>
Row 16 –repeat Row 4 <22(23, 24, 25, 26, 28,30)Ch1 and 23( 24, 25, 26, 27, 29, 31)SC>
Row 22 –repeat Row 4 <24(25, 26, 27, 28, 30,32)Ch1 and 25( 26, 27, 28, 29, 31, 33)SC>
Row 28 –repeat Row 4 <26(27, 28, 29, 30, 32,34)Ch1 and 27( 28, 29, 30, 31, 33, 35)SC>
Row 34 –repeat Row 4 <28(29, 30, 31, 32, 34,36)Ch1 and 29( 30, 31, 32, 33, 35, 37)SC>
Row 35 ( WS): repeat Row 3 <28(29, 30, 31, 32, 34,36)groups of 2 DC, 1DC at the end>
Rows 36-51: Repeat Rows 2-3. After last row cut the yarn, leaving a tail for the seam.
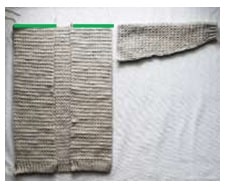
JOIN PANELS (green lines in picture):
Lay your front and back panels together, right sides facing. Using your joining method of choice, sew the shoulders together
SEW SLEEVE on main body of cardigan:
-align the sleeves against the body of the sweater so that the seam of the shoulder is in the exact middle of the sleeve.
Pin the sleeve into place so that it doesn’t move while you are joining your pieces. Sew the last row of the sleeves to the main sweater.

SEW SLEEVE AND SIDE of cardigan:
-fold the cardigan and sleeves in half, wrong side out. Join yarn with a Sl St at the cuff, sew from cuff to underarm. Continue down the side of the sweater and sew from underarm to bottom hem. Tie off and repeat on opposite side. Weave in all ends.
TRIM
With your cardigan right side out, join yarn with a Sl St to the corner of the right front panel.
Stitch count is not crucial here, place your sts as evenly as possible, my suggestion:
In each row ending in SC, you make 1 SC, in each row that ends in DC you make 2 SC, in each row that ends in Ch3 you make 2 SC.
Row 1– RS: Ch 1, SC evenly up the side of the first panel, across the back neckline, and down the second panel until you reach the opposite corner, turn.
Row 2-6: Ch 1, SC in each st around, turn. (the last row is on the WS). Tie off and weave in all ends
Congratulations