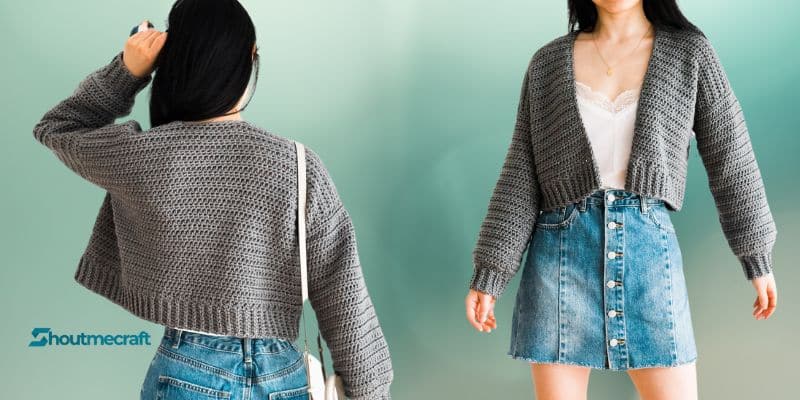
Crochet cardigan you should have in your collection; oversized, comfortable and so easy to crochet! You will want to crochet a cardi in every color as this simple pattern is so flexible and beginners friendly!
The body is worked flat and totally in one piece with the sews sewed into the armhole holes using a basic bottom up technique. Customisable body and sleeve lengths with three alternative neckline finishing choices and modification instructions!
*Sample is a size small shown on a 5’3” model with a 32” bust.
*The sizing guide follows size XS(S, M, L, XL)(2XL, 3XL, 4XL, 5XL). E.g. “HDC 99(111, 123, 135, 147)(159, 171, 183, 195) means HDC 99 for XS, HDC 111 for S, HDC 123 for M, HDC 135 for L, HDC 147 for XL, HDC 159 for 2XL, HDC 171 for 3XL, HDC 183 for 4XL and HDC 195 for 5XL.”
If there is only one number, it applies to all sizes.
*”HDC 10” means HDC into the next 10 stitches.
*”2HDC” means place 2HDC into the same stitch.
*The turning chain, ch 1 does NOT count as a stitch.
*Total stitches are indicated between < >.
*This pattern uses US crochet terms.
*This crochet cardigan is constructed from 3 pieces – 1 main body panel and 2 sleeves.
*The body panel and sleeves are crocheted from the bottom up.
*The ribbing is crocheted lengthways and the body and sleeves are crocheted directly onto the long edge of the ribbing.
*The body is worked entirely in one piece. We’ll start with the hemline ribbing and then crochet the main body portion. We’ll then separate the body panel into 3 sections, 2x front panels and back panel with openings for the sleeves.
*The sleeves are crocheted from the cuff ribbing up, sewn together and onto the body.
*There are 3 neckline finishing options – slip stitch edging, HDC ribbing crocheted separately and HDC ribbing crocheted directly onto the neckline.
*To make your sweater shorter/longer, simply remove/add rows (alteration instructions provided).
For every 2cm/0.75” you’ll need an extra approx. 12(12, 14, 16, 18)(18, 20, 20, 22)g.
*All pieces are sewn together with the RS on the inside and the WS facing outwards.
*The sample cardigan uses Lion Brand Heartland which is classified as an Aran/Worsted/Medium
(4). It’s on the thicker end of a worsted yarn, to substitute it look for a yarn with a recommended hook size of 6mm (J) / 6.5mm (K).
LEVEL: Beginner+
MATERIALS
- Yarn – LionBrand Heartland – Aran/Worsted/Medium(4), 230m/142g, 251yds/5oz., 100% Acrylic, Petrified Forest
No neckline ribbing: approx. 375(440, 500, 550, 620)(685, 755, 830, 900)g
With neckline ribbing: approx. 415(485, 545, 595, 670)(735, 805, 885, 955)g
- 6.5mm (US K) Crochet Hook
- Bent Tip Darning Needle
- Scissors
- 1 x Stitch Marker/Safety Pin
STITCHES & ABBREVIATIONS
- Ch = Chain
- Sl st = Slip Stitch
- HDC = Half Double Crochet
- BLO = Back Loop
- St(s) = Stitch(es)
- Rep = Repeat
- RS = Right Side
- WS = Wrong Side
MEASUREMENTS
Measurements cm:
- To fit Bust: 71(81, 91, 101, 112)(122, 132, 142, 152)
- Back Width: 44(49, 54, 59, 64)(69, 74, 79, 84)
- Body Length: 37(39, 41, 43, 45)(47, 49, 51, 53)
- Armhole: 17(18, 19, 20, 21)(23, 24, 25, 26)
- Sleeve Length: 37(39, 39, 39, 41)(41, 41, 43, 43)
Measurements inches:
- To fit Bust: 28(32, 36, 40, 44)(48, 52, 56, 60)
- Back Width: 17.5(19.5, 21.5, 23.5, 25.5)(27.5, 29, 31, 33)
- Body Length: 14.5(15.5, 16, 17, 18)(18.5, 19, 20, 21)
- Armhole: 6.5(7, 7.5, 8, 8.5)(9, 9.5, 10, 10.5)
- Sleeve length: 14.5(15.5, 15.5, 15.5, 16)(16, 16, 17, 17)
GAUGE
10cm/4” square = 12 stitches wide x 10 rows tall in half double crochet
BODY HEMLINE RIBBING
FOUNDATION CHAIN: Ch 9.
ROW 1 (RS): HDC into 2nd ch from the hook, HDC across, turn. <8>
ROW 2: Ch 1, BLO sl st 7, sl st in last st, turn. <8>
ROW 3: Ch 1, BLO HDC 7, HDC in last st, turn. <8>
*Make sure the ch is tall and loose enough to match the height of the BLO HDCs.
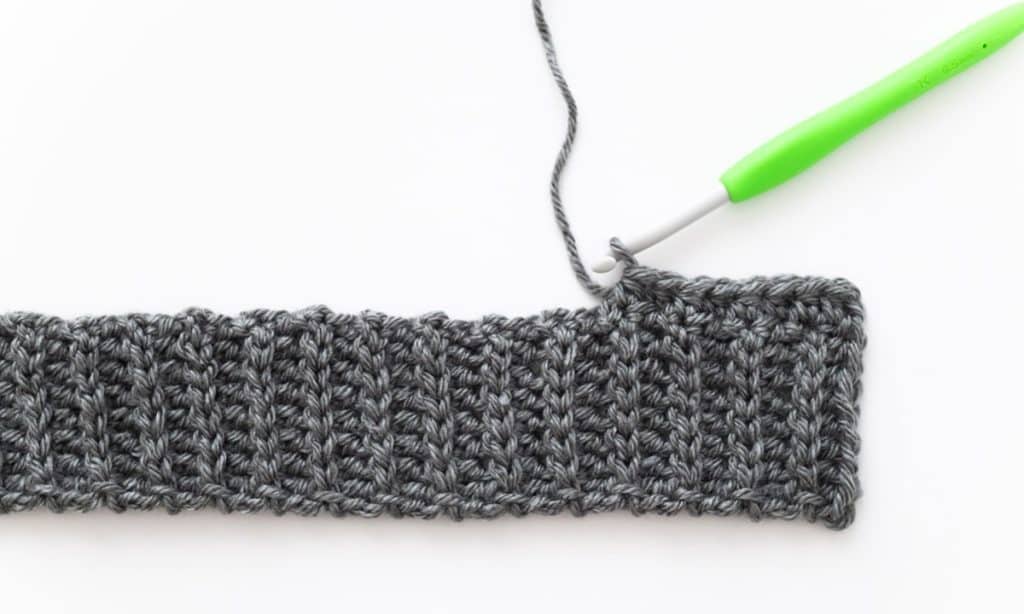
Repeat ROWS 2 – 3 until ROW 99(111, 123, 135, 147)(159, 171, 183, 195). (photo 1)

Do not fasten off! We will now work along the long edge of the ribbing.
MAIN BODY PANEL
ROW 1 (RS): Ch 1, HDC in each row until end, turn. <99(111, 123, 135, 147)(159, 171, 183, 195)>
*You should have 1 HDC in each sl st and HDC row. (photo 2)
ROW 2: Ch 1, HDC across, turn. <99(111, 123, 135, 147)(159, 171, 183, 195)>
Repeat ROW 2 until ROW 14(14, 16, 16, 18)(18, 18, 20, 20).
*You can add/remove rows to make your cardigan longer/shorter. Keep in mind that the front + back panel shaping adds approx. 18(20, 20, 22, 24)(24, 26, 26, 28)cm / 7(8, 8, 8.5, 9.5)(9.5, 10, 10, 11)“ to the current length of your cardigan.(photo 3)

Do not fasten off! We will now crochet the FIRST FRONT PANEL.
FIRST FRONT PANEL
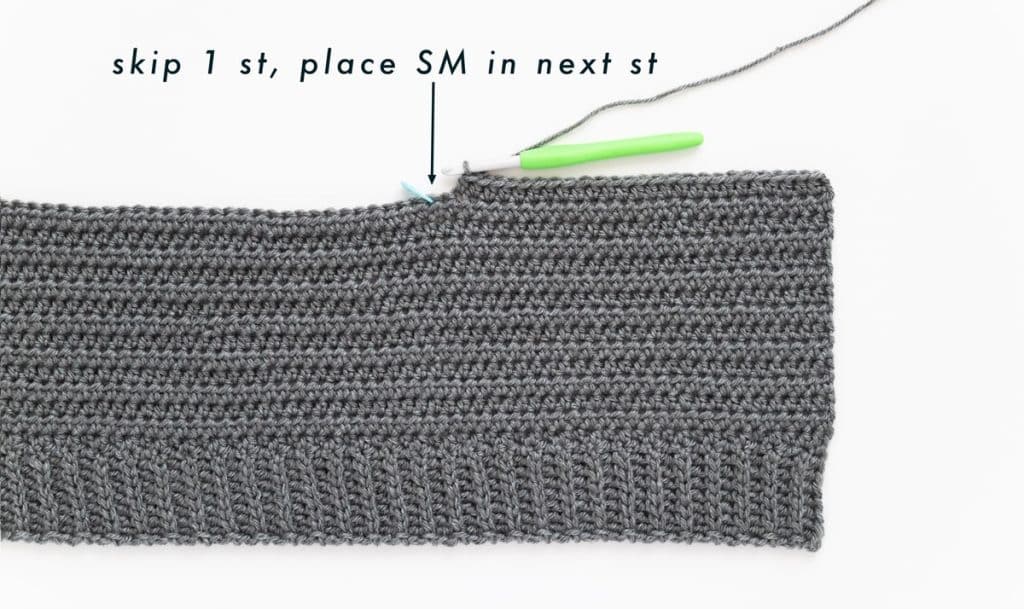
ROW 1: Ch 1, HDC 22(25, 28, 31, 34)(37, 40, 43, 46), skip 1 st, place stitch marker in next st, turn.
<22(25, 28, 31, 34)(37, 40, 43, 46)> (photo 4)
ROW 2: Ch 1 HDC across, turn. <22(25, 28, 31, 34)(37, 40, 43, 46)>
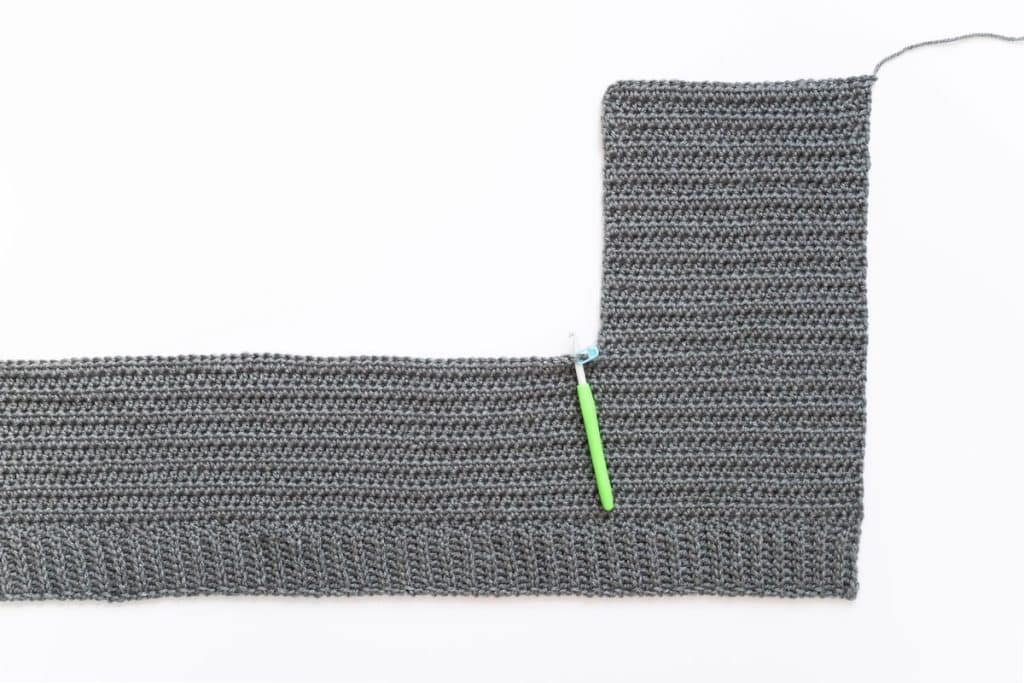
Repeat ROW 2 until ROW 18(20, 20, 22, 22)(24, 26, 26, 28).
<Total rows: 32(34, 36, 38, 40)(42, 44, 46, 48)> (photo 5)
Fasten off.
BACK PANEL
With the RS facing you, insert hook in st with a stitch marker. Secure your yarn and pull up a loop.
ROW 1: Ch 1, HDC 53(59, 65, 71, 77)(83, 89, 95, 101), skip 1 st, place stitch marker in next st, turn.
<53(59, 65, 71, 77)(83, 89, 95, 101)> (photo 6)
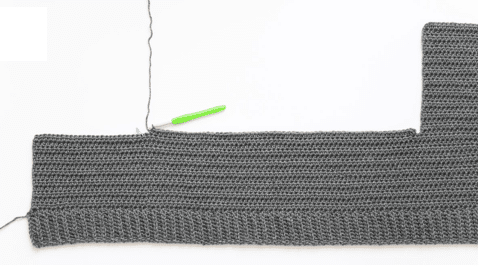
ROW 2: Ch 1, HDC across, turn. <53(59, 65, 71, 77)(83, 89, 95, 101)>
Repeat ROW 2 until ROW 18(20, 20, 22, 22)(24, 26, 26, 28).
<Total rows: 32(34, 36, 38, 40)(42, 44, 46, 48)> Fasten off.
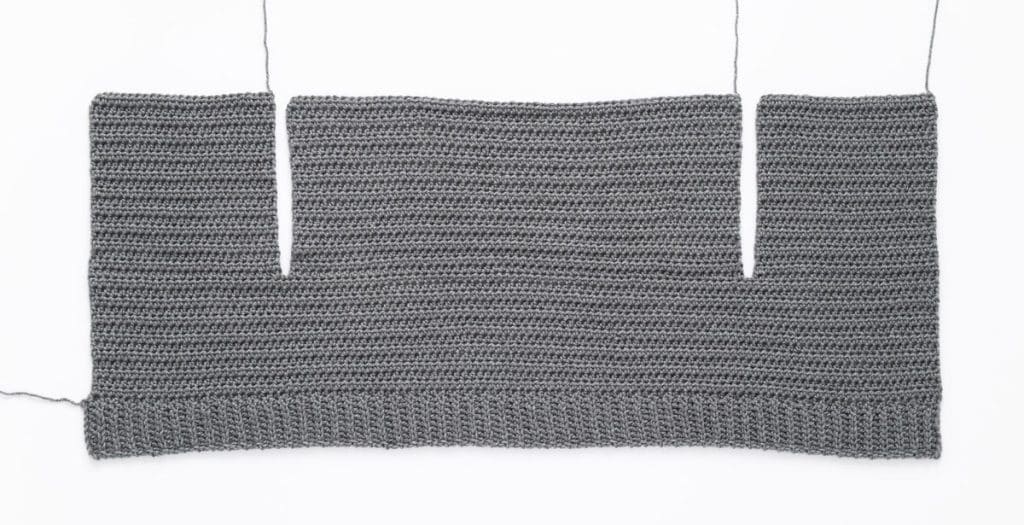
SECOND FRONT PANEL
With the RS facing you, insert crochet hook in st with a stitch marker. Secure your yarn and pull up a loop.
ROW 1: Ch 1, HDC across, turn.
<22(25, 28, 31, 34)(37, 40, 43, 46)>
Repeat ROW 1 until ROW 18(20, 20, 22, 22)(24, 26, 26, 28).
<Total rows: 32(34, 36, 38, 40)(42, 44, 46, 48)>
Fasten off. (photo7)
SLEEVE RIBBING
FOUNDATION CHAIN: Ch 9.
ROW 1 (RS): HDC into 2nd ch from the hook, HDC across, turn.<8>
ROW 2: Ch 1, BLO sl st 7, sl st in last st, turn.<8>
ROW 3: Ch 1, BLO HDC 7, HDC in last st, turn.<8>
Repeat ROWS 2 – 3 until ROW 21(23, 25, 25, 27)(29, 31, 31, 33). (photo 8)
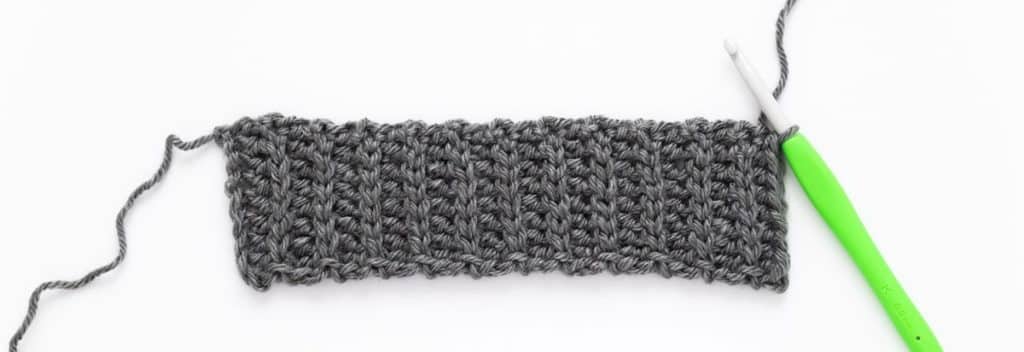
Do not fasten off! We will now work along the long edge of the ribbing.
SLEEVES
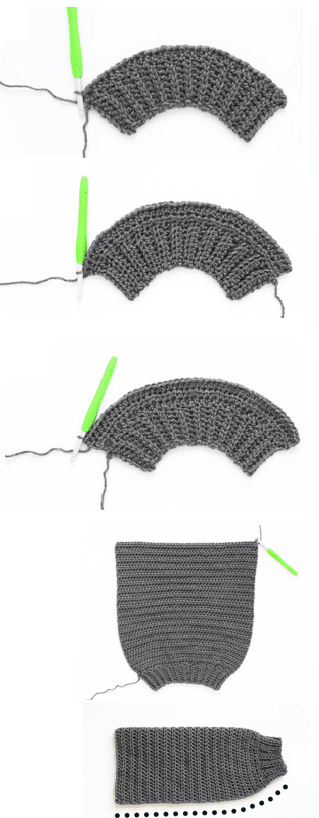
ROW 1 (RS): Ch 1, HDC in 1st row, HDC in sl st row, *2HDC in HDC row, HDC in sl st row; rep from
* until last row, HDC in last row, turn. <30(33, 36, 36, 39)(42, 45, 45, 48)> (photo 9)
Sizes XS(S, M, XL)(2XL, 3XL, 5XL) only:
ROW 2: Ch 1, *2HDC, HDC 2; rep from * until end, turn. <40(44, 48, 52)(56, 60, 64)> (photo 10)
Sizes (L, 4XL) only:
ROW 2: Ch 1, 2HDC 3, *2HDC, HDC 2; rep from * until end, turn. <(50, 62)> (photo 10)
ALL SIZES:
ROW 3: Ch 1, HDC across, turn. <40(44, 48, 50, 52)(56, 60, 62, 64)> (photo 11)
Repeat ROW 3 until sleeve measures 37(39, 39, 39, 41)(41, 41, 43, 43)cm/ 14.5(15.5, 15.5, 15.5, 16)(16,16, 17, 17) “ – approx. ROW 32(34, 34, 34, 36)(36, 36, 38, 38).
*You can add/remove rows to make your sleeve longer/shorter. (photo 12)
Fasten off.
Fold sleeve in half lengthways and whip stitch the long edge of the sleeve together. (photo 13)
ASSEMBLY
Fold the front panels on top of the back panel. Whip stitch the shoulder seams together. (photo 14)
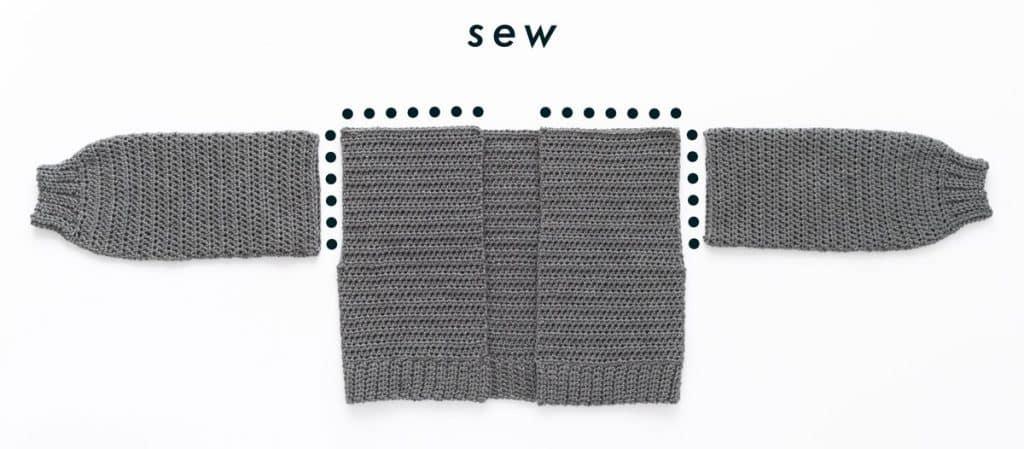
Line up sleeves with the shoulder seams. Whip stitch top of sleeves to armholes. If there is a gap underneath your sleeve on the body panels, sew the gap closed.
With the Doveport Cardigan, you can finish the neckline with a simple edging OR crochet matching neckline ribbing separately OR directly onto the neckline.
NECKLINE EDGING
(recommended for beginners)
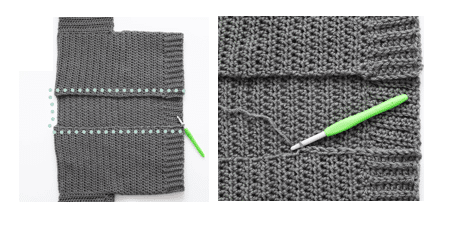
With the RS facing you, insert your hook into the corner of the front panel. Secure your yarn and pull up a loop.(photo 15)
ROW 1: Ch 1, sl st evenly along the edge of the neckline.
*The exact number of stitches doesn’t matter, rather focus on spacing out your stitches evenly. If your neckline is ruffling you have too many stitches and if your neckline is puckering you have too few stitches. (photo 16)
Fasten off.
NECKLINE RIBBING – SEPARATE
(recommended for beginners)
FOUNDATION CHAIN: Ch 9.
ROW 1 (RS): HDC into 2nd ch from the hook, HDC across, turn. <8>
ROW 2: Ch 1, BLO sl st 7, sl st in last st, turn. <8>
ROW 3: Ch 1, BLO HDC 7, HDC in last st, turn. <8>
Repeat ROWS 2 – 3 until the ribbing measures the length of the entire neckline. (photo 17)
Fasten off.
Pin ribbing along neckline and whip stitch ribbing to neckline.
NECKLINE RIBBING – ONTO NECKLINE
With the RS facing you, insert your hook into the corner of the front panel. Secure your yarn and pull up a loop.
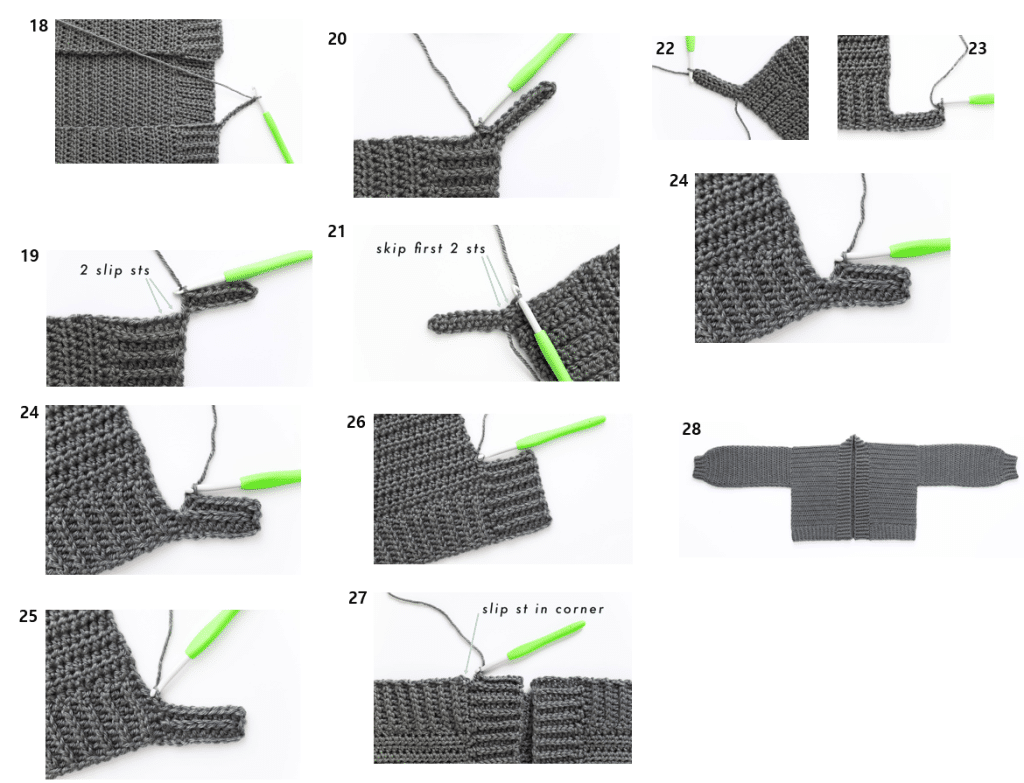
FOUNDATION CHAIN: Ch 9. (photo 18)
ROW 1: HDC in 2nd ch from the hook, HDC 7, sl st into next 2 sts on neckline edge, turn.<8> (photos 19 + 20)
ROW 2: Skip first 2 sl sts, BLO sl st 7, sl st in last st, turn. <8> (photos 21 + 22)
ROW 2: Ch 1, BLO HDC 8, sl st into next 2 sts on neckline edge, turn,<8> (photos 23, 24 + 25)
Repeat ROWS 2 – 3 until you make your way around to the opposite corner of the second front panel. End on a repeat of ROW 3 and place 1 sl st in the corner. Fasten off. (photos 26 + 27)
*When crocheting directly onto the raw edge of the HDC rows, space your slip stitches out evenly. If your slip stitches are too close together, the neckline will ruffle and if they are too far apart the ribbing will pucker and pull on the neckline.
*For even slip stitch spacing, I found that lining up the first slip stitch at the same height as the BLO HDCs works best and then placing the 2nd slip stitch slightly above it.
*In general, I found that I spaced out 4 ribbing rows for every 3 HDC body panel rows (instead of 1 slip stitch in each HDC row) the ribbing laid flat. But experiment with your specific yarn choice and crochet tension to find the best spacing.
FINISHING
Weave in all of your ends. Steam block to measurements.