I hope you enjoy making it as much as I did! If you have any questions about this pattern, I am happy to assist you
Finished Approximate Dimensions:
H= 8 ½ “ (to the base to the handles)/ W= 10”
What you will need
- Lion Brand 24/7 cotton worsted weight yarn, 100% mercerized cotton
Color options:- Taupe
- Cool Grey
- Yardage: 300 yards
- Crochet hooks: 3 mm & 2.5 mm (for the edging)
- Gauge: 4” square =18 rows and 19 SC
- Magnetic snap: I used Hidden magnetic snaps
- Beads: I used Mixed wooden beads
- Fabric: 14”/ 20” rectangle
- Stitch markers
- Tapestry needle
Abbreviations
CH: Chain_ ST: Stitch_ SL ST: Slip stitch_ SC: Single crochet_ DC: Double crochet HDC: Half double crochet_ BLO: Back loop only_ RSC: Reverse SC_ YO: Yarn over Rnd: Round_ SP: Space _ Rep: Repeat_ RS: Right side_WS: Wrong side.
Note: Various yarns, even though worsted may change slightly the measurement of this pattern. I suggested that you do a gauge swatch.
Step 1- Crochet the bag
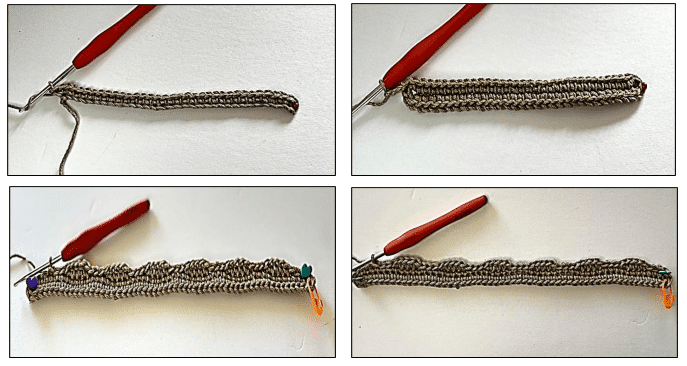
The bag is crocheted in “rounds” using a Wave Stitch, but instead of working continuously in circle, you work back and forth from the starting stitch. You must turn your work at the end of each round, working one round on the right side of the work (RS) and the following
round on the wrong side of the work (WS). For alignment purposes, the rounds are joined by a SC instead of a SLST. Use a stitch marker to identify the start of rounds. Use a 3 mm hook then chain 56 to make a foundation chain,
- Rnd 1: 2 SC in the 2nd CH from the hook, SC in next 53 ST, 3 SC in the last CH. Continue crocheting along the back unused loops of the foundation chain. SC in next 53 ST (crochet over the tail to hide it), 2 SC in the last CH already holding 2 SC, join with a SC into the 1st SC. (use a ST marker here).
- Rnd 2: (RS)* SL ST BLO in next 4 SC, HDC BLO in next 4 SC,* rep to around, join with SC in the 1st SC, turn.
- Rnd 3: (WS) SC in the 1st SC, * HDC BLO in next 4 ST, SL ST BLO in next 4 ST,* rep to around, join with SC in the 1st SC, turn.
- Rnd 4: (RS) SC in the 1st SC,HDC BLO in next 4 ST, SL ST BLO in next 4 ST, rep * to* around, join with SC in the 1st SC, turn.
- Rnd 5: (WS) SC in the 1st SC,* SL ST BLO in next 4 ST, HDC BLO in next 4 ST,* rep to around, join with SC in the 1st SC, turn.
- Rnd 6: (RS) SC in the 1st SC,* SL ST BLO in next 4 ST, HDC BLO in next 4 ST,* rep to around, join with SC in the 1st SC, turn.
For the pattern, repeat Rnd 3- Rnd 6 for 45 rounds ( total ) making sure you turn your work at the end of each round

Step 2- Crochet the edging
To crochet the edging I used a reversed single crochet skipping one stitch in between the reversed single crochets. Instead of working from right to left, you will work from left to right. Use a 2.5 mm hook and keep your tension is nice and even.
Edging: * Insert the hook to the right into the next ST, then yarn over and draw the loop back to the front, yarn over again, and draw that loop through the two loops already on the hook,* rep to around, join with a SL ST. Add one or two SL ST if needed to position your hook in the corner stitch where you will start crocheting the strap. Do not cut the yarn yet.
Additional resources:

How to crochet a reverse single crochet border
Step 3- Crochet the strap
Lay out your bag on a smooth surface, then mark each corner stitch of the edging with 2 stitch markers then,
- Change to a 3 mm hook then CH 180 (or to reach the desired length), SL ST in the 2nd marked ST. Make sure the foundation chain is not twisted.
- SC in every ST of the foundation chain, finish with a SL ST into the next ST to the 1st marked ST, CH1.
- Use a 2.5 mm hook to RSC in every ST across, join with a SL ST into the next ST to the 2 nd marked ST, fasten off.
- Next, you will crochet a 2nd border using in the unused loops of the foundation Chain.
- SL ST in the 2nd marked ST, RSC in every ST of the foundation CH (in the unused loops), join with a SL ST to into the next ST to the 1st marked ST, fasten off.
- Weave in and cut all ends.

Step 4- Line the bag
In this step you will make a pouch with the fabric the same size as the crocheted bag. You will insert the pouch inside your bag then stitch it up. I chose invisible magnetic snaps to close the bag, but you can add a zipper following the link below if you prefer. You can hand/machine sew or even glue the fabric and the zipper!
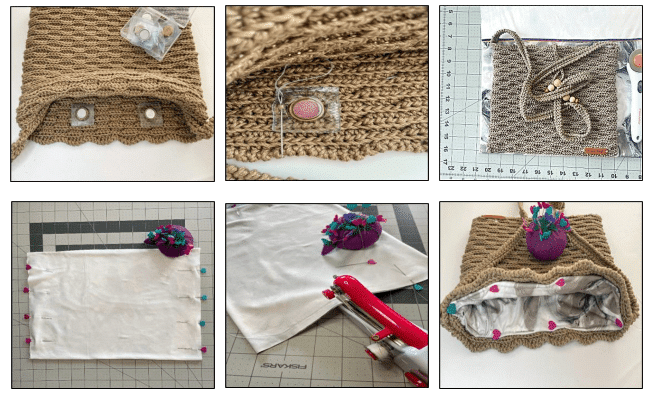
Before you line the bag:Turn the bag inside out, then symmetrically place 2 magnetic snaps at the top of front and back panels. Sew them using a thread and a sewing needle.
- Layout your fabric on a smooth surface then fold it in half.
- Place your bag on top of the folded fabric, the bottom of the bag should be on top of the folded side of the fabric.
- Trace around the bag leaving roughly 1/2-inch extra fabric along the sides and top of the bag.
- Cut out your fabric.
- Sew the lateral sides of the fabric leaving the top side only unsewed. You just made a pouch!
- Place the pouch inside of the bag. Keeping the right side of the fabric facing outward.
- Adjust the lining carefully, fold down the fabric roughly 1/2 inch at the top then clip it or pin it to the crochet bag.
- Use a needle and thread to stitch around the top of the bag, sewing the lining and the crocheted bag together.
Additional resources:

How to line a bag with fabric
How to line a bag and add a zipper without a sewing machine
Step 5- Finish the bag
- CH 60 to make a string and leave 2” long tails on each end to attach the beads. Finish with a knot then cut the yarn.
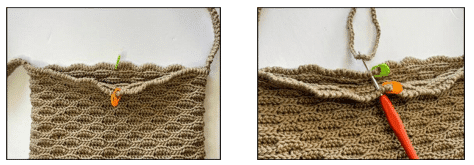
- Lay out the bag then place 2 stitch markers roughly in the middle of the back and the front panels.
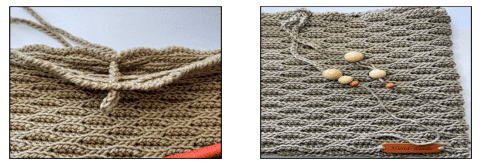
- Fold the string in half, then with the crochet hook pull it through both the middle back stitch and the middle front stitch forming a little loop at the top front of the bag (see pictures). You can attach the string to the front panel only if you prefer)
- To close the bag, pull the both ends of the string through the loop.
- With the tapestry needle pull the long tail through the beads, make a couple of tight knots to secure them then cut the yarn. You may use a drop of glue to secure the beads.
- Repeat the same steps to add the beads to the other end of the string
1- Lay out the bag then place 2 stitch markers roughly in the middle of the back and the front panels

2- Fold the string in half, then with the crochet hook pull it through the middle back ST and the middle front ST forming a little loop at the top front of the bag

Congratulations!
You just finished the Caramel Bag. I hope you enjoyed making it and are pleased with the results!