Beach Bag Zero Waste Step By Step Tutorial – Crochet Bag Pattern, Crochet Granny Square Bag, Reusable Grocery Bag, Crochet Beach Bag Zero Waste.
To create your project you need the following materials:
- Twine twisted jute rope: white color – 0.55 lb (0.25 kg), natural color – 0.66 lb (0.3 kg)
- Hook No. 4 and No. 3.5 mm
- Markers – 4 pcs.
- Jute rope 4 mm – 60 “ (150 cm)
Quick reminder and abbreviations of the stitches:
- CH – chain stitch
- DC – double crochet
- SC – single crochet
- DC 2 tog – Double Crochet 2 stitches together
- CH-2-sp: chain 2 space (which will be the corner space)
- BLO – the back loop only.
Approximate finished size is:
width – 14 1/2” (37 cm), height – 11 1/2” (29 cm), handles length – 23.5” (60 cm).
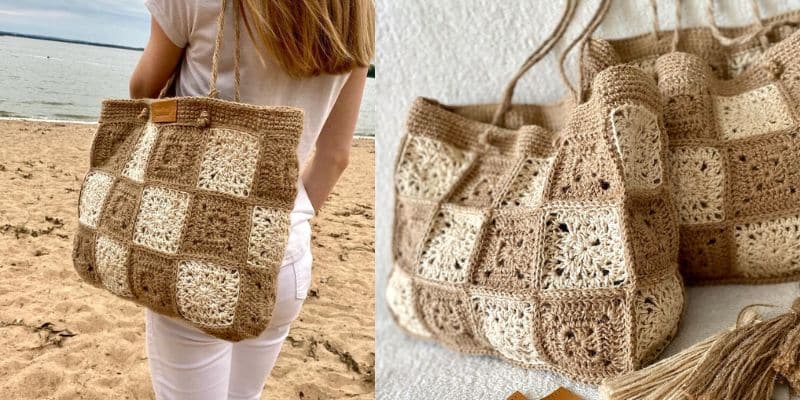
So let’s get it started!
Even though granny squares look complicated, they’re actually quite easy to make!
Granny squares are easy and fun to crochet. I’ve written the following granny square tutorial with the beginners in mind.
For this bag model we will crochet squares of two different types: Solid Granny Square with open corners and Openwork Granny Square. The basic granny square motif is worked from the center out in joined rounds.
NATURAL COLOR GRANNY SQUARE
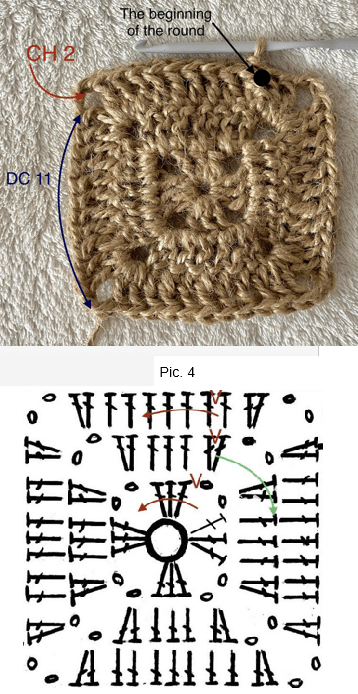
(Solid Granny Square with open corners – see diagram on pic. 5)
Use the Magic Circle to start Granny Square. This method will give you a tight center with no holes or gaps.
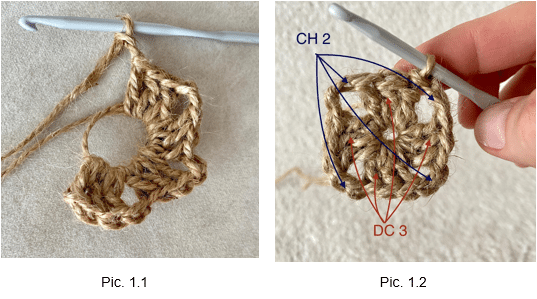
ROUND 1: work into the ring: *DC 3, CH 2* rep. 4 times (pic. 1.1).
Pull the end of the rope and tight the ring. To join the round and create the square shape, slip stitch (SL ST) into the top of the first DC (pic. 1.2.) and turn.
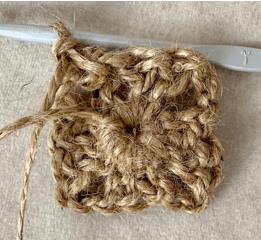
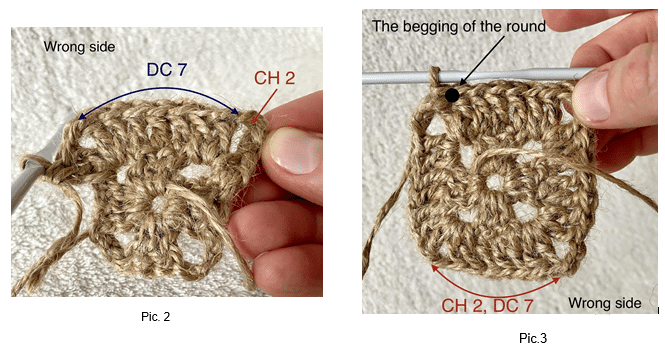
ROUND 2: work DC in the CH-2-sp (the corner space), – pic. 2
CH 2, DC 2 in the same CH-2-sp, DC 3 along the side, DC 2 in the corner CH-2-sp rep. 3 times,CH 2, DC 2 in the same CH-2-sp, DC 3 along the side, DC in the corner CH-2-sp (pic. 2).
To join the round and create the square shape, slip stitch (SL ST) into the top of the first DC of the current round (pic. 3) and turn.
ROUND 3: DC 6 along the side, DC 2 in the corner CH-2-sp,
*CH 2, DC 2 into the same CH-2-sp, DC 7along the side, DC 2 into the corner CH-2-sp* rep. 3 times,
CH 2, DC 2 in the same CH-2-sp, DC along the side (pic. 4)
Break the rope, fasten off and hide the tail.
Natural color crochet Solid Granny Square is completed (the first one). Make 16 the same squares
V – the beginning of the round
Red and Green arrows – crocheting direction
Pic. 5 -solid Granny square with open corners diagram
WHITE COLOR GRANNY SQUARE (openwork Granny Square)
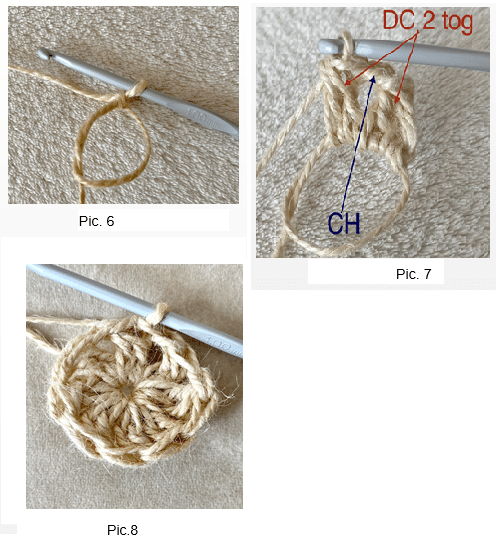
Use the Magic Circle to start White Granny Square (pic. 6).
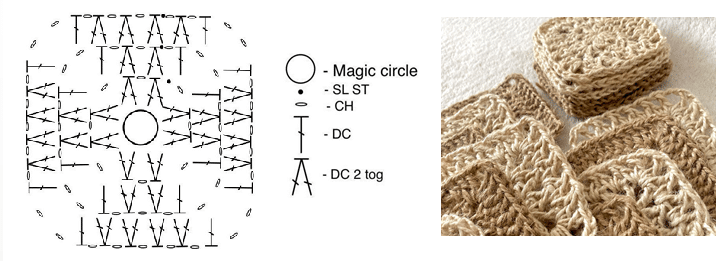
I offer two options for the description White Granny Square: the diagram (pic. 14) and detailed description round by round.
ROUND 1: DC 2 tog, CH rep. 8 times (pic. 7)
SL ST into the top of the first DC of the current round to join the round and create the square shape (pic. 8).
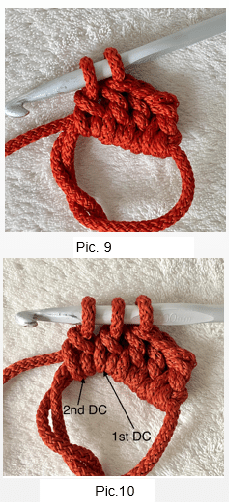
How to make DC 2 tog?
- Yarn over the hook.
- Insert your hook into the next stitch/Magic circle.
- Yarn over.
- Draw the yarn through the stitch.
- Yarn over.
- Draw the yarn through the first 2 loops on your hook.
- Two loops remain on the hook (pic.9)
- Yarn over the hook.
- Insert your hook into the next stitch/Magic circle.
- Yarn over.
- Draw the yarn through the stitch.
- Yarn over.
- Draw the yarn through the first 2 loops on your hook.
- Two loops remain on the hook (pic.9)
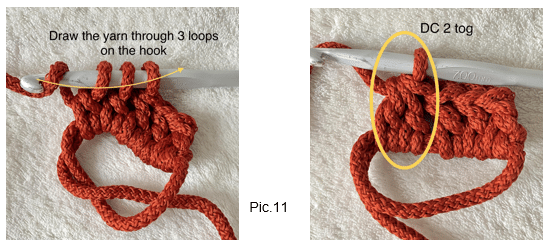
Yarn over. Draw the yarn through all 3 loops on your hook (pic. 11). You’ve made 1 complete DC 2 tog stitch (pic. 11).
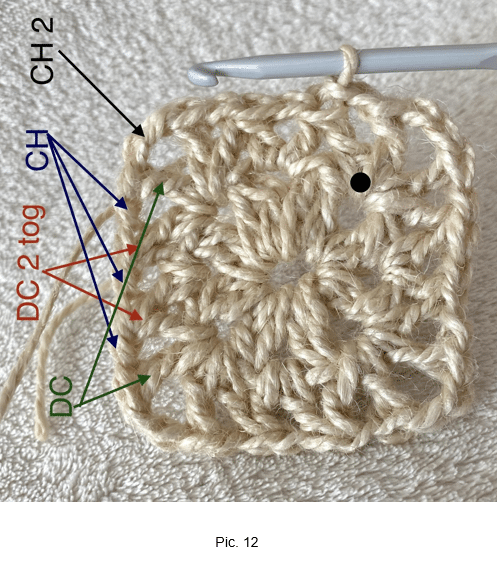
ROUND 2: work along the side: DC 2 tog, CH, DC 2 tog, CH, DC in the CH-2-sp,
*CH 2, DC into the same CH-2-sp, CH, DC 2 tog, CH, DC 2 tog, CH, DC into the corner CH-2-sp* rep. 3 times,
CH 2, DC in the CH-2-sp, CH, SL ST into the top of the first DC of the current round to join the round and create the square shape (pic. 12).
Black dot on the pic. 12 – the beginning of the round.
ROUND 3: work along the side: *DC 2 tog, CH* rep. 3 times, DC in the CH-2-sp,*CH 2, DC into the same CH-2-sp, CH, **DC 2 tog, CH** rep. 4 times, DC into the corner CH-2-sp* rep. 3 times,
CH 2, DC in the CH-2-sp, CH, DC 2 tog, CH, SL ST into the top of the first DC of the current round to join the round and create the square shape (pic. 13).
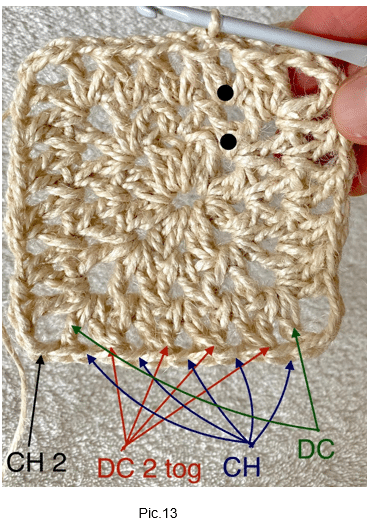
White crochet Granny Square is completed (the first one). Make 16 the same squares.
Pic. 14 – openwork Granny Square diagram
White and Natural Granny Squares
SEW DETAILS
Arrange White jute and Natural jute granny squares in a checkerboard pattern as in the pic. 15. Join squares first in the direction of the red arrows, then – blue arrows.
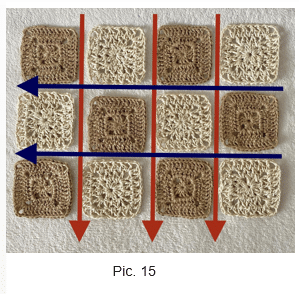
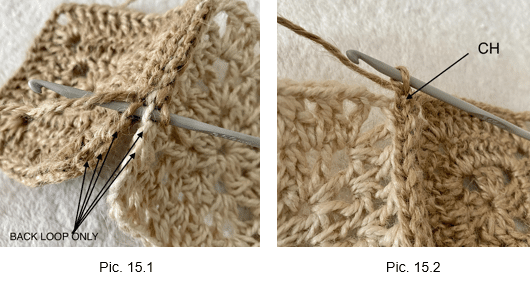
The easiest and the most effective way to join squares is the SL ST in the back loops only of both parts (pic. 15.1).
Work: 13 SL ST in BLO along the squares side + one CH to go to the next squares (pic. 15.2).
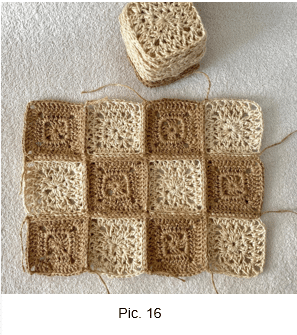
Make one more the same rectangle (pic. 16).
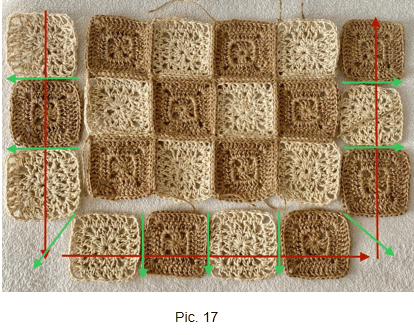
Arrange the remaining 10 squares in the order shown on pic.17( the red arrow): W-N-W-W-N-W-N-N-W-N
W – White square N – Natural square
Join squares along the green arrows by SL ST in BLO (pic. 17)
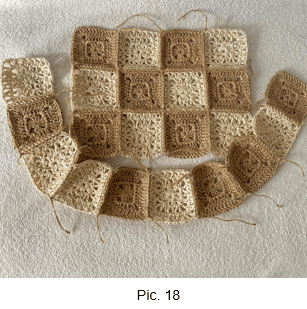
You will end up with a long strip of 10 squares (bag sides and bottom) – pic. 18
Connect 2 rectangles and a long strip.
Your bag is almost ready.
FINISHING TOUCHES – bag top and handles
ROUND 1-3: SC around the bag top (use smaller hook size 3.5-3.75 mm and try to work tight).
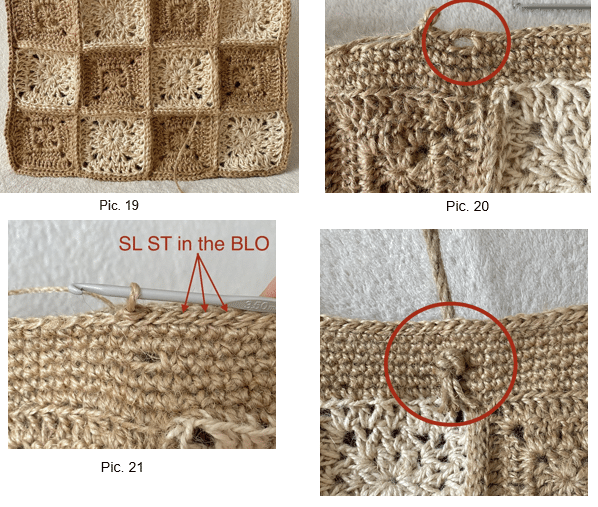
ROUND 4: place 2 markers at the points where the handles will be.
I placed them at a distance of two central squares. Do the same on the other side (pic.19).
At the first marker work: CH 2, skip 2 stitches, SC along the bag top till the next marker (pic. 20).
Repeat from * at the 2nd, 3rd and 4th markers.
ROUND 5-6: SC around
ROUND 7: SL ST in the BLO around (pic. 21). Break the rope, fasten off and hide the tail.
Slip 4 mm jute rope in the holes of the bag top and tie the knots at the ends
Congratulations!!!
You’ve just finished your jute Granny Square bag!