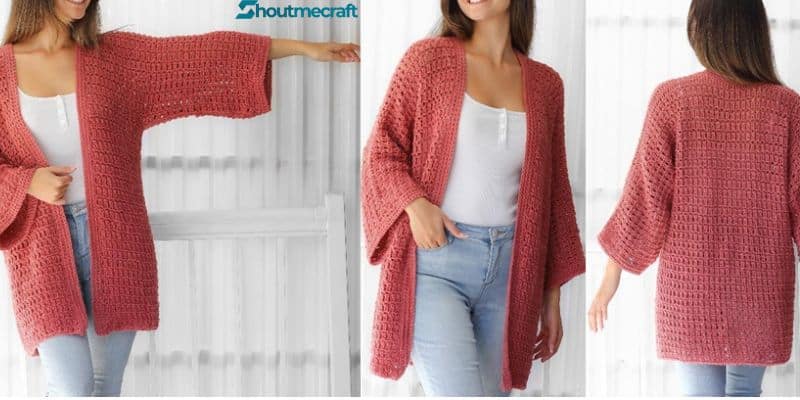
Cardigan The Easy Design ✨: a new design for a 😍drapey sleeves, exquisitely textured lacy cardigan.
-You’ll adore this incredibly simple crochet pattern for this stunning cardigan; it’s fashionable to wear as well!
Lightweight crochet cardigan with kimono sleeves and an airy design, made with DK weight yarn and L/11- 8 mm crochet hook.
This cardigan is suitable even for novices who wish to make their first wearable clothing because of its simple stitch pattern and relatively easy construction, and it looks great with any outfit!
Everything you need for a 💞great & easy project is included in this cardi: a loose fit, minimum seaming, a beginner pattern with simple stitches.
Materials:
Any Light weight, #3 yarn – 1440( 1560, 1680, 1840, 1980, 2120, 2300)yds.
– I used Drops Puna -color Old Pink
Crochet hook L/11- 8 mm- the 8mm crochet hook is larger than suggested for this weight of yarn. The reason for the larger hook is to make a loose and drape-y material, a lightweight and airy cardigan.
Tapestry needle
Gauge: 14DC= 4inch = 10cm whit U.S. size L/11-8 mm crochet hook or size needed to obtain gauge.
Legend: Ch-chain, St-Stitch, RS/WS-Right/Wrong side, SC-Single Crochet, DC-Double Crochet
Use the bust measurements when choosing the size for your cardigan
Sizes instructions in the pattern: XS ( S – M – L – XL- 2XL- 3XL)
Bust: 31″ (33″-35″-38″-41″-44″-47″) =79 (84-89-97-104-112-120)cm
Finished Cardigan Sizes (after blockage): Length- 26(27, 27, 28, 28, 29, 30)”
Width- 19.5(21, 22.5, 24, 25.5, 27.5, 29.5)”
The front and back panels are crocheted top down. Chains at beginning of rows do not count as stitch.
Number within < > shows the total number of stitches you should have after that row.
So, let’s get started!
BACK PANEL
Chain 142[150, 158, 166, 178, 190, 202]
Foundation row: SC in 2nd ch and in each ch (this row is not taken into account when counting the rows). < 141[ 149, 157, 165, 177, 189, 201] >
Row 1 (RS): Ch3, DC in each sts, turn. < 141[ 149, 157, 165, 177, 189, 201] >
Row 2 ( WS): *chain 1, skip 2DC, SC between DC*, repeat from *-* until 2 sts remaining,*chain 1, skip 2DC, SC between DC*, repeat from *-* until 2 sts remaining

Row 3 ( RS): Ch3,. 2DC in each chain 1 space across, end the row by 1DC in ch1 < 70[74, 78, 82, 88, 94, 100] groups of 2 DC, 1DC at the end>

Row 4 ( WS): Ch1, SC in between the first and the second DC , *chain 1, skip the 2DC group, SC in between the 2 DC groups*, repeat from *-* until 2 sts remaining, chain 1, skip 2 DC, SC in between the last DC and the chain 3.
Turn. < 70[74, 78, 82, 88, 94, 100] Ch1 and 71[75, 79, 83, 89, 95, 101] SC>

Rows 5- 20[ 22, 22, 24, 24,26,28] – repeat Rows 3-4. After last row cut the yarn. This rectangle represents the upper back and the sleeves.
In the following rows you will make the lower back. Turn.
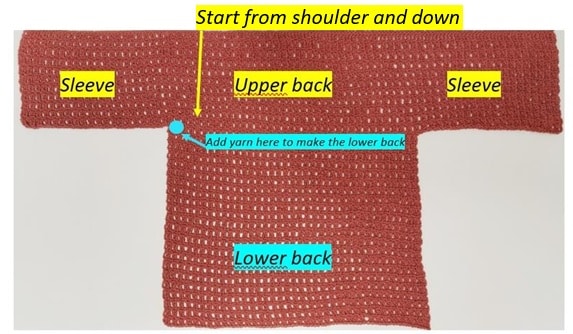
Row 21 [23, 23, 25, 25, 27, 29]:
Skip 18[ 19, 20, 21, 22, 23, 24] Ch1 spaces,then in the next SC, join with sl st, make ch3, ( see the blue dot on the picture), make 2DC in each chain 1 space until there are 18[ 19, 20, 21, 22, 23, 24] Ch1 spaces left,DC in next SC. < 34[36, 38, 40, 44, 48, 52] groups of 2 DC, 1DC>
Row 22 [24, 24, 26, 26, 28, 30]:repeat Row 4
<34[36, 38, 40, 44, 48, 52] Ch1 and 35[37, 39, 41, 45, 49, 53] SC>
Rows 23[ 25, 25, 27, 27, 29, 31] -66[68, 68, 70, 70, 72, 74]- Repeat Rows 3-4
* You can add or remove rows in multiples of 2 to make your cardigan longer or shorter.
RIGHT FRONT PANEL
start from shoulder and down – Join yarn at the back side, in the First chain of the foundation chain, with a slst.(yellow dot)
Row 1:Ch3, DC in each chain, for a total of < 63[ 67, 71, 75, 79, 85, 91] DC>
Row 2 ( WS): Ch1, SC in between the first and the second DC ,
*chain 1, skip 2DC, SC between DC*, repeat from *-* until 2 sts remaining, chain 1, skip 2 DC, SC in between the last DC and the chain 3. Turn.
< 31 [33, 35, 37, 39, 42, 45] Ch1, 32[ 34, 36, 38, 40, 43, 46]SC>
Row 3 ( RS): Ch3, 2DC in each chain 1 space across, end the row by 1DC in ch1
< 31 [33, 35, 37, 39, 42, 45] 2DC groups, 1DC>
Row 4 (WS): Ch1, SC in between the first and the second DC , *chain 1, skip the 2DC group, SC in between the 2 DC groups*, repeat from *-* until 2 sts remaining, ch1, skip 2 DC, SC in between the last DC and ch3.
< 31 [33, 35, 37, 39, 42, 45] Ch1, 32[ 34, 36, 38, 40, 43, 46]SC>
Rows 5 – 20[ 22, 22, 24, 24,26,28] – repeat Rows 3-4. After the last row cut the yarn.
In the following rows you will make the lower front.)SyTurn.
Row 21 [23, 23, 25, 25, 27, 29]:Skip 18[ 19, 20, 21, 22, 23, 24] Ch1 spaces, then in the next SC, join with sl st, make ch3, ( see the black dot on the picture), make 2DC in each chain 1 space across, end the row by 1DC in ch1
< 13[14, 15, 16, 17, 19, 21] groups of 2 DC, 1DC>
Row 22 [24, 24, 26, 26, 28, 30]:repeat Row 4
< 13[14, 15, 16, 17, 19, 21]ch1, 14 [15, 16, 17, 18, 20, 22] SC>
Rows 23[ 25, 25, 27, 27, 29, 31] -66[68, 68, 70, 70, 72, 74]– Repeat Rows 3-4
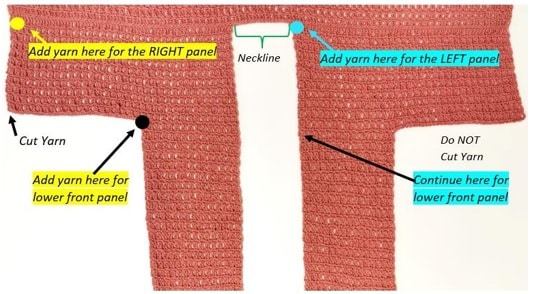
LEFT FRONT PANEL
Start from shoulder and down – Join yarn at the back side, to the foundation ch with a sl st. Count from right shoulder line: 16[ 16, 16, 16, 20, 20, 20] chains (for the neckline), join yarn in next chain, with a sl st ( see the blue dot in the picture).
Row 1:Ch3, DC in each chain across. < 63[ 67, 71, 75, 79, 85, 91] DC>
Repeat rows 2 -20[ 22, 22, 24, 24,26,28] from the Right front side.
– In the following rows you will make the lower front.
Row 21 [23, 23, 25, 25, 27, 29]:ch3, ( see the picture), make 2DC in each of the next 13[14, 15, 16, 17, 19, 21] chain 1 space, end the row by 1DC in the next ch1. Turn.< 13[14, 15, 16, 17, 19, 21] groups of 2 DC, 1DC>
Repeat Rows 22 [24, 24, 26, 26, 28, 30] -66[68, 68, 70, 70, 72, 74] from the Right front side.
Front TRIM
With your cardigan right side out, join yarn with a Sl St to the corner of the right front panel. Stitch count is not crucial here, place your sts as evenly as possible, my suggestion: In each row ending in SC, you make 1 SC, in each row that ends in DC you make 2 SC, in each row that ends in Ch3 you make 2 SC.
Row 1– RS: Ch 1, SC evenly up the side of the first panel, across the back neckline, and down the second panel until you reach the opposite corner, turn.
Row 2-6: Ch 1, SC in each st around, turn. (the last row is on the WS). Tie off.
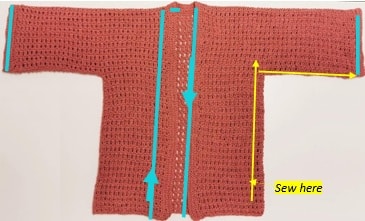
Sleeve TRIM -the blue lines
With your cardigan right side out, join yarn with a Sl St to the corner of one of the sleeves. Work 1 row of SC, in the same way you worked around the front parts:
Row 1– RS: Ch 1, SC evenly on the edge of the sleeve.
Repeat Row 2-6 from the front trim. (the last row is on the WS). Tie off.
Sew the cardigan together – Fold the cardigan in half at the shoulder seam, ( I prefer to sew on the right side). Cut a new strand of yarn 60 – 70 inches long, enough to sew the side and sleeve. Start sewing from the bottom up to the side seam until you reach the armpit and continue sewing the sleeve side seam until you reach the end of the sleeve.
(see the yellow lines) Repeat for the other side.
Tie off and weave in all ends.
Congratulations!