Brooklyn Jute Bag – Crochet Tote Bag Pattern Reusable Crossbody Bag, Crossbody Jute Bag, Crochet Pattern, Sling Bag Crochet Pattern.
To create your project you will need the following materials:
- Twine twisted jute cord – 450-500 gr (approx. 490 yds/450 meters).
- Hook N 4 mm.
- Magnetic buttons – 3 ps.
- Scissors
Terms:
- CH – chain
- SLST – slip stitch
- SC – double crochet
- DC – single crochet
Dimensions of the bag:
Width of the bottom of the bag – 22 cm, width of the top part of the bag – 49-50 cm, height – 26.5 cm, effective length of the strap – 78 cm.
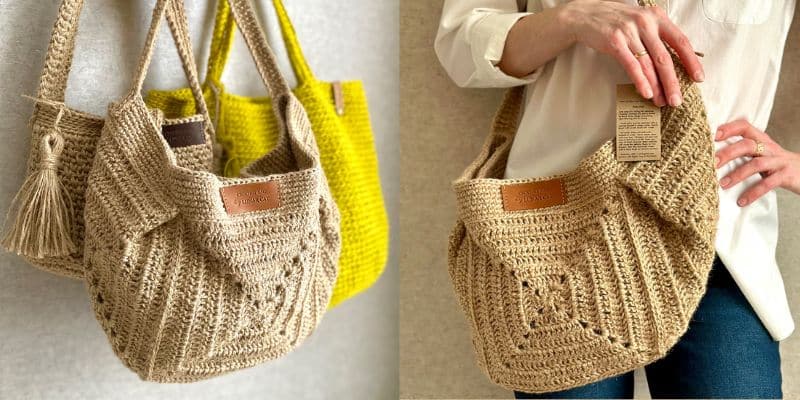
So let’s get started!!
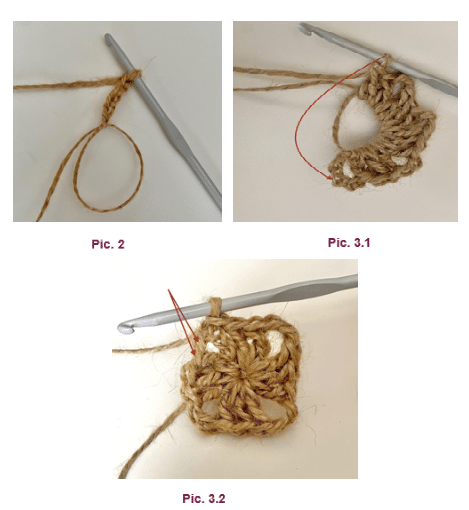
ROUND 1: Make 4 CH (pic. 2).
Then crochet the following sequence into the amigurumi ring:
DC 3, CH 2, DC 3, CH 2, DC 3, CH 2, DC 2.
Join the round with a SLST (slip stitch) in the 3rd stitch of the chain – pic. 3.1.
Make 2 SLST along the chain (see the red arrows on the pic. 3.2). CH 4, turn the work. The first round is finished.
ROUND 2: DC 2 into the arch, DC 3 along the side, DC 2 into the arch, CH 2 repeat 3 times (see pic. 4)
DC 2 into the arch, DC 3 along the side, DC 1 into the arch.
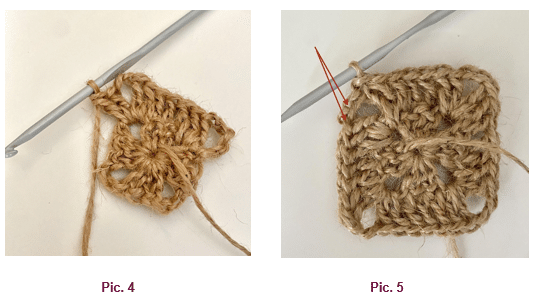
Join the round with a slip stitch in the 3rd stitch of the chain (pic. 5).
Make 2 SLST along the chain – positions indicated with red arrows on the pic. 5.
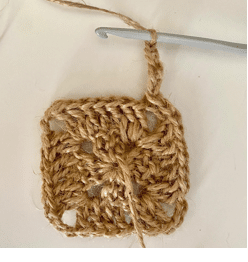
CH 4, turn the work. The second round is finished (pic. 6).
The square is formed with 8 turning rows. To get on a new row:
- make 2 slip stitches along the starting chain of this row;
- add 4 chains to become the first arch of the new row and the first DC in the new row.
The quantity of DC on each side of the square increases by 4 DC in each following row: DC 3-7-11-15-19-23-27-31.
ROUND 3:
DC 2 into the arch, DC 7 along the side, DC 2 into the arch, CH 2 repeat 3 times (see pic. 7)
DC 2 into the arch, DC along the side, DC 1 into the arch.
Join the round with a slip stitch in the 3rd stitch of the chain.
Make SLST 2 along the chain. CH 4, turn the work. The third round is finished.
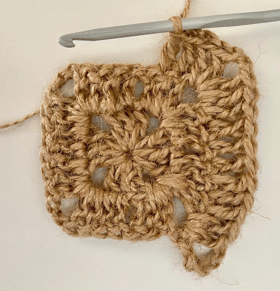
ROUND 4:
*DC 2 into the arch, DC 11 along the side, DC 2 into the arch, CH 2* repeat 3 times. DC 2 into the arch, DC 11 along the side, DC 1 into the arch.
Join the round with a slip stitch in the 3rd stitch of the chain. Make SLST 2 along the chain. CH 4, turn the work. The fourth round is finished.
ROUND 5:
*DC 2 into the arch, DC 15 along the side, DC 2 into the arch, CH 2* repeat 3 times. DC 2 into the arch, DC 15 along the side, DC 1 into the arch.
Join the round with a slip stitch in the 3rd stitch of the chain. Make SLST 2 along the chain. CH 4, turn the work. The fifth round is finished.
ROUND 6:
*DC 2 into the arch, DC 19 along the side, DC 2 into the arch, CH 2* repeat 3 times. DC 2 into the arch, DC 19 along the side, DC 1 into the arch.
Join the round with a slip stitch in the 3rd stitch of the chain. Make SLST 2 along the chain. CH 4, turn the work. The sixth round is finished.
ROUND 7:
*DC 2 into the arch, DC 23 along the side, DC 2 into the arch, CH 2* repeat 3 times. DC 2 into the arch, DC 23 along the side, DC 1 into the arch.
Join the round with a slip stitch in the 3rd stitch of the chain. Make SLST 2 along the chain. CH 4, turn the work. The seventh round is finished.
ROUND 8:
*DC 2 into the arch, DC 27 along the side, DC 2 into the arch, CH 2* repeat 3 times. DC 2 into the arch, DC 27 along the side, DC 1 into the arch.
Join the round with a slip stitch in the 3rd stitch of the chain. Make SLST 2 along the chain. The eighth round is finished.
Cut the cord. Hide the tails in the work. The dimensions of the square: 22х22 cm Crochet 3 more squares like this.
I do not recommend the steaming of jute pieces (as well as washing and ironing) because the object would lose its rigidity and elasticity after the contact with water.
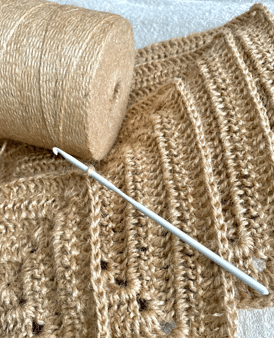
Place the pieces of the bag on a horizontal surface:
- front and back parts – one upon the other one
- lateral parts – fold diagonally.
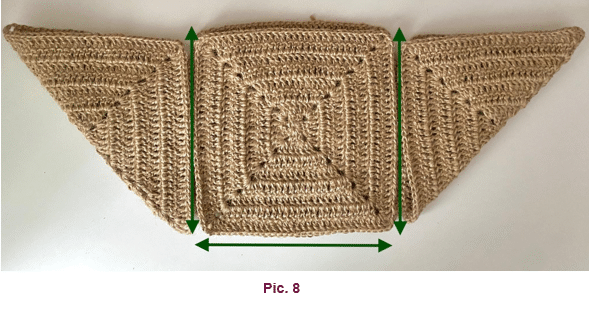
Sew the pieces together. In picture 8 you can see the positions of the seams indicated with green arrows.
Hint: sew the bottom lines first and then the lateral ones.
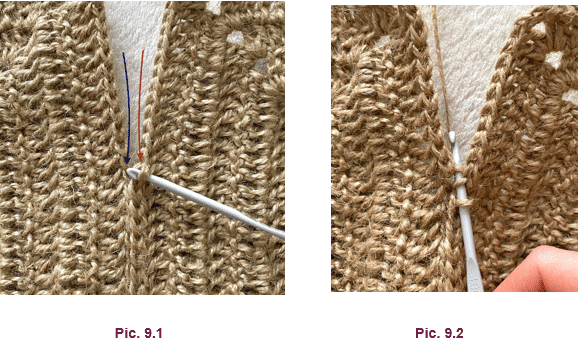
Connect the pieces with slip stitches, picking up the back loops of the outside chain on the squares.
The way it should be made:
- Insert the hook in the center of the stitch (“chain”) of the right piece – see the red arrow in pic. 9.1;
- Then insert the hook in the center of the stitch (“chain”) of the left piece – see the blue arrow in pic. 9.1;
- Now you’ve got 3 stitches on your hook – the working one + 2 stiches from the left and the right pieces (see pic. 9.2);
- Pull the cord through all the 3 stitches on the hook; Repeat these steps until the end of the side of the square.
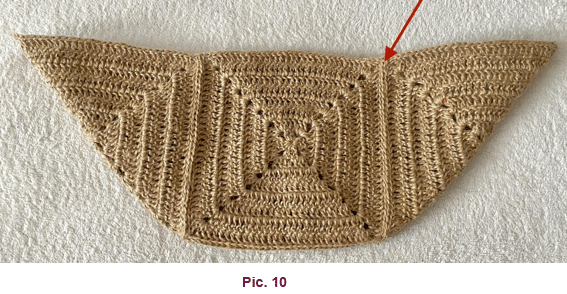
Now let’s do the edge binding of the bag. In pic. 10 you can see the red arrow indicating the starting point. .
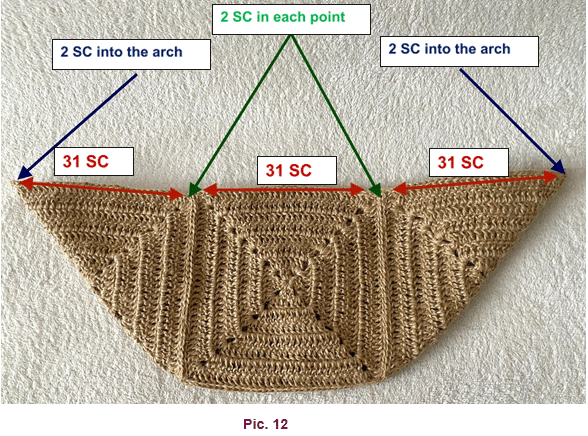
Distribute equally 198 SC on the top of the bag. Follow the principle: (pic. 12):
- 31 SC along each full side of the square (there are 6 such elements along the top line);
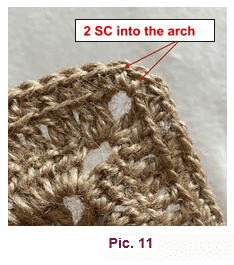
- 2 SC into the arches (top lateral points of the bag) – pic. 11;
- 2 SC in the joints – where vertical seams end.
ROUND 1: 198 SC around – picking up the back loop.
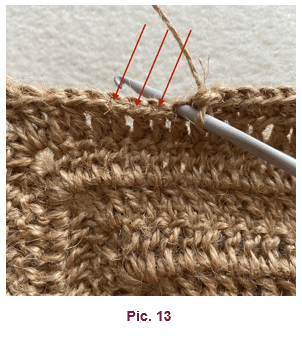
In this round insert the hook under the back loop of the stitch – this will make a beautiful transition from the pieces of the bag to the border. In the pic. 13 red lines show the back loops of the stitches.
Now crochet in spiral order: do not close one round and open the new one with a connection stitch. Just continue crocheting. Use a marker to indicate the beginning of the round.
ROUND 2: in this round make 4 pleats. The pleats should be formed on the lateral parts of the bag (the squares folded diagonally); the pleats are directed OUTSIDE from the center.
Make SC 33 from the beginning of the round.
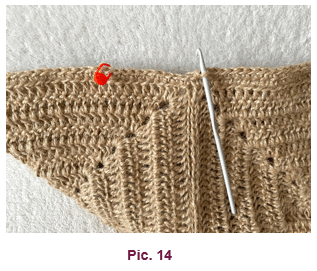
Count 10 stitches to the left of the hook and place the marker in the 10th stitch (see pic. 14).
Form a pleat: join the stitch with the marker with the one on the hook (pic. 15.1). The pleat is formed inside the bag. Length of the pleat – 5 stitches.
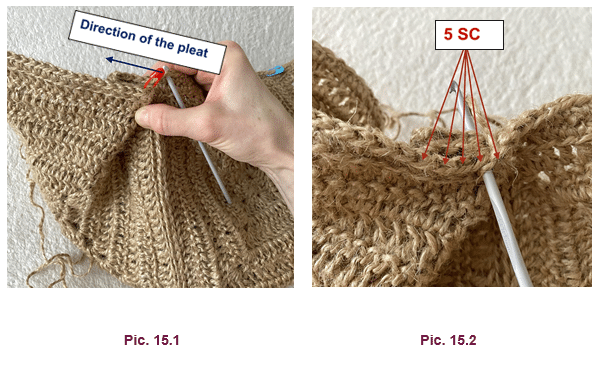
Make 5 SC, inserting the hook through all the three layers (pic. 15.2). Then make SC 36 along the top of the bag (binding the top left part).Form a symmetric pleat on the opposite side – make SC 5, inserting the hook through the three layers.
The forming of the pleat on the opposite side is shown in the pic. 16.
Now the half of this round is ready.
Sequence for the ROUND 2:
*SC 33, SC 5 (first pleat), SC 36, SC 5 (second pleat) * repeat 2 times.
Altogether 158 SC in the round (pic. 17).
ROUND 3-7: SC 158 in circle.
ROUND 8: SLST in circle.
Cut the cord. Hide the tails in the knitting.
Attach 3 magnetic buttons as shown in pic. 18

CROSSBODY STRAP
Make 5+1 CH. Skip the first chain and insert the hook in the second one. (pic. 19.1), pull the cord through. Then insert the hook in the following stitch and pull the cord in the same way. Continue until the end of the chain. Now you have 6 stiches on your hook: 5 stiches you’ve casted on and the working one. (pic. 19.2).
Pull the working cord through 2 stitches – red arrow in pic. 19.2.
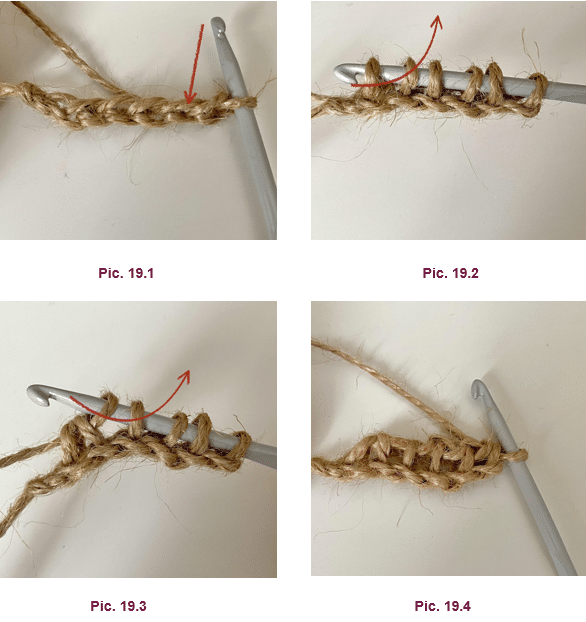
Then hook the working cord again and pull it through the next two stitches (see the red arrow in the pic 19.3). Continue in the same way until the end of the row – pic. 19.4.
The following rows are crocheted with the same principle: cast 5 stitches on your hook and then pull the cord through each 2 stitches.
Insert the hook in the first stitch of the previous row (place and direction are indicated in pic. 20.1 with blue plastic needle). Hook the working cord and pull it through. Now you’ve got two stitches on your hook (pic. 20.2).
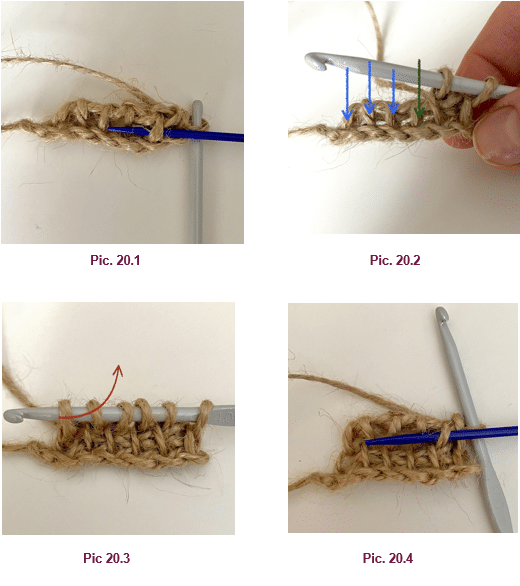
Insert the hook in the next stitch – see the green arrow in pic. 20.2. Hook the cord and pull it through. Continue until the end of the row – pull the cord through the stitches indicated with blue arrows in pic. 20.2. Now you’ve got 6 stitches on your hook (pic. 20.3).
Hook the cord and pull it through two stitches – red arrow in pic. 20.3. Hook the cord again and pull it through the following two stitches – and continue like this till the end of the row.
In pic. 20.4 – two rows of the strap are crocheted. The blue needle indicates the place to insert the hook when starting the 3rd row.
Continue your work. The length of the strap – 90 cm. See VIDEO HERE. Cut the cord, hide the tails inside the work.
Attach the strap to the bag – to the lateral angles. I used a normal needle and capron thread of the same color as the bag. The overlap of the strap on the top of the bag – 5-6 cm.
Congratulations!!!
You’ve just finished your Brooklyn jute bag!