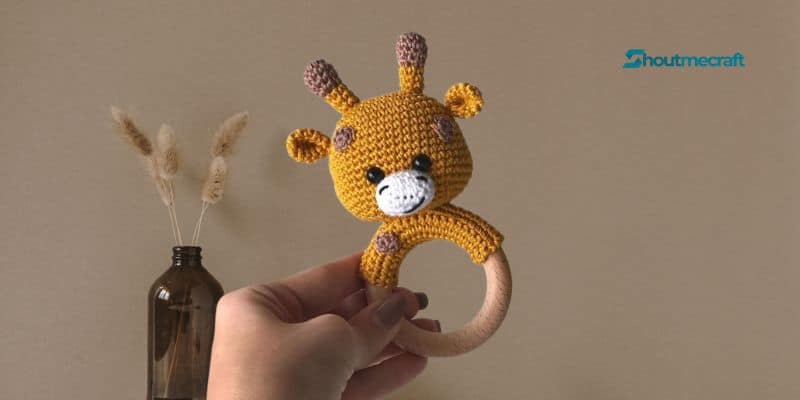
Amigurumi Rattle Crochet Pattern – Use this comprehensive crochet pattern to create your very own adorable baby giraffe, which is great to give as a present at baby showers or to decorate a nursery! Our 5-page, simple-to-follow tutorial walks you through the production process step-by-step with illustrations and instructions provided in English for US readers.
There are two adorable eye alternatives available in the crochet giraffe toy design: safety eyes that are simple to install or embroidered eyes that provide a softer feel. When using the same weight yarn and wooden ring as suggested by the design, the finished item stands at 5″/12 cm high and is a charming little safari buddy. However, keep in mind that finishing this project will require intermediate crocheting abilities.
Materials Needed
- Vita Lily 100% c otton1.75oz/50g approx 137yds/125m in 3 different colors – (yellow or orange, brown, white).
You can substitute yarn just make sure that it matches original proportions. - Gauge
26 sc and 25 rows = 4 in(10cm)
Suggested substitute yarn
“Scheepjes Catona”, “Alpina Anabel”
Colors – MC – yellow, CC – brown, CC1 – white - Crochet hook 2 mm and 2.5 mm
- Stuffing
- Rattle approx 1in/24-30mm in diameter
- Safety eyes 8 mm
- Scissors
- Tapestry needle
Abbreviations (US terminology)
- BOR – beginning of round
- ch – chain
- sl st – slip stitch
- st(s) – stitch(es)
- sc – single crochet
- dec – decrease (sc2tog)(I recommend to make invisible decreases)
- inc – increase (2sc in one st)
- rnd(s) – round(s)
- foll – follow(ing)(s)
- rep – repeat
- rem – remain(ing)
- cont – continue
- The number in parenthesis at the end of each rnd is the total number of sts in the rnd.
Notes
All pieces worked in a continuous spiral. Do not join in the rnd, just work sc in the next st. Place marker or use contrasting color yarn to mark BOR. Use hook 2.5 mm or size matching your yarn and obtaining gauge. When working around the wooden ring, use smaller size hook, it will be easier to work.
Head
With MC and hook 2.5mm ch8.
Rnd 1 – 2sc in the second st from the hook, sc in next 5 sts, 3sc in last st. Now cont to work from the opposite side of the chain as foll: sc in next 5 sts, sc in the same st we worked 2sc in the same st from the opposite side. Do not join with a sl st. Work next rnd as foll:
Rnd 2 (INC) – [inc] 2 times, sc in next 5 sts, [inc] 3 times, sc in next 5 sts, inc = 22 sts.
Rnd 3 (INC) – [inc, sc in next st] 2 times, sc in next 5 sts, [inc, sc in next st] 3 times, sc in next 5 sts, inc, sc in next st = 28 sts.
Rnd 4 (INC) – [inc, sc in next 2 sts] 2 times, sc in next 5 sts, [inc, sc in next 2 sts] 3 times, sc in next 5 sts, inc, sc in next 2 sts = 34 sts.
Rnd 5 (INC) – [inc, sc in next 3 sts] 2 times, sc in next 5 sts, [inc, sc in next 3 sts] 3 times, sc in next 5 sts, inc, sc in next 3 sts = 40 sts.
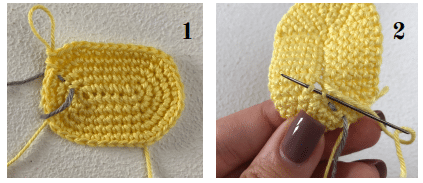
The piece should look like as it’s shown on pic.1. If there is a hole after working rnd 1, use a tail to tighten it as it’s shown on pic.2
Rnd 6 (INC) – sc in next 3 sts, inc, sc in next 19 sts, inc, sc in next 16 sts = 42 sts.
Rnd 7 (INC) – sc in next 3 sts, inc, sc in next 20 sts, inc, sc in next 17 sts = 44 sts.
Rnd 8 – sc in every st = 44 sts.
Rnd 9 (INC) – sc in next 5 sts, inc, sc in next 21 sts, inc, sc in next 16 sts = 46 sts.
Rnds 10-12 – sc in every st = 46 sts.
Rnd 13 (INC) – sc in next 5 sts, inc, sc in next 22 sts, inc, sc in next 17 sts = 48 sts.
Rnds 14-16 – sc in every st = 48 sts.
Rnd 17 (DEC) – [dec, sc in next 4 sts] 3 times, sc in next 6 sts, [dec, sc in next 4 sts] 3 times, sc in next 6 sts = 42 sts.
Rnd 18 (DEC) – [dec, sc in next 3 sts] 3 times, sc in next 6 sts, [dec, sc in next 3 sts] 3 times, sc in next 6 sts = 36 sts.
Rnd 19 (DEC) – [dec, sc in next 2 sts] 3 times, sc in next 6 sts, [dec, sc in next 2 sts] 3 times, sc in next 6 sts = 30 sts.
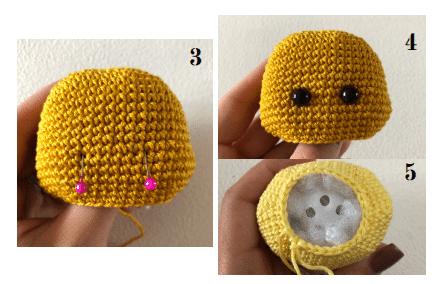
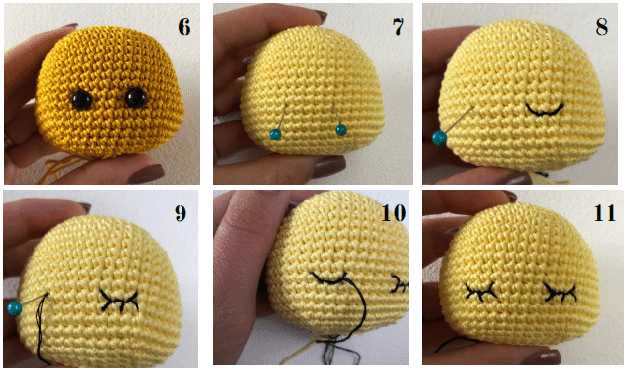
Insert safety eyes, if you use them, at level of 13 and 14 rnds with 6 sts in between or see next page for the embroidered eyes.
Stuff the head and put rattle inside
Rnd 20 (DEC) – [dec, sc in next st] 3 times, sc in next 6 sts, [dec, sc in next st] 3 times, sc in next 6 sts = 24 sts.
Rnd 21 (DEC) – [dec] 3 times, sc in next 6 sts, [dec] 3 times, sc in next 6 sts = 18 sts.
Stuff the piece firmly.
Rnd 22 (DEC) – [dec, sc in next st] 6 times = 12 sts.
Rnd 23 (DEC) – [dec] 6 times = 6 sts.
Bind off rem 6 sts and fasten off, leaving a long tail for sewing.
Make eyesockets, using needle sculpting technique, Embroider sleepy eyes, if you didn’t use safety eyes.
Using pins, mark eyes
Muzzle
With CC1 and hook 2.5mm.
Rnd 1: ch6, 2sc in the 2nd st from the hook, sc in next 3 sts, 3sc in the last ch. Now cont to work from the opposite side of the chain as foll: sc in next 3 sts, 1sc in last st, we worked 2sc in the same st from the opposite side = 12 sts. Do not join with a sl st, start working next rnd as foll:
Rnd 2 (INC): inc in next 2 sts, sc in next 3 sts, inc in next 3 sts, sc in next 3 sts, inc = 18 sts.
Rnds 3-4: sc in every st = 18 sts. End with sl st. Fasten off.
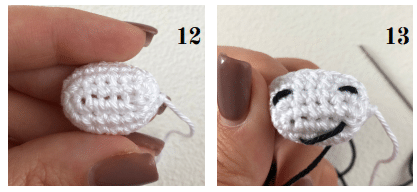
Embroider nostrils and smile, see pic.12-13. Stuff the piece.
Ear (Make 2)
With MC and hook 2.5mm make a magic ring.
Rnd 1: 6sc into the ring = 6 sts.
Rnd 2 (INC): [inc] 6 times = 12 sts.
Rnd 3 (INC): [inc, sc in next 5 sts] 2 times = 14 sts.
Rnds 4-5: sc in every st = 14 sts.
Rnd 6 (DEC): [dec, sc in next 5 sts] 2 times = 12 sts. End
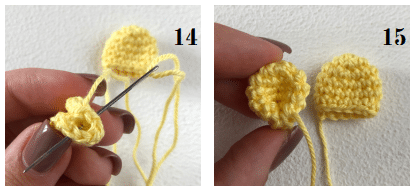
with sl st. Fasten off, leaving a long tail for sewing. Sew the ears as it’s shown on pic. 14.
Horn (Make 2)
With CC and hook 2.5mm make a magic ring.
Rnd 1 – 6sc into the ring = 6 sts.
Rnd 2 (INC) – [inc] 6 times = 12 sts.
Rnds 3-4 – sc in every st = 12 sts.
Rnd 5 (DEC) – [dec, sc in next st] 4 times = 8 sts.
Change to MC.
Rnds 6-8 – sc in every st = 8 sts.
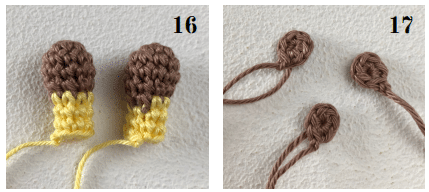
Join with a sl st. Fasten off, leaving a long tail for sewing. Stuff the piece firmly. Rep for the 2nd horn, pic.16.
Spot (Make 3)
With CC and hook 2.5mm make a magic ring. Work 6sc into the ring, join with a sl st. Fasten off, leaving a long
tail for sewing.
Working around the ring. Option 1
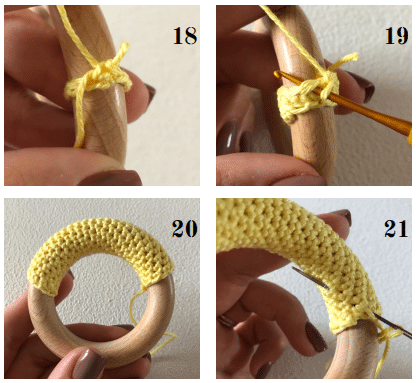
With MC yarn work around the ring in a continuous spiral. The total number of sts depends on the size of your wooden ring and yarn. For my size ch10 using hook 2.5 mm, then work around the ring using hook 2 mm.
Join chain with sl st around the ring. Then sc in each st around. The first rnd is the most difficult.Then start to work in a continuous spiral, sc in every st. If it’s still uncomfortable to work, try to use smaller size hook.
Pay attention to your tension, crochet around the ring tightly. If the fabric is moving loosely, rip it out and start over again with one st less.
Cont to work until half or a less than half of the ring is covered. End with sl st. The beginning and the end of work should be inside of the ring. Weave in ends.
Pull the end through the last rnd to tighten the fabric around the ring, and then pull it through the fabric inside the ring.
Working around the ring. Option 2
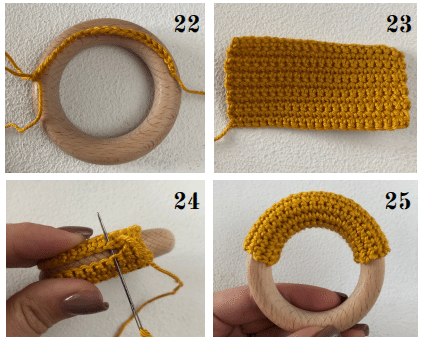
If option 1 is too complicated for you, you can crochet a rectangle, working sc. For my ring size, with hook 2.5 mm ch21 and work for 12 rows. When the rectangle is finished, fold it over the ring and sew it, the fabric should be tight around the ring. The seam should be inside the ring. Weave in ends using tapestry needle.
Assembly
Pin muzzle under the eyes and sew it to the head. See pic. 26-27.
Pin horns at the top of the head and sew them, see pic.28-29.
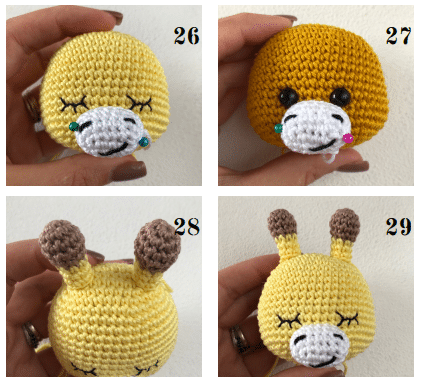
Count 3 rnds down from the horns and sew the ears, see pic.30.
Sew 2 spots to the head and 1 spot to the ring, see pic.31-33.
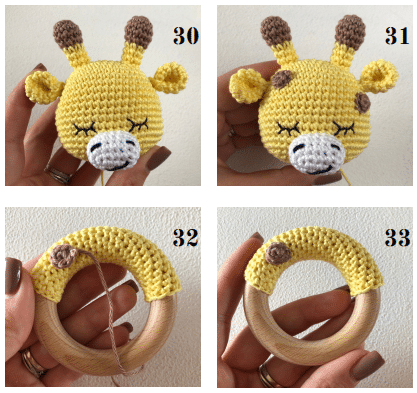
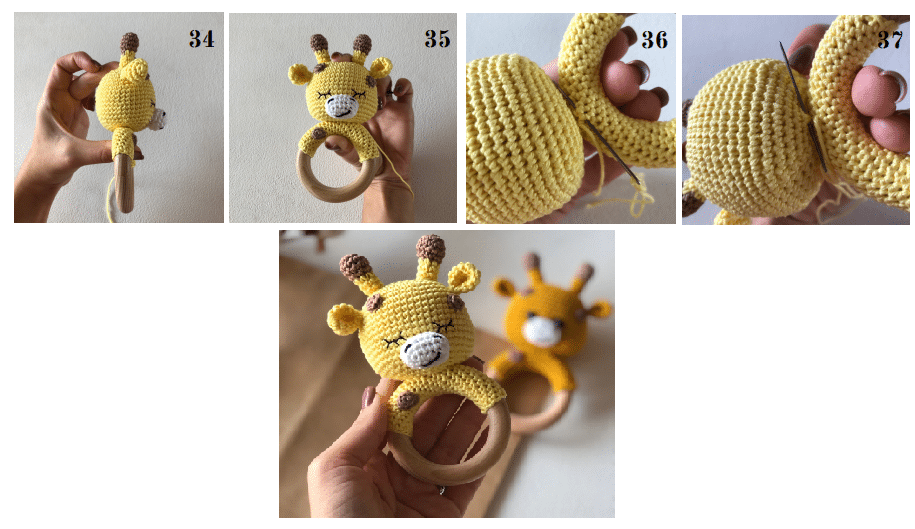
Sew the head to the wooden ring, making sure it is centered, press it a bit to avoid thin neck. I recommend to sew it around twice.
