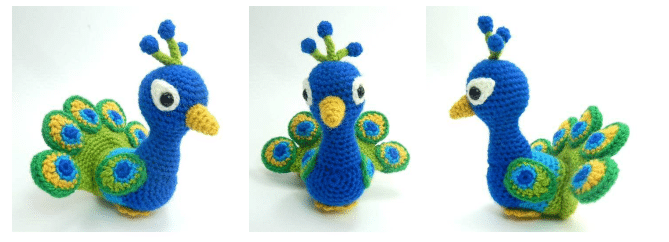
Amigurami Paksha The Peacock – Our crochet designs are meant to be simple to grasp. Each design includes all of the instructions you need to make gorgeous amigurumis.
We give information on the materials and tools used, and each step is clearly described and illustrated with images.
Each crochet pattern is created with passion and attention to assure correctness, without exception.
Terminology
This pattern is written in American crochet terminology, which differs from British terminology in some instances. The following table of terms used in this pattern will help should you wish to translate one to the other.
| ch | chain | ch | chain |
| slst | slip stitch | ss | slip stitch |
| sc | single crochet | dc | double crochet |
| hdc | half double crochet | htr | half treble crochet |
| dc | double crochet | tr | treble crochet |
| tr | treble crochet | dtr | double treble crochet |
| skip | miss |
Abbreviations & Symbols
- cm ==> centimeters
- g ==> grams
- invdec ==> invisible decrease
- mm ==> millimeters
- sc2tog ==> Single crochet 2 together
- st(s) ==> stitch(es)
- ( ) ==> Round brackets indicate:
- A group of stitches to be worked into the same stitch or space, or
- The amount of stitches you should have on completion of the round or row it follows, or Explanatory notes within the pattern.
- [ ] ==> Square brackets contain a group of stitches to be worked the amount of times indicated after the brackets
- * ==> Asterisks indicate a point of repeat.
- “ ==> inches
Special Stitch Explanations:
Invdec
This is a good way of decreasing in amigurumi when you need a tight, smooth fabric as this technique will eliminate bumps and holes in the fabric and will be almost completely invisible.
Insert hook into front loop only of first stitch, do not wrap yarn, insert hook into front loop only of next stitch. You will now have a total of three loops on your hook. Wrap your yarn around hook and pull through both of the 2 front loops on the hook, wrap yarn around hook again and pull through last 2 loops on hook. You have now ‘invisibly’ decreased by one stitch.
Sc2tog
This decrease method is easier to use when working decreases on a back loop only round.
Insert hook into st, wrap yarn round hook and draw up a loop. Insert hook into next st, wrap yarn round hook and draw up a second loop. You will now have 3 loops on hook. Wrap yarn round hook again and draw through all 3 loops on hook.
Color Changing:
Make all color changes in the last 2 loops of the final stitch of the old color.
Tips for Neater Color Changes (optional):
- Make the first stitch in the new color a slip stitch instead of a single crochet. (Don’t pull the slip stitch too tight or it will be difficult to crochet into in the next round)
- On narrow stripes (1-2 rounds), add 1 extra stitch of the old color to the end of every color change round (move marker up a stitch to reflect new start of round). This extra stitch will help to counteract the shortness of the slip stitch that replaced the single crochet.
Color Change Ends:
Tie off and trim your color change ends as you go. Tie securely on the inside of your work. With amigurumi crochet it can be difficult to reach the ends once you have crocheted too many rows above.
For repeating stripes carry the unused color up the inside of the work to save keep cutting and re-tying.
Embroidered Stitches and Yarn Ends:
To hide the starting and fastening off ends of the embroidered stitches, first thread your yarn needle with the appropriate yarn. Tie a knot in the end of your yarn and push needle into and out of toy between crochet stitches, coming out where you want the first embroidery stitch to be. As you pull on the yarn the polyester toy filling will catch the knot securely inside the toy. When you have worked the required embroidery stitches you can finish off by passing the needle in and out between different crochet stitches a few times until the yarn is securely caught up in the polyester filling. When secure, pull on end of yarn and snip off close to toy. Yarn ends from closing pieces or sewing pieces together can be hidden inside the stuffing in the same way.
Stitch Marker Use:
Place marker in first stitch of each round. Move marker up with each completed round.
Stitch Placement: Work in both loops of the stitch unless specified otherwise.
Gauge (Tension):
Exact gauge is not crucial for this pattern. Just make sure your crochet hook is small enough to create a tight fabric that the stuffing can’t poke through.
With the yarn and hook specified peacock measures approximately 6” (15 cm) tall.
Materials for each
- Light worsted weight, (DK/8 ply) yarn in the following color suggestions: Dark Blue (15 g), Turquoise (5 g), Yellow (10 g), Dark Green (5 g), Light Green (10 g), Cream (2 g). (Weights are approximate and may vary from those quoted depending on the individual yarns you choose).
- 2 x 9 mm black plastic toy safety eyes
- Polyester toy stuffing
Equipment
- 3 mm crochet hook
- Scissors
- Yarn needle
- Stitch marker
- Tweezers (for stuffing small or narrow parts)
The Pattern

Eye Patches
Make 2 pieces, starting at center. With Cream yarn make 2 ch.
Rnd 1 : 6 sc in second ch from hook. (6 sts)
Rnd 2 : Sc in first st, (sc, hdc, dc, hdc, sc) in next st, sc in next st, slst in next st.
Fasten off, leaving a long yarn tail for sewing.
Body
Make 1 piece, starting at front. Working in continuous spiral rounds. With Dark Blue yarn make 2 ch.
Rnd 1 : 6 sc in second ch from hook. (6 sts)
Rnd 2 : 2 sc in each of next 6 st. (12 sts)
Rnd 3 : [Sc in next st, 2 sc in next st] 6 times. (18 sts)
Rnd 4 : [Sc in each of next 2 st, 2 sc in next st] 6 times. (24 sts)
Rnd 5 : [Sc in each of next 3 st, 2 sc in next st] 6 times. (30 sts)
Rnd 6-8 : Sc in each st around. (3 rounds)
Rnd 9 : [Sc in each of next 3 st, invdec] 6 times. (24 sts)
Change to Turquoise yarn.
Rnds 10-14 : Sc in each st around. (5 rounds)
Change to Light Green yarn.
Rnds 15-18 : Sc in each st around. (4 rounds)
Rnd 19 : [Sc in each of next 2 st, invdec] 6 times. (18 sts)
Stuff body.
Rnd 20 : [Sc in next st, invdec] 6 times. (12 sts)
Rnd 21 : [Invdec] 6 times. (6 sts)
Fasten off, leaving a long yarn tail for finishing. Thread yarn tail onto yarn needle, pick up front loop only of remaining 6 stitches. Pull tight to close the hole. Fasten off. Weave in end.
Head and Neck
Make 1 piece, starting at crown of head. Working in continuous spiral rounds. With Dark Blue yarn make 2 ch.
Rnd 1 : 6 sc in second ch from hook. (6 sts)
Rnd 2 : 2 sc in each of next 6 st. (12 sts)
Rnd 3 : [Sc in next st, 2 sc in next st] 6 times. (18 sts)
Rnd 4 : [Sc in each of next 2 st, 2 sc in next st] 6 times. (24 sts)
Rnd 5 : [Sc in each of next 3 st, 2 sc in next st] 6 times. (30 sts)
Rnds 6-10 : Sc in each st around. (5 rounds)
Rnd 11 : [Sc in each of next 3 st, invdec] 6 times. (24 sts)
Insert safety eyes into center of Rnd 1 of the eye patches, then insert into head between Rnds 8 and 9, spacing them 9 stitches apart. Make sure the pointed part of the eye patches are facing towards the back of the head before you fix on the washers.
Rnd 12 : [Sc in each of next 2 st, invdec] 6 times. (18 sts)
Rnd 13 : [Sc in next st, invdec] 6 times. (12 sts)
Rnds 14-17 : Sc in each st around. (4 rounds)
Rnd 18 : [Sc in each of next 3 st, 2 sc in next st] 3 times. (15 sts)
Rnd 19 : [Sc in each of next 4 st, 2 sc in next st] 3 times. (18 sts)
Rnd 20 : Sc in each st around.
Rnd 21 : [Sc in each of next 5 st, 2 sc in next st] 3 times. (21 sts)
Rnd 22 : Sc in each st around.
Fasten off, leaving a long yarn tail for sewing.
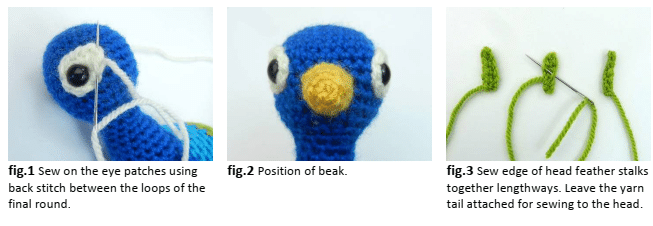
Stuff head and neck. Sew base of neck to top front portion of body. Sew edges of eye patches to head with back stitch in between the loops of the final round (fig.1).

Beak
Make 1 piece, starting at tip. Working in continuous spiral rounds. With Yellow yarn make 2 ch.
Rnd 1 : 3 sc in second ch from hook. (3 sts)
Rnd 2 : 2 sc in each of next 3 st. (6 sts)
Rnd 3 : Sc in each st around.
Rnd 4 : [Sc in next st, 2 sc in next st] 3 times. (9 sts)
Rnd 5 : [Sc in each of next 2 st, 2 sc in next st] 3 times. (12 sts)
Fasten off, leaving a long yarn tail for sewing
Stuff beak and sew to center of face, in between eye patches (fig.2).
Head Feather Stalks
Make 3 pieces. With Light Green yarn make 6 ch.
Rnd 1 : Sc in second ch from hook, sc in each of next 4 ch. (5 sts)
Fasten off, leaving a long yarn tail for sewing.
Fold head feather stalk in half lengthways and sew long edge together, leaving the rest of the yarn tail for sewing stalks to head (fig.3).
Head Feather Tips
Make 3 pieces. With Dark Blue yarn make 2 ch.
Rnd 1 : 6 sc in second ch from hook. (6 sts)
Rnd 2 : Sc in each st around.
Fasten off, leaving a long yarn tail for finishing. Thread yarn tail onto yarn needle, pick up front loop only of remaining 6 stitches. Place the head feather tip over the top of the head feather stalk and pull tight to gather the tip around the stalk. Sew a few stitches through the top of the stalk to secure the tip in place (fig.4). Fasten off and weave in the yarn end. Tie all three head feathers together at the base (fig.5) and sew base of stalks to top of head (fig.6).

Wings
Make 2 pieces, starting at center. Working in continuous spiral rounds. With Dark Blue yarn make 2 ch.
Rnd 1 : 6 sc in second ch from hook. (6 sts)
Change to Turquoise yarn.
Rnd 2 : 2 sc in each of next 6 st. (12 sts)
Change to Light Green yarn.
Rnd 3 : Sc in each of next 4 st, 2 hdc in next st, (dc, tr) in next st, (tr, dc) in next st, 2 hdc in next st, sc in each of next 4 st, slst in next st. (16 sts)
Rnd 4 : Sc in each of next 6 st, (sc, hdc) in next st, (hdc, dc) in next st, (dc, hdc) in next st, (hdc, sc) in next st, sc in each of next 6 st. (20 sts)

Fasten off, leaving a long yarn tail for sewing.
Sew wings to either side of body with pointed part facing towards the back.
Foot
Make 1 piece, starting at center. Working in continuous spiral rounds. With Yellow yarn make 2 ch.
Rnd 1 : 6 sc in second ch from hook. (6 sts)
Rnd 2 : 2 sc in each of next 6 st. (12 sts)
Rnd 3 : [Sc in next st, 2 sc in next st] 6 times. (18 sts)
Rnd 4 : Working in front loops only: (Slst, 4 ch, slst) in each of next 3 st, slst in each of next 2 st, (slst, 4 ch, slst) in each of next 3 st, sc in each of next 10 st
Rnd 5 : Working in leftover back loops from previous round (fig.7): [Sc in next st, sc2tog] 6 times. (12 sts)
Rnd 6 : [Invdec] 6 times. (6 sts)
Do not stuff foot. Fasten off, leaving a long yarn tail for finishing. Thread yarn tail onto yarn needle, pick up front loop only of remaining 6 stitches. Pull tight to close the hole. Fasten off, leaving a long yarn tail for sewing (fig.8).
Sew foot to underside of body with Rnds 1-4 facing outwards (fig.9).

Tail
Tail Lobes
Make 5 pieces, starting at center. Working in continuous spiral rounds. With Light Green yarn make 2 ch.
Rnd 1 : 6 sc in second ch from hook. (6 sts)
Rnd 2 : 2 sc in each of next 6 st. (12 sts)
Rnds 3-5 : Sc in each st around. (3 rounds)
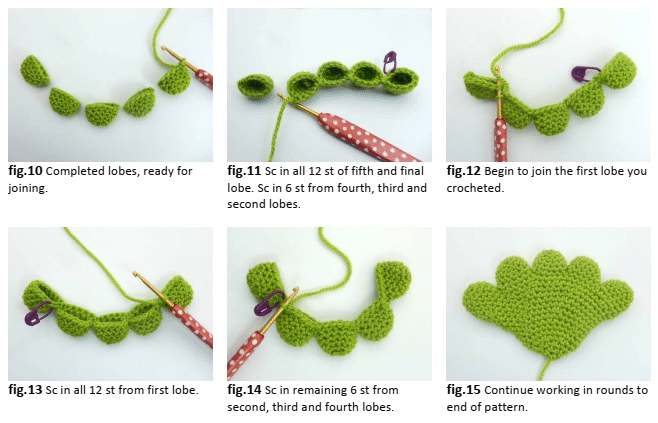
Fasten off and weave in the yarn end on the first four lobes. Leave yarn attached on the fifth lobe (fig.10).
Rnd 6 : With yarn still attached, sc in each of next 12 st from fifth lobe, sc in each of next 6 st from fourth lobe, sc in each of next 6 st from third lobe, sc in each of next 6 st from second lobe, sc in all 12 st from first lobe, sc in each of next 6 st from second lobe, sc in each of next 6 st from third lobe, sc in each of next 6 st from fourth lobe (figs. 11-14). (60 sts)
Rnd 7 : Sc in each st around.
Rnd 8 : [Sc in each of next 3 st, invdec] 12 times. (48 sts)
Rnd 9 : [Sc in each of next 6 st, invdec] 6 times. (42 sts)
Rnd 10 : Sc in each st around.
Rnd 11 : [Sc in each of next 5 st, invdec] 6 times. (36 sts)
Rnd 12 : Sc in each st around.
Rnd 13 : [Sc in each of next 4 st, invdec] 6 times. (30 sts)
Rnd 14 : Sc in each st around.
Rnd 15 : [Sc in each of next 3 st, invdec] 6 times. (24 sts)
Rnds 16-17 : Sc in each st around. (2 rounds)
Rnd 18 : [Sc in each of next 2 st, invdec] 6 times. (18 sts)
Rnd 19 : [Sc in next st, invdec] 6 times. (12 sts)
Rnd 20 : [Invdec] 6 times. (6 sts)
Do not stuff tail. Fasten off, leaving a long yarn tail for finishing. Thread yarn tail onto yarn needle, pick up front loop only of remaining 6 stitches. Pull tight to close the hole. Fasten off, leaving a long yarn tail for sewing (fig.15).
Tail Feathers
Make 10 pieces, starting at center. Working in continuous spiral rounds.
With Dark Blue yarn make 2 ch.
Rnd 1 : 6 sc in second ch from hook. (6 sts)
Rnd 2 : 2 sc in each of next 6 st. (12 sts)
Rnd 3 : Sc in each of next 4 st, 2 hdc in next st, (dc, tr) in next st, (tr, dc) in next st, 2 hdc in next st, sc in each of next 4 st, slst in next st. (16 sts)
Change to Dark Green yarn.
Rnd 4 : Sc in each of next 5 st, 2 sc in each of next 6 st, sc in each of next 5 st. (22 sts)

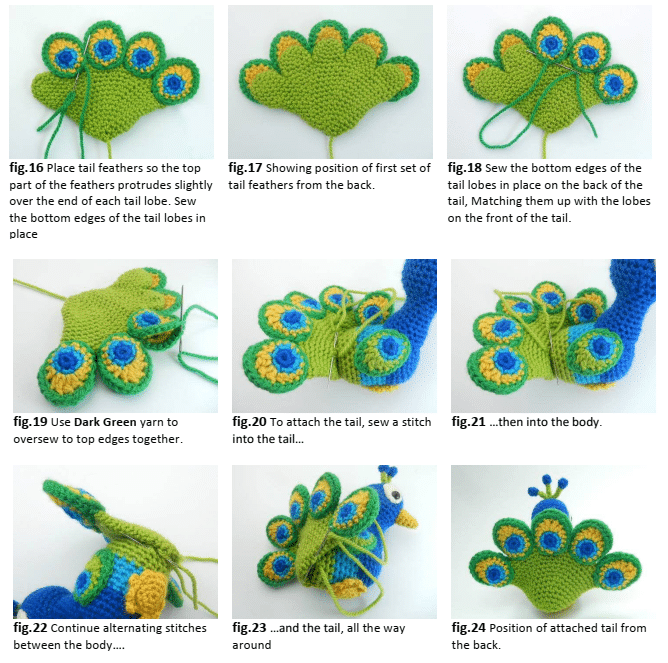
Place a tail feather to the top of each tail lobe so that the top parts stick up slightly over each tail lobe (fig.16). Sew the bottom edges in place. Turn work over (fig.17). Sew the bottom edge of each a matching tail feather to the back of each tail lobe (fig.18). Oversew the tops of the tail feathers together (fig.19). Sew base of tail to back of body, making neat stitches alternately through the body then the tail until it is firmly attached all the way around the back of the body (figs.20-24).
Bunting
To make the bunting follow the pattern and instructions for the wings. Follow all color changes for the front pieces. For the back pieces use Light Green yarn throughout, omitting all color changes. Match a front and a back piece together with right sides facing outwards and oversew the edges together. Thread onto a piece of yarn, spacing with beads if you prefer, and tie a loop at either end for hanging.