Women Crochet Top Pattern an easy pattern for an absolutely feminine top. The lace design for this beginner trendy summer top is different from everything you’ve seen so far!
With its flattering fit and adjustable length, the Abigail top is perfect for all body shapes.If you want a new spring or summer easy pattern to work on, this one is the perfect project. You’ll love this so easy way to crochet this comfy and modern top.
Materials needed:
Sport weight yarn, #2 : 590[650, 720, 790, 850, 920]yds.
I recommend: Premier Yarns-Cotton Fair or Ice Yarns-Lorena. Also, you can use a Light weight yarn, 3, as Truboo-Lion Brand.
G6-4mm crochet hook and a tapestry needle.
Gauge: 4 pattern repeats = 4”/10 cm. 8 rows/ 4’’/ 10 cm. For swatch, chain 24 and work rows 1-8 of pattern. Take time to check the gauge and adjust if necessary. If it takes you fewer stitches to make your swatch, try using a smaller size hook. If more stitches, try a larger size hook.
Ch=chain / St(s) =stitch(es) /R=row /SC=single crochet/SlSt=Slip stitch / SM=stitch marker
DC= double crochet , TC= triple crochet, HDC=half double crochet
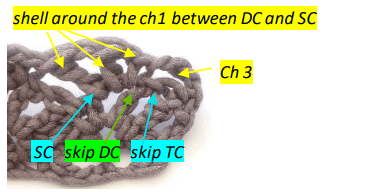
SHELL: (SC, ch1, DC, ch1, TC)
around the ch1 situated between DC and SC from previous row.
Info:
- *Total stitches are indicated between < >
- **For size XS work pattern as written. Counts in brackets ([]) are for size S, M, L, XL, 2XL.
- *** This top is crochet in two pieces. Each piece is worked from the bottom up.
- **** You will add neckline trim at the end.
So let’s get started!
Measure your bust to choose the size:
Sizes: XS [S, M, L, XL, XXL]
Bust: 31″ [34″, 37″, 40″, 43″, 47″] – 78 [86, 94, 101, 110, 120]cm
Top Measurements ( double the width for bust measurements):
- XS = 15.5″ (39.5 cm) Width across back X 19.75″ (50cm) Length
- S = 17.5″ (44.5 cm) Width across back X 19.75″ (50 cm) Length
- M = 19.5″ (49.5 cm) Width across back X 20.5″ (52 cm) Length
- L = 21.5″ (54.5 cm) Width across back X 22″ (55.5 cm) Length
- XL = 23.5″ (59.5 cm) Width across back X 22.75″ (57.5 cm) Length
- XXL = 25.5″ (64.5 cm) Width across back X 23.5″ (59.5 cm) Length
The BACK piece
Chain 79[89, 99, 109, 119, 129].
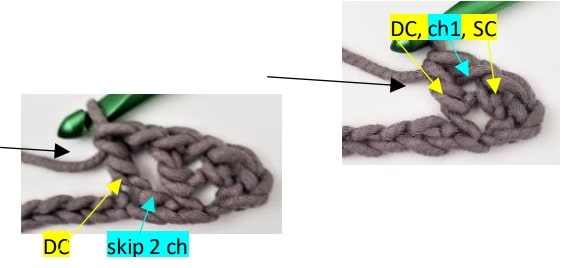
R1: Starting with 4 th ch from hook: (1SC, ch 1,1DC) in the same ch, ch1, skip 2 ch, DC in the next ch, skip 1 ch,

- (1SC, ch 1, 1DC) in the next ch, ch1, skip 2 ch, DC in the next ch, skip 1 ch*, repeat from *-* across, DC in last chain. <15 [17, 19, 21, 23, 25] groups of (1SC, ch 1, 1DC) and 16 [18, 20, 22, 24, 26]DC>
R2: Ch3, skip the next 2 DC, and work a shell around the ch1 situated between DC and SC from previous row, *skip the SC, skip the next 2 DC, and work a shell around the ch1 situated between DC and SC from previous row*, repeat from *-* across, end the row by DC around the ch3. <15 [17, 19, 21, 23, 25]shells and 1 DC>

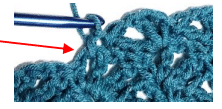
R3: Ch3, *in next shell: skip the TC and DC and work a shell around the ch1 situated between DC and SC, skip the SC*, repeat from *-* across, end the row by DC around the ch3. <15 [17, 19, 21, 23, 25]shells and 1 DC>

Repeat R3 for a total of 46[ 46, 48, 52, 54, 56] rows. Do not fasten off. Proceed directly to ’’Shoulder Shaping’’ instructions.
- * NOTE: You can add or remove rows in multiples of 2 to make your top longer or shorter.
- **For simplicity, in the following explanations, I will replace the instructions by the expression
Shoulder Shaping
Left Shoulder
R1: Ch3, make a shell around ch1 for a total of 5 [6, 7, 7, 8,9]shells. Make a SC around the ch1 situated between DC and SC,in the 6 [7, 8, 8, 9, 10]th shell.Leave remaining sts unworked. Turn.
R2: Ch4, make a shell around ch1 across, end the row by DC around the ch3. <5 [6, 7, 7, 8, 9]shells and 1 DC>. Tie off, leave a long tail for seaming shoulder. Right Shoulder -lay front panel out in front of you, right side up. Count 5 [6, 7, 7, 8, 9] shells in towards center at row 46[ 46, 48, 52, 54, 56].
Join yarn with a Sl St around the ch1 situated between DC and SC of the next shell.
R1: Ch4, make a shell around ch1 across, end the row by DC around the ch3. <5 [6, 7, 7, 8, 9]shells and 1 DC>
R2: Ch3, make a shell around ch1 across, end the row by SC around the ch4. <5 [6, 7, 7, 8, 9]shells and 1 SC>. Tie off, leave a long tail for seaming shoulder.
The FRONT piece
Chain 79[89, 99, 109, 119, 129].
Repeat Rows 1-34[34, 36, 36, 38, 40] of Back Panel.
Split Neckline
Left Shoulder
R1: Ch3, make a shell around ch1 for a total of 7 [8, 9, 10, 11, 12] shells.
Make a SC around the ch1 situated between DC and SC, in the 8 [9, 10, 11, 12, 13]th shell (the center shell) . Leave remaining sts unworked. Turn.

R2: Ch4, make a shell around ch1 across, end the row by DC around the ch3. <7 [8, 9, 10, 11, 12]shells and 1 DC>

R3: Ch3, make a shell around ch1 for a total of 6 [7, 8, 9, 10, 11] shells. Make a SC around the ch1 situated between DC and SC, in the last shell. Turn.
R4: Ch4, make a shell around ch1 across, end the row by DC around the ch3. <6 [7, 8, 9,10, 11]shells and 1 DC>
R5: Ch3, make a shell around ch1 for a total of 5 [6, 7, 8, 9, 10]shells. Make a SC around the ch1 situated between DC and SC, in the last shell. Turn.
R6: Ch3, make a shell around ch1 across, end the row by DC around the ch3. <5 [6, 7, 8,9, 10]shells and 1 DC>
Continue depending on size:
Only for XS [S, M]
R7: Ch3, make a shell around ch1 across, end the row by DC around the ch3. <5 [6, 7]shells and 1 DC>
R8-14: Repeat R7. Tie off, leave a long tail for seaming shoulder.
Only for L [ XL, XXL]
R7: Ch3, make a shell around ch1 for a total of 7 [8, 9]shells. Make a SC around the ch1 situated between DC and SC, in the last shell. Turn.
R8: Ch3, make a shell around ch1 across, end the row by DC around the ch3. <7[8,9]shells and 1 DC>
R9: Ch3, make a shell around ch1 across, end the row by DC around the ch3. <7 [8,9]shells and 1 DC>
R10-18: Repeat R9. Tie off, leave a long tail for seaming shoulder.
Right Shoulder
Lay the front panel in front of you with the finished shoulder on the right side. Join yarn with a Sl St at row 34[34, 36, 38, 40] around the the ch1 situated between DC and SC, in the center shell.
R1: Ch4, make a shell around ch1 across, end the row by DC around the ch3. <7 [8, 9, 10,11, 12] shells and 1 DC> .Turn.

R2: Ch3, make a shell around ch1 for a total of 7 [8, 9, 10, 11, 12] shells. End the row by SC in the last chain of the ch4. <7 [8, 9, 10, 11, 12]shells and 1 SC> . Turn.

R3: Ch4, skip the first shell, make a shell around ch1 in next shells, end the row by DC around the ch3. <6 [7, 8, 9, 10, 11]shells and 1 DC>. Turn.
R4: Ch3, make a shell around ch1 for a total of 6 [7, 8, 9, 10, 11] shells. End the row by SC in the last chain of the ch4. <6 [7, 8, 9, 10, 11]shells and 1 SC>. Turn.
R5: Ch4, skip the first shell, make a shell around ch1 in next shells, end the row by DC around the ch3. <5 [6, 7, 8, 9, 10]shells and 1 DC>. Turn.
R6: Ch3, make a shell around ch1 for a total of 5 [6, 7, 8, 9, 10] shells. End the row by SC in the last chain of the ch4. <5 [6, 7, 8, 9, 10]shells and 1 DC>. Turn.
Continue depending on size:
Only for XS [S, M]
R7: Ch3, make a shell around ch1 across, end the row by DC around the ch3. <5 [6, 7]shells and 1 DC>. Turn.
R8-14: Repeat R7. Tie off, leave a long tail for seaming shoulder.
Only for L [ XL, XXL]
R7: Ch4, skip the first shell, make a shell around ch1 in next shells, end the row by DC around the ch3. <7[8, 9]shells and 1 DC>. Turn.
R8: Ch3, make a shell around ch1 for a total of 7 [8, 9]shells. End the row by SC in the last chain of the ch4. <7[8, 9]shells and 1 SC>. Turn.
R9: Ch3, make a shell around ch1 across, end the row by DC around the ch3. <7 [8, 9]shells and 1 DC>. Turn.
R10-18: Repeat R9. Tie off, leave a long tail for seaming shoulder.
Join shoulders
Place your panels right side facing and using the tail of yarn from the front panel, sew the front and back panel together at the shoulder seam. Be sure your sts are lined up correctly and that you are not skipping any as you go. Use mattress stitch or whichever method you prefer to sew. Repeat on other shoulder.
Join sides
Place your top in front of you, right sides facing. Arm opening: measure from the shoulder seam down the side of your top a total of 7[7.5,8, 8.5, 9, 9.5]”, place a SM. Repeat on other side. Make sure your SM was placed on the same row on both sides.
Start sewing from SM down, leaving the arms opening unworked, making sure that your rows on both panels are aligned correctly. Stop the seam when there is 1 1/2” left of the front, leaving a split in each side. Fasten off and weave the ends.
Neckline Trim:
With your top wrong side out, join yarn to one of the shoulder seams with a Sl St. Ch 1, work HDC stitches evenly around the neck opening. Stitch count is not crucial just be sure to space them out evenly, where it is most comfortable to you. If the HDC row is wavy that is too many stitches. If the HDC row puckers, it is too few stitches. You can easily work back and adjust stitch count if necessary. Fasten off and weave the ends.