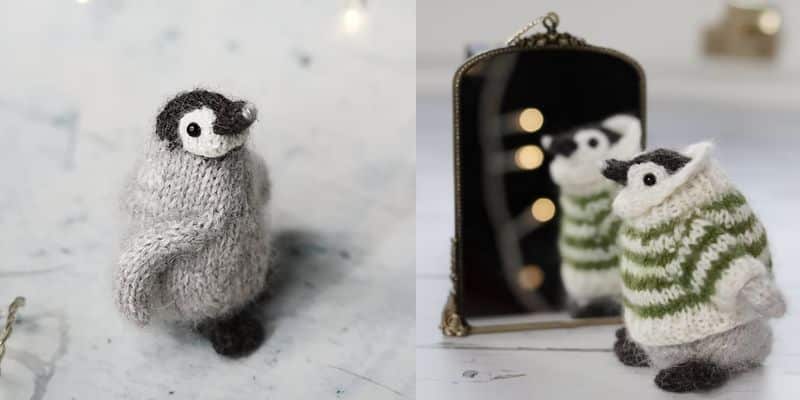
Knitting Pattern Pinguin – Your final penguin, knitted, will be around 10 cm tall. Lots of how-to pictures to help you throughout the pattern; additionally, pattern assistance from me should you find it necessary!
P.S. I also offer yarn suggestions inside the design, should you like to create yours like mine. I have also included links inside the design to: Where to find comparable yarn and eyes.
MATERIALS
My yarn choices, the brand and shades I used, are italicized:
- Yarn A small amount 4-ply Alpaca or Wool in black, Drops Alpaca shade 8903 Black
- Yarn B small amount 4-ply Alpaca or Wool in light-grey Drops Sky (a fine DK yarn) shade 03 Grey Fog
- Yarn C small amount lace-weight kid-mohair in light-grey Drops Kid-Silk shade 44 Moonlight
- (Or you replace Yarn BC with small amount fluffy aran yarn in light grey, Drops Brushed Alpaca Silk shade 02 Light Grey)
- Yarn D small amount 4-ply Alpaca or Wool in white Drops Alpaca shade 0100 White This is the website for the yarn – garnstudio.com
KNITTING NEEDLES
- Pair of 2.50mm/ US 1 for Beak and Feet & pair of 3.25mm/ US 3 for Head and Body
TOY EYES
Pair 6mm or 7mm, black, toy safety eyes with plastic or metal backs or black fine yarn or embroidery thread for the eyes (toy eyes are not suitable for children under 3 years)
This is the website for the eyes – CelloExpress.co.uk
TOY FILLING
- I use uncarded toy filling out of preference but for such a small project any toy filling and yarn snippings will do
EXTRAS
Scissors and yarn-sewing needle, 12 coloured stitch markers (see page 3)
PLUS: If you want to add wire into the wings and body then one 6in length plant tie, cut in half to give two 3in lengths plus a bundle of about 7 plant ties
FINISHED SIZE 10cm tall
COLOURED MARKER GUIDE:
This guide is here to pull out and use together with the should you to wish to use similar coloured guides to mine for ease of following, especially at the making-up stage:
- PALE PINK NECK
- BRIGHT PINK HEAD BACK RED LEFT WING
- ORANGE RIGHT WING
- LIGHT TURQUOISE LEFT FRONT TURQUOISE RIGHT FRONT GREEN FOOT
SPECIAL INSTRUCTIONS
- W+Tk bring working yarn to the front of the work, slip next stitch purl- wise onto the RH needle, take working yarn to the back, slip the slipped stitch back onto the LH needle, turn the knitting = W+Tk (wrap and turn knit)
- W+Tp take working yarn to the back of the work, slip next stitch knit- wise onto the RH needle, bring working yarn to the front, slip the slipped stitch back onto the LH needle, turn the knitting = W+Tp (wrap and turn purl)
ABBREVIATIONS
- k = knit
- p = purl
- inc = increase
- dec = decrease
- k2tog/ k3tog = knit two together/ knit three together
- p2tog/ p3tog = purl two together/ purl three together
- RH/LH = right hand/ left hand
- RS/WS = right side/ wrong side st/ sts =stitch/ stitches
- skpo = slip one stitch, knit next stitch, pass slipped stitch over knit stitch to decrease by one stitch
- kb = knit into front then into back of stitch to increase by one stitch
- pb = Purl into front then knit into back of stitch to increase by one stitch
- M1= With RH needle point pick up the horizontal bar in between stitches, put onto LH needle, knit the new stitch
BEAK
Beginning at the Front of the Beak with yarn A and smaller 2.50mm needles cast on 6 sts
Row 1 Purl
Row 2 inc) Kb, k4, kb – 8sts
Row 3 inc) P3, pb twice, p3 to end of row – 10sts
Row 4 inc) Kb, knit to last st, kb – 12sts
Row 5 Purl PM (place marker) on stitch at each end for Left and Right Neck Markers (refer to colour marker guide on page 3)
Switch to larger 3.25mm needles and continue as follows:
HEAD
Row 6 inc) K3, kb, k4, kb, k3 to end of row – 14sts
Row 7 Purl
Row 8 K2tog, k2, kb, k4, kb, k2, k2tog Row 9 dec) P2tog, p10, p2tog – 12sts Row 10 K2tog, k1, kb, k4, kb, k1, k2tog
Row 11 dec) P2tog, purl to last 2 sts, p2tog – 10sts Row 12 dec) K2tog, knit to last 2 sts k2tog – 8sts Row 13 dec) P2tog, purl to last 2 sts, p2tog – 6sts Row 14 dec) K2tog three times – 3sts
Cast off all 3 Head Back sts purl-wise PM on first and last stitch for Left and Right Head Back Markers
BODY
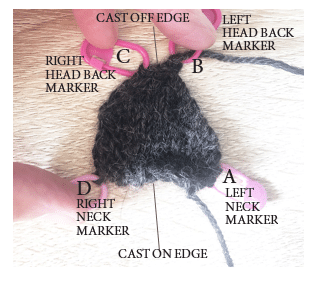
RS facing, begin at penguin’s Left Neck Marker, with yarn A and larger 3.25mm needles pick up and knit 7 sts along row ends towards the corner of Head Back Cast-Off Edge at Left Head Back Marker; pick up and knit 3 sts across the cast- off edge; from Right Head Back Marker pick and knit 7 sts along row ends to the Right Neck Marker – 17sts See fig. 1 pick up from A to B; B to C; C to D
Remove Head Back Markers.
Cut yarn A, join yarn BC, continue with yarn BC as follows: Row 1 inc) Cast on 4 sts for Right Neck Front, purl all 21 sts Row 2 inc) Cast on 4 sts for Left Neck Front, knit all 25 sts
Row 3 Purl
Row 4 inc) K10, kb, k3, kb, k10 to end of row – 27sts
Row 5 Purl
Row 6 inc) K10, kb, k5, kb, k10 to end of row – 29sts
Row 7 inc) Pb, purl to last st, pb – 31sts
Row 8 inc) K12, kb, k5, kb, k12 to end of row – 33sts
Row 9 inc) Pb, purl to last st, pb – 35sts
Row 10 inc) K5, PM on last (5th) stitch for Left Wing Marker, k9, kb, k5, kb, k10 PM on last (10th) stitch for Right Wing Marker, k4 to end of row – 37sts
Row 11 inc) Pb, purl to last st, pb – 39sts
Work short rows to shape Back
Short Row 1 K34, W+Tk (Wrap and Turn knit – see Page 4)
Short Row 2 P29, W+Tp (Wrap and Turn purl – see Page 4)
Short Row 3 K28, W+Tk
Short Row 4 P27, W+Tp
Short Row 5 K26, W+Tk
Short Row 6 P25, W+Tp
Short Row 7 K24, W+Tk
Short Row 8 P23, W+Tp
Short Row 9 K31 across to end
Rows 12 & 14 Purl
Row 13 dec) K5, skpo, k25, k2tog, k5 to end of row – 37sts
Row 15 dec) K5, skpo, k23, k2tog, k5 – 35sts
Row 16 Purl
Row 17 dec) K2tog, k3, skpo, k21, k2tog, k3, k2tog – 31sts
Rows 18 & 20 Purl
Row 19 dec) K4, skpo, k19, k2tog, k4 – 29sts
Row 21 dec) Cast off 3 sts for Left Front Edge PM on last cast-off stitch (3rd) for Left Front Marker, knit next 22 sts, cast off last 3 sts PM on first of those 3 cast-off stitches for Right Front Marker – 23sts
Rejoin yarn BC to 23 sts on the knitting needle, continue as follows: TAIL
Work short rows to create Tail
Short Row 1 P14, W+Tp
Short Row 2 K5, W+Tk
Short Row 3 P4, W+Tp
Short Row 4 K3, W+Tk
Short Row 5 P2, W+Tp
Short Row 6 K1, W+Tk
Short Row 7 P12 across to end
Row 22 dec) K9, cast off next 5 Tail sts, knit next 8 sts to end of row PM on first and last stitch at each end of the remaining 18sts for Left and Right Foot Markers – 18sts
Cast off first set of 9 Foot Edge sts purl-wise. Rejoin yarn BC to second set of 9 Foot Edge sts and cast off all 9 sts purl-wise.
Join Body Seam
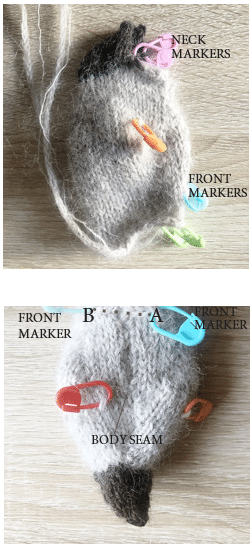
WS together, fold the penguin in half so that the corners of the cast-off Front Edges (near the Left Front and Right Front Markers) match and the Neck Markers match See fig. 2
Work mattress stitch the join all along the front of the body from the corners of the cast-off front edges to the neck markers so joining the Front Seam row ends and cast-on edges at Left and Right Neck Front.
Join Beak Seam
Fold the beak in half across the cast-on edge, join both cast-on edge halves together then continue to join the seam along the head and beak with mattress stitch from the neck markers to the Beak Seam.
Remove Neck Markers.
BELLY
RS facing, begin at penguin’s Right Front Marker, with yarn BC and larger
3.25mm needles pick up and knit 5 sts along cast-off edges (4 sts either side of the Front Seam and 1 stitch at the seam) to Left Front Marker See fig. 3 pick up as dotted line shows from A to B
Rows 1-3 Beginning with a purl row work three rows stocking stitch PM on first and last stitch of last row (purl row) for Left and Right Foot Match Markers
Rows 4-13 Work ten rows stocking stitch
Row 14 dec) K2tog, k1, k2tog – 3sts
Row 15 dec) P3tog, fasten off for Under Tail Point Remove Front Markers.
WHITE FACE
The White Face section is knitted independently and sewn on as follows: Beginning at the Neck Edge with yarn D and smaller 2.50mm needles cast on 15 sts
Row 1 Purl
Work short rows to shape Face Side 1
Short Row 1 K5, W+Tk (Wrap and Turn knit – see Page 4) Short Row 2 P5 back to the beginning of the row
Short Row 3 K4, W+Tk Short Row 4 P4
Short Row 5 K3, W+Tk Short Row 6 P3
Row 2 Knit all 15 sts
Work short rows to shape Face Side 2
Short Row 1 P5, W+Tk (Wrap and Turn purl – see Page 4) Short Row 2 K5
Short Row 3 P4, W+Tp Short Row 4 K4
Short Row 5 P3, W+Tp Short Row 6 K3
Cast off all 15 White Face sts purl-wise.
Join White Face to the Head
It’s easier to do this if the head is stuffed first so stuff the upper part of the body and the head with yarn endings and toy filling.
Place the White Face section WS down onto the head, below the beak and symmetrical to the beak – the straight cast-on edge from the white face sits at the neck.
With a length of fine yarn (I used white kid-silk but you can use sewing thread too if you wish) carefully join the White Face to the head by over- sewing neat little stitches all around the white face section on the head See Fig. 4 & Fig. 5 opposite
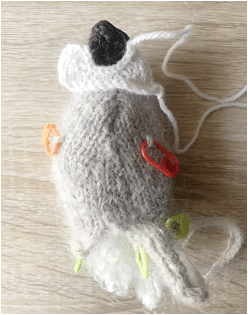
Add Eyes
If you’re using the toy safety eyes push each eye in place at each side of the head into the white face and into the head side making sure you are happy with the placement before securing each eye in place with its backing See Fig. 6.
If you’re not using toy eyes simply embroider two large (from black yarn) French Knits in place of the toy eyes.
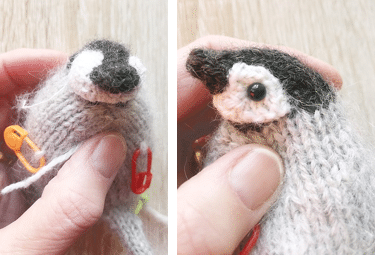
Join Seam at the Bottom of the Penguin
Working on one side of the body at a time, match the Foot Match Marker to the Foot Marker. Mattress stitch to join the tiny seam so joining the Belly row ends to the Back row ends from marker to the split See Fig. 7, join as dotted lines show Remove Foot Match Markers.
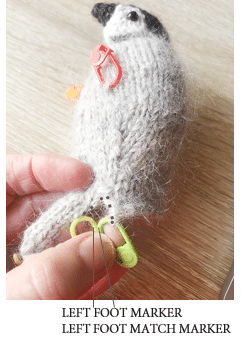
Join the Bottom of the Penguin to the Tail
Complete the stuffing into the body before the closing the seam at the bottom of the penguin as follows:
Find the centre of Tail Cast-Off Edge then the Match the Under Tail Point to the centre of the tail cast-off edge and working on one side of the body at a time, mattress stitch to join the seams either side of the tail and joining the bottom row ends to the cast-off edges at the Back See Fig. 8
NOTE: Because I wanted to be able to pose my penguin I added a bundle of about 7 plant ties, folding over the sharp ends, into the head and body at the same time as stuffing
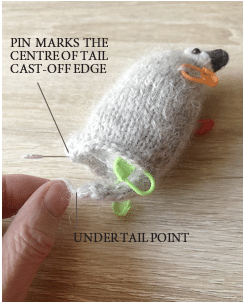
WINGS
The Wings are picked up at knitted at the side of the body as follows:
Left Wing
RS and top of penguin’s head facing you, begin at penguin’s Left Wing Marker, with yarn BC and larger 3.25mm needles pick up and knit 4 sts into the knitting, in a straight line and into each of the four stitches from the marker towards the centre of the Back See fig. 9 pick up from A to B
Remove Left Wing Marker.
Row 1 Purl
Row 2 inc) Cast on 4 sts for Left Wing Back, knit all 8 sts
Row 3 Pb, p1, p2tog twice, p1, pb
Row 4 Knit
Rows 5-6 Repeat last 2 rows (Rows 3 & 4) once
Row 7 inc) Pb, purl to last st, pb -10sts
Work short rows to shape Left Wing
Short Row 1 K9, W+Tk
Short Row 2 P8, W+Tp
Short Row 3 K7, W+Tk
Short Row 4 P6, W+Tp
Short Row 5 K5, W+Tk
Short Row 6 P4, W+Tp
Short Row 7 K3, W+Tk
Short Row 8 P2, W+Tp
Short Row 9 K6 to end of row
Row 8 Purl all 10 sts
Row 9 dec) [K2tog, k1] twice, k2tog twice – 6sts
Row 10 Purl
Row 11 dec) K2tog three times – 3sts
Row 12 dec) P3tog, fasten off for Wing Tip.
Right Wing
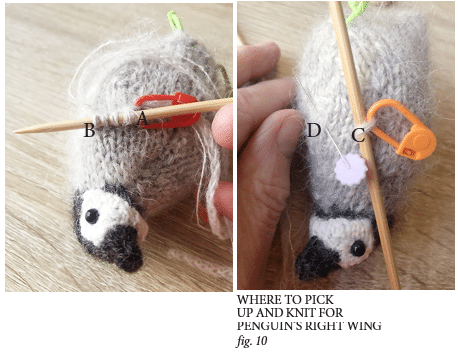
RS and top of penguin’s head facing you, begin at penguin’s Right Wing Marker, with yarn BC and larger 3.25mm needles pick up and knit 4 sts into the knitting, in a straight line and into each of the four stitches from the marker towards the Front Seam See fig. 10 pick up from C to D Remove Right Wing Marker.
Row 1 inc) Cast on 4 sts for Right Wing Back, purl all 8 sts
Row 2 Kb, k1, skpo, k2tog, k1, kb
Row 3 Purl
Rows 4-5 Repeat last 2 rows once
Row 6 inc) Kb, knit to last st, kb – 10sts
Row 7 Purl
Work short rows to shape Right Wing
Short Row 1 K9, W+Tk
Short Row 2 P8, W+Tp
Short Row 3 K7, W+Tk
Short Row 4 P6, W+Tp
Short Row 5 K5, W+Tk
Short Row 6 P4, W+Tp
Short Row 7 K3, W+Tk
Short Row 8 P2, W+Tp
Short Row 9 K6 to end of row
Row 8 Purl all 10 sts
Row 9 dec) K2tog twice, [k1, k2tog] twice – 6sts
Row 10 Purl
Row 11 dec) K2tog three times – 3sts
Row 12 dec) P3tog, fasten off for Wing Tip.
Join the Back of the Wings to the Front
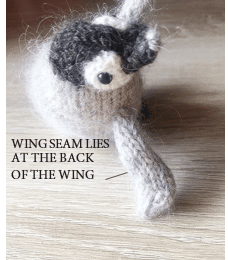
Working on one wing at a time, with WS together fold the wing so that the corner of the cast-on edge matches with the first picked-up stitch (where your marker was placed). Mattress stitch to join from here all along the back seam of the wing/ joining row ends, to the Wing Tip, then mattress stitch to join the cast-on edge just under the wing’s picked-up sts See fig. 11
The wings are only stuffed the yarn endings but read ‘note’ below re. Wires.
NOTE: Because I wanted to be able to pose my penguin, before I completed the joining of the Wing Seam, I passed a single 6in plant tie through the body from one wing to the other, pulling through so that equal lengths of plant tie were sticking out at each side of the body. Then, folding over the sharp ends, I joined the wing seams around the plant ties.
FEET
The feet are knitted independently to the body then joined at the feet markers later as follows:
Foot – make 2 alike
With yarn A and smaller 2.50mm needles cast on 10 sts
Work short rows to shape Foot
Short Row 1 K9, W+Tk Short Row 2 P9
Short Row 3 K8, W+Tk Short Row 4 P8
Short Row 5 K7, W+Tk Short Row 6 P7
Short Row 7 K6, W+Tk Short Row 8 P6
Short Row 9 K5, W+Tk Short Row 10 P5
Short Row 11 K4, W+Tk Short Row 12 P4
Short Row 13 K3, W+Tk Short Row 14 P3
Short Row 15 K2, W+Tk Short Row 16 P2
Short Row 17 K1, W+Tk Short Row 18 P1
Cast off all 10 sts.
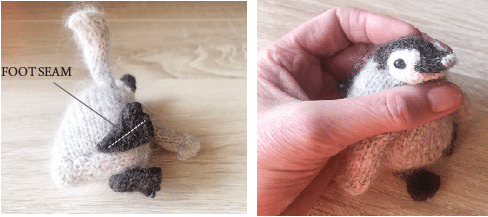
Join the Foot Seam
With WS together fold the foot to match cast-on edge to cast-off edge and join those edges together with mattress stitch (or over-sew if it’s easier).
Flatten the foot so that the seam lies in the centre of the triangle that’s created and over-sew the widest edge/ front of foot, together then over-sew the tiny heel edge together.
Join the Foot to the Body
The seam lies at the sole, place the upper against the bottom of the body – the foot marker markers the centre of the foot See fig. 11
Remove the markers and join the feet with whip stitch.
Extra Detail
Thread up a length of yarn C and work three or four stitches over the centre of the tip of the beak See fig. 12
