Crochet Blanket Pattern – It gives me great pleasure to present this new blanket pattern, meant to honor the delicate and fascinating tones of the color spectrum.
Though individually offer small bits of color that are pretty delicious, when together they create a delicate, glossy overall effect.
I have created a blanket looking equally lovely on clean white bed linen or a soft gray sofa by using extremely soft grey and cream, mixed with pinks, greens and lilacs.
Though it will look just as nice as a big blanket which the entire family can snuggle beneath to watch TV on winter evenings, the pattern has been created to fit the top of a double bed, with a little overhang on either side, and measures 68.5ins (174cms).
Guide each part of the pattern step by step.
My You Tube channel offers a list of the video instructions that complement the pattern.
I have chosen five sections that, together with the textual one, I believe would profit from a visual aid. Should you like to view them, it is totally your decision. Complete page photo of the blanket displaying the many components.
Please note:
- The original blanket, which features in the photos throughout this pattern, was partly worked in a Deramores yarn, which is now discontinued. The replacement colours are very close to the original, although there may be slight differences between your blanket and the images of mine.
- I have some video tutorials on my You Tube channel which accompany this pattern. The yarn colours I mention in the videos are the original colours, and not the updated ones in this pattern, although it’s easy to recognise the substituted shades.
The design combines easy crochet methods and only a few different stitches, so it is suitable for an eager beginner, especially since I will guide you carefully and thoroughly through each step.
First, we’ll look at the yarns and colours I used. If you’ve followed one of my designs before, you’ll know that I like to blend various yarn companies when choosing colors. This is because I can’t always locate all of the colors I wish to use in one brand.
However, because they are all similar in weight and kind, they may be used together in the same project without issue. Furthermore, they may all be purchased from the same provider.
I use a 4mm crochet hook and 100% acrylic yarn in DK weight. This yarn is perfect for blankets since it is less heavy than pure wool, does not require blocking, is machine washable, and is reasonably priced.
For this project, I combined Stylecraft Special DK, King Cole Comfort DK, and Scheepjes Colour Crafter DK.
There is one optional extra: Stylecraft Special in 4 PLY Cream, which I used for the appliqué flower petals. It is not necessary because you will have enough DK yarn in the SS Cream to complete the blooms, but I believe the slightly finer yarn gives them a more delicate appearance.
YARN LIST
| Yarn | Shade | No of balls |
| Stylecraft Special DK | SS Silver | 6 |
| Stylecraft Special DK | SS Cream | 4 |
| Stylecraft Special DK | SS Soft Peach | 2 |
| Stylecraft Special DK | SS Powder Pink | 2 |
| Stylecraft Special DK | SS Parma Violet | 2 |
| Stylecraft Special DK | SS Parchment | 1 |
| Stylecraft Special DK | SS Mushroom | 1 |
| King Cole Comfort DK | KC Basil (1732) | 2 |
| Scheepjes Colour Crafter DK | SCH Verviers (2017) | 1 |
| Scheepjes Colour Crafter DK | SCH Heerenveen (1202) | 1 |
| Stylecraft Special 4 PLY | Cream | 1 (optional) |
You will also need a 4mm crochet hook, and a 3mm crochet hook if using the 4 ply for the petals, sharp scissors, a blunt tapestry needle and some plain pins or stitch markers.
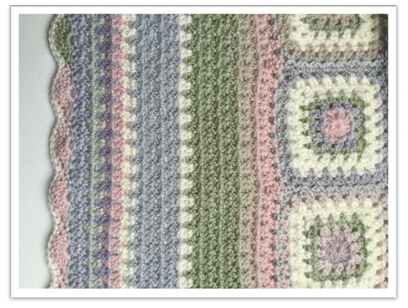
Tips Before You Begin: (or, in other words, how I prefer to work!)
- Ensure you understand the pattern before proceeding.
- Turn on your GRANNY! I’ll explain more in the pattern, but I highly suggest this method of producing granny squares, rotating your work after each round. I cannot overstate how nice and flat your square will be after doing this.
- Prioritize finishing tasks as you go! I’m afraid there will be a lot of ends due to the variety of hues. Don’t let that get you down, though. Sit down with your needle and a decent movie or boxset on TV or Netflix, and you’ll get through them. (I genuinely enjoy sewing in my ends, by the way. It’s quite a soothing rhythm you get into, honestly!
- Identify the front of the blanket. It is easy to get confused because you are constantly rotating, but the front is when your connecting thread has a slight raised ridge (the joining stitch appears flat on the back). To make the front easier to recognize, place a stitch marker anywhere on the front while working the first strip, and keep checking for it as you go.
The primary square motif is essentially a variant on the classic granny square. I used it a few years ago in a blanket that I created with squares and flowers. While I was pleased with certain features of the blanket, I felt that others were not as successful. I always wanted to utilize the portions I loved in another blanket, and this is the finished outcome. The granny square and appliquéd flowers are the components I’ve chosen to use again.
Throughout the blanket, I replaced the standard granny square of three Trebles, TR (DC in US parlance), with two Treble clusters. This keeps the blanket lighter and more open, so it drapes nicely.
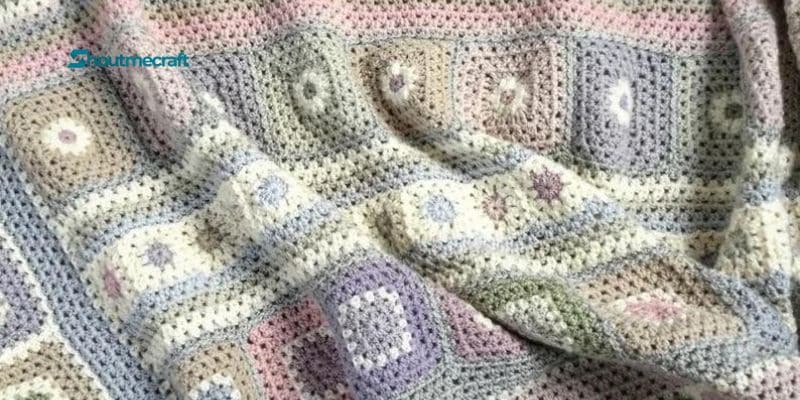
Stitches used are:
(The pattern is written in UK terms)
- TR – TREBLE CROCHET ==> (US terms, DC double crochet)
- HTC – HALF TREBLE CROCHET ==> (US terms, HDC half double crochet) DC – DOUBLE CROCHET (US terms, SC single crochet)
- DTR – DOUBLE TREBLE CROCHET ==> (US terms, TRIPLE crochet) TR2TOG – TREBLE TWO TOGETHER (US terms, DC2TOG)
- SL ST – Slip Stitch
- JAYG – Join as you go and finally, CH – Chain Stitch
DC Double Crochet Stitch –
- Insert hook. Pull through loop (two loops on hook). Yarn over, pull through two loops.
TR Treble Stitch –
- Yarn over. Insert hook. Pull through loop. Yarn over pull through two loops on hook, yarn over pull through remaining two loops.
HTR Half Treble Stitch –
- Yarn over. Insert hook. Pull through loop. Yarn over, pull through three loops on hook.
DTR Double Treble Stitch –
- Yarn over twice. Insert Hook. Pull through two loops. Yarn Over. Pull Through two loops.
Treble2together Stitch –
- Yarn over. Insert hook. Pull through loop. Yarn over. Pull through two loops, leaving two loops on the hook. Yarn over. Insert hook again. Pull through loop. Yarn over, pull through two loops. Yarn over. Pull through three loops.
Now for the Granny Square –
- All the square motifs in this blanket apart from one, are made using this pattern. They only look different because of the different way the colours have been combined.
So please refer to the following step by step guide each time you are asked to make a square in the pattern. I will guide you through the colours for each one when you get to them.
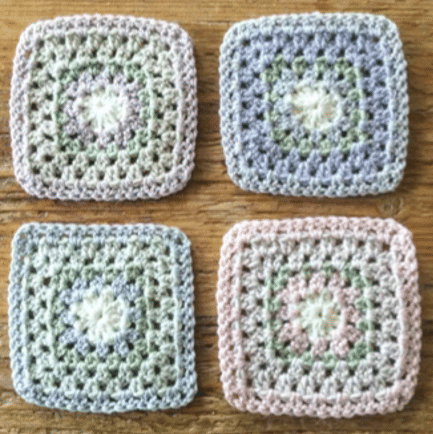
OPEN GRANNY SQUARE PATTERN
Note – You will find that some of the squares in the blanket have different sequences of colour changes. For example, some have three different colours, while others have four. For this tutorial I am showing you how to make the square for the first STRIP of squares you will be starting with, and these use four colours.
For a video tutorial of this square, see Video No 1 of the Frosted Pearl Blanket on my You Tube channel.
Round 1:
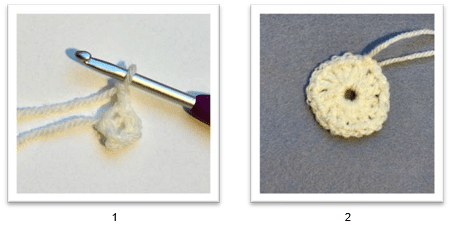
With the first colour, CH4 and SL ST to the first CH to form a loop. CH2 (counts as first treble) (pic 1).
TR1 into the loop, CH1, *TR2, CH1. Repeat from * six more times, which means you will have groups of 8 x TR2 with a CH1 in between. SL ST into the top of the first CH2 and fasten off. (pic 2)
Round 2:
Turn your work to the reverse side. Turning after each round helps to keep your work flat and straight.
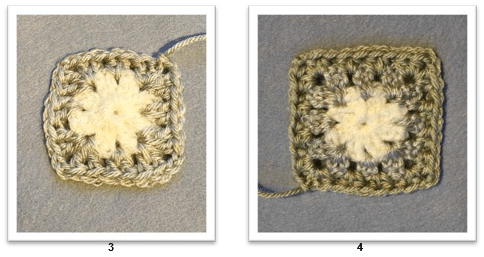
Attach second colour in any chain space. CH2 (counts as first TR), TR1. TR2 in next chain space, TR2, CH2, TR2 in next space, TR2, in next space, TR2, CH2, TR2 in next space and continue like this until to get back where you started. TR2, CH2 in the same space where you started and SL ST to the top of the first CH2 to finish the round. Fasten off. (pic 3)
Note – To keep my photos clear and uncluttered, I sewed in the ends as I went along. (Notice how I pulled the centre end nice and tight to close up the centre hole). However, I suggest you wait to weave in your ends until each square is completed. This is because it can be tricky to figure out which will eventually be the right side of the square when you are turning your work after each round. Once each square is completed, and you can see the right side, pull all the ends through to the back to weave in. More about that later.
Round 3:
(Please note that for this and all the other squares, I have chosen to make the third round in a slightly different stitch, the HALF TREBLE – just to create a teeny bit more interest by varying the size of stitch.)
So, turn your work again.
Attach the third colour at any corner space and CH2, HTR1. HTR2 in each of the next two spaces, HTR2, CH2, HTR2 in the corner space, and continue in this way around the square. Once you get back to where you started, HTR2, CH2 and SL ST to the top of the first CH2. Fasten off. (pic 4)
Round 4:
Turn your work.
Attach the fourth colour to any corner space and going back to Treble Stitch, CH2 (counts as the first TR), TR1, TR2 in the next three spaces, TR2, CH2, TR2 in the corner and so on round the square until you reach the first corner, TR2, CH2 and SL ST to the top of the first CH2. DO NOT FASTEN OFF. Instead CH2. (pic 5)
Round 5:
Turn your work. Notice that the CH2 is now on the extreme right of the corner, so treat this corner slightly differently from previous rounds.
TR1, CH2, TR2 and that means the first corner is completed. TR2 in the next four spaces, TR2, CH2, TR2 in the corner, and so on. When you get back to where you started you will finish with TR2 in the space before the corner, then SL ST to the top of the first CH2. Fasten off. (pic 6)

Round 6: Turn your work.
Attach the second colour once more to any corner space. CH2, (counts as first TR), TR1. TR2 in each of the next five spaces, TR2, CH2, TR2 in the corner and so on. When you get back to the first corner, complete it with TR2, CH2 and SL ST to the top of the first CH2. (pic 7)
Now turn your work once more, and this will be classed as the Front of your square. Can you see that the very first round of the square is now the right way up, and the last round is the wrong way? That’s how to tell which is the front. You can now pull all the ends through to the underside and securely weave them in, before you move on to make the next square.
So, what do you think about this slightly different granny square?
I think it looks softer and more “feminine” for a change from the usual three treble granny square, and it complements the pale colours very well. There are also other benefits worth mentioning, namely it works up quicker – in fact it obviously takes a third less time, it uses a third less yarn, and it drapes really well as a blanket. Who can complain about that?!
Now Let’s Start The Blanket….. Strip 1
The first block, or let’s call it the first Strip, will be a row of granny squares. They will be joined together and then you will add rows of stripes of granny clusters above and below this strip. The reason for starting with a strip of squares is that no-one, least of all me, likes starting a blanket with a seemingly neverending row of chain stitches, which you then have to struggle to work into with your first row. So, to avoid that, you will be starting your blanket with the first row strip of squares.
The squares are each made in different colours and you will follow the main pattern for the granny square in the previous pages. The centre colour for each will be SS Cream and the third round for each will be KC Basil. The other colours will change.
The following chart is the colour choice for each square. There are eleven squares in total.
| Square | Round 1 | Round 2 | Round 3 | Round 4 | Round 5 | Round 6 |
| 1 | SS CREAM | SS MUSHROOM | KC BASIL | SS SOFT PEACH | SS SOFT PEACH | SS MUSHROOM |
| 2 | SS CREAM | SS PARCHMENT | KC BASIL | SS PARMA VIOLET | SS PARMA VIOLET | SS PARCHMENT |
| 3 | SS CREAM | SS SILVER | KC BASIL | SS POWDER PINK | SS POWDER PINK | SS SILVER |
| 4 | SS CREAM | SS SOFT PEACH | KC BASIL | SS PARCHMENT | SS PARCHMENT | SS SOFT PEACH |
| 5 | SS CREAM | SS PARMA VIOLET | KC BASIL | SS MUSHROOM | SS MUSHROOM | SS PARMA VIOLET |
| 6 | SS CREAM | SS SILVER | KC BASIL | SS POWDER PINK | SS POWDER PINK | SS SILVER |
| 7 | SS CREAM | SS PARCHMENT | KC BASIL | SS PARMA VIOLET | SS PARMA VIOLET | SS PARCHMENT |
| 8 | SS CREAM | SS MUSHROOM | KC BASIL | SS SILVER | SS SILVER | SS MUSHROOM |
| 9 | SS CREAM | SS POWDER PINK | KC BASIL | SS PARCHMENT | SS PARCHMENT | SS POWDER PINK |
| 10 | SS CREAM | SS SOFT PEACH | KC BASIL | SS SILVER | SS SILVER | SS SOFT PEACH |
| 11 | SS CREAM | SS PARMA VIOLET | KC BASIL | SS MUSHROOM | SS MUSHROOM | SS PARMA VIOLET |
Once you have made up all these squares, and of course the ends are all nicely sewn in, make sure they are all facing right side uppermost (which means that Round 6 is on the reverse side). Now put them in a pile with number 11 at the bottom and number 1 on the top.
You are now ready to join these squares with the Continuous Join as you Go method (CJAYG).This is much easier than it sounds and means that you will only have two ends to sew in, the start and the finish
You will be joining these squares with a HALF TREBLE stitch. Although this method commonly uses a Treble Stitch, I believe the Half Treble is neater and less bulky, and as with every other part of the blanket you will be doing clusters of two half trebles together instead of the usual three. (Video Tutorial No 2 on You Tube)
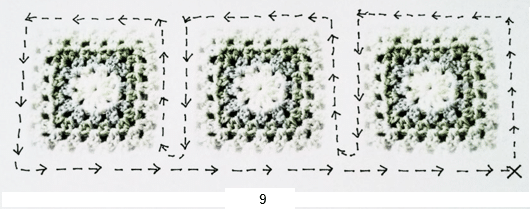
The picture above shows the direction in which you will be working, going right to left along the row, starting at the cross in the bottom right corner. So don’t worry, just follow me and off we go.
The colour you will be using to join is SS Silver. (Please note that in the photos I have used SS Cream. This was simply to make the pictures clearer. You use the Silver)
Take the top square from the pile and attach your yarn to the bottom right corner. CH2 (counts as the first HTR), HTR1 in the same corner.
Now move up the side of the square making 2HTR in each of the next five spaces.
At the corner, HTR2, CH2, HTR2, then continue along the top of the square with HTR2 in each of the next five spaces, HTR2, CH2, HTR2 in the next corner and work down the side in the same way.
When you reach the bottom left corner of the square, HTR2 and CH1 but don’t complete the corner. Instead, pick up your next square and lay it alongside (pic 10).
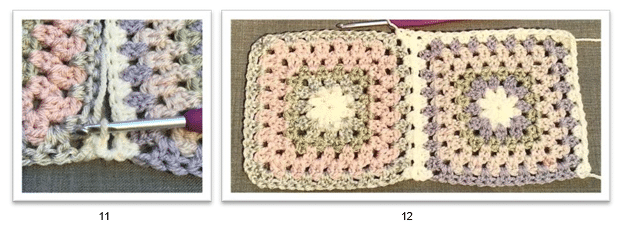
Find the corresponding corner in the second square and HTR2, CH1 in that corner space (pic 11).
Then move up the side of the first square to the next space and SL ST into it. Now returning to the second square, HTR2 in the next space. Then it’s back to the first to SL ST into the next space. Keep going like that, HTR2 in the second square and hopping over to SL ST into the first square until you reach the top corner.
On the second square, HTR2, CH1 in the corner, then SL ST into the corner of the first square, and back to complete the corner of the second square with HTR2. Continue along the top and down the side as you did with the first square until you reach the bottom left corner. Attach the third square as you did the first and continue until you have all the squares joined (pic 12).
At this point you will of course realise that you have only worked around three sides of each square. There is still the bottom to work all the way along, and that is what you will do now.
At the bottom left corner of the last square, HTR2, CH2, HTR2 and then start to work back along the bottom. There is one important thing to note here, and that is how to deal with the parts where two squares meet (pic 13).
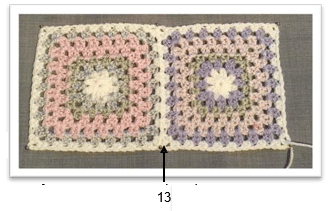
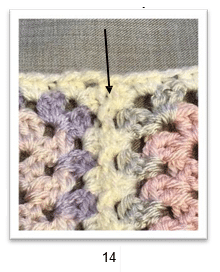
Here is how to hop from the corner of one square over to the other – At the corner of the first square, HTR2, CH1, then look for the little gap where the two squares butt together and SL ST into that gap (where the arrow is pointing in pic 14), just so that your yarn travels neatly along to the next corner space. CH1, HTR2 into that space and then continue right along until you are back where you started, remembering to do the little extra travelling stitches between each join of squares. Complete that very first corner with HTR2, CH2 and SL ST into the top of the first CH2. Fasten off. Now there are only two ends to sew in and your first strip is complete.
Before you move on to the next strip of squares, there are some simple rows of granny cluster stitch to work, both above and below Strip 1.
We’ll start with the rows above, which will take you to the top edge of the blanket. (Video Tutorial No 3) Before you start, identify the RIGHT SIDE of the first Strip. It is the side where the join has a slightly raised look and the little centres are also right side up. This is the FRONT. When you join all the other squares you will want all the joins to look uniform and neat, so each strip will be this way up. I recommend you pop a stitch marker into the front of this strip somewhere to remind you which is the right side of the blanket.
Having said all that, I now want you to turn your strip over to the reverse side to start the first row of grannies.
The first row will be in SS Silver, which is the same as the joining colour for Strip 1.
Attach your yarn in the top right corner space of the Strip. CH2, TR1 in that space. (NOTE – when you do the granny stripes you will be using Treble Stitch (TR) again and not HTR as in the join).
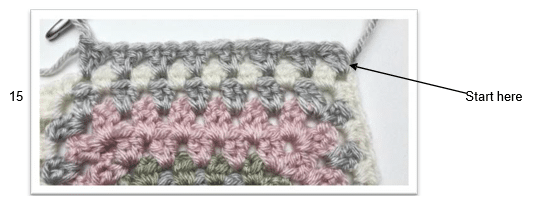
Note – For the photo samples, you’ll remember I used the SS Cream for joining the squares, which is why it shows up as white here.
Move along to the next space and TR2 (pic 15).
Continue along the row until you reach the join where the two squares meet. To make a nice flat group of stitches over this join you work as follows. In the first corner, TR1 then make a TR2tog between the first and second corner spaces. To do this, YO, insert hook into first space, YO pull up the loop, (3 loops on hook), YO pull through two loops, (2 loops on hook). Now YO and insert your hook into the second corner space, YO pull through loop, (4 loops on hook), YO pull through two loops, YO pull through three loops. Complete the second square with a TR1.(pics 16&17)
Work right along the row in this way until you come to the end of the row.
Instead of two TR in the last space, work just one (pic18). You should have 88 clusters plus the single Treble stitch at the end.
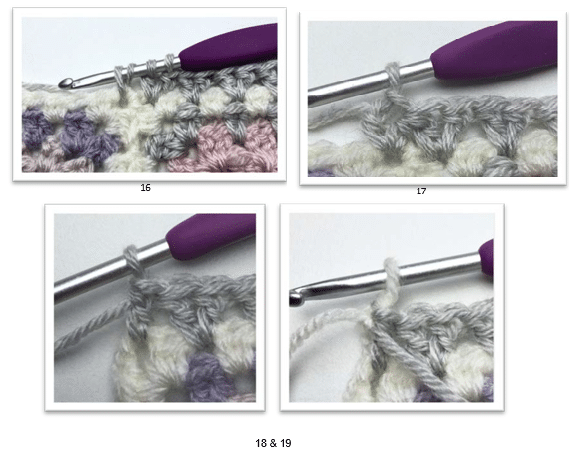
It is now time to change the yarn to the next colour. Don’t fasten off the grey yarn though – leave the grey loop on your hook, but you can cut the yarn, leaving a tail to sew in.
With the loop still on your hook, bring the new colour, SS Cream, loop it over your hook and pull it through the grey loop. At this point I like to make it extra secure by tying a knot in the two ends. You can gently tighten the loops as you make the knot to keep it neat (pic 19).
Now working with the new yarn, CH2 and turn.
TR1 in the first space after that single grey treble from the last row, and work along the row with a TR2 in each space. When you reach the groups of stitches which covered the joins in the previous row, don’t be tempted to work between them although they look like a bigger group. Jump right over them and work the two TR in the next space. Granted, it seems like quite a long distance to jump and the space it creates looks quite large, but it sorts itself out with the next row. I’ve used my hook as a pointer in the photo to show you where I mean (pic 20).
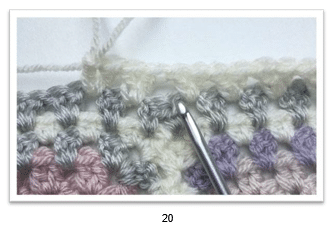
Work right along the row making two TR in each space, until you reach the end. TR2 in the last space and then look for the TR1 and the CH2 from the previous row. You want to now work one TR between these two stitches. Time to change the yarn colour again, so following the instructions on how to join the yarn from before, attach KC Basil. CH2 and turn. Work FIVE rows of granny stitch in KC Basil in the same way as above. Fasten off.
You now have the basis of how to make both the Granny Square Strip and also the rows of Granny Stitch. Using these instructions, and simply changing the colours you can now do the main section of the blanket, apart from one strip of squares which is very slightly different, but I’ll explain that when we reach it.
Moving on, the rows of granny stripe you have just made are the top part of the blanket. You are now going to start working down the blanket from Strip 1, starting with more rows of granny stripes.
Turn your blanket on to the reverse side and also upside down.
You will now be making the following stripes, following the same instructions on pages 9 and 10.
Remember to treat the join between the squares in the first row slightly differently. Refer back to on Page 10 every time you have to granny stitch in the first row above the join between two squares.
Stripe 1 – SS Silver Stripe 2 and 3 – KC Basil
Stripe 4 and 5 – SS Parma Violet Stripe 6 and 7 – SS Mushroom.
Work these seven rows and fasten off.
You can now lay your blanket aside for the time being as you are going to be making the second Strip of Granny Squares.
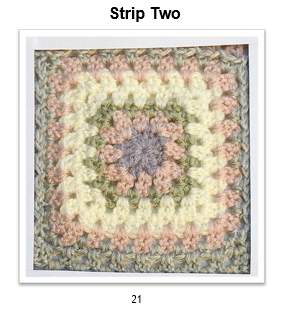
Using the same pattern as on pages 4 & 5, follow the chart for the colour sequence for each round, remembering that Round 3 is done in Half Trebles
| SQ | Round 1 | Round 2 | Round 3 | Round 4 | Round 5 | Round 6 |
| 1 | SS Silver | SS Parchment | KC Basil | SS Cream | SS Cream | SS Parchment |
| 2 | SS Parma Violet | SS Powder Pink | KC Basil | SS Cream | SS Cream | SS Powder Pink |
| 3 | SS Parchment | SS Mushroom | KC Basil | SS Cream | SS Cream | SS Mushroom |
| 4 | SS Powder Pink | SS Silver | KC Basil | SS Cream | SS Cream | SS Silver |
| 5 | SS Silver | SS Parma Violet | KC Basil | SS Cream | SS Cream | SS Parma Violet |
| 6 | SS Mushroom | SS Soft Peach | KC Basil | SS Cream | SS Cream | SS Soft Peach |
| 7 | SS Soft Peach | SS Powder Pink | KC Basil | SS Cream | SS Cream | SS Powder Pink |
| 8 | SS Parma Violet | SS Silver | KC Basil | SS Cream | SS Cream | SS Silver |
| 9 | SS Mushroom | SS Parchment | KC Basil | SS Cream | SS Cream | SS Parchment |
| 10 | SS Powder Pink | SS Parma Violet | KC Basil | SS Cream | SS Cream | SS Parma Violet |
| 11 | SS Silver | SS Soft Peach | KC Basil | SS Cream | SS Cream | SS Soft Peach |
Once each of these squares is finished and the ends sewn in, remember which is the right side – the one where the last round is on the reverse – and join with CJAYG in SS Silver as before, but this time you will also be joining them to the blanket along the top of the squares (see video No 2).
That isn’t difficult to do. Just remember that you will be doing the joining stitch on the FRONT of the blanket and you will be using HALF TREBLE STITCH. The joining colour is SS Silver.
Take your first square and attach your yarn to the bottom right corner. CH2, HTR2 in the corner space then HTR2 in each space until you reach the top corner. HTR2, CH1 in that space, then SL ST to the first space at the end of the row of granny stitches in SS Mushroom on the blanket. Go back to the square and complete that corner with HTR2.
Work your way along the top of the square, with HTR2 in each space and a SL ST in each space on the blanket. When you reach the corner of the square, HTR2, CH1 and SL ST into the next space on the blanket before completing the corner with HTR2.
Work down the side of the square then join the second square as you did before, working up the side of it with HTR2 in the spaces and alternately slip stitching to the spaces in the first square until you reach the corner adjoining the blanket. HTR2, CH1 in that corner and then SL ST to the adjoining corner of the first square as well slip stitching to the space in the blanket where the first square was joined.
Continue in this way until all the squares of Strip 2 are joined to the blanket. Now you can work down the outside edge and along the bottom following the instructions for the Join as you Go in Strip 1 (page 8).
It is time to do a block of granny stripes again.
So, turn the blanket to the reverse for the first stripe and upside down again so that the Strip 2 is at the top. Following the instructions for the granny stripes as before, make one row in SS Silver, followed by 2 rows of
SS Parchment, 2 rows of SS Powder Pink and 2 rows of SS Soft Peach. Remember the cluster count is 88 + the
single TR.
Strip 3
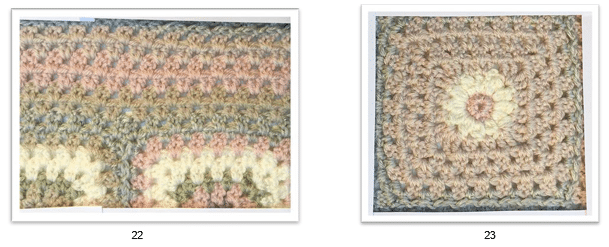
Back to another strip of squares. This is the strip where the pattern is a little different from the standard granny square pattern you have been using, so follow the directions below. (See video No 4)
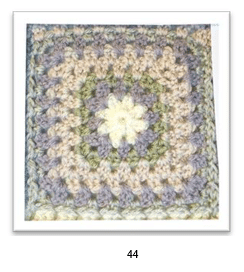
It is a square starting with a cute little cream flower in popcorn stitch with a tiny contrasting centre. The background of the square is then filled in with one colour.
The following chart shows the colours for each square, working from right to left. You will make 11 squares.
| Centre Colour | Popcorn Flower | Outer Colour (four rounds) | |
| Square1 | SS Mushroom | SS Cream | S Parchment |
| 2 | SS Powder Pink | SS Cream | SS Soft Peach |
| 3 | SS Parma Violet | SS Cream | SS Parma Violet |
| 4 | KC Basil | SS Cream | SCH Verviers |
| 5 | SS Mushroom | SS Cream | SS Parchment |
| 6 | SS Powder Pink | SS Cream | SS Soft Peach |
| 7 | SS Parma Violet | SS Cream | SS Parma Violet |
| 8 | KC Basil | SS Cream | SCH Verviers |
| 9 | SS Powder Pink | SS Cream | SS Soft Peach |
| 10 | SS Mushroom | SS Cream | SS Parchment |
| 11 | SS Parma Violet | SS Cream | SS Parma Violet |
The Pattern:
Round 1:
With first colour, CH4 and SL ST to first chain to form a circle.
Make 12 DC into the circle and SL ST to the top of first DC. Fasten off (pic 24).

Round 2:
Without turning this time, attach the second colour to the top of any DC from the previous round.
You are now going to be making a series of 12 Popcorn stitches. This is a cluster of stitches which makes a pretty petal shape and is slightly puffed, like popcorn.
Start by CH2 (this is the equivalent of the first TR) in the same stitch you attached your yarn, TR2 in the same stitch. Now pull up the loop that’s on your hook a little bit to make it bigger and slip it off the hook.
Insert your hook into the top of the first CH2. (In the subsequent groups of popcorn stitches it will be in the top of the first TR) (pic 25)
Pick up that loose loop you dropped and pull it through the loop that’s on the hook (pic 26.) This has the effect of bunching these three stitches together into a pretty petal shape. Finish off the cluster with CH1 (pic 27).
In the very next stitch, TR3 and work the popcorn cluster as above.
Work all round the circle making one popcorn cluster in each stitch, finishing with a CH1 and slip stitching to the top of the first CH2. Fasten off. (12 popcorn stitch petals).
Now it all gets a bit packed as you are working these stitches and it’s a little difficult to see how they will look like actual petals, but that gets sorted out in the next round. The important thing is that you have exactly twelve clusters, so make sure you work into every stitch of the first round (pic 28).
Round 3: Turn your work at this point.
Attach the third colour to any space between the popcorns.
The first thing you are going to do is start to make a corner. So, CH3 (counts as the first DTR), DTR1. (pic 29) Move along the top to the next space and TR2. Then TR2 in the next space. To make the next corner, DTR2, CH2, DTR2 in the next space. Repeat this all the way around until you get back to where you started with the half completed first corner. Complete that with DTR2, CH2 and SL ST to the top of the first CH3 (pic 30).
You are going to stay with that same colour for the next three rounds.

Round 4: CH2 and turn.
That first CH2 counts as the first TR in the corner, TR1, CH2, TR2 to complete the corner. TR2 in the next three spaces. TR2, CH2, TR2 in the next corner and repeat all the way round. Remember that the first corner was completed at the start of the round, so all you have to do is SL ST into the top of the first CH2 (pic 31).
Round 5: CH2 and turn. That first CH2 counts as the first TR in the space immediately after the corner this time so you are not starting in a corner. TR1 in the same space. Continue around the square with TR2 in each space and TR2, CH2, Tr2 in each corner space, finishing with a corner space. SL ST to the top of the first CH2 to finish (pic 32).
Round 6: CH2 and turn. TR1 in the space beside the CH2. Work around the square as before in Round 5. (You will have 5 spaces between each corner.)
That is your popcorn flower square complete.
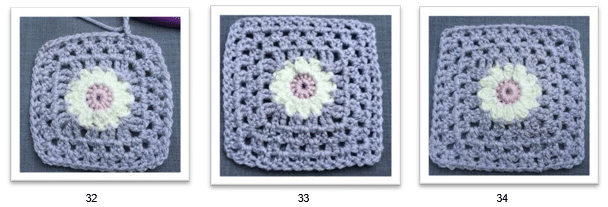
A quick word about the front and reverse of these squares.
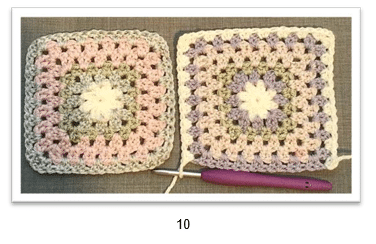
All the way through the blanket so far, I’ve advocated that you join the squares with the last round of the square showing the wrong side uppermost. That would be the case in pic33. However, for this square, I prefer the look of the flower centre in pic 34 and this is where the last round is right side uppermost. It is a matter of choice. If you also prefer the look of the flower in pic 34, don’t be concerned about attaching the squares this way for this one strip.
Once you have all 11 squares complete, join them to the blanket in the same continuous join as you go method described on page 7. Three things to remember – your joining colour is SS Silver, you will be joining with HALF TREBLES and make sure that the blanket is the RIGHT WAY UP.
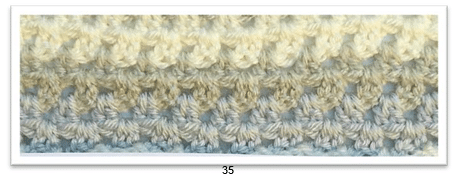
So, as usual there is a section of granny stripes to do and you will turn the whole blanket to the reverse to start, following the instructions on Page 8
Two rows of SS Cream (Remember the in the first row) Two rows of SCH Verviers
Two rows of SS Silver (pic 35)
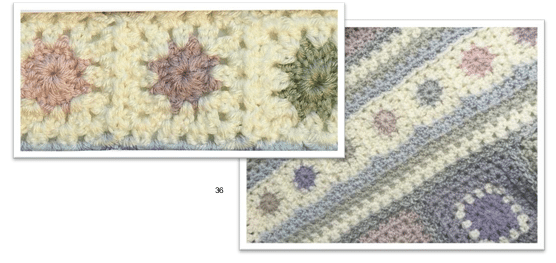
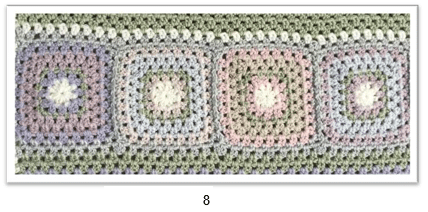
I actually love how this strip of little squares looks between the larger ones, and it’s well worth the task of joining them all (pic 36).
You will be making 22 mini granny squares. Each one is made up of just two rounds. They are the first two rounds of the basic granny square. If you look back to pics 2 and 3 on pages 4 and 5, you’ll see what I mean.
Each centre, (or Round 1) is a different colour and each Round 2 is done in the SS Cream. Right to Left, the centre colours are as follows:
| 1 | SS Powder Pink | 12 | SS Silver |
| 2 | S Parma Violet | 13 | KC Basil |
| 3 | SS Soft Peach | 14 | S Parchment |
| 4 | S Mushroom | 15 | S Parma Violet |
| 5 | SCH Heerenveen | 16 | D MIST |
| 6 | KC Basil | 17 | SS Soft Peach |
| 7 | SS Powder Pink | 18 | SCH Verviers |
| 8 | S Parchment | 19 | SS Powder Pink |
| 9 | Ss Silver | 20 | S Mushroom |
| 10 | SS Soft Peach | 21 | SCH Heerenveen |
| 11 | S Mushroom | 22 | S Parma Violet |
Now make a neat pile of the squares in the correct order with no.1 at the top. I found that skewering them on to a knitting needle is a good way of storing them, and you can then start the joining. By now, you should be quite an expert at the join as you go, as it’s the same method each time – Half Trebles and the little squares are all turned to the wrong side whereas the blanket is of course on the right side.
One small difference this time is that the joining colour is SS Cream.Next, you will make a number of granny stripe rows. They are a mirror image of the ones made above Strip 4. So it will be two rows each of – SS Silver, SCH Verviers and SS Cream.
Strip 5
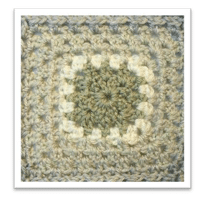
These squares are once more the same as the basic Granny Square of strip 1, except for a different colour sequence. There are only three colours used in each square and Round 3 (the half Treble round) is always SS Cream (pic 37).
| Rounds 1 and 2 | Round 3 | Rounds 5 – 7 | |
| Square 1 | SS Silver | SS Cream | SS Parchment |
| 2 | SS Mushroom | SS Cream | SS Powder Pink |
| 3 | SS Silver | SS Cream | S Parma Violet |
| 4 | SS Soft Peach | SS Cream | SS Mushroom |
| 5 | SCH Verviers | SS Cream | KC Basil |
| 6 | D ROSÉ | SS Cream | SS Soft Peach |
| 7 | SCH Heerenveen | SS Cream | SS Silver |
| 8 | SS Mushroom | SS Cream | SS Soft Peach |
| 9 | S Parma Violet | SS Cream | SS Mushroom |
| 10 | KC Basil | SS Cream | SCH Heerenveen |
| 11 | SS Parchment | SS Cream | SS Powder Pink |
Once more, these squares are joined with SS Silver using Half Treble Continuous Join As You Go with the squares turned to the Wrong side and the blanket on the Right side.
Strip 6
Now you come to a section of Granny Stripes which is wider than other parts but is designed in that way to give you a nice plain area which will be embellished afterwards with Crochet flowers, added separately.
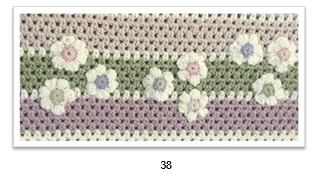
You will make 4 rows of SS Silver, one row of SS Cream, 4 rows of SS Soft Peach, one row of SS Cream, 4 rows of
KC Basil, one row of SS Cream, 4 rows of SS Mushroom and finally 3 rows of SS Cream.
Once these stripes are completed, it’s a good idea to make the flowers now and attach them, before the blanket gets too big and cumbersome to sew the flowers on easily (pic 38).
Flower Motif
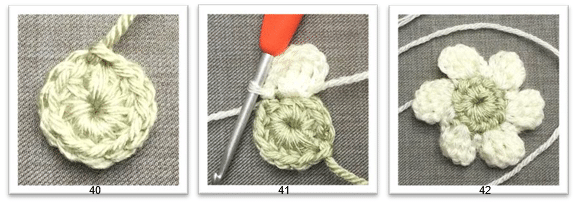
You need to make 24 of these flower motifs and I picked 8 colours from the Yarn List (it doesn’t matter which) and made 3 of the flower centres in each colour. The petals are all done in S CREAM 4 PLY if you have opted to buy that yarn.
You also want to use your 3mm hook for both the centres and the petals.
Video No 5 on my You Tube channel, shows how I stitched them down. I decided after making the video that it would be so much easier to stitch the flowers down at this point rather than wait until the whole blanket is finished, which is what I had done
Round 1:
Using one of the colours, CH4, SL ST to the first chain to form a ring. CH2 (counts as first HTR), HTR 11 times into the ring, SL ST to top of CH2. Fasten off. (12 HTR) (pic 40).
Round 2:
Using S CREAM 4 ply, attach the yarn to the top of any stitch.
CH3, DTR3 in same stitch, CH3, SL ST into the next stitch. *CH3, DTR3 in next stitch, CH3, SL ST into the next stitch* repeat from * to * around. (pic 41) You should have SIX petals.
Fasten off, leaving a long tail of approx. 18ins, as this will be what you use to sew the flower to the blanket. Weave in the other ends neatly. You can now decide which way up you want the flowers to be sewn down. Pic 41 is the right side, pic 42 is the reverse side. Either way is fine but make them all the same way.
You will see from the earlier photo that I arranged my flowers in groups of three, rather than scatter them randomly, but the groups themselves are randomly placed in order to create a more natural look (pic 39).
The diagram below gives you an idea of the way mine were laid out. Place them first and then secure them with either a pin or a stitch marker before you sew them down. Thread the long tail on to a blunt tapestry needle then work around the flower shape making neat little stab stitches to attach it to the blanket. Just make sure that you are attaching the flowers to the RIGHT side of the blanket.

Strip 7
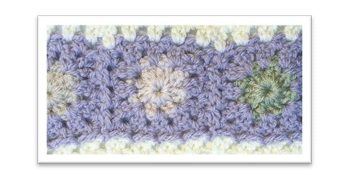
I loved the look of the mini grannies of Strip 3 so much I decided to repeat them! So, going back to page 15 for the instructions, make 24 little squares in the colours on the following page. This time the joining colour is SS Parma Violet.
From right to left, the centre colours are:
| 1 | SS Cream | 12 | SS Parchment |
| 2 | SCH Verviers | 13 | SS Powder Pink |
| 3 | SS Powder Pink | 14 | SS Cream |
| 4 | SS Parchment | 15 | KC Basil |
| 5 | SS Mushroom | 16 | SS Soft Peach |
| 6 | KC Basil | 17 | SS Silver |
| 7 | SS Cream | 18 | SCH Verviers |
| 8 | SS Powder Pink | 19 | SS Powder Pink |
| 9 | SS Silver | 20 | SS Mushroom |
| 10 | SS Mushroom | 21 | SCH Heerenveen |
| 11 | SS Soft Peach | 22 | SS Soft Peach |
As I mentioned above, the joining colour is SS PARMA VIOLET. Remember to join to the right side of the blanket, and as usual the joining stitch is Half Treble.
Next, make two rows of Granny Stripe in SS Cream, turning the blanket to the reverse before you start.
Strip 8
This is an exact copy of Strip 1 with the same eleven squares. Make them up in the colours listed in the first strip, but you can change the layout along the row if you like. The joining colour as usual is D MIST and the stitch is Half Trebles. Next you make two rows each of Granny Stripe in the following:
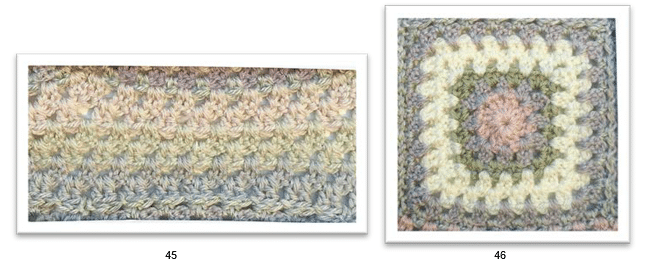
SS MUSHROOM starting with the first row on the reverse side of the blanket (pic 45). Then, SCH VERVIERS and SS SILVER.
Strip 9
This strip is a repeat of the Strip 2 squares. Make up the eleven squares in the colours as noted for Strip 2. You can change the layout of the squares if you like. The join as usual is in SS Silver with Half Trebles (pic 46).
You are almost at the bottom edge of the blanket now, and there are just some more rows of Granny Stripes left to do. Remember the cluster count as always is 88 + the single Treble at the end.
They are as follows:
Two rows of SS Powder Pink, starting on the reverse of the blanket, then two rows of SS Parchment and finally five rows of KC Basil.
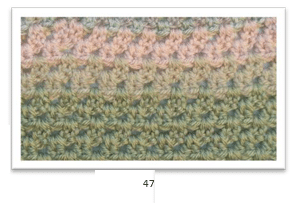
Now you have come to the end of the main body of the blanket. You can leave it this size if you like and finish it off by working a border all round, as is explained later on page 22, or continue on to make the full sized blanket.
I chose to make two extra sections with strips of squares down each of the two long sides, then tied the whole lot together with a border edging. This makes the blanket wide enough for a king size bed.
But first, you will work around all four sides of the blanket with a number of rows of granny stripes. I call this the inner border. This is easy to do, but the important thing is to make sure that the number of granny clusters on the long sides have to be an exact number. If you don’t end up with the number I’ve stated, your squares won’t fit later.
Strip 10 Inner Border Section 1
The colour will be SS Cream. Starting in the top right corner of the blanket, and with the blanket right side uppermost
– CH2 (counts as first Treble), TR1. Work along the edge with TR2 in each space until you reach the corner. TR2, CH2, TR2 in the corner space (pic 48).
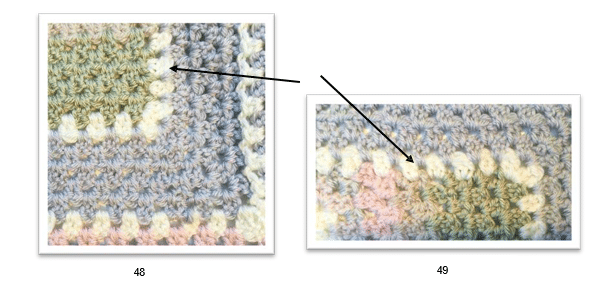
You will now be working along the left side of the blanket. It’s important that you end up with a total of 111 clusters of TR2 (including the cluster in each corner), so work as evenly as possible, especially when you come to the areas of granny stripes where it’s not quite so obvious where to put your hook. I’ve tried to show in pic 49 where I worked the clusters in these areas, but one tip is to fold your blanket in half, pop in a stitch marker at the halfway point, fold it again and pop in a marker, so that it is sectioned off into quarters. You can now check as you are working that you have done 27 or 28 clusters in each quarter.
A word here about that wonderful term in the crochet dictionary – fudging. Fudge is such a lovely word, isn’t it? On the one hand it it’s a sticky, thoroughly decadent sweet treat and on the other, in crochet terms it means making something work out with just a little creative stitching!
So, this is what you can do here. Just make sure that you have 111 clusters as I say, even if that means you have to either miss a space or put two clusters in one space.
It’s plain sailing once you have worked around the other two sides (111 clusters on the other long side too) and are back to the first corner, which of course you will finish off with TR2, CH2 and SL ST to the top of the first CH2. Fasten off.
Now work five rounds of TR2 granny stripe clusters in SS Silver. After each round the stitch count gets bigger, so by the 5th round your cluster count on the long side will be 116.
Strip 11 Side Border Section
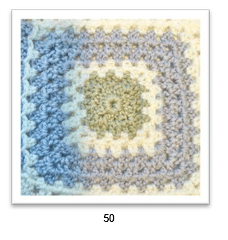
You will make 26 squares, 13 of them to be attached to each of the two long sides. These squares are the same as those you made in STRIP 5 on Page 12, but with one important difference. There are going to be seven rounds to this square instead of six. Round 3, which is in the SS Cream and worked in HTR will be repeated once more, before you go on and do the next three rounds.
Round 1&2 – the first colour
Rounds 3&4 – SS Cream (both rounds HTR) Rounds 5,6&7 – the third colour
This will make the square one round bigger, which is needed in order to fit accurately down the side. As for the colour sequences for the squares, use the table for Strip 5 as a guide, but really anything goes as long as the centre and outer rounds are different colours. I’m deliberately being a little vague here, as I’m aware that some of the colours will be getting quite low so you may need to ration them. The squares on each side can be the same sequence, or different.
The joining colour is SS Cream this time, and as always you will be using Half Trebles. Turn the squares over so that the last round of the square is on the reverse before you join them to the Right Side of the blanket with 13 squares on each side.
And with that, you are almost finished! There are just some more granny stripe rounds to go, all the way around the blanket followed by a pretty scalloped edging.
Strip 12 Outer Border Section
Starting in any corner, make one round of Granny Stripe clusters of TR2 in SS Cream. Remember how to treat the joins between the squares as you did before, as follows – TR1 in first corner, TR2tog from first corner to the second, TR1 in the second.
One round each of SS Powder Pink, SS Parma Violet, SCH Verviers and lastly, two rounds of SS Silver.
Scalloped Edging
For this, pick out all the colours you have left, except for the SS Cream. You may only have a little bit of some of the colours, but that’s OK as it can all be used.
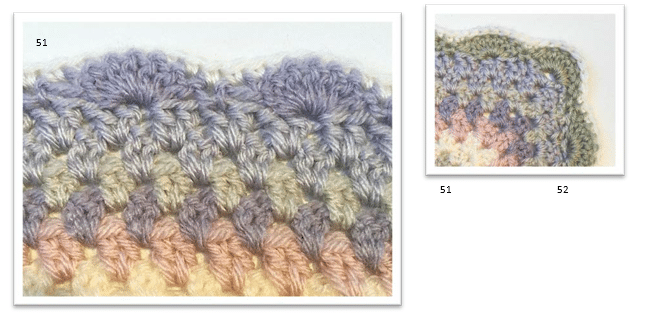
Starting with one colour, attach your yarn in any corner space. I personally like the look of the scalloped edging on its reverse side better than the front, so I turned the blanket to the wrong side to do this stitch. That means when you turn it back once the edging is completed the blanket is the right way up but with the scalloped edge wrong way up. This is a matter of personal taste, and you may prefer to have both the edge and the blanket right side uppermost.
So, CH1 to start and then DC1 in the same corner space. Miss two spaces, TR7 in the next space, miss two spaces,
*DC1 in the next space, miss two spaces, TR7 in the next space, miss two spaces.
Repeat from * three more times (five scallops). Now it’s time to change colour so to do this, start to make the next DC in the first colour, but stop halfway as follows:
Insert hook, yarn over, pull up a loop (2 loops on hook). Instead of yarning over and pulling through the two loops, drop the yarn and lay the second colour of your choice over the hook and pull through the loops instead. Pull everything nice and firmly and you can now continue with the second colour. I suggest you make a second DC in that same space just to anchor it, and you can cut the first colour and tie the two ends together with a knot if you like. You will still need to weave in the ends of course.
Now continue around the blanket changing colour after every five scallops.
The corners look best if they are treated in a similar way as the scallop but by making 9 Trebles to take you round the corner, rather than the 7TR. You may need to tweak the stitch count as you approach the corner to make it fit, by either missing three spaces or reducing it down to one space missed, but the scallop edging is very forgiving and you can do that without any problem. (Yes, that’s fudging again!)
You are almost at the end of the journey, and it’s been quite a journey!
The very last thing to do is go round the blanket once more, using either the SS Cream DK or the SS Cream 4ply and make a slip stitch edge in each of the stitches at the top of the scallop, and also the top of the DC stitch in between. This makes a pretty outline just to complete the edge (pic 52).
And there you are. Your Frosted Pearl Blanket is complete. Check over the whole blanket for any ends which have still to be sewn in, including those on the scalloped edge, remove any stitch markers and you are ready to freshen it up with a pamper wash.
These premium acrylic yarns are all easily machine washable, so pop your blanket into the washing machine. I use a standard laundry pod and some fabric conditioner and set it to a minimum wash. On my machine that is 30 degrees for 15 minutes and I set a spin speed of 1000rpm. It comes out only slightly damp. I then lay it out on my spare bed, on top of a large sheet or blanket. It won’t need to be blocked, but you can tweak any parts here and there which could be stretched slightly into shape. Take a few minutes to make sure the scallops are pulled out a bit to show themselves off.
I hope you have enjoyed making this blanket.