This is a step-by- step template for the spiderweb top. For every stage, the design consists in a size chart including comprehensive images in small-xlarge scale.
Materials:
- Crochet Hook size G/4mm Worsted Weight Yarn
- (I am using Lily Sugar n Cream Cotton) Yarn Needle
- Stitch Markers (Optional)
Terminology:
- SL ST: Slip Stitch
- CH: Chain
- SC: Single Crochet
- DC: Double Crochet
Gauge:
- 16 DC x 8 Rows
- 4 x 4 inch Square
Important Info:
You may sell the finished product from this pattern but you must credit me as the designer by linking the pattern listing from my Etsy.
You may not redistribute the pattern itself in any way (video tutorial, typed, screenshots, etc.)
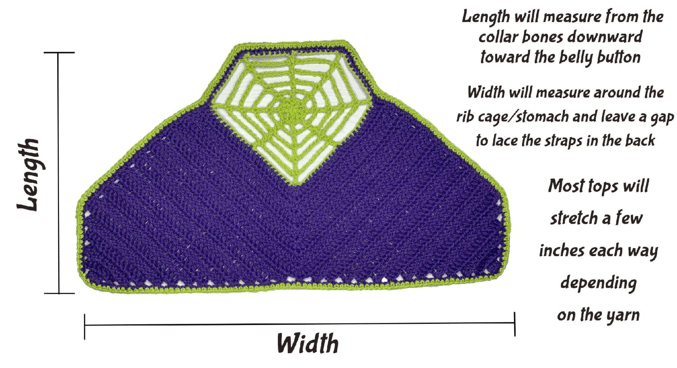
Size Measurements
All Measurements were taken with the top laid flat and do not account for stretching
| Small | Medium | Large | Xlarge | |
| Width | 22 inches | 24 inches | 26 inches | 28 inches |
| Length | 12 inches | 14 Inches | 16 inches | 18 inches |
The Web:
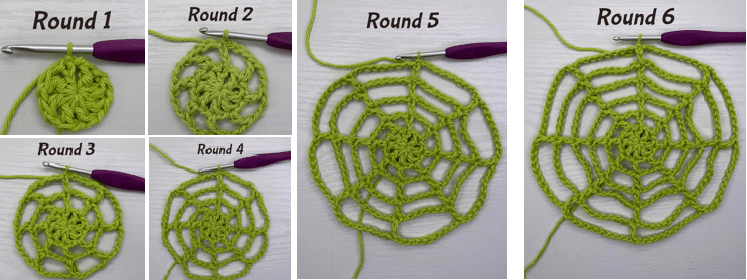
Make a magic circle or chain 4, SL into first chain
Round 1: Chain 3 (this counts as a DC and a chain 1),* DC chain one* 7 times then slip stitch into the second chain from the first chain three. You should have 8 DC total including the first chain 3.
Round 2: Chain 5 (this counts as a DC and chain 3) *DC into the next DC in the circle then chain three* repeat around. SL ST into the second chain from the first chain 5.
Round 3: Chain 7 (this counts as a DC and a chain 5) DC on into the next Dc in the circle, Chain 5 and repeat around. SL ST into the second chain from the chain 7.
Round 4: Chain 9 (this counts as a DC and a chain 7) Dc into the next Dc in the circle, chain 7, then repeat around. SL ST into the second chain from the chain 9.
Round 5: Chain 11 (this counts as a DC and a chain 9) Dc into the next Dc in the circle, chain 9, then repeat around. SL ST into the second chain from the chain 11.
Round 6: Chain 11 (this counts as a DC and a chain 9) *DC into the next DC in the circle, chain 11* repeat 5 times. Chain 9 then SL ST into the second chain from the chain 11.
Cut off yarn, you’re done with the spider web!
The Main Body:
Change colors every other row for stripes
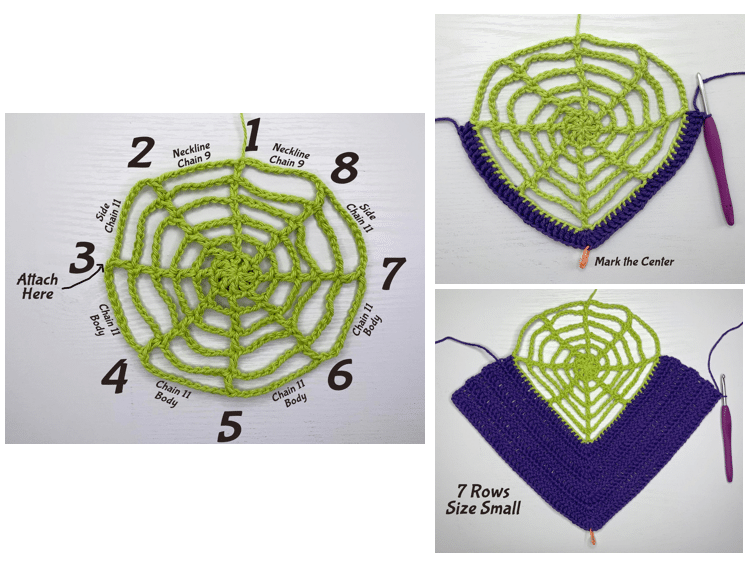
Row 1: Start by placing a DC into the third DC in the spiderweb (photo shown below). Dc across 23 stitches. You should be at the 5th DC in the spider web. Place 5 Dc in this stitch, place a stitch marker in the third stitch. DC 24 stitches, CH 2 and turn. (53 DC total)
Body Rows:
DC across until you reach the stitch marker. Place 5 stitches in the marked stitch and move your stitch marker up a row. Continue with DC until you reach the end of your row, CH 2 and turn. You may continue the body rows until you reach your desired length or follow my pattern sizes:
Small– 7 rows total Medium– 9 rows total Large– 11 rows total XLarge– 13 rows total
Bottom decreasing rows:
This will create a stair stepping pattern at the bottom of your top.
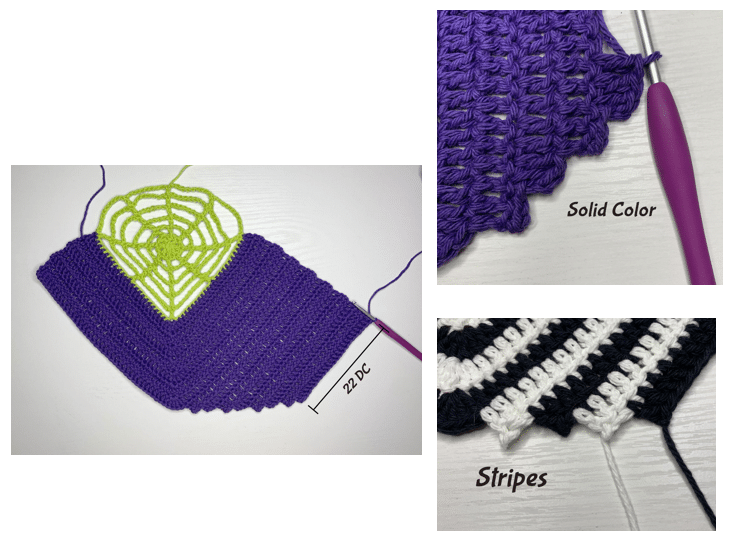
Instructions for Solid Color Top:
Row 1:Dc across stopping on the DC before the cluster of 5 starts, turn.
Row 2: SL ST 3, CH 2, then DC into the same stitch, Continue with DC to the end of the row, CH 2 and Turn.
Row 3: DC Across until you have 2 stitches left, turn. Repeat rows 2 and 3 until you have 22 DC remaining. Instructions for Striped Top:
Row 1: DC across stopping on the DC before the cluster of 5 starts, cut off yarn, turn.
Row 2: Attach new color to the third DC in the row, DC across, cut off yarn, turn. Row 3: Attach new color at the beginning of the row, DC across until you have 2 stitches left, cut off yarn, turn.
Repeat rows 2 and 3 until you have 22 DC remaining.
Side and bottom decreasing rows:
Instructions for Solid Color Top:
Row 1: SL ST 3, CH 2, then DC into the same stitch, Continue with DC until you have 2 stitches left, turn.
Repeat row 1 until you have 2 DC left.
Instructions for Striped Top:
Row 1: Attach new color to the third DC in the row, DC across until you have 2 stitches left, cut off yarn, turn.
Repeat row 1 until you have 2 DC left.
You should only need 5 rows for all sizes, you can cut yarn off here.
Other Side:
Attach your yarn to the other side of your cluster of 5DC at the bottom center of the top. At this point you will be repeating what we just did on the other side of your top.
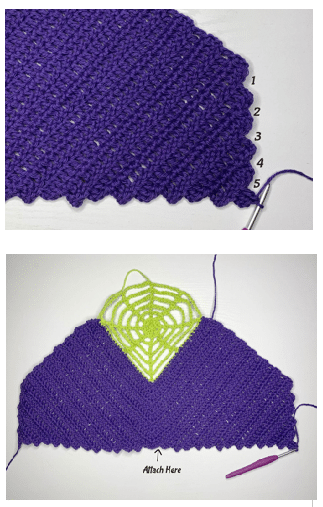
Skipping 2 stitches in each row on the bottom edge of the top until you have 22 stitches, then begin skipping 2 stitches at each end of your last 5 rows.
Once you’re done, keep your yarn attached, we will continue on from here.
Edges:
Turn your top. SC across the 2 DC in your row and CH 2. SC into the next available corner, CH 2 and repeat all the way across the bottom of your top. When you reach the end, SC across the 2 DC row and continue the pattern up the side. Place 2 SC in the last corner of the pattern, then begin single crochets up the side of your top
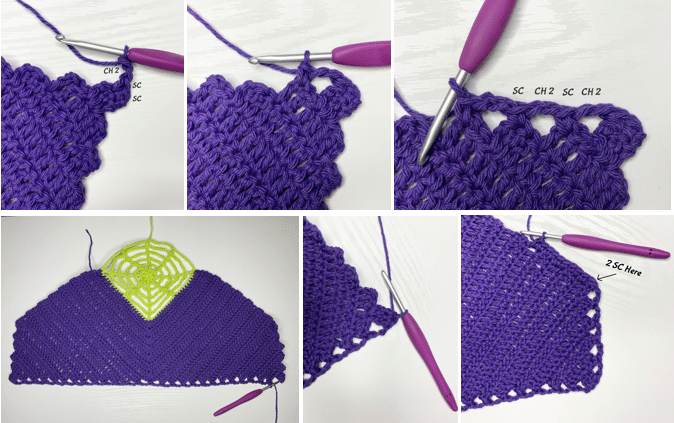
Continue single crochets until you reach DC #8 in your web. Place 3 SC in this stitch, mark the center. SC across to DC #2 in the web, place 3 SC in this stitch, mark the center. Continue with SC down the side of your top until you reach the corner, place 2 SC in the corner then CH 2 and SC in the next corner. Repeat until you come back to the start and SL ST to close the round.
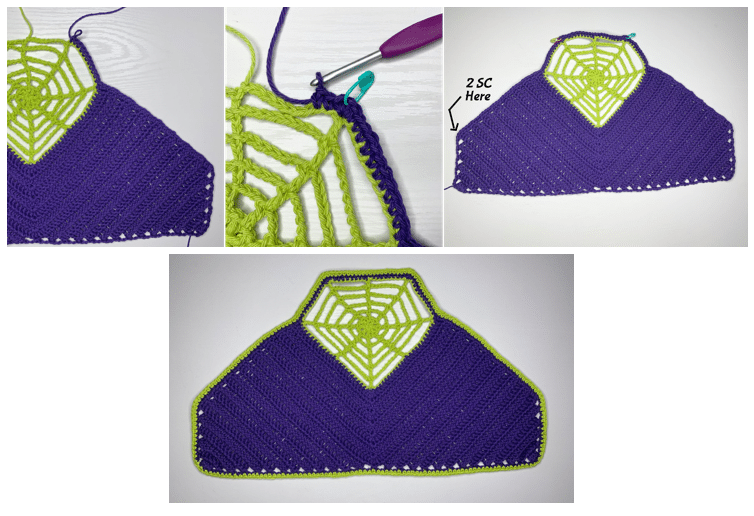
CH 1 and SC around in every stitch. In the 2 marked stitches at the neckline place 2SC. Changing colors is optional.
Cut off your yarn and weave in all your ends!
Straps:
Tie your yarn to one of the 2 SC we placed in the marked stitches at the corners of the neckline. Weave in the end.
Insert your hook into the outside SC, yarn over and pull through. Insert your hook into the inner SC, yarn over, and pull through. Yarn over and pull through both loops, you can start a chain from here.
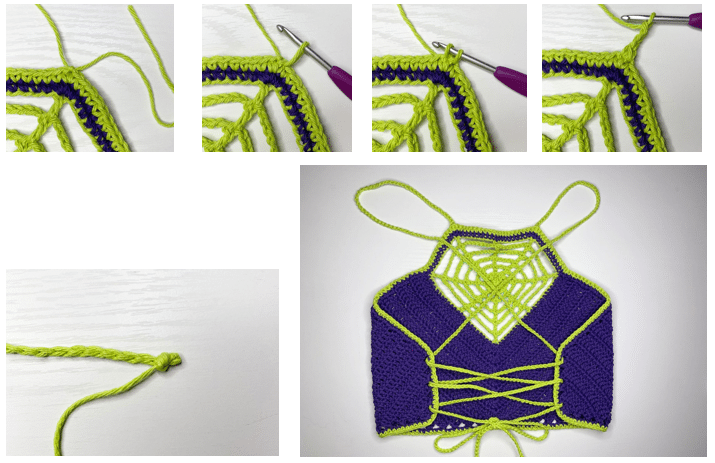
I chained 60 inches for a size small, 70 for medium, 80 for large, and 90 inches for xlarge. Strap lengths are highly changeable so make them as long or short as you want. End your chain in a tight knot. Lace up the straps in the back like a corset using the holes in the sides. Done!