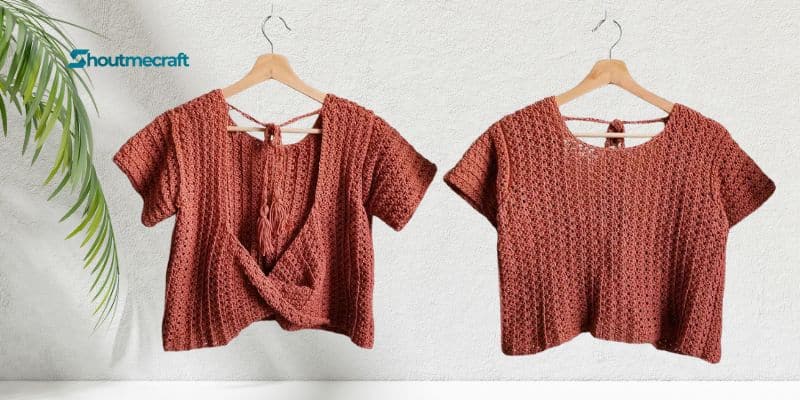
Crochet Top Twist Open Back – This shirt will definitely make people notice its delightfully textured stitch design and open back! Perfect for the summer, this airy shirt accentuates high waisted shorts, skirts, and pants!
Crochet Top Twist Open Back is a beginners level crochet design. Combined with some simple increasing and decreasing to create a visually appealing garment free of the trouble of intricate stitches or complex shaping, it employs simply single and double crochet stitches, worked in the back loop alone to give a ribbed look.
Tutorial style writing allows this design to be scaled to suit any size needed! Any weight 2-4 yarn would work great for this project; using a hook 1-2 sizes bigger than advised on the yarn label for the body of the garment will ensure the tension is not too tight, therefore producing a flowing and light top with loads of drape!
This shirt is worked up in four independent pieces: front, back, two sleeves. The front panel is built first; then, when twisted, the rear panel is constructed to match the front panel’s measurements.
The two sleeves are worked up; then, underarms, side seams, and the shoulders all four pieces are seamed together. The yarn is then reattached along the neck hole to complete the neckline and produce the tassel shoulder ties.
Stitches and Abbreviations Used (US Terms):
- ch- chain
- sl st- slip stitch
- sc- single crochet
- dc- double crochet
- sk- skip
- st- stitch
- lp- loop
- blo- back loop only
- sc3tog- single crochet 3 together blo lemon peel st- see below prev- previous
Note:
- As said already, this design is written to allow for all sizes, yarn weights, gauges, and hook sizes. Strict numbers, measures, or gauges are not part of this pattern! Throughout the instruction, I will go back to the quantity of stitches and rows I used for my size. My top fits a size Small using a 5mm hook and 600m of The Cotton from We Are Knitters, a weight 3 cotton yarn. Get the same appearance in yours by using like materials!
- Although any yarn and hook can be used for this project, I strongly advise working the main body of the garment using a hook at least size bigger than what the label of your chosen yarn advises. This guarantees a beautiful drape for the top and prevents excessive stiffness.
- Working sideways from the left armhole toward the right armhole, the front and back panels shape the shoulders and neckline as required. Starting at the shoulder and fashioned to suit the armhole, the sleeves are knit top down, their length lengthened as needed.
- A dc stitch counts from the ch 3 at the beginning of every even numbered row.
- Works the first sc into the very first st of the row; the ch 1 at the beginning of every odd numbered row does NOT count as a st.
- Should a row begin with a sc, it should also finish with a sc. Should a row begin with a dc, it should also finish with a dc. Unless indicated, you should always be working with an odd number of stitches!
- This design is done in turned rows.
- Unless indicated, every stitch in this design is to be worked in the back loop only. This gives one the ribbed appearance!
- Measure yourself true to your body; avoid adding additional width; the ease of the garment is generated when shaping the armholes.
- Should you have any questions or concerns regarding the pattern or find yourself stuck, kindly email me at [email protected] and I will gladly try to assist you!
Working the Back Loop Lemon Peel Stitch:
This fun stitch, for its textural payoff, is quite easy to achieve! It has a 2 row repeat and requires an odd numbered amount of stitches, plus one extra to start the first row.
- Sc into the 2nd ch from hook. *dc, sc* across. Turn.
- Ch 3 (counts as dc) , working in blo, *sc, dc*. Turn.
- Ch 1, blo sc in same st. Working in blo, *dc, sc*. Turn.
To make the Back Loop Lemon Peel Stitch, it simply requires alternating between single crochet and double crochet stitches, working in the back loop only. For the next and subsequent rows, the single crochet stitches are worked into the double crochet stitches from the previous round, while the double crochets are placed on top of the single crochet stitches from the previous round. Whatever stitch you start your row with, you should also end the row with that same stitch. This alternation of stitches creates a beautiful texture, and working only in the back loop creates a gorgeous ribbed effect!
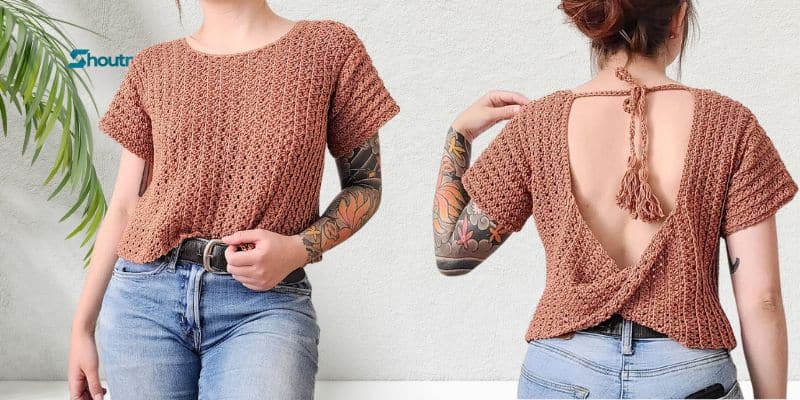
Part 1: Shaping the Front Left Armhole
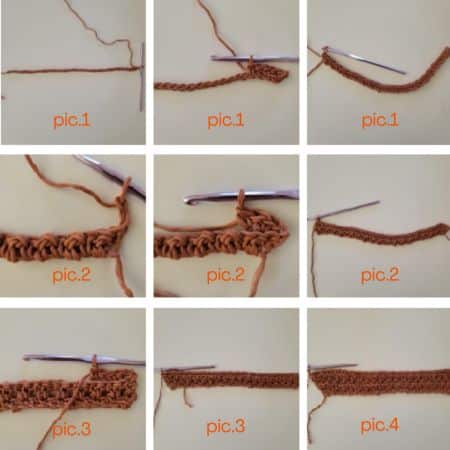
Ch a length that reaches from your underarm to your desired hemline, ensuring it’s an odd number, plus one extra ch to start the row. I made my ch 38 sts long, and it reaches from my underarm to my hip. Sc in 2nd ch from hook. dc, sc across. Turn.(pic.1)
Ch 3 (counts as dc), * blo sc, dc, sc* in next st. Blo lemon peel st across. Turn. (pic.2)
Ch 1, sc in same st. Blo lemon peel st across. Turn.(pic.3)
Repeat steps 2-3.(pic.4)
Part 2: Creating the Front Left Shoulder
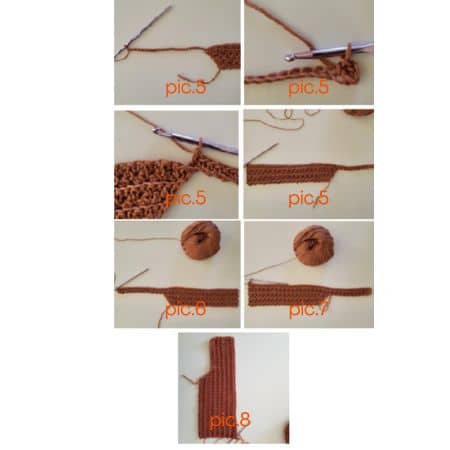
Ch a length reaching up to the top of your shoulder, ensuring it’s an odd number of chs. I worked 21 sts. Ch an additional 3 (counts as dc), sc in 4th ch from hook. *dc, sc* across until reaching the end of your ch. Blo dc in sc from prev row, blo lemon peel st across. (pic.5)
Ch 1, sc in same st. Blo lemon peel st across (pic.6)
Ch 3 (counts as dc), blo lemon peel st across.(pic.7)
Continue repeating steps 5-6, working rows of blo lemon peel st evenly, until shoulder covers from the base of your neck to the tip of your shoulder, ensuring your final row is a step 6 row, ending with a dc at the bottom of the shirt. (I worked a total of 11 rows to complete the shoulder section) (pic.8)
Part 3: Decreasing the Front Neckline:
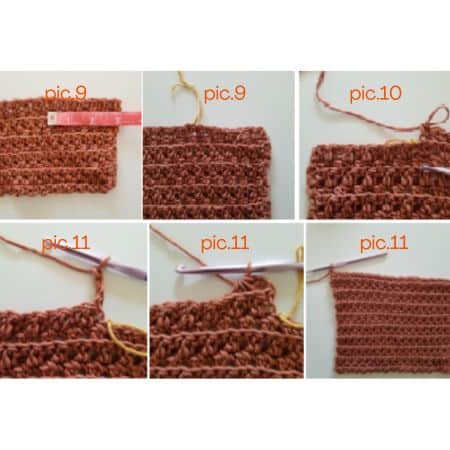
Measure 3” down from shoulder. Place a st marker in nearest sc. There should be an even number of sts from top of shoulder to marked st. I had 12 sts from the top of the shoulder to the marked st.(pic.9)
Ch 1, sc in same st. Blo lemon peel st across until reaching 1 st before marker. Sc in final st before marker. Turn, leaving remaining sts unworked. I had 12 sts unworked.(pic.10)
Ch 3 (counts as dc) , blo sc3tog, blo lemon peel st across. Turn.(pic.11)
Part 4: Working the Front Neckline
Ch 1, sc in same st. Blo lemon peel st across. Turn. (pic.12)
Ch 3 (counts as dc), blo lemon peel st across. Turn. (pic.13)
Continue repeating steps 9-10, working rows of blo lemon peel st evenly, until neckline is approximately 2 rows shorter than your desired width, ensuring your final row worked is a step 9 row, ending with a sc at the neckline. I did 11 rows total. (pic.14)

Part 5: Increasing the Front Neckline
Ch 3 (counts as dc), *sc, dc, sc* into next st, blo lemon peel st across. Turn. (pic.15)
Ch 1, sc in same st. Blo lemon peel st across. Turn. (pic.16)
Part 6: Creating the Front Right Shoulder
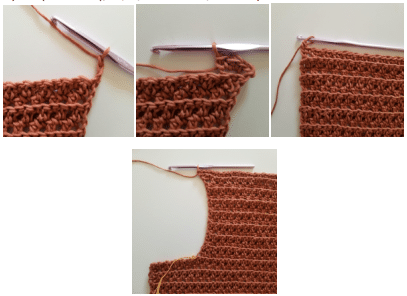
Ch a length that is 1 st less than the number of sts left unworked at the end of step 7. I made a ch of 11, since I had 12 sts unworked on the left shoulder. Ch an additional 3 (counts as dc), sc into 4th ch from hook.
*Dc, sc* across until you come to the end of your ch. Blo dc in sc from prev row, blo lemon peel st across. Turn.(pic.17)
Repeat steps 5 and 6 until right shoulder has the same total number of rows as left shoulder, ending on a step 5 row.(pic.18)
Part 7: Shaping the Front Right Armhole
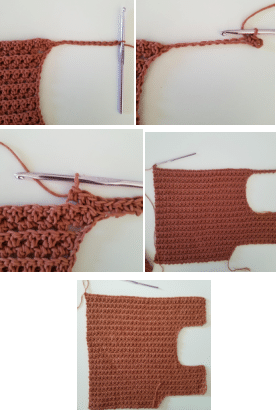
Starting at the top of the shoulder and working downward, count the same number of sts as chs you created when making the shoulder in step 4, plus one extra st. I counted 22 sts, since I made 21 chs when increasing for the shoulder in step 4. Mark the last st counted with a st marker. (pic.19)
Ch 1, sc in same st. Blo lemon peel st across until you reach the st marker. Turn, leaving remaining sts unworked. (I had 22 sts left unworked) (pic.20)
Ch 3 (counts as dc), sc3tog, blo dc in next st. Blo lemon peel st across. Turn. (pic.21)
Ch 1, sc in same st. Blo lemon peel st across. Turn. (pic.22)
Repeat steps 15-16. Fasten off. (pic.23)
Part 8: Starting the Back Panel
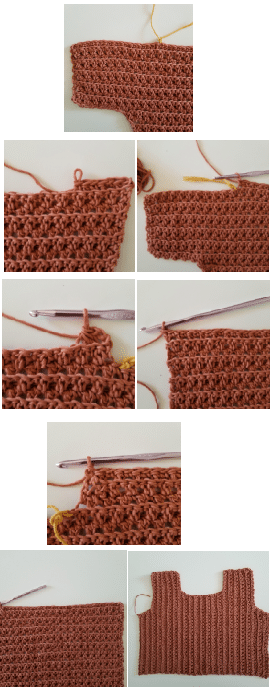
Repeat steps 1-6 to create the left shoulder of back panel. (pic.24)
Part 9: Decreasing for Twist Portion
Working from bottom of hem upward, count same number of sts made when creating your first row in step 1. Place st marker in next st. I counted 37 sts before placing my st marker in the next st
Ch 1, sc in same st. Blo lemon peel st across until reaching st marker. Turn, leaving marked st and remaining sts unworked. (I had 26 sts left unworked.)
Ch 3 (counts as dc), sc3tog, blo lemon peel st across. Turn.

Part 10: Working Twist Portion
Work blo lemon peel st until you have approximately 1.5 x the amount of rows worked in part 4, ensuring your last row worked is a step 9 row, ending with a sc. The amount of rows required for this section depends on your gauge, so to check if you’ve made the appropriate amount of rows, flip the bottom edge up towards the top of the shoulder. Lay back panel on top of front panel, your final row worked should line up with the row worked before the neckline increase on the front panel. (I completed 17 rows)

Part 11: Increasing for Twist Portion
Ch 3 (counts as dc) , blo lemon peel st across until you reach final 2 sts of row. *blo sc, dc, sc* in next st, blo dc in final st. Turn.
Ch 1, sc in same st. Blo lemon peel st across. Fasten off.
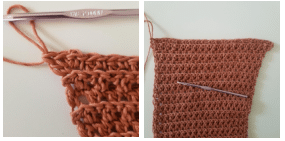
Important!!! Steps 19 and 20 of back panel should line up with steps 11-12 of front panel once back panel is twisted!
Part 12: Creating Right Shoulder
Reattach yarn on opposite side, which should be the bottom of the shirt (the same side you made your increase on at the start of the previous row). Ch a length that measures 1 st less than the amount of sts left unworked in step 17 (I made a ch of 25). Ch an additional 3 (counts as dc), sc into 4th ch from hook. *dc, sc* across until you reach the end of your ch. Blo dc into sc from prev row, blo lemon peel st across. Turn.
Repeat steps 5-6 until right shoulder has same total number of rows as left shoulder, ensuring the last row worked is a step 5 row, ending with a sc.

Part 13: Shaping Back Right Armhole
Repeat steps 14-16 in part VII of front panel. Fasten off.
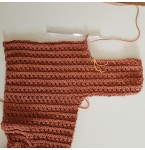
Part 14: Sleeves
Count the number of chs made for shoulder in step 4, plus 1. Multiply this number by 2 and add one more ch.
( I made 22 chs for my shoulder panel, so after adding 1, I’ll multiply 23 by 2 and add one extra ch, for a total of 47 chs). Make 1 additional ch, sc in 2nd ch from hook. *Dc, sc* across. Turn. (I am starting my sleeve with 47 sts)
Ch 3 (counts as dc), *blo sc, dc, sc* in next st. Blo lemon peel st across until reaching final 2 sts of row. *blo sc, dc, sc* in next st, blo dc in final st. Turn.
Ch 1, sc in same st. Blo lemon peel st across. Turn.
Repeat steps 23-24.
Work lemon peel st evenly, with no increases, until sleeve is desired length. Fasten off
Repeat steps 22-25 to create a second sleeve. Fasten off.
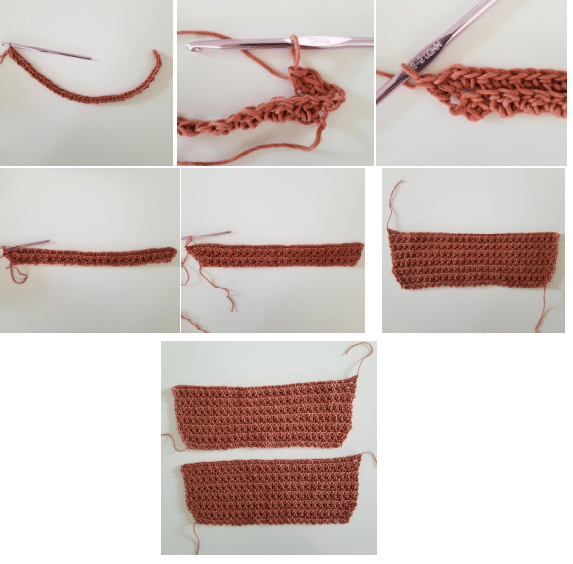
Part 15: Seaming Everything Together
(I prefer to seam my pieces by slip stitching them together, which is what I did for this top- however you absolutely can attach your pieces together by sewing them using a tapestry needle and yarn! If you prefer to sew your pieces together, I recommend the ladder stitch as it’s practically seamless!)
Twist back panel by flipping the right shoulder to face upward. Lay twisted back panel on top of front panel, taking care to line up the shoulders, armholes, and side seams. Use your preferred method of seaming to attach the front and back shoulder pieces together.
Unfold the shirt so the garment has both front and back pieces laying flat in one layer, shoulder seam facing outward. Assemble sleeve by aligning the first 5 sleeve rows with the 5 armhole shaping rows on the front and back panel, taking care to align the centre of the sleeve with the shoulder seam. Use your preferred method of seaming to attach the sleeve. Repeat for the second sleeve.
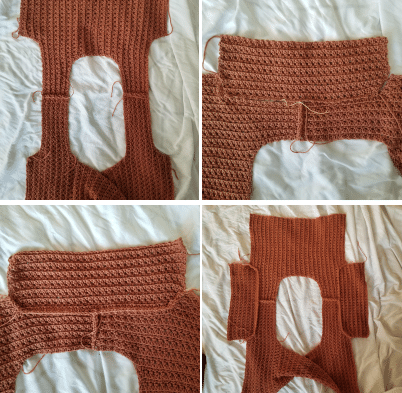
Fold the shirt back in half at the shoulders, ensuring the seams are facing outward, and aligning the underarms and sides of both front and back. Use your preferred method of seaming to attach the bottom of the sleeves and sides.
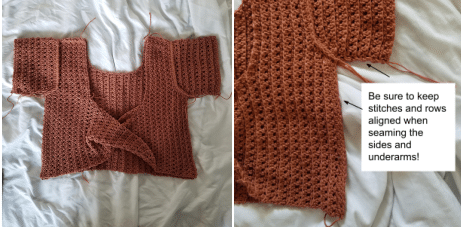
Turn work right side out
Part 16: Creating the Shoulder Ties
Attach yarn to bottom st of back shoulder panel. Ch 1, sl st in same st. Sc in next st and each across back shoulder panel until you reach 2 sts before shoulder seam
Ch your desired length for tie, plus an additional ch (I made a ch of 46). Sc into 2nd ch from hook, sc in each st across until you reach the end of your ch.
Sk next st, sc in shoulder seam and each st across until you reach front neckline.
Working along the neckline, place a sc into each front panel neckline row until you reach opposite shoulder.
Sc in next st and each across until you reach shoulder seam. Sc into shoulder seam, ch the same amount as you did for the first tie, sc into 2nd ch from hook and each across until reaching the end of your ch.
Sk 1 st, sc in next st and each across until you reach the final st of back shoulder panel. Sl st into final st, fasten off.
Optional: Create and Add Tassels
Making Tassels:
- Cut a piece of cardboard to the desired length you would like your tassel to be. Mine was 3 inches.
- Cut two 8 inch lengths of yarn from the ball, we will use these to attach the tassels to the ties, and to form the “head” of the tassel.
- Wrap your yarn around the cardboard several times. The more you wrap, the more full the tassel will be. I wrapped mine approximately 20 times. Cut the yarn from the ball after your last wrap.
- Place one of the 8 inch pieces of yarn under the top edge of the wrapped yarn, and tie a tight knot. These two loose ends will be what you use to fasten the tassel to the ties.
- Cut the wrapped yarn along the bottom of the cardboard. Attach 1 tassel to each strap by tying the two loose ends through the tip of the strap. Tie the other 8 inch length of yarn around the tassel, about a ½ inch down from the top. Trim the bottom of the tassel evenly.
Tie the straps in a bow, weave in all ends, and enjoy your new Coffee Date Top!
