Crochet Flower – A highly popular choice for home décor and wedding flowers are these little bell-shaped blossoms for their unusual form and amazing beauty.
Materials
- Cotton thread size #40 (in white and green) & size #20 (in green, for the leaves).
- Steel Crochet Hooks in Sizes 0.6mm & 1.0mm.
- Floral tape, Metal wire in gauge 18/20, Stringing Wire in gauge 0.33/0.38.
- All purpose clear adhesive.
Pattern notes
In this e-book I first show a pattern diagram, and then the instructions in American Standard Terms (You can see conversion table for British terms at the end of the e-book). After that you’ll find photo guides for how to make the branch.
I’ve created a page in my Blog where I updated a list of recommended tested threads – see here.
This flower is quite small, I tried to make the photos as clear as I could, I’m sorry if some of them didn’t turn out clear enough!
Abbreviations
- sl-st – Slip Stitch
- ch – Chain
- sc – Single Crochet
- hdc – Half Double Crochet
- dc – Double Crochet
- tc – Triple (treble) Crochet
- qc – Quadruple (double-treble) Crochet
- 2-st dc inc – 2 Stitch DC Increase (2 dc in same stitch)
- 2-st sc dec – 2 sc decrease (sc2tog)
- 2-st dc-tc inc – dc followed by a tc in the same stitch
- yo – Yarn over
- sk – Skip
- beg – Beginning
Plant is made of as many as 15-20 flowers in various sizes, and optionally, a leaf or two attached to a single core stem. In here, you’ll find patterns for an open flower, a semi open flower, a closed bud and a leaf.
I used 7-10 blossoms per branch, having the open blossoms at the bottom, semi open as we head up, and at the top, 1-3 closed buds
Once all elements have been crocheted, to complete the plant, simply attach the elements, one by one, to a core stem by wrapping floral tape around the blossoms stem and the core stem. I recommend using a 18/20 Gauge wire for a core stem, Cut it at a length of your choice and add the blossoms to it.
Open Flower – Pattern Diagram
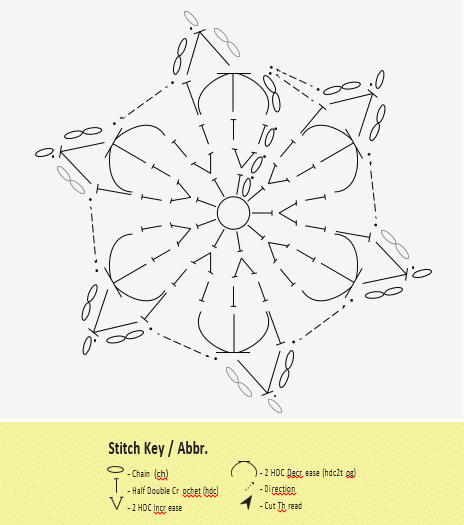
Open Flower – Instructions
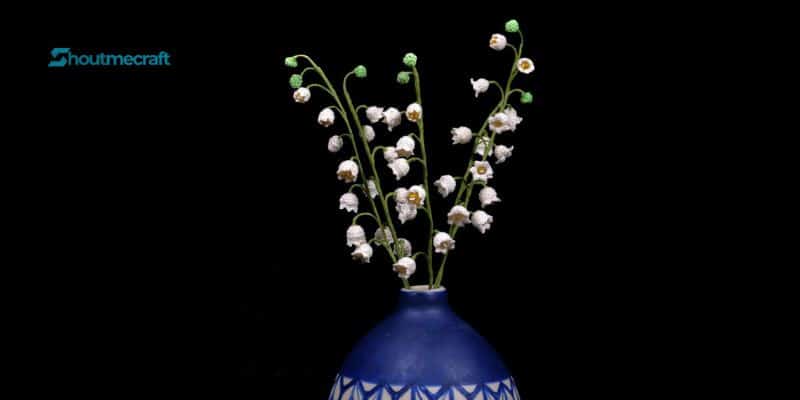
The large flower is crocheted in the round, starting with a magic ring. Its crocheted in one continuous work, with thread size #40 and a hook size 0.6mm.
Rnd 1 : Magic ring, and crochet in ring – ch 1, hdc 9 times, sl-st to beg ch.
Rnd 2 : Ch 1, work 2-st hdc inc in each stitch around 9 times, sl-st to beg ch.
Rnd 3 : Ch 1, hdc 18 times, sl-st to beg ch.
Rnd 4 : Ch 2, [3-st hdc dec (hdc3tog), hdc* in same stitch as the last hdc of the 3-st hdc decrease], repeat [] 6 times, finish the round with sl-st to second ch of beg ch 2.
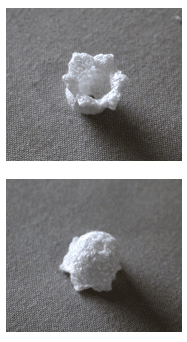
Rnd 5: [Ch 2, 2-st hdc dec, work first hdc of decrease in the loop create by the 3-st hdc dec of Rnd 4, and second hdc in hdc* of Rnd 4, 1-ch picot, Ch 2, sl-st to hdc*, and add another sl-st to next 3-st hdc dec of Rnd 4], repeat [] 6 times. Fasten off thread.
Semi Open Flower – Pattern Diagram
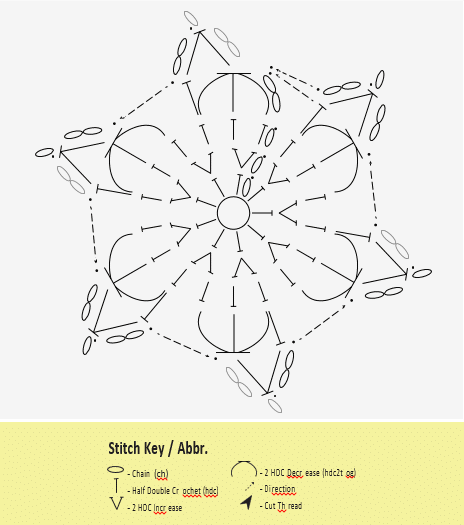
Semi Open Flower – Instructions
The semi open flower is crocheted in a similar fashion as the open flower, starting with a magic ring.
Rnd 1 : Magic ring, and crochet in ring – ch 1, hdc 6 times, sl-st to beg ch. Rnd 2 : Ch 1, work 2-st hdc inc in each stitch around 6 times, sl-st to beg ch. Rnd 3 : Ch 1, hdc 12 times, sl-st to beg ch.
Rnd 4 : Ch 2, [2-st hdc dec (hdc2tog), hdc* in same stitch as the last hdc of the 2-st hdc decrease], repeat [] 6 times, finish the round with sl-st to second ch of beg ch 2.
Rnd 5: [Ch 2, 2-st hdc dec, work first hdc of decrease in the loop create by the 2-st hdc dec of Rnd 4, and second hdc in hdc* of Rnd 4, 1-ch picot, Ch 2, sl-st to hdc*, and add another sl-st to next 2-st hdc dec of Rnd 4], repeat [] 6 times. Fasten off thread.
Closed Bud – Pattern Diagram
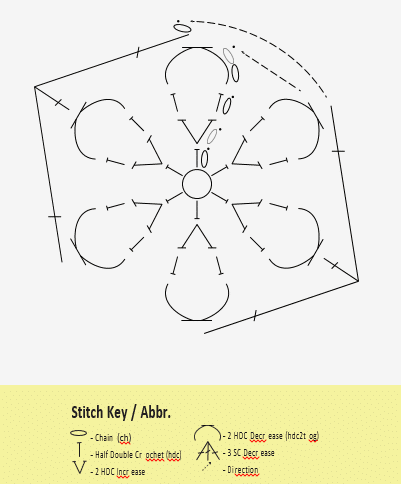
Closed Bud – Instructions
The closed bud is crocheted very similarly to the semi open flower, only difference is that closed bud have no tepals, and Rnd 4 one stitch different.
Crochet the bud in thread size #40 in either white or green.
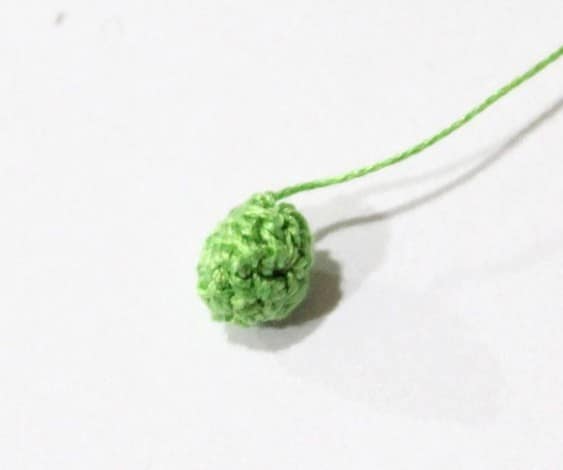
Rnd 1 : Magic ring, and crochet in ring – ch 1, hdc 6 times, sl-st to beg ch. Rnd 2 : Ch 1, work 2-st hdc inc in each stitch around 6 times, sl-st to beg ch. Rnd 3 : Ch 1, hdc 12 times, sl-st to beg ch.
Rnd 4 : Ch 2, [2-st hdc dec (hdc2tog)], repeat [] 6 times, finish the round with sl-st to second ch of beg ch 2.
Rnd 5: Ch1 , 3-st sc dec (sc3tog) 2 times, sl-st to beg ch. At this point the bud should be closed enough, if not, add another sl-st to next stitch and Fasten off thread. To finish the closed bud, we add the stem – to do so, pass 2 ~6”/15cm stringing wires through the base, perpendicular to each other (see photos below). Once you pass the wires, tightly roll the wires together, and wrap floral tape around them to finish the stem.

Single Flower Assembly
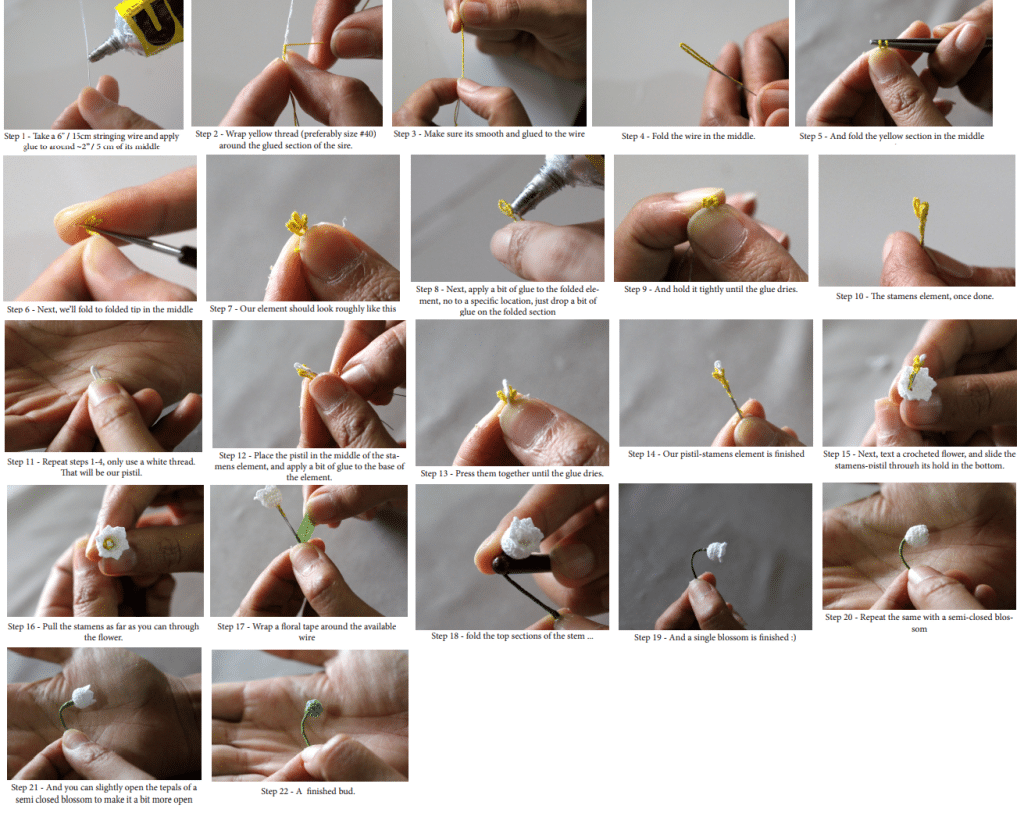
To assemble a single flower, whether its an open or semi-open, we need to pre- pare the stamens & pistil first. To do so, we’ll be using a 2 ~6” / 15cm stringing wires, making the yellow stamens and the white pistil.
Once both elements are done, we’ll slide the wire through the flower to complete the blossom.
Sorry if the photos are not clear enough, its just so tiny! 🙂
Leaf – Pattern Diagram
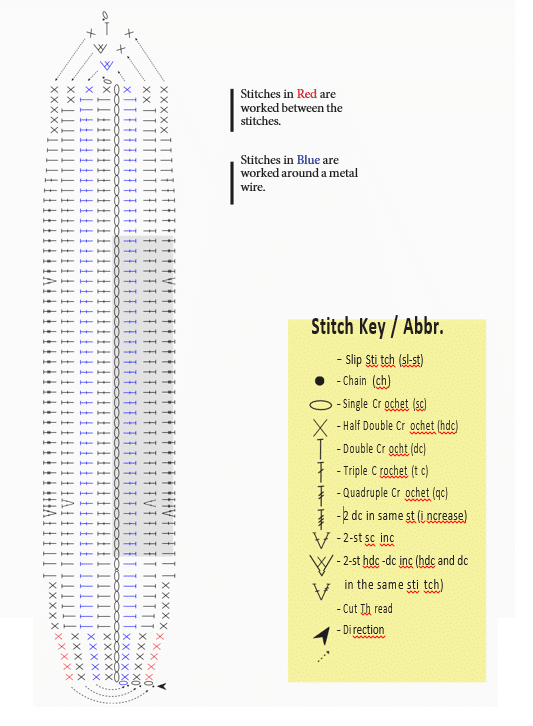
Leaf – Instructions
The leaf is crocheted in the round, with thread size #20 in green. The second round is being crocheted around a metal wire.
Rnd 1 : Ch 61, sk 1, and crochet in each chain heading back, sc, 2 hdc, 45 dc, 7 hdc, 5 sc.
Rnd 2 : (Crochet around a metal wire) Continue working around the element, in the same direction following Rnd 1 – Ch 1, 5 sc, 7 hdc, 45 dc, 2 hdc, sc, crochet 2-st sc inc at the tip, and continue with sc, 2 hdc, 45 dc, 7 hdc, 5 sc, finish the round with sl-st to beg ch.
Rnd 3 : Ch 1, 5 sc, 7 hdc, 5 dc, 2-st dc inc, 31 dc, 9 hdc, 2 sc, crochet sc, 2-st sc inc at the tip, and continue the round with 2 sc, 9 hdc, 31 dc, 2-st dc inc, 5 dc, 7 hdc, 5 sc, finish the round with sl-st to beg ch.
Rnd 4 : Ch 1, work 5 sc between the stitches, followed with another 5 sc worked normally, continue with 3 hdc, 3 dc, 2-st dc-tc inc, 2 tc, 21 qc, 2-st qc inc, 2 qc, 5 tc,3 dc, 4 hdc, 5 sc, another [sc, hdc, 1-ch picot, sc] at the tip and continue with 5 sc,4 hdc, 3 dc, 5 tc, 2 qc, 2-st qc inc, 21 qc, 2 tc, 2-st tc-dc inc, 3 dc, 3 hdc, 5 sc, and the last 5 sc work between the stitches. Finish the round with sl-st to beg ch. Fasten off thread.
That’s it 🙂 done! I hope you enjoyed making it, and now its time to enjoy its beauty! Make a few for your home, and a few more for your loved ones!