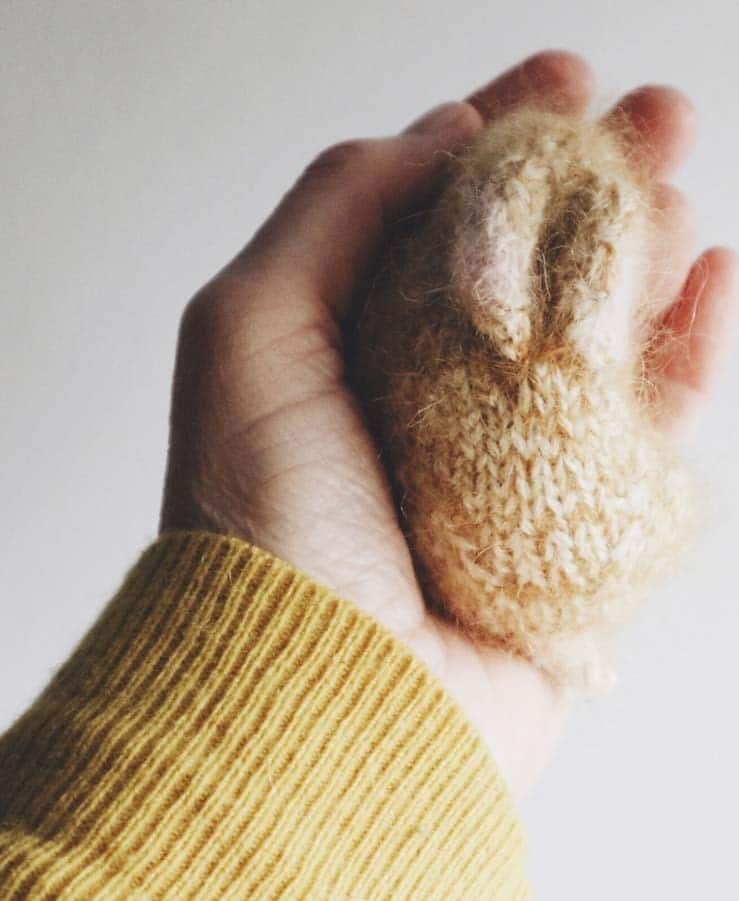
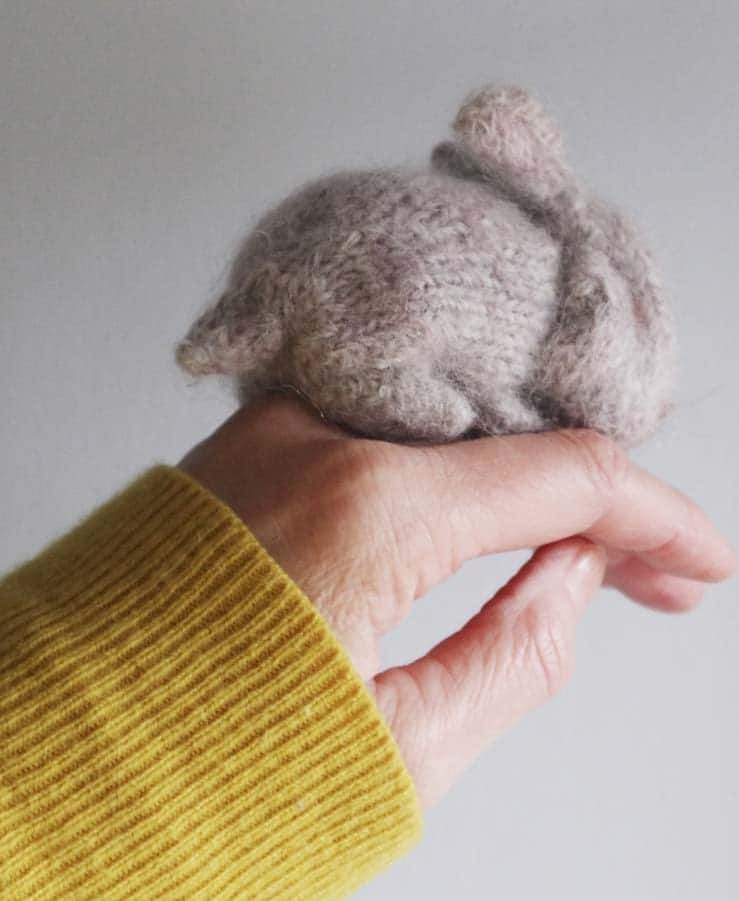
Amigurami Baby Bunny – Your completed knitted bunny will be around 10 cm/ 4 inches long, almost the same length as a genuine newborn baby rabbit!
Consistent with this trend:
- I can give pattern help if necessary. Digital knitting patterns are flat knitting on two needles, body built with little seaming connecting as you go with pick-up stitch and short row techniques.
- I also include yarn suggestions inside the design.
FINISHED SIZE Approx. 10cm/ 4in long from tip of nose to tail tip
YARN Unless otherwise stated, double strands of yarn are used together throughout this pattern. The exact combinations of yarn to be used are indicat- ed by multiple letters so if the pattern states yarn AB use both A & B yarn held together as one:
YARN A Small amount 4-ply/ fingering weight yarn – I used Drops Sky shade 01
YARN B Small amount mohair/ lace weight yarn – I used Drops Kid-Silk shades
– 30 (gold colour bunny); shade 22 (grey colour bunny); shade 01 (white colour bunny with strands of brown shade 15)
YARN C Small amount mohair/ lace weight yarn – pink for inner ear I used Drops Kid-Silk
KNITTING NEEDLES Pair of 3.25mm/ US 3 straight knitting needles
TENSION 14 stitches, 17 rows over 5cm with 3.25mm needles and suggested AB yarn
EXTRAS Toy filling (I use un-carded fibre filling and yarn endings); locking type stitch markers (see colour guide on Page 2); brown sewing thread or fine yarn and sewing needle for nose and eyes details.
PATTERN NOTES:
- Use Cable Cast-on throughout
- General knitting abbreviations can be found on Page 3
COLOURED MARKER GUIDE:
This guide is here to pull out and use together with the pattern should to wish to use similar coloured guides to mine for ease of following, especially at the making-up stage:
- HEAD & BODY ORANGE CHEEK TURQUOISE JAW
- BABY PINK EAR FRONT PINK EAR BACK GREEN NECK
- YELLOW FRONT
- PALE TURQUOISE THIGH ORANGE BELLY TO THIGH BLUE THROAT TO JAW
SPECIAL INSTRUCTIONS:
W+Tk bring working yarn to the front of the work, slip next stitch knit- wise onto the RH needle, take working yarn to the back, slip the slipped stitch back onto the LH needle, turn the knitting = W+Tk (wrap and turn knit)
W+Tp take working yarn to the back of the work, slip next stitch purl- wise onto the RH needle, bring working yarn to the front, slip the slipped stitch back onto the LH needle, turn the knitting = W+Tp (wrap and turn purl)
GENERAL ABBREVIATIONS:
- K = knit
- P = purl
- inc = increase
- dec = decrease
- K2tog/ K3tog = knit two together/ knit three together
- P2tog/ P3tog = purl two together/ purl three together
- RH/LH = right hand/ left hand RS/WS = right side/ wrong side
- st/ sts =stitch/ stitches
- Skpo = slip one stitch, knit next stitch, pass slipped stitch over knit stitch to decrease by one stitch
- Kb = knit into front then into back of stitch to increase by one stitchPb = Purl into front then knit into back of stitch to increase by one stitch
HEAD
Beginning with the nose, with yarn AB cast on 8 sts for Muzzle
Row 1 RS) inc) Kb, knit to last st, kb – 10sts
Row 2 Purl
Rows 3-6 inc) Repeat last 2 rows twice – 14sts Row 7 inc) Kb, k3, kb, k4, kb, k3, kb – 18sts Row 8 Purl
PM (place marker) at each end of the last row for left and right Cheek Markers
Rows 9-12 Work four rows stocking stitch
PM at each end of the last (purl) row for left and right Jaw Markers
Row 13 dec) Cast off 3 sts for bunny’s Left Head Side, knit next 3 sts, kb, k5, kb, k4 to end – 17sts
Row 14 dec) Cast off 3 sts purlwise for Right Head Side, purl to end – 14sts
Row 15 dec) K2tog, k to last 2 sts, k2tog – 12sts
Row 16 dec) P2tog, p to last 2 sts, p2tog – 10sts
Rows 17-18 dec) Repeat last 2 rows once – 6sts
PM at each end of the last (purl) row for left and right Ear Front Markers
Row 19 dec) K2tog, k2, k2tog – 4sts
Row 20 dec) P2tog twice – 2sts
Row 21 inc) Cast on 4 sts for Left Head Back, knit to end – 6sts
Row 22 inc) Cast on 4 sts for Right Head Back, purl to end – 10sts
Row 23 inc) Kb, knit to last st, kb – 12sts
PM at each end of the last row for left and right Ear Back Markers
Row 24 inc) Cast on 4 sts for Right Neck, PM for Right Neck Marker, purl to end – 16sts
Row 25 inc) Cast on 4 sts for Left Neck, PM for Left Neck Marker, knit to end – 20sts
Row 26 dec) [P2, p2tog] twice, p4, [p2tog, p2] twice – 16sts Cast off all 16 sts for Neck Edge.
EARS
Left Outer Ear
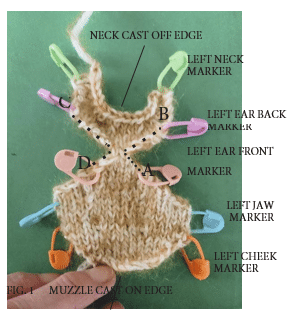
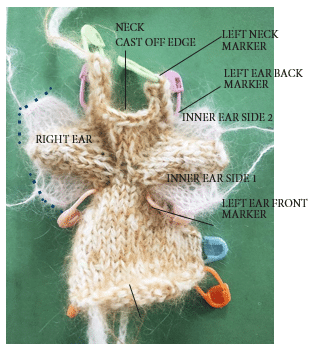
RS and muzzle cast-on edge facing you, with yarn AB and beginning at Left Ear Front Marker, pick up and knit 7 sts along row ends and cast- on edge to Left Ear Back Marker (see Fig. 1, pick up from A to B along dotted lines)
*Row 1 WS) Purl
Row 2 Knit
Row 3 Purl
Work short rows to shape Left Outer Ear
Short Row 1 K6, W+Tk (Wrap and Turn knit- see page 3)
Short Row 2 P5, W+Tp (Wrap and Turn purl- see page 3)
Short Row 3 K4, W+Tk
Short Row 4 P3, W+Tp
Short Row 5 K2, W+Tk
Short Row 6 P1, W+Tp
Short Row 7 K4 to end
Row 4 dec) P2tog, p to last 2 sts, p2tog – 5sts
Row 5 Knit
Row 6 dec) P2tog, p1, p2tog – 3sts
Row 7 K3tog
Cut yarn, fasten off for Left Ear Peak, thread each yarn ending into a sewing needle and weave in and out neatly along the outer ear edges to the Ear Base at markers **.
Right Outer Ear
RS and neck cast-off edge facing you, with yarn AB, beginning at Right Ear Back Marker, pick up and knit 7 sts along cast-on edge and row ends to Right Ear Front Marker (see Fig. 1, pick up from C to D along dotted lines)
Continue to work as Left Outer Ear from * to **.
Left Inner Ear – Side 1
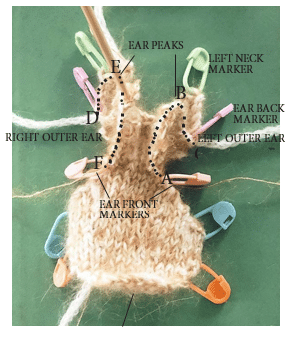
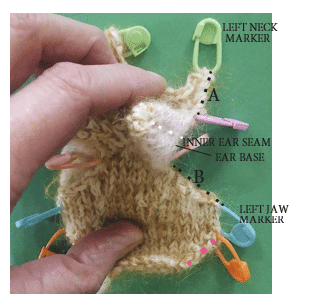
RS facing you, with yarn C and beginning at base of Left Ear (near Left Ear Front Marker), pick up and knit 6 sts along row ends from Edge of Outer Ear along to Left Ear Peak (see Fig. 2, pick up from A to B along dotted lines)
Row 1 WS) Purl
Work short rows to shape Inner Ear Side 1
Short Row 1 K5, W+Tk
Short Row 2 P5
Short Row 3 K4, W+Tk
Short Row 4 P4
Cast off all 6 sts for Inner Ear Side 1.
Left Inner Ear – Side 2
RS facing you, with yarn C and beginning at Left Ear Peak, pick up and knit 6 sts along row ends from Edge of Outer Ear along to base of Left Ear (near Left Ear Back Marker). (See Fig. 2, pick up from B to C along dotted lines)
Work short rows to shape Inner Ear Side 2
Short Row 1 WS) P5, W+Tp
Short Row 2 K5
Short Row 3 P4, W+Tp
Short Row 4 K4
Cast off purlwise all 6 sts for Inner Ear Side 2.
Right Inner Ear – Side 1
RS facing you, with yarn C and beginning at base of Right Ear (near Right Ear Back Marker), pick up and knit 6 sts along row ends from Edge of Outer Ear along to Right Ear Peak (see Fig. 2, pick up from D to E along dotted lines)
Row 1 Purl
Work short rows to shape Inner Ear Side 1
Short Row 1 K5, W+Tk
Short Row 2 P5
Short Row 3 K4, W+Tk
Short Row 4 P4
Cast off all 6 sts for Inner Ear Side 1
Right Inner Ear – Side 2
RS facing you, with yarn C and beginning at Right Ear Peak, pick up and knit 6 sts along row ends from Edge of Outer Ear along to base of Right Ear (near Right Ear Front Marker). (See Fig. 2, pick up from E to F along dotted lines)
Work short rows to shape Inner Ear Side 2
Short Row 1 P5, W+Tp
Short Row 2 K5
Short Row 3 P4, W+Tp
Short Row 4 K4
Cast off purlwise all 6 sts for Inner Ear Side 2.
Joining Inner Ears
RS together, working on one ear at a time and with yarn C threaded into a sewing needle, match the cast-off edges from Inner Ear Side 1 and Side 2 together and work back stitch to join both cast-off edges from Inner Ear Side 1 and Side 2 and row ends up to the ear peak (see Fig. 3, joining dotted lines as shown for Right Inner Ear). Turn out to RS via the base of the ear (see Fig. 4).
Joining Muzzle and Cheeks
When you’ve completed the Head Side Seam work a few rows of mattress stitch to join the very base of the ear up to the bottom of the Inner Ear Seam. Push the inner ear inwards to give a good ear shape.
RS together, fold the Muzzle Cast-On Edge (from the beginning of the pattern) in half and backstitch with yarn B to join both halves together so that when you turn out to RS you have created a crease at the front of the face – this is the Muzzle Seam.
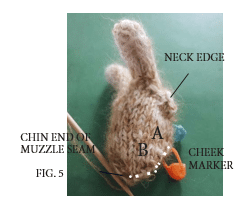
Then, RS together and working on one side of the head at a time, with yarn B threaded into a sewing needle, fold row ends to match the Cheek marker to the bottom/ chin end of the Muzzle Seam (see Fig. 5) and backstitch to join small seam along the rows ends (see Fig. 4, pink dotted line) from the marker/chin end of muzzle seam to the fold, so that when you turn out to RS you have created a crease at the side of the face – this is the Cheek Seam. (See Fig. 5, matching white dotted lines A TO B).Turn out to RS and work face and chin squish as directed on next page. Remove one of the cheek markers.
Work Face and Chin Squish
Stuff all the yarn endings into the head.
To make the face squish up a little, bend a length of yarn A in half and pass the cut ends through a yarn sewing needle.
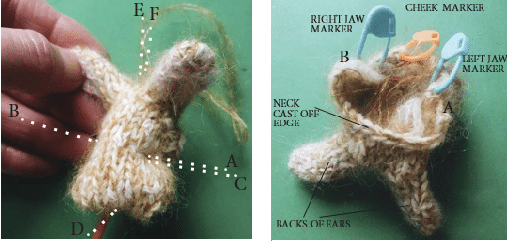
Pass the threaded needle through one side of the head – halfway between the ears and chin – and out the other side of the head then back in to emerge back out where you started – pull up to squish the face a little and secure the thread (See Fig. 6, A to B, B to C and pull).
For the Chin – apply the same process to the Chin Centre (at the seam), the stitch emerges at the back of one of the ears so you can’t see it.
(See Fig. 6, D to E, E to F and pull).
BACK
RS of knitting and backs of the ears facing you, with yarn AB, starting at the corner of Neck Cast-Off Edge, pick up and knit 8 sts evenly along cast-off edge from corner to corner (see Fig. 7, pick up from A to B,& Fig. 8 showing picked-up stitches)
Row 1 WS) inc) [Pb, p1] four times – 12sts
Row 2 inc) Cast on 3 sts, k6, kb six times, k3 to end – 21sts
Row 3 inc) Cast on 3sts, purl to end – 24sts
Rows 4-5 Work two rows stocking stitch
PM at each end of last (purl) row for left and right Front Markers
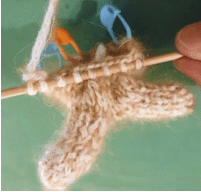
Rows 6-7 Work two rows stocking stitch
Work short rows to shape Back
Short Row 1 K18, W+Tk
Short Row 2 P12, W+Tp
Short Row 3 K11, W+Tk
Short Row 4 P10, W+Tp
Short Row 5 K9, W+Tk
Short Row 6 P8, W+Tp
Short Row 7 K7, W+Tk
Short Row 8 P6, W+Tp
Short Row 9 K15 to end
Row 8 Purl. PM at each end for left and right Thigh Markers
Work short rows to shape Left Thigh
Short Row 1 K7, W+Tk
Short Row 2 P6, W+Tp
Short Row 3 K5, W+Tk
Short Row 4 P4, W+Tp
Short Row 5 K3, W+Tk
Short Row 6 P2, W+Tp
Short Row 7 K21 to end
Work short rows to shape Right Thigh
Short Row 1 P7, W+Tp
Short Row 2 K6, W+Tk
Short Row 3 P5, W+Tp
Short Row 4 K4, W+Tk
Short Row 5 P3, W+Tp
Short Row 6 K2, W+Tk
Short Row 7 P21 to end
Row 9 dec) K7, skpo, k6, k2tog, knit to end – 22sts
Rows 10, 12, 14 & 16 Purl
Row 11 dec) K7, skpo, k4, k2tog, knit to end – 20sts
Row 13 dec) K7, skpo, k2, k2tog, knit to end – 18sts
Row 15 dec) K4, k2tog, k6, k2tog, knit to end – 16sts
Row 17 dec) K2tog, k1, k2tog, k6, k2tog, k1, k2tog – 12sts
Row 18 Purl
Row 19 dec) [K2tog, k3] twice, k2tog – 9sts
TAIL
Row 20 P6, Turn work over so knit side faces Cut yarn B, continue with just yarn A as follows:
Row 21 K3 Tail sts, Turn so purl side faces
Row 22 inc) Cast on 2 sts, p5 Tail sts, Turn so knit side faces
Row 23 inc) Cast on 2 sts, k7 Tail sts, Turn so purl side faces
Row 24 dec) P2tog, p3, p2tog – 5sts
Row 25 dec) K1, k3tog, k1 – 3sts
Cut yarn, thread end through 3 Tail sts. and slip all 3 off knitting needle. Fasten off for Tail Point.
Join Tail Seam
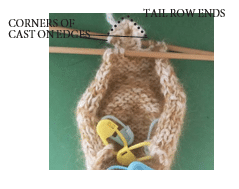
WS together fold the tiny tail to match the row ends (see Fig. 9, join dotted lines together).Mattress stitch (or oversew if easier) to join from the Tail Point to the corners of the cast-on edges but don’t join the cast-on edges – it’s along these edges that you’ll pick up for Belly next. Tail is un-stuffed.
BELLY
WS of knitting facing you, rejoin yarn AB to 3 sts on your left needle, continue as follows:
Row 1 P3
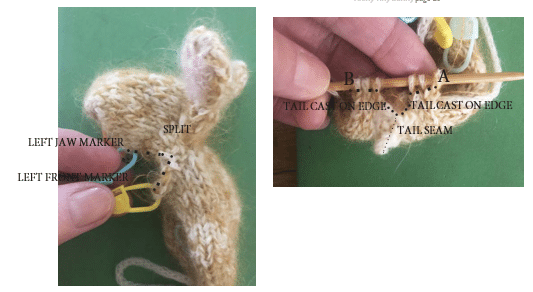
Row 2 inc) K3, pick up 2 sts across the tail cast-on edges (one stitch either side of the seam), k3 – 8sts. (see Fig. 10, pick up from A to B)
NOTE: Work a couple stitches to close the tiny gap either side of the tail at the sewing up stage later.
Row 3 dec) P2, p2tog twice, p2 – 6sts
Row 4 inc) Kb, k to last st, kb – 8sts
Row 5 Purl
Rows 6-13 Repeat last 2 rows four times – 16sts
PM at each end of last (purl) row for left and right Belly to Thigh Markers
Row 14 dec) K5, skpo, k2, k2tog, knit to end – 14sts
Rows 15, 17, 19, 21 & 23 Purl
Row 16 dec) K2tog, k2, skpo, k2, k2tog, k2, k2tog – 10sts
Row 18 dec) K2, skpo, k2, k2tog, k2- 8sts
Row 20 dec) K2tog, k to last 2 sts, k2tog – 6sts
PM at each end of last (knit) row for left and right Throat to Jaw Markers
Row 22 dec) K2tog, k2, k2tog – 4sts
Row 24 dec) K2tog twice – 2sts
Row 25 dec) P2tog. Fasten off for Chin Point.
Join Front to Jaw
RS together, working on one side of the head at a time, match the Jaw Marker to Front Marker and work backstitch to join the small jaw seam along cast-on edge and row ends from markers to the split (see Fig. 11, join dotted lines). Turn out to RS.
Remove front markers.
Join Chin to Muzzle
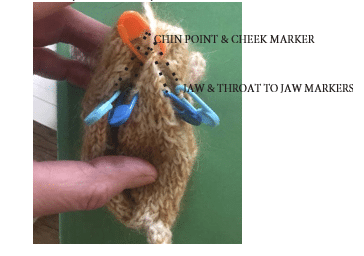
WS together match the Chin Point from Belly with the bottom of the Muzzle Seam at the Cheek Marker; working on one side of the head at a time, match Throat to Jaw with Jaw Markers, mattress stitch the throat seam along row ends from throat to jaw/ jaw markers to cheek marker/ chin point (see Fig. 12, join dotted lines).
Remove cheek, jaw and throat to jaw markers
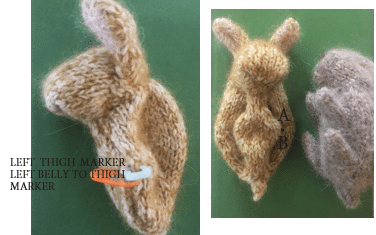
Join Thigh to Belly
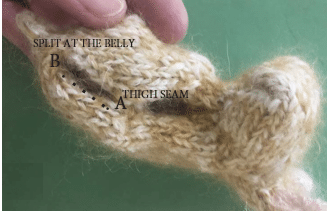
WS together, working on one side of the body at a time, match the Thigh Marker with the Belly to Thigh Marker and work mattress stitch to join where the markers are and then join the seam two rows up from the marker and two rows down from the markers – so a really tiny seam
(see Fig. 13 & 14, from A to B), you’re needing to leave four gaps for the foreleg and hind feet; two/ one each side, in between thigh seam and beginning of the belly, and two/ one each side, from thigh seam to throat seam (see Figs. 14 & 15)
HIND FEET
Bunny’s Left Hind Foot – Side 1
RS facing, bunny’s Back towards you, with yarn AB beginning at the Thigh Seam, pick up and knit 7 sts all along row ends to the split at the Belly (see Fig. 15, from A to B), continue as follows:
*Row 1 inc) Purl to last st, pb – 8sts
Work short rows to Paw Front
Short Row 1 K7, W+Tk
Short Row 2 inc) P6, pb – 9sts
Short Row 3 inc) K7, W+Tk
Short Row 4 P6, pb – 10sts
Short Row 5 inc) K7, W+Tk
Short Row 6 P7
Cast off all 10 Sole sts.**
Left Hind Foot – Side 2
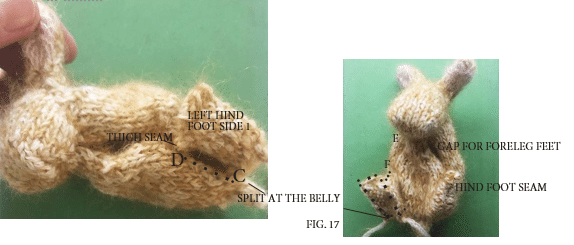
RS facing, bunny’s Belly facing you, with yarn AB beginning at the split at the Belly, pick up and knit 7 sts all along row ends to Thigh Seam (see Fig. 16, from C to D), continue as follows:
***Work short rows to Paw Front
Short Row 1 inc) Pb, p5, W+Tp – 8sts
Short Row 2 K7
Short Row 3 inc) Pb, p5, W+Tp – 9sts
Short Row 4 K7
Short Row 5 inc) Pb, p5, W+Tp – 10sts
Short Row 6 K7
Cast off all 10 Sole sts. purlwise.****
Right Hind Foot – Side 1
RS facing, bunny’s belly facing you, with yarn AB beginning at the Thigh Seam, pick up and knit 7 sts all along row ends to the split at the Belly.
Continue as Left Hind Foot Side 1 from * to **.
Right Hind Foot – Side 2
RS facing, bunny’s Back towards you, with yarn AB beginning at the split at the Belly, pick up and knit 7 sts all along row ends to Thigh Seam. Continue as Left Hind Foot Side 2 from *** to ****.
Join Hind Feet Seams
Working on one foot at a time, WS together and yarn B carefully mattress stitch (or oversew if it’s easier) all around both sides of the foot so joining cast-off edges together; heel row ends together; foot fronts together – stuff the foot a little (not too much) with yarn endings before completing the seams (see Fig. 17). Flatten the foot with your fingers to enhance the shape. Stuff the bunny well before continuing with the foreleg feet as follows.
FORELEG FEET
Left Foot – Side 1
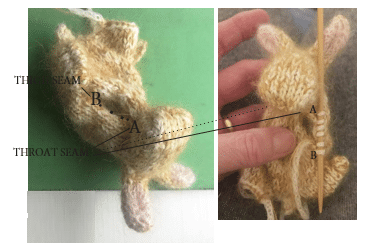
RS facing, bunny’s Back towards you, with yarn AB beginning at the Throat Seam, pick up and knit 6 sts all along row ends to top of the Thigh Seam (see Fig. 18, from A to B & Fig 19), continue as follows:
*Rows 1-3 Beginning with a purl row work three rows stocking stitch
Work short rows to Paw Front
Short Row 1 inc) Kb, k4, W+Tk – 7sts
Short Row 2 P6
Short Row 3 inc) Kb, k4, W+Tk – 8sts
Short Row 4 P6
Cast off all 8 Sole sts.**
Left Foot – Side 2
RS facing, bunny’s Belly towards you, with yarn AB beginning at the Thigh Seam, pick up and knit 6 sts all along row ends to the Throat Seam (see Fig. 17, from E to F), continue as follows:
***Rows 1-2 Beginning with a purl row work two rows stocking stitch
Work short rows to Paw Front
Short Row 1 inc) Pb, p4, W+Tp – 7sts
Short Row 2 K6
Short Row 3 inc) Pb, p4, W+Tp – 8sts
Short Row 4 K6
Cast off all 8 Sole sts purlwise.****
Right Foot – Side 1
RS facing, bunny’s Belly facing you, with yarn AB beginning at the Throat Seam, pick up and knit 6 sts all along row ends to the top of the Thigh Seam. Continue as Left Foot Side 1 from * to **.
Right Foot – Side 2
RS facing, bunny’s Back towards you, with yarn AB beginning at the Thigh Seam, pick up and knit 6 sts all along row ends to Throat Seam. Continue as Left Foot Side 2 from *** to ****.
Join Foreleg Feet Seams as Hind feet Seams, completing any stuffing into body and head before closing the final seam.
Finishing touches
Work a ‘X’ for the nose mouth with a length brown sewing thread or fine yarn (see Fig. 20).
Likewise work a straight stitch for a sleepy eye look or a French knot for a small open eye.
Finally – If you’d like the head to lie back onto the back, so it looks as though bunny’s head is snuggled against its back, lift the head backwards against his back and work a stitch or two at the back of the neck to secure it onto the bunny’s back.
Felting (optional but it’s what I did with mine)
Fill a washing bowl with very hot tap water and a squeeze of soap (hand or washing liquid) and immerse the toy into the water to start the felting process – leave it to soak until the water cools enough for you to pull out the toy with your hands. Rub a little more soap into the toy, rinse out the soap then squeeze and gently wring out the water.
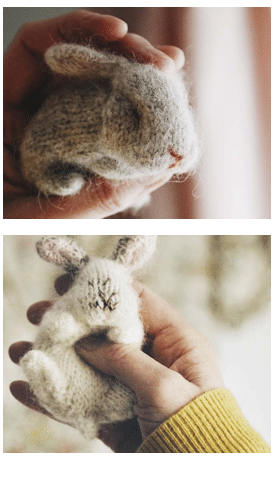
Mould the bunny as you’d like it to finally look then leave to dry on a cloth or towel on a radiator or somewhere warm (it’ll take about a day to dry completely).
Another technique you may like to try: – work in a few darker strands of brown mohair and swap with the white/ light mohair to create markings in the ‘fur’ – simply strand the yarn that’s not in use across the back until needed – similar to fairisle kntting.