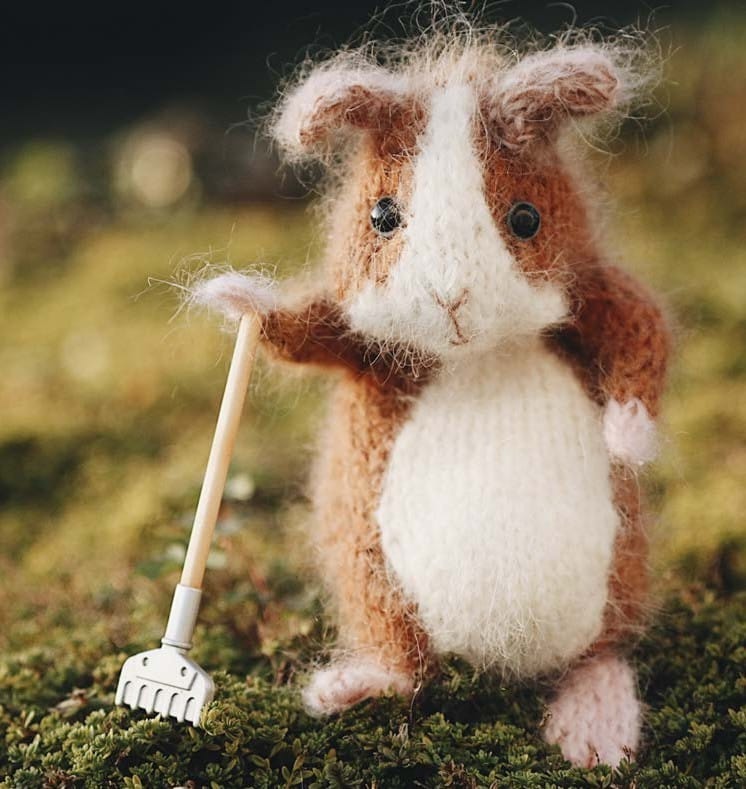
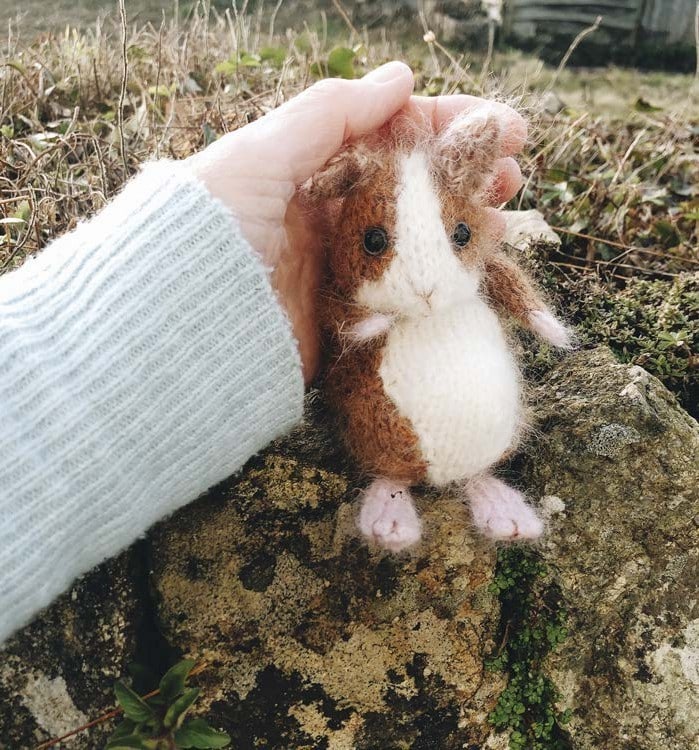
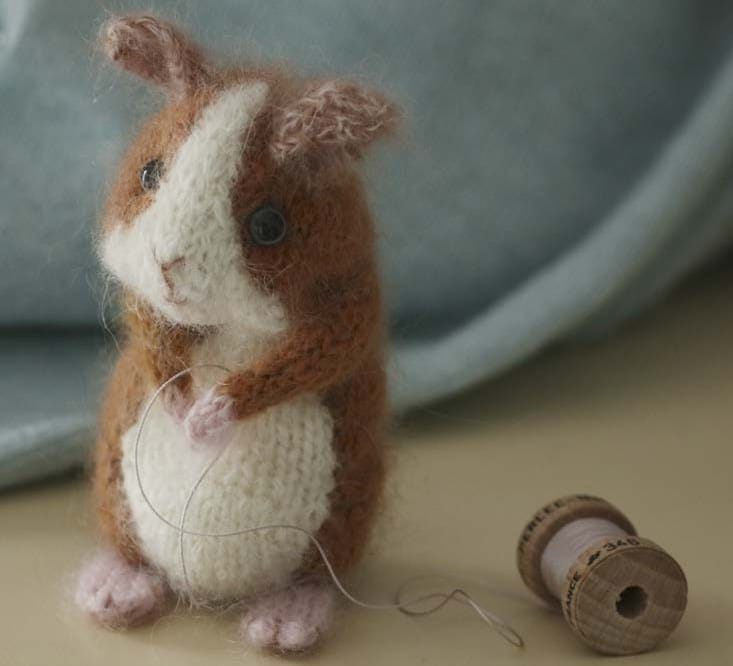
Amigurami Gunie Pig – Your final knitted guinea pig will be Approx. 14cm/ 5.5in tall from feet to ears, around the same length as a genuine guinea pig when knitted!
FINISHED SIZE Approx. 14cm/ 5.5in tall from feet to ears
YARN Unless otherwise stated, double strands of yarn are used together throughout this pattern. The exact combinations of yarn to be used are indicated by multiple letters so if the pattern states yarn AB use both A & B yarn held together as one:
- YARN A 1 x 25g ball 4-ply/ fingering weight alpaca or merino yarn in cinnamon I used Rowan Alpaca Classic shade 118 Cinnamon
- YARN B 1 x 25g ball lace-weight/ 1-ply mohair, kid-silk for example, in light brown I used Drops Kid-Silk shade 12 Beige
- YARN C 1 x 25g ball 4-ply/ fingering weight alpaca or merino yarn in white I used Rowan Alpaca Classic shade 115 Snowflake
- YARN D 1 x 25g ball lace-weight/ 1-ply mohair, kid-silk for example, in white I used Drops Kid-Silk shade 38 Chalk
- YARN E small amount lace-weight/ 1-ply mohair, kid-silk for example, in pale pink I used Rowan Kid Silk Haze shade Grace
- KNITTING NEEDLES Pair of 3.75mm/ US 5 straight knitting needles
TENSION 15 rows and 13 stitches over 5cm with 3.75mm needles and suggested 4-ply plus 1-ply yarn
EXTRAS optional -8mm toy safety eyes with metal or plastic backings; toy filling (I use un-carded fibre filling); locking type stitch markers (see colour guide on Page 2); yarn sewing needle; pair of large safety pin for holding stitches when not in use
PATTERN NOTE: Use Cable Cast-on throughout
COLOURED MARKER GUIDE:
This guide is here to pull out and use together with the pattern should to wish to use similar coloured guides to mine for ease of following, especially at the making-up stage:
HEAD & BODY
- BABY PINK TOP AND BOTTOM HEAD BACK
- ORANGE NECK
- TURQUOISE CHIN
- BLUE FRONT
- GREEN THIGH
- LIGHT TURQUOISE BELLY
SPECIAL INSTRUCTIONS:
W+Tk bring working yarn to the front of the work, slip next stitch knit- wise onto the RH needle, take working yarn to the back, slip the slipped stitch back onto the LH needle, turn the knitting = W+Tk (wrap and turn knit)
W+Tp take working yarn to the back of the work, slip next stitch purl- wise onto the RH needle, bring working yarn to the front, slip the slipped stitch back onto the LH needle, turn the knitting = W+Tp (wrap and turn purl)
GENERAL ABBREVIATIONS:
- K = knit
- P = purl
- inc = increase
- dec = decrease
- K2tog/ K3tog = knit two together/ knit three together
- P2tog/ P3tog = purl two together/ purl three together
- RH/LH = right hand/ left hand RS/WS = right side/ wrong side
- st/ sts =stitch/ stitches
- Skpo = slip one stitch, knit next stitch, pass slipped stitch over knit stitch to decrease by one stitch
- Kb = knit into front then into back of stitch to increase by one stitch
- Pb = Purl into front then knit into back of stitch to increase by one stitch
HEAD
Beginning at guinea pig’s Left Head Side, with yarn AB cast on 15 sts – PM (place marker) at each end for left Top and Bottom Head Back Markers Work short rows for guinea pig’s Left Cheek
Short row 1 P14 W+Tp (wrap and turn purl, see Page 3) Short row 2 K13 W+Tk (wrap and turn knit)
Short row 3 P12 W+Tp Short row 4 K11 W+Tk Short row 5 P10 W+Tp Short row 6 K9 W+Tk Short row 7 P12 to end
Row 1 dec) Knit to last 2 sts, k2tog – 14sts
Row 2 Purl
Rows 3-4 dec) Repeat last two rows once -13sts
Row 5 dec) Knit to last 2 sts, k2tog – 12sts PM at end of last row for Left Neck Marker Row 6 Purl
Row 7 dec) K2tog, k to last 2sts, k2tog – 10sts Rows 8-9 dec) Repeat last two rows once – 8sts Rows 10 & 12 Purl
PM at beginning of last row for Left Chin Marker Row 11 dec) K2tog, k to last 2sts, k2tog – 6sts Row 13 dec) K2tog, k2, k2tog – 4sts Cut yarn, thread end though all 4 Left Cheek Point sts, pull up and secure.
Right Side
With yarn AB cast on 15 sts – PM at each end for right Top and Bottom Head Back Markers
Work short rows for guinea pig’s Right Cheek
Short row 1 P14 W+Tp Short row 2 K13 W+Tk Short row 3 P12 W+Tp Short row 4 K11 W+Tk Short row 5 P10 W+Tp Short row 6 K9 W+Tk Short row 7 P12 to end
Row 1 dec) K2tog, knit to end – 14sts
Row 2 Purl
Rows 3-4 dec) Repeat last two rows once -13sts
Row 5 dec) K2tog, knit to end – 12sts
PM at beginning of last row for Right Neck Marker Row 6 Purl
Row 7 dec) K2tog, k to last 2sts, k2tog – 10sts Rows 8-9 dec) Repeat last two rows once – 8sts Rows 10 & 12 Purl
PM at end of last row for Right Chin Marker Row 11 dec) K2tog, k to last 2sts, k2tog – 6sts Row 13 dec) K2tog, k2, k2tog – 4sts Cut yarn, thread end though all 4 Right Cheek Point sts, pull up and secure.
Join Head Back Seam
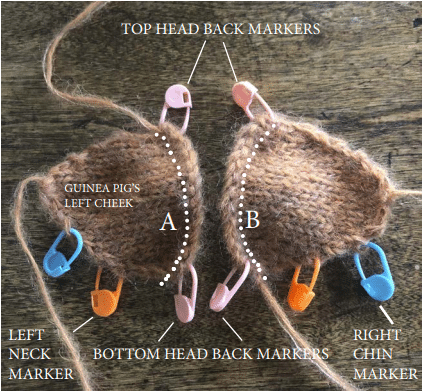
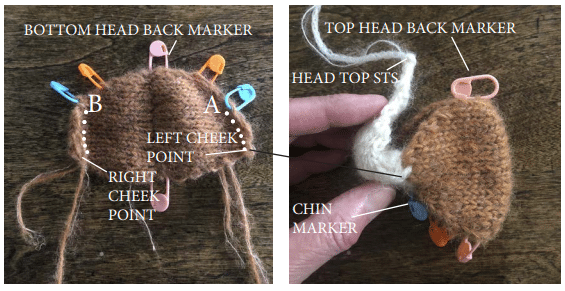
WS together, match the cast-on edges from the both head sides and mattress stitch the seam from Top Head Back Markers to Bottom Head Back Markers – making sure both sides are the right way up, in other words the Neck Markers are both on the same side, at the bottom of the head (see Fig. 1, join dotted line A to dotted line B).
Remove one of the top head back markers and one of the bottom head back markers.
Chin & Face Front
With Head Back Seam facing you, RS (knit side) up, begin at guinea pig’s Left Cheek Point (on your right) and with yarn CD, pick up and knit 4 sts across row ends to guinea pig’s Left Chin Marker; match Left Chin Marker to Right Chin Marker (see Fig. 2, match A to B) and pick up and knit 4 sts across row ends to guinea pig’s Right Chin Marker across row ends to Right Cheek Point (see Fig. 2, pick up as dotted lines show) – 8sts
Remove one of the chin markers.
Row 1 WS) inc) Cast on 2 sts for Right Cheek, p10 to end – 10sts
Row 2 inc) Cast on 2 sts for Left Cheek, k12 to end – 12sts
Row 3 inc) Pb, p to last st, pb – 14sts
Work short rows to shape the Chin as follows:
- Short row 1 K9, W+Tk
- Short row 2 P4, W+Tp
- Short row 3 K3, W+Tk
- Short row 4 P2, W+Tp
- Short row 5 K8 to end
Work short rows to shape the Nose as follows:
- Short row 1 P7, W+Tp
- Short row 2 K4, W+Tk
- Short row 3 P3, W+Tp
- Short row 4 K2, W+Tk
- Short row 5 P6 to end
Row 6 dec) K2tog, k to last 2 sts, k2tog – 8sts
Row 7 dec) P2tog, p to last 2 sts, p2tog – 6sts
Row 8 dec) K2tog, k2, k2tog – 4sts
Rows 9-12 Beginning with a purl row work four rows stocking stitch
Row 13 dec) P2tog twice – 2sts
Rows 14-15 Work two rows stocking stitch
Cut yarn, thread end though both Head Top sts, pull up and secure.
Join Face Front to Cheeks
Stuff all of the yarn endings inside the head.
WS together, match Fastened-Off Head Top to Top Head Marker, secure with a stitch then working from head top, working on one side at a time, ease together then carefully oversew the face front to the cheeks. (see Fig. 4, as dotted line shows seam for left side & Fig. 5).
NOTE: I like to use a length mohair to stitch the small seams with. Remove top head back marker.

BACK
RS facing, with head toward you, begin at guinea pig’s Left Neck Marker, with yarn AB pick up and knit 5 sts to Head Back Seam at Bottom Head Back Marker; pick up and knit 5 sts from head back Seam to Right Neck Marker (see Fig. 6 dotted line from A to B, B to C) – 10sts
Remove bottom head back marker.
Row 1 WS) inc) Cast on 5 sts, p15 – 15sts
Row 2 inc) Cast on 5 sts, k8, kb, k2, kb, k8 to end – 22sts PM at each end of Last row for left and right Front Markers Rows 3, 5 & 7 Purl
Row 4 inc) K8, kb, k4, kb, knit to end – 24sts
Row 6 K2tog, k7, kb, k4, kb, k to last 2 sts, k2tog
Row 8 inc) K8, kb, k6, kb, knit to end – 26sts
Row 9-11 Beginning with a purl row work three rows stocking stitch
Row 12 K2tog, k7, kb, k6, kb, k to last 2 sts, k2tog
Row 13 Purl
Row 14 K2tog, k to last 2 sts, k2tog – 24sts
Row 15-16 Repeat last 2 rows once – 22sts
Row 17 Purl
Work short rows to shape Left Thigh as follows:
- Short row 1 inc) Cast on 3 sts, PM for Left Thigh Marker, k7, W+Tk
- Short row 2 P1, W+Tp
- Short row 3 K2, W+Tk
- Short row 4 P3, W+Tp
- Short row 5 K4, W+Tk
- Short row 6 P5, W+Tp
- Short row 7 K6, W+Tk
- Short row 8 P10 to end
Row 14 dec) K10, skpo, k4, k2tog, k7 to end – 23sts
Work short rows to shape Right Thigh as follows:
- Short row 1 inc) Cast on 3 sts, PM for Right Thigh Marker, p7, W+Tp
- Short row 2 K1, W+Tk
- Short row 3 P2, W+Tp
- Short row 4 K3, W+Tk
- Short row 5 P4, W+Tp
- Short row 6 K5, W+Tk
- Short row 7 P6, W+Tp
- Short row 8 K10 to end
Row 15 P26 sts
Row 16 dec) K9, skpo, k4, k2tog, knit to end – 24sts
Row 17 Purl
Row 18 dec) K8, skpo, k4, k2tog, knit to end – 22sts
Row 19 dec) P2tog, p to last 2 sts, p2tog – 20sts
Row 20 dec) K6, skpo, k4, k2tog, knit to end – 18sts
Row 21 dec) P2tog, p to last 2 sts, p2tog – 16sts
Row 22 dec) K4, skpo, k4, k2tog, knit to end – 14sts
Row 23 dec) P2tog, p to last 2 sts, p2tog – 12sts
Cast off for the Little Hind Legs
Row 24 dec) Cast off 4 sts for Left Hind Leg, knit next 3 sts, cast off last 4 sts for Right Hind Leg – 4 Belly sts
BELLY
Rejoin yarn CD to 4 sts on the knitting needle
Row 1 inc) Pb, p2, pb – 6sts
Rows 2-5 Work four rows stocking stitch
Row 6 inc) K1, kb, k2, kb, k1 – 8sts
Rows 7, 9 & 11 Purl
Row 8 inc) K1, kb, k4, kb, k1 – 10sts
Row 10 inc) K1, kb, k6, kb, k1 – 12sts
PM at each end of last (purl) row for left and right Belly Markers
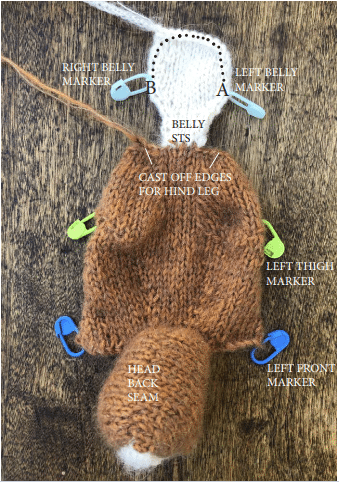
Work short rows to shape Belly Short Row 1 K11, W+Tk
- Short Row 2 P10, W+Tp
- Short Row 3 K9, W+Tk
- Short Row 4 P8, W+Tp
- Short Row 5 K7, W+Tk
- Short Row 6 P6, W+Tp
- Short Row 7 K9 to end
Row 12 dec) P2tog, p to last 2 sts, p2tog – 10sts Cast off all 10 Belly sts.
BREAST
RS facing, starting at guinea pig’s Left Belly Marker, with yarn CD, pick up and knit 10 sts evenly along row ends, cast-off edge and row ends to the Right Belly Marker (see Fig. 7, pick up along dotted lines from A to B)
Rows 1-11 Beginning with a purl row work 11 rows stocking stitch
Row 12 dec) K2tog, k to last 2 sts, k2tog – 8sts
Row 13 Purl
Rows 14-17 dec) Repeat last 2 rows twice – 4sts
Cast off all 4 sts for Throat Edge.
Join Front to Cheek Seam
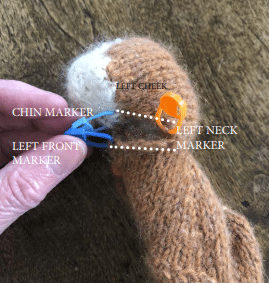
Working on one side of the body at a time, WS together match Front Marker with Chin Marker and mattress stitch to join the Cheek Seam from front/ chin markers to the split at Neck Marker (see Fig. 8, join dotted lines).
Add the eyes, either by working French Knots or fitting in the toy eyes. Stuff the head.
Join Hind Leg Seam
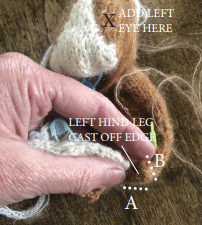
Working on one leg at a time, WS together fold the short Hind Leg Cast-Off edge in half and work a couple of stitches to join both edges – literally just a stitch or two to secure the fold at the cast-off edge
(see Fig. 9, join dotted line A to B).
Remove neck and front markers.
Join Belly to Thigh Seam
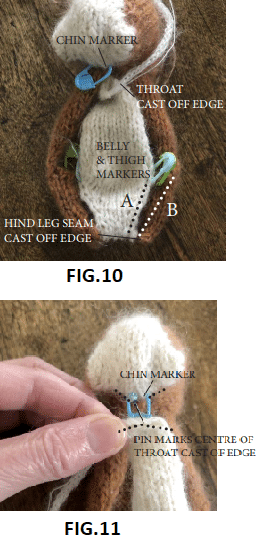
Working on one side of the body at a time, WS together match Thigh Marker with Belly Marker, ease together and mattress stitch to join the Belly/ Thigh Seam from thigh/ belly markers to the tiny Hind Leg Seam (see Fig. 10, join dotted lines A to B).
Remove thigh markers.
Join Throat Edge to Chin Seam
WS together match the centre point of the Throat Cast-Off Edge with the Chin Marker.
Join with a couple of stitches then carefully ease the edges either side of the centre point across the chin oversewing the tiny seam neatly
(see Fig. 11, join dotted lines from chin to dotted lines from throat). Remove chin marker.
Join Belly and Breast to Back
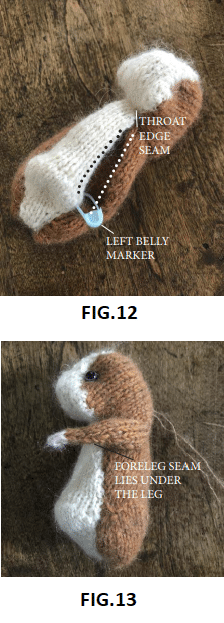
Working on one side of the body at a time, mattress stitch to join the Belly to the Back, from Belly Marker up to the seam at the Throat Edge at the same time stuffing the body, shaping and sculpting as you stuff (see Fig. 12, join dotted lines).
Remove belly markers.
FORELEGS – these are knitted separately and then joined onto the body
Left Foreleg
Starting at the Shoulder, with yarn AB cast on 6 sts
Rows 1-3 Beginning with a purl row work three rows stocking stitch
Row 4 inc) Cast on 5 sts for Left Foreleg Back, k11 – 11sts
Row 5 Purl
Row 6 dec) K2tog, k to last 2 sts, k2tog – 9sts
Row 7 Purl
Rows 8-11 dec) Repeat last 2 rows twice – 5sts
Row 12 K5, Do not Turn:
With RS facing you, slip all 5 sts from RH needle to LH needle, then continue as follows:
Row 13 K5, Do not Turn:
With RS facing you, slip all 5 sts from RH needle to LH needle
Row 14 dec) K2tog, k1, k2tog – 3 sts. Do not Turn:
Cut yarn AB, join yarn EE (use other end of the ball so you have two strands) With RS facing you, slip all 3 sts from RH needle to LH needle
Row 15 K3, Do not Turn:
With RS facing you, slip all 3 sts from RH needle to LH needle
Row 16 K3, Do not Turn:
With RS facing you, slip all 3 sts from RH needle to LH needle
Row 17 K3, Do not Turn:
With RS facing you, slip all 3 sts from RH needle to LH needle Cast off all 3 Left Paw sts.
Right Foreleg
Starting at the Shoulder, with yarn AB cast on 6 sts
Rows 1-3 Work three rows stocking stitch
Row 4 inc) Cast on 5 sts for Left Foreleg Back, p11
Row 5 Knit
Row 6 dec) P2tog, p to last 2 sts, p2tog – 9sts Rows 7-10 dec) Repeat last 2 rows twice – 5sts Row 11 K5, Do not Turn:
With RS facing you, slip all 5 sts from RH needle to LH needle, then continues as follows:
Row 12 K5, Do not Turn:
With RS facing you, slip all 5 sts from RH needle to LH needle
Row 13 K5, Do not Turn:
With RS facing you, slip all 5 sts from RH needle to LH needle
Row 14 dec) K2tog, k1, k2tog – 3 sts. Do not Turn: Cut yarn AB, join yarn EE
With RS facing you, slip all 3 sts from RH needle to LH needle
Row 15 K3, Do not Turn:
With RS facing you, slip all 3 sts from RH needle to LH needle
Row 16 K3, Do not Turn:
With RS facing you, slip all 3 sts from RH needle to LH needle
Row 17 K3, Do not Turn:
With RS facing you, slip all 5 sts from RH needle to LH needle Cast off all 3 Right Paw sts.
Join Foreleg Seam
Pass yarn ends through the ‘i-cord’ tube.
WS together, fold the foreleg at the Foreleg Back Cast-On Edge, match the row ends and mattress stitch the tiny seam to join the rows ends along to where you began the i-cord. Stuff the foreleg with yarn endings and a tiny amount of stuffing if necessary.
NOTE: the first three rows from 6 sts cast-on are for the shoulder so these aren’t sewn as part of the leg seam. The seam lies at the back of the foreleg.
Join Foreleg to the body
Making sure you have the correct foreleg for the correct side of the body lay the shoulder rows, at the top of the foreleg, onto the body near the neck seam looking at the image for guidance (see Fig. 13).
Carefully over sew around the shoulder so joining it to the body.
Then lift up the arm and join the cast on edge to complete the joining to the body (see Fig.14).
HIND LEG FEET– these are knitted separately and then joined onto the body – make 2 alike
With yarn EE cast on 10 sts.
Rows 1-6 Work six rows stocking stitch Row 7 dec) [K2tog, k2] twice, k2tog – 7sts Row 8 Purl
Row 9 dec) K2tog, k3, k2tog – 5sts
Row 10 Purl
Cast off all 5 Ankle sts.
Join the Foot Seams
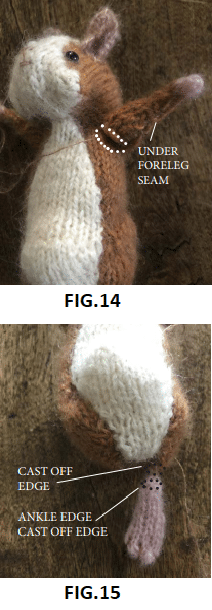
Fold the cast-on edge in half, WS together, mattress stitch to join the two halves then mattress stitch the row ends together for the Sole Seam all along to the cast-off edge at Ankle, at the same time lightly stuffing the foot with just yarn endings (see Fig. 15).
The Ankle edge is then sewn onto the cast-off edge seam at Hind Foot (see Fig. 15, matching around the top of the foot to around the hind leg cast-on edge, as dotted lines show for left foot to leg).
Embroider a few straight sts for claws with yarn B.
EARS – these are knitted separately and then joined onto the body
– make 2 alike
With yarns BE cast on 8 sts
Row 1 Purl
- Short row 1 K6, W+Tk
- Short row 2 P4, W+Tp
- Short row 3 K3, W+Tk
- Short row 4 P2, W+Tp
- Short row 5 K1, W+Tk
- Short row 6 P4 to end of row
Row 2 Knit
Row 3 dec) P2tog, p to last 2 sts, p2tog – 6sts
Row 4 dec) K2, k2tog, k2 – 4 sts
Cast off all 4 sts purl-wise for Ear Base. Weave in the ends.
Join Ears to Head
Use the tail ends to join each ear onto each side of the head – the backs of the ears are the RS/ knit side which lie against the head (see Fig. 16). As you join the ears pinch across the top of the head – so creating a ‘top of head squish’ (see Fig. 17).
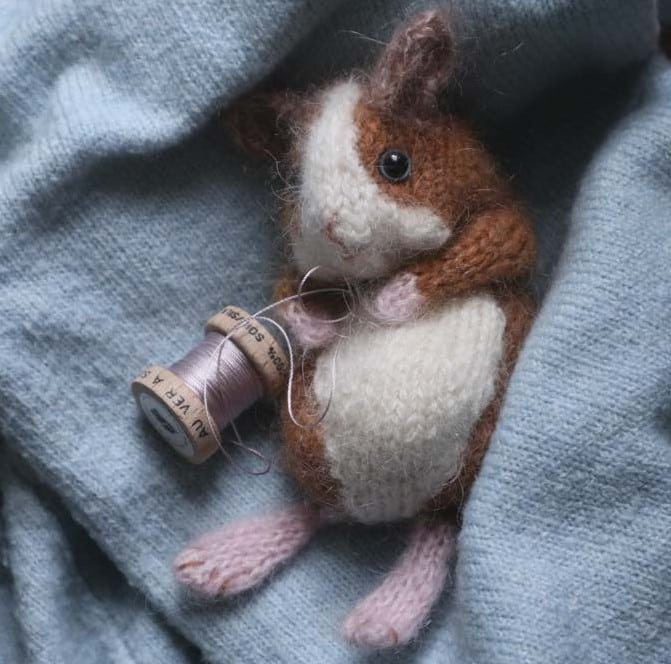
Face Squish
To make the face squish up a little, bend a length of yarn in half and pass the cut ends through a yarn sewing needle.
Pass the threaded needle through one side of the head, just behind eye, and out the other side of the head, behind the other eye, then back in to emerge back out where you started – pull up to squish the face a little and secure the thread.
Face Markings
Use yarn BE to embroider a ‘Y’ mouth and upside down ‘(‘ (smiley mouth) shape for face features.
A NOTE ABOUT FELTING
A word of caution – do check your yarn is feltable before attemping this:
Like I do with some of my knits I felted mine and in this case to get the fluffy, fuzzy look I think it’s worth it. – What’s more it’s fun and easy to do: – Rub the finished guinea pig (yes with the eyes and stuffing all completed) in some warm/ hand-hot soapy water, rinse off the soap completely, gently wring and
then shape and sculpt before placing him/ her on a towel over a radiator to dry – takes about a day to dry completely.