Crochet Pattern Bubbles Sweater Pullover – Wear it throughout the day or at night; the sweater will look stylish in your closet. This straightforward pattern is all about 🥰.Simple to create and stylish to wear,
- U-using the most simple textures and forms
- Basic stitches are used
- The length can be readily adjusted to fit various forms, and the design may be made in seven different bust sizes ranging from XS to 3XL.
Materials needed:
Any worsted/medium weight yarn 680(730, 790, 860, 940, 1020, 1150)yds. I used Feels Like Butta yarn.
Crochet hook size G/6 (4.25mm) ,tapestry needle
Gauge:
14DC= 4inch = 10cm whit U.S. size G /6- 4.25mm crochet hook or size needed to obtain gauge.
Take time to check gauge and adjust needle sizes if necessary.
Legend:
- St(s) =stitch(es)
- SC= single crochet
- HDC= half double crochet
- DC= double crochet
- FPHDC=front post half double crochet
- BPHDC=back post half double crochet
- Inc1DC= Increase 1 st by working 2 DC into the same stitch
- Inc1SC= Increase 1 st by working 2 SC into the same stitch
- Dec1DC=Decrease 1 st by working 2DC together
- Total stitches are indicated between < >
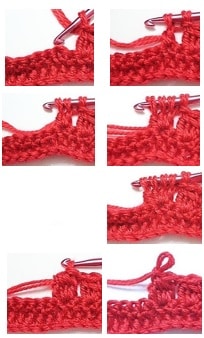
Bubble Stitch =4DC worked together in the same st: [YO, insert hook in the stitch, YO and pull up loop , YO, draw through 2 loops]X 4 times (5 loops on hook), YO, draw through all 5 loops on hook.
- YO, put the hook through both loops of the specified stitch and draw up a loop the size of a DC, YO, draw through 2 loops; =2loops on hook
- YO, insert hook in same st and draw up a loop, YO and draw through 2 loops=3loops on hook
- YO, insert hook in same st and draw up a loop, YO and draw through 2 loops=4loops on hook
- YO, insert hook in same st and draw up a loop, YO and draw through 2 loops =5loops on hook
- YO and draw through all 5 loops on hook, Bubble stitch made.

Use the bust measurements when choosing the size for your pullower. The pullower is designed with approx. 2” of positive ease.
Sizes instructions in the pattern: XS ( S – M – L – XL- 2XL- 3XL)
Bust: 31″ (33″-35″-38″-41″-43″-45″) =79 (84-89-97-104-109-114)cmThe pullower width(one side): 17.5” ( 18.5”- 19.5”- 21”- 23”- 24”- 25”)
So, let’s get started!
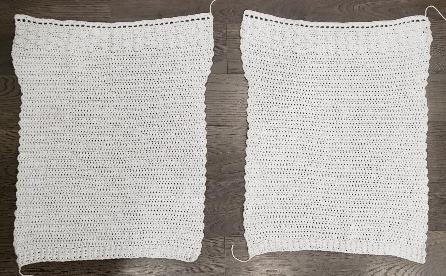
Body of the pullower (make 2)
Chains at beginning of rows do not count as stitch.
-It is worked flat, bottom up.
The ribbing
Chain 63( 67, 71, 75, 83, 87, 91).
Row 1: HDC in 3rd ch from hook and across. Turn. <61( 65, 69, 73, 81, 85, 89)>
Row 2: Ch2, HDC, *FPHDC, BPHDC*,repeat from *-*. Turn. < 61( 65, 69, 73, 81, 85, 89)>
Row 3-4 : Repeat Row 2
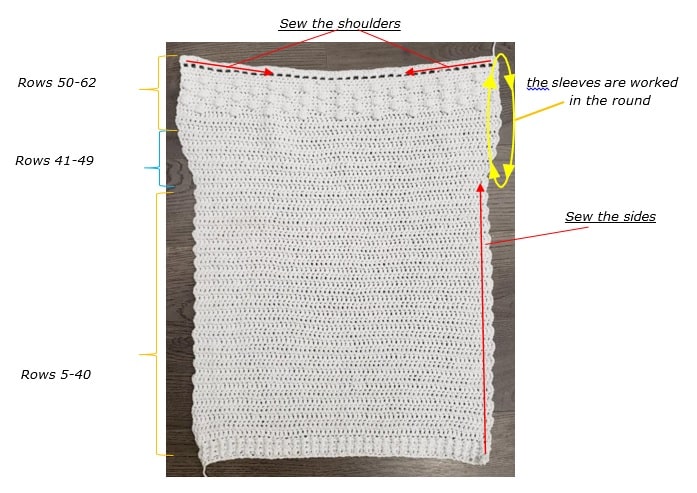
The Row5-40 will be made in DC, No increases
Row 5 until Row 40: Ch3, DC across. Turn. < 61( 65, 69, 73, 81, 85, 89)>
The rows 41, 43, 45, 47, 49 has increases – every two rows.
Row 41: Ch3, Inc1DC in first st, DC in each st until the last st, Inc1DC in the last st. < 63( 67, 71, 75, 83, 87, 91)> Turn.
Row 42: Ch3, DC across. Turn. < 63( 67, 71, 75, 83, 87, 91)>
Row 43: Ch3, Inc1DC in first st, DC in each st until the last st, Inc1DC in the last st. Turn. < 65( 69, 73, 77, 85, 89, 93)>
Row 44: Ch3, DC across. Turn. < 65( 69, 73, 77, 85, 89, 93)>
Row 45: Ch3, Inc1DC in first st, DC in each st until the last st, Inc1DC in the last st. Turn. < 67( 71, 75, 79, 87, 91, 95)>.
Row 46: Ch3, DC across. Turn. < 67( 71, 75, 79, 87, 91, 95)>
Row 47: Ch3, Inc1DC in first st, DC in each st until the last st, Inc1DC in the last st. Turn. < 69( 73, 77, 81, 89, 93, 97)>
Row 48: Ch3, DC across. Turn. < 69( 73, 77, 81, 89, 93, 97)>
Row 49: Ch3, Inc1DC in first st, DC in each st until the last st, Inc1DC in the last st. Turn. < 71( 75, 79, 83, 91, 95, 99)>
Next is the “bubbles” part- see the explanation in the legend.
Row 50: Ch1, SC in 3(5, 3, 5, 5, 3, 5)st, [Bubble in next st, SC in 7sts] for 8(8, 9, 9, 10,11, 11) times, Bubble in next st, SC in 3(5, 3, 5, 5, 3,5)st. Turn. < 71( 75, 79, 83, 91, 95,99)>
Row 51: Ch1, SC across. Turn. < 71( 75, 79, 83, 91, 95, 99)>
Row 52: Ch1, SC in 7(1,7, 1, 1,7,1)st, [Bubble in next st, SC in 7sts] for 7(9, 8, 10, 11,10,12) times, Bubble in next st, SC in 7(1,7,1,1,7,1)st. Turn < 71( 75, 79, 83, 91, 95, 99)>
Row 53: Ch1, SC across. Turn. < 71( 75, 79, 83, 91, 95, 99)>
Rows 54-55-56-57: repeat Rows 50-51-52-53
Row 58: repeat Row 50
Row 59: Ch1, Inc1SC, SC in each st until the last st, Inc1SC.Turn <73( 77,81,85,93,97,101)>
Row 60: Ch1, Inc1SC, SC in each st until the last st, Inc1SC. Turn <75(79,83,87,95,99,103)>
Row 61: Ch3, DC in first 2 st, * Ch1, skip 1st, DC in next st* , repeat from *-*, end the Row by 1DC into the last st. Turn. <39(41, 43, 45, 49, 51, 53) DC, 36(38, 40, 42, 46, 48, 50)Ch1>
Row 62: Ch2, HDC in first DC, *skip DC, 2HDC around Ch1* repeat from *-* until the 2 last sts, HDC in each of 2 last DC. Cut the yarn, leaving a 30” for the shoulder seam.

Sewing the pieces together
After the two body pieces are done, you will lay them both right sides together, and sew them on the very edges. For additional assistance on when to stop sewing, you can pin them together with sewing pins or use a stitch marker.
Sew the shoulders: sew the pieces together along the top, starting on the outside edge, coming in 7’’. You could customize the neck opening by taking away or adding to your sewing.
Sew the sides: start on the bottom at row 1 of the body, and sew up through Row 42( 41, 40, 40, 39, 38, 37).

The sleeves –(make 2 -follow the same instructions for both sides)
- The sleeves are worked in the round, from shoulder and down.
- Chains at beginning of rounds do not count as stitch
- Work the Round 1 on the wrong side, then, turn ad work the Round 2 on the right side, and continue in this way, by turning at the end of each round.
Round 1( wrong side): Start by drawing the yarn right on the side seam, then Ch3 and work a DC into the same side space you drew up your yarn,then work 1DC into the end space of each row of your body piece until you reach the shoulder seam, excepted few rows where you work 2DC:
- For XS (S, M) sizes: work 2DC in the end space of Rows 45 and 49
- For L size : work 2DC in the end space of Rows 42, 46 and 49
- For XL(2XL, 3XL) size: work 2DC in the end space of Rows 40, 43, 46 and 49.
So, you have 22(23, 24, 25, 27, 28, 29)DC. With the one DC you put at the beginning in the side seam, you have a total of: 23(24, 25, 26, 28, 29, 30)DC.
- Then make another DC into the shoulder seam
- Then make another 22(23, 24, 25, 27, 28, 29)DC into the other side of your sleeve hole
- Then join to the first DC with a slip stitch. < 46( 48, 50, 52, 56, 58, 60)>. Turn.
- From here work in the round and Turn at the end of each Round.
- The rows 6, 12, 18, 24 has decreases – every six rows.
Round 2-5:Ch3, DC around, join to the Ch3 with a Slst. Turn.< 46( 48, 50, 52, 56,58,60)>
Round 6: Ch3, Dec1DC, DC in each st until the 2 last st, Dec1DC, sl to join. Turn. <44( 46, 48, 50, 54, 56, 58)>
Round 7-11: Ch3, DC around, sl to join.Turn<44( 46, 48, 50,54,56,58)>
Round 12: Ch3, Dec1DC, DC in each st until the 2 last st, Dec1DC, sl to join.Turn. <42( 44, 46, 48, 52, 54, 56)>
Round 13-17:Ch3, DC around, sl to join.Turn <42( 44, 46,48,52,54,56)>
Round 18: Ch3, Dec1DC, DC in each st until the 2 last st, Dec1DC, sl to join.Turn. <40( 42, 44, 46, 50, 52, 54)>
Round 19-23: Ch3, DC around, sl to join. Turn. <40(42,44, 46,50,52,54)>
Round 24: Ch3, Dec1DC, DC in each st until the 2 last st, Dec1DC, sl to join.Turn. <38(40,42, 44,48,50,52)>
Round 25-40 (or desired length): Ch3, DC around, sl to join.Turn.<38(40,42,44,48,50, 52)>
The ribbing
Round 41: Ch2, HDC in each st around. Turn.<38( 40, 42, 44, 48, 50, 52)>
Round 42, 43, 44: Ch2, *FPHDC, BPHDC*,repeat from *-*around, sl to join.Turn. <38( 40, 42, 44, 48, 50, 52)> At the end of Round 44 fasten off. Weave in all ends.
Congratulations!