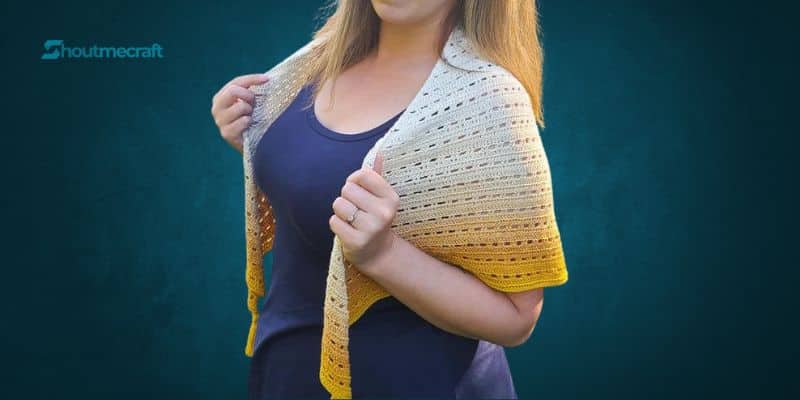
Crochet Shawl Wrap – This light weight crochet shawl provides a real “made for you” vibe, simple with wide places to let the air penetrate. Stunning in any color and able to be made to your exact size, this summer shawl crochet pattern is a wonderful addition to your collection.
This crochet summer shawl has a straightforward three row repetition that keeps things fresh. This is a simple and easy approach to make something fluid, a little open, and really beautiful, and it keeps you interested and having fun.
Crochet Shawl Wrap Pattern, Women’s Crochet Shawl, The Lumina Shawl,Summer Shawl Crochet,Shawl Crochet
Skill Level : Advanced Beginner
Yarn Requirements
- Fingering (1 – Super Fine) weight yarn of your choice in any color you prefer. You will need approximately: 6.8 ounces/195 grams/900 yards.
Yarn Used
- Yarn Bee Rainbow Wrapsody in Brilliant Blonde – Used nearly 1 cake.
- This yarn is a blend of 60% cotton and 40% acrylic. This helps keep the shawl wearable and breathable.
Tools & Notions
- 3 mm hook
- Tapestry needle
- Scissors
- Stitch markers, if you prefer them
Size
- Wingspan: Approx 58 inches.
- Depth: Approx 25 inches.
You can easily customize this size. Simply follow the pattern repeat for as long as preferred to reach your desired size.
Pattern Notes
- This triangle shawl is worked from the
- Pattern is written to a specific size, however, if you desire a larger or smaller shawl, you can add or remove rows.
- Chain 2 at the beginning of rows never counts as a stitch.
- Each row worked increases the size of the shawl. There is no decreasing.
- This shawl is written to use Fingering (1
- Super Fine) weight yarn which gives the finished piece a beautiful drape. However, you can use any weight of yarn you prefer.
- Yarn requirements are listed for Fingering weight. If you use a different yarn weight, your usage will be different.
- You might want to mark your center chain 2 space with a stitch marker and move the stitch marker up each row if you haven’t worked a shawl in this way before. Some rows have many chain 2 spaces, so it will be important to know where the center chain 2 space is.
Abbreviations
Abbreviations are in Standard US terms.
- Ch – Chain
- Dc – Double Crochet
- Sk – Skip
- Spc – Space
- Sts – Stitch(es)
- […] – Repeats are listed inside brackets
- (…) – Indicates to work all stitches in the same space.
- (…) – Stitch counts are listed at end of row in ( ) and bold italics.
Gauge
Isn’t important as the shawl can be worked to your desired size.
Ensure you enjoy the stitch definition of the shawl using a 3 mm hook. If you find that your stitches are coming out too tight to work into, go up a hook size.
For reference, my shawl after Row 7 was approximately 6.5 inches long, measuring along what would be the “wingspan”.
Note: I am a tight crocheter, so my tension is usually tighter than others. Learn more about gauge and what this means here. Because this shawl can be worked to your desired size and still be wearable, there’s no need to worry if your gauge is off.
Special Stitch – Magic Circle
This pattern is written to use a magic circle. You can use the magic circle or you can chain 3 and slip stitch to the first chain made to create a circle to work into. Your choice!
If you don’t know how to work a magic circle but would like to learn, I do have my video tutorial here
If you prefer not to use the magic circle, start your first row by omitting “In Magic Circle, chain 2” and instead chain 3, then work the rest of the instructions in the 3rd chain from the hook.
Pattern Instructions
Row 1 – In Magic Circle, chain 2 (doesn’t count here or throughout). Place 3 dc, chain 2, 3 dc. Pull tail tight. (6 dc, 1 ch 2 spc)
Row 2 – Ch 2, turn. Place 3 dc in same st. 1 dc next 2 sts, (2 dc, ch 2, 2 dc) in ch 2 spc. 1 dc next 2 sts, 3 dc last st. (14 dc, 1 ch 2 spc)
Row 3 – Ch 2, turn. 3 dc in same st. Ch 2, sk 2, 1 dc next 2 sts. Ch 2, sk 2, (2 dc, ch 2, 2 dc) in ch 2 spc. Ch 2, sk 2, 1 dc 2 sts. Ch 2, sk 2, 3 dc last st. (14 dc, 5 ch 2 spcs)
Row 4 – Ch 2, turn. 3 dc in same st. 1 dc in each st and 2 dc in each ch 2 spc to center ch 2 spc (point of triangle). (2 dc, ch 2, 2 dc) in center ch 2 spc. Place 1 dc in each st and 2 dc in each ch 2 spc until 1 st remains. 3 dc in last st. (30 dc, 1 ch 2)
Row 5 – Ch 2, turn. 3 dc in same st. 1 dc in each st to ch 2 spc. (2 dc, ch 2, 2 dc) in ch 2 spc. 1 dc in each st until 1 st remains. 3 dc in last st. (38 dc, 1 ch 2 spc)
Row 6 – Ch 2, turn. 3 dc in same st. Ch 2, sk 2,[1 dc next 2 sts, ch 2, sk 2] Repeat inside brackets to ch 2 spc. (2 dc, ch 2, 2 dc) in ch 2spc. Ch 2, sk 2, [1 dc next 2 sts, ch 2 sk 2] Repeat inside brackets until 1 st remains. 3 dc in last st. (26 dc, 11 ch 2 sps)
Rows 7 through 62 – Repeat Rows 4, 5 and 6 in sequence. For example, Row 7 will be a repeat of Row 4, Row 8 will be a repeat of Row 5, Row 9 will be a repeat of Row 6.
On the next page, there is a table that will walk you through the entirety of the pattern.
Here is an example of what the information looks like: “Row 7 – (R4) 54 dc”.
This means that for Row 7, you will repeat “R4” (Row 4) and at the end of the row, you will have 54 double crochet stitches and 1 chain 2 space.
If you prefer a different size, work Rows 4, 5 and 6 in sequence to your desired size. Make sure to end on a repeat of Row 5.
The above paragraph is especially important if you’re using a different yarn weight.
When the rows are completed
Once the rows are completed, finish off your yarn and weave ends.
Shawl may need to be blocked into the “perfect” triangle shape, as there can sometimes be a bit of a “winged” look to shawls.
If you do need to block the shawl, you will need to pin the shawl into shape (so the edges are straight), wet with a spray bottle and leave to dry overnight.
Once blocked, you can add fringe or tassels if you prefer. You’re all done! Enjoy!
| Row 7 – (R4) 54 dc | Row 26 – (R5) 206 dc | Row 45 – (R6) 182 dc, 89 ch 2 spcs |
| Row 8 – (R5) 62 dc | Row 27 – (R6) 110 dc, 53 ch 2 spcs | Row 46 – (R4) 366 dc |
| Row 9 – (R6) 38 dc, 17 ch 2 spcs | Row 28 – (R4) 222 dc | Row 47 – (R5) 374 dc |
| Row 10 – (R4) 78 dc | Row 29 – (R5) 230 dc | Row 48 – (R6) 194 dc, 95 ch 2 spcs |
| Row 11 – (R5) 86 dc | Row 30 – (R6) 122 dc, 59 ch 2 spcs | Row 49 – (R4) 390 dc |
| Row 12 – (R6) 50 dc, 23 ch 2 spcs | Row 31 – (R4) 246 dc | Row 50 – (R5) 398 dc |
| Row 13 – (R4) 102 dc | Row 32 – (R5) 254 dc | Row 51 – (R6) 206 dc, 101 ch 2 spcs |
| Row 14 – (R5) 110 dc | Row 33 – (R6) 134 dc, 65 ch 2 spcs | Row 52 – (R4) 414 dc |
| Row 15 – (R6) 62 dc, 29 ch 2 spcs | Row 34 – (R4) 270 dc | Row 53 – (R5) 422 dc |
| Row 16 – (R4) 126 dc | Row 35 – (R5) 278 dc | Row 54 – (R6) 218 dc, 107 ch 2 spcs |
| Row 17 – (R5) 134 dc | Row 36 – (R6) 146 dc, 71 ch 2 spcs | Row 55 – (R4) 438 dc |
| Row 18 – (R6) 74 dc, 35 ch 2 spcs | Row 37 – (R4) 294 dc | Row 56 – (R5) 446 dc |
| Row 19 – (R4) 150 dc | Row 38 – (R5) 302 dc | Row 57 – (R6) 230 dc, 113 ch 2 spcs |
| Row 20 – (R5) 158 dc | Row 39 – (R6) 158 dc, 77 ch 2 spcs | Row 58 – (R4) 462 dc |
| Row 21 – (R6) 86 dc, 41 ch 2 spcs | Row 40 – (R4) 318 dc | Row 59 – (R5) 470 dc |
| Row 22 – (R4) 174 dc | Row 41 – (R5) 326 dc | Row 60 – (R6) 242 dc, 119 ch 2 spcs |
| Row 23 – (R5) 182 dc | Row 42 – (R6) 170 dc, 83 ch 2 spcs | Row 61 – (R4) 486 dc |
| Row 24 – (R6) 98 dc, 47 ch 2 spcs | Row 43 – (R4) 342 dc | Row 62 – (R5) 494 dc |
| Row 25 – (R4) 198 dc | Row 44 – (R5) 350 dc |
This table shows the stitch counts for each row. Rows that only have the center chain 2 space will not reference the chain 2 space in the stitch count, but you should have 1 chain 2 space. The rows that list chain 2 spaces in the stitch counts are the repeats of Row 6 which creates many chain spaces.
Picture Tutorial – Rows 1 through 6
This picture tutorial will show what your work should look like after completing Rows 1 through 6, and shows some steps in more detail.
This photo tutorial will show the row instructions in shorthand, and then will be explained in detail. There will be arrows and other illustrations to show specific areas.
“Row 1 – In Magic Circle, chain 2 (doesn’t count here or throughout). Place 3 dc, chain 2, 3 dc. Pull tail tight. (6 dc, 1 ch 2 spc)”
To begin the shawl, we work into a magic circle.
If you prefer to not use a magic circle, you can start your first row by omitting “In Magic Circle, chain 2” and instead chain 3, then work the rest of the instructions in the 3rd chain from the hook.
After completing Row 1, your work should look like the picture below.
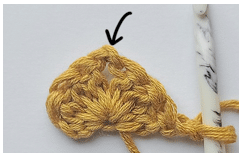
A black arrow points to the “center” chain 2 space.
This chain 2 space is what forms the shawl into a triangle, so it is important to stay aware of it. If you want to, you can place a stitch marker in this chain 2 space and move it up each row.
“Row 2 – Ch 2, turn. Place 3 dc in same st. 1 dc next 2 sts, (2 dc, ch 2, 2 dc) in ch 2 spc. 1 dc next 2 sts, 3 dc last st. (14 dc, 1 ch 2 spc)”
To begin Row 2, we chain 2 and turn. Then, we place 3 double crochet in the first stitch.
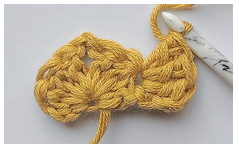
Then, place 1 double crochet in each of the next 2 stitches. We have now reached the center chain 2 space, which is marked with a black arrow in the picture below.
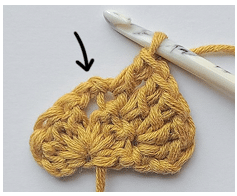
In this chain 2 space, work 2 double crochet, chain 2, and 2 more double crochet. If you’re using a stitch marker, move your stitch marker up to the new chain 2 space.
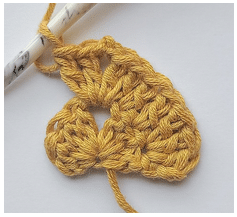
Work 1 double crochet in each of the next 2 stitches, and 3 double crochet in the last.
Once complete, your work should look like the image below.
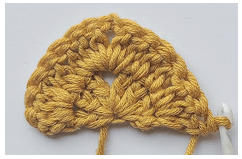
“Row 3 – Ch 2, turn. 3 dc in same st. Ch 2, sk 2, 1 dc next 2 sts. Ch 2, sk 2, (2 dc, ch 2, 2 dc) in ch 2 spc. Ch 2, sk 2, 1 dc 2 sts. Ch 2, sk 2, 3 dc last st. (14 dc, 5 ch 2 spcs)”
To begin Row 3, chain 2 and turn. Place 3 double crochet in the first stitch.
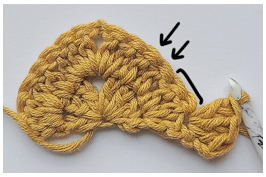
Next you will chain 2, skip two stitches, and place 1 double crochet in each of the following 2 stitches.
In the image below, a bracket shows the stitches to skip, and arrows point to the stitches in which you will place each double crochet.
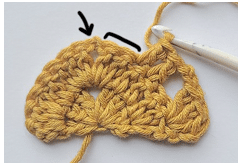
Then, you will chain 2 and skip the two remaining stitches before the chain 2 space from Row 2. In the image below, a bracket shows the stitches to skip and an arrow points to the chain 2 space.
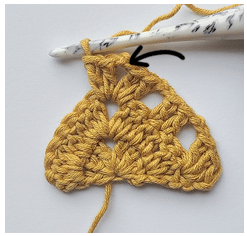
In this chain 2 space, work 2 double crochet, chain 2, and 2 more double crochet. If you’re using a stitch marker, move your stitch marker up to the new chain 2 space.
The next image has a black arrow pointing to the new “center” chain 2 space.
Because this row has several chain 2 spaces, it’s important to remember where the “center” space is.
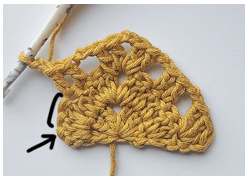
Just like the first half of the triangle, we will chain 2, skip two stitches, and then place 1 double crochet in the following 2 stitches.
Three stitches will remain. Skip two stitches (shown with a bracket below) and in the last stitch (an arrow points to this stitch below), place 3 double crochet.
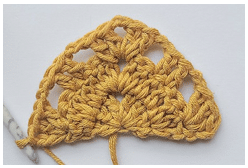
Once complete, your work should look like the image below.
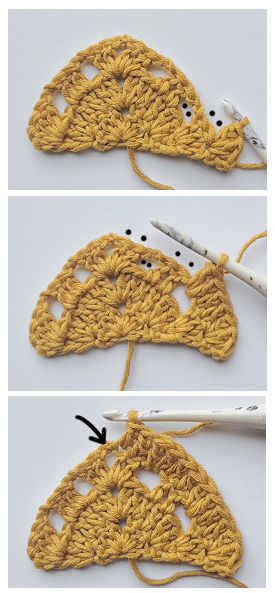
“Row 4 – Ch 2, turn. 3 dc in same st. 1 dc in each st and 2 dc in each ch 2 spc to center ch 2 spc (point of triangle). (2 dc, ch 2, 2 dc) in center ch 2 spc. Place 1 dc in each st and 2 dc in each ch 2 spc until 1 st remains. 3 dc in last st. (30 dc, 1 ch 2)”
Begin Row 4 the same as previous rows with a chain 2, turn and work 3 double crochet in the first stitch.
Then, we will work 1 double crochet in each of the double crochets below, and 2 double crochet in each chain 2 space until we reach the center chain 2 space.
In the next two images, these stitches are marked with black dots. Where you will work 1 double crochet in each stitch, the dots are on the outside of the work, near the top of the stitches.
Where you will work 2 double crochet in the chain 2 spaces, the dots are on the inside of the chain spaces.
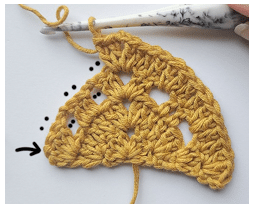
We have now reached the center chain 2 space (marked with a black arrow in the image above).
In this chain 2 space, work 2 double crochet, chain 2, and 2 more double crochet.
Then, work down the other side of the triangle the same as before until 1 stitch remains. Place 3 double crochet in the last stitch.
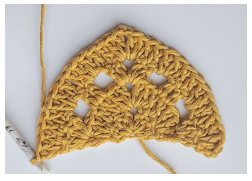
Once complete, your work should look like the image below.
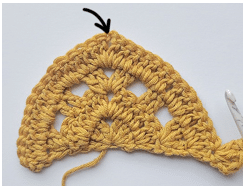
“Row 5 – Ch 2, turn. 3 dc in same st. 1 dc in each st to ch 2 spc. (2 dc, ch 2, 2 dc) in ch 2 spc. 1 dc in each st until 1 st remains. 3 dc in last st. (38 dc, 1 ch 2 spc)”
To begin Row 5, chain 2 and turn. Place 3 double crochet in the first stitch. Then, place 1 double crochet in each stitch leading to the chain 2 space (marked with a black arrow).
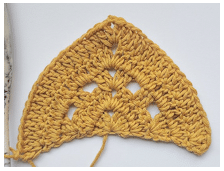
In this chain 2 space, work 2 double crochet, chain 2, and 2 more double crochet. If you’re using a stitch marker, move your stitch marker up to the new chain 2 space.
Then, place 1 double crochet in each stitch down this side of the work until 1 stitch remains. Place 3 double crochet in the last stitch.
Once complete, your work should look like the image below.
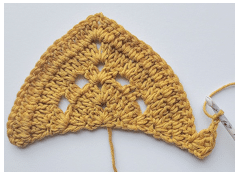
“Row 6 – Ch 2, turn. 3 dc in same st. Ch 2, sk 2, [1 dc next 2 sts, ch 2, sk 2] Repeat inside brackets to ch 2 spc. (2 dc, ch 2, 2 dc) in ch 2 spc. Ch 2, sk 2, [1 dc next 2 sts, ch 2 sk 2] Repeat inside brackets until 1 st remains. 3 dc in last st. (26 dc, 11 ch 2 sps)”
Row 6 is similar to Row 3, however, in Row 6 there are more stitches and therefore more chain 2 spaces to create.
Begin like all the other rows. Chain 2, turn and place 3 double crochet in the first stitch. Then chain 2 and skip two stitches.
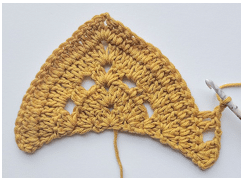
Then, chain 2 and skip 2 stitches.
Across this side of the triangle and until the center chain 2 space, repeat: Place 1 double crochet in each of the following 2 stitches, chain 2, skip 2 stitches.
The repeat ends on “chain 2, skip 2 stitches” as shown in the bracket in the image below. The black arrow points to the center chain 2 space.
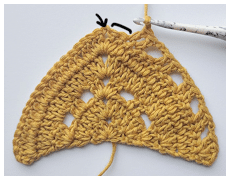
In this chain 2 space, work 2 double crochet, chain 2, and 2 more double crochet. If you’re using a stitch marker, move your stitch marker up to the new chain 2 space.
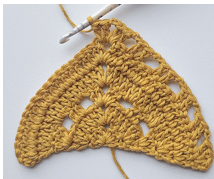
Now, we will work the same stitch pattern down the second side of the triangle until one stitch remains.
So we will chain 2 and skip two stitches. Then repeat: Place 1 double crochet in each of the following 2 stitches, chain 2, skip 2 stitches.
The repeat ends on “chain 2, skip 2 stitches” and one stitch should remain. In this last stitch, work 3 double crochet.
Once complete, your work should look like the next image.
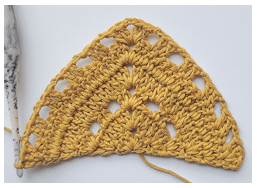
All rows following are repeats of Rows 4, 5 and 6 as indicated in the written pattern.
The only difference between Rows 4, 5 and 6 and the later row repeats is that the rows add more and more stitches so you will work more stitches on rows following.
These pictures should help you through any of the later rows. Just remember that you will need to work more stitches or repeats than the pictures show.
If you have any questions or need any help, please don’t hesitate to reach out! I’ll be happy to help.
Enjoy!