Mongolian Crochet Tote Bag Pattern – Crochet Tote Bag Pattern Reusable Grocery Bag, Crochet Granny Square Bag Pattern, Aesthetic Bag
To create your project you need the following materials:
- Polyester rope 3 mm – 436 yds (400 mts)
- Hook No. 4.5 mm
- Leather/Faux leather straps (20-22” (52-55 cm) or any other length you like)
- Scissors
Quick reminder and abbreviations of the stitches:
- CH – chain stitch
- SL ST – slip stitch
- DC – double crochet
- BLO – back loop only
- ST – stitch
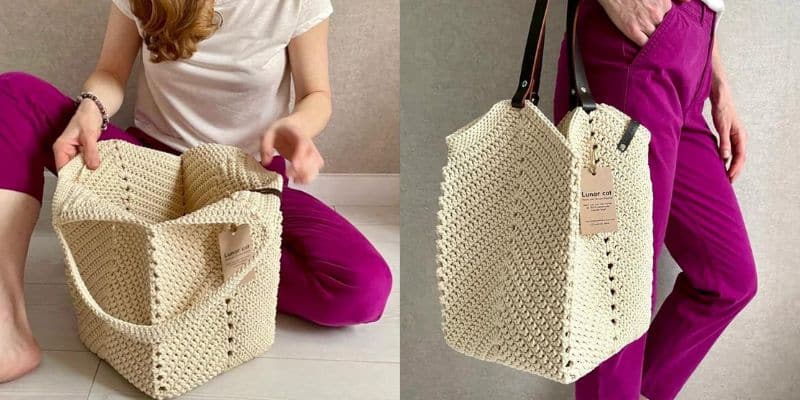
Approximate finished size is: width – 17” (43-44 cm), height – 13 3⁄4” (35 cm), handles length – 20” (52 cm).
So let’s get it started!
Use the Magic Circle to start the bag bottom. This technique is exactly what you need to keep center closed uptight (pic.1).
Loop the rope around your fingers so that the rope you are working with lies on the right while the “tail” of the yarn lies on the left. Insert the hook through the loop.Slide the crochet hook under both pieces of yarn from right to left.
Pull the yarn through the ring.
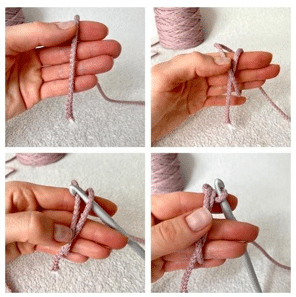
Pull the portion of yarn you grabbed through the ring to create another loop on your hook. Note that this does not count as your first stitch. Work 4 CH (pic.2).
Now we will start to create the bag bottom in the Granny Square style.
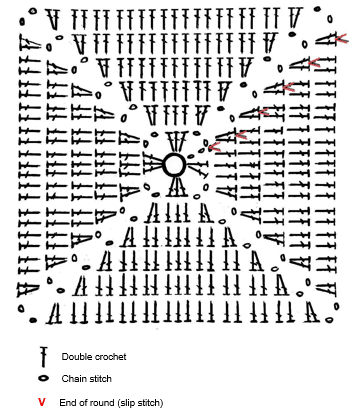
I offer two options for the description: Granny Square scheme (pic.16 on page 12) and detailed description round by round.
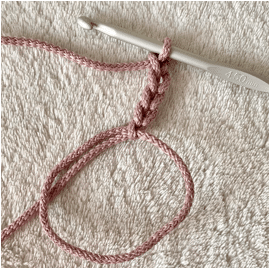
ROUND 1: *DC 3 in the center of Magic Circle, CH 2* repeat 3 times; DC 2 in the center of Magic Circle.
Pull the end of the rope and tight the ring. Work SL ST in the second stitch of the starting chain; one CH (pic.3).
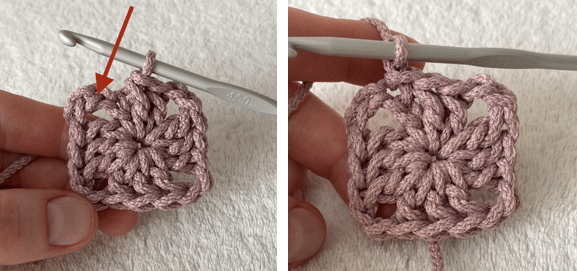
ROUND 2: DC in the arc, CH 2, DC 2 in the same arc, DC 3, DC 2 in the next arc repeat 3 times; CH 2, DC 2 in the arc, DC 3, DC in the first (starting arc).
Quantity of DCs on one side of the square is 7.
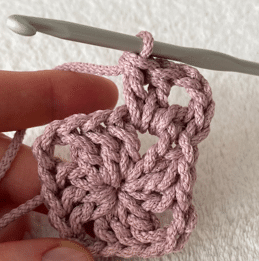
How to crochet DCs in the first arc is on pic.4.
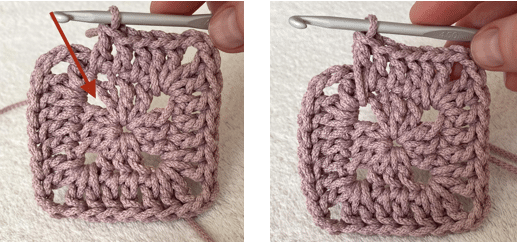
Red arrow on the pic. 5 – is the place where you should work the last DC of the ROUND 2.
Make SL ST in the top of the first DC to close ROUND 2 (pic.6).
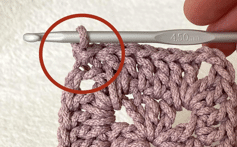
This is a principle of crocheting that will be used to create the bag bottom.
Remember: crochet the last DC into the first arc of the current round. Then close the round by SL ST.
ROUND 3: DC in the arc, *CH 2, DC 2 in the same arc, DC 7, DC 2 in the next arc* repeat 3 times; CH 2, DC 2 in the arc, DC 7, DC in the first (starting arc).
Quantity of DCs on one side of the square is 11.
Make SL ST in the top of the first DC to close the round (pic.7).
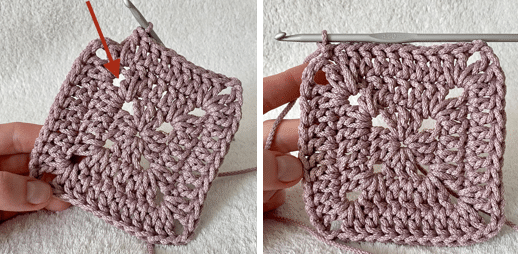
ROUND 4: DC in the arc, *CH 2, DC 2 in the same arc, DC 11, DC 2 in the next arc* repeat 3 times; CH 2, DC 2 in the arc, DC 11, DC in the first (starting arc).
Make SL ST in the top of the first DC to close the round. Quantity of DCs on one side of the square is 15.
ROUND 5: DC in the arc, *CH 2, DC 2 in the same arc, DC 15, DC 2 in the next arc* repeat 3 times; CH 2, DC 2 in the arc, DC 15, DC in the first (starting arc).
Make SL ST in the top of the first DC to close the round. Quantity of DCs on one side of the square is 19.
ROUND 6: DC in the arc, *CH 2, DC 2 in the same arc, DC 19, DC 2 in the next arc* repeat 3 times; CH 2, DC 2 in the arc, DC 19, DC in the first (starting arc).
Make SL ST in the top of the first DC to close the round. Quantity of DCs on one side of the square is 23.
ROUND 7: DC in the arc, *CH 2, DC 2 in the same arc, DC 23, DC 2 in the next arc* repeat 3 times; CH 2, DC 2 in the arc, DC 23, DC in the first (starting arc).
Make SL ST in the top of the first DC to close the round. Quantity of DCs on one side of the square is 27.
ROUND 8: DC in the arc, *CH 2, DC 2 in the same arc, DC 27, DC 2 in the next arc* repeat 3 times; CH 2, DC 2 in the arc, DC 27, DC in the first (starting arc).
Make SL ST in the top of the first DC to close the round. Quantity of DCs on one side of the square is 31.
ROUND 9: DC in the arc, *CH 2, DC 2 in the same arc, DC 31, DC 2 in the next arc* repeat 3 times; CH 2, DC 2 in the arc, DC 31, DC in the first (starting arc).
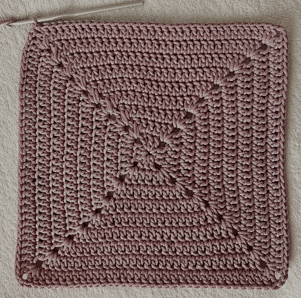
Make SL ST in the top of the first DC to close the round. Quantity of DCs on one side of the square is 35. Granny Square bag bottom is ready (pic.8)
BAG “BODY”
ROUND 10: DC in the arc; *CH 2, DC 2 in the arc, DC 16; skip 2 stitches, DC 16, DC 2 in the arc* repeat 3 times;
CH 2, DC 2 in the arc, DC 16; skip 2 stitches, DC 16, DC in the first arc (pic.9).
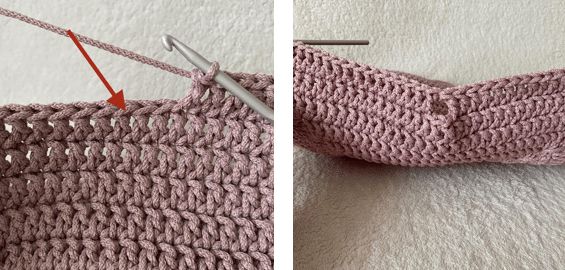
Make SL ST in the top of the first DC to close the round.
Red arrow on the pic. 9 shows the place where you should work 19th DC (after skipping 2 stitches).
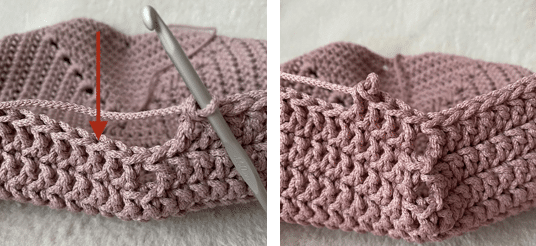
ROUND 11-24: DC in the arc; *CH 2, DC 2 in the arc, DC 16; skip 3 stitches, DC 16, DC 2 in the arc* repeat 3 times;
CH 2, DC 2 in the arc, DC 16; skip 3 stitches, DC 16, DC in the first arc (pic.10). Make SL ST in the top of the first DC to close the round.
Red arrow on the pic. 10 shows the place where you should work 19th DC (after skipping 3 stitches).
Bag “body” is ready!
BAG HANDLES
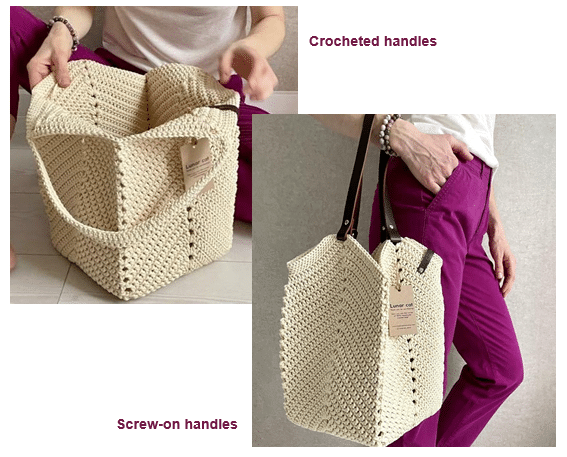
I offer 2 types of handles to choose from: crocheted and sew-on.
Crocheted handles
ROUND 1: *SC in the 1st arc, CH 70, SC in the 2nd arc, SL ST in the BLO till the next arc* repeat 2 times. See pic. 11.1, 11.2, 11.3.
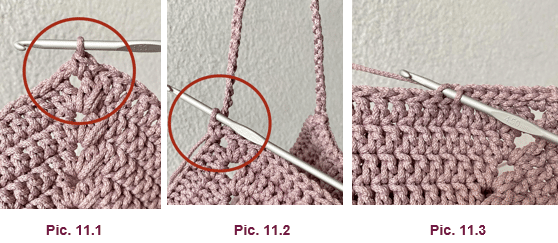
Pic. 11.1 – SC in the first arc.
Pic. 11.2 – CH 70 and SC in the second arc.
Pic. 11.3 – SL ST in the BLO from handle to handle.
ROUND 2: *SC 70 along the first handle, SL ST in the BLO from one handle to another* repeat 2 times. See pic.12.
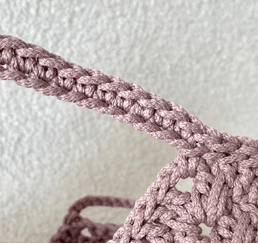
Life hack! to get a smooth joint of handles and bag “body” I recommend to skip one stitch on the left side of each handle (see red arrow on pic. 13).
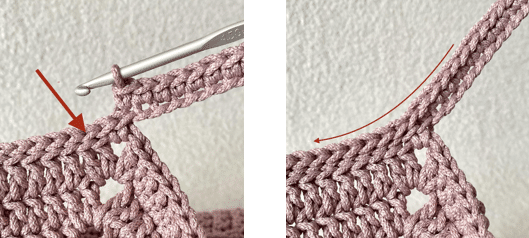
ROUND 3: *SC 70 along the first handle, SL ST in the BLO from one handle to another* repeat 2 times. See pic.14
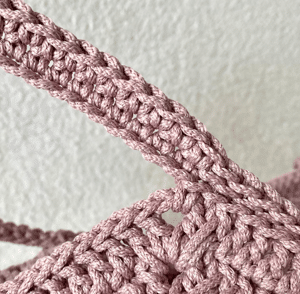
Life hack! to get a smooth joint of handles and bag “body” I recommend to skip one stitch on the left side of each handle (see red arrow on pic. 15).
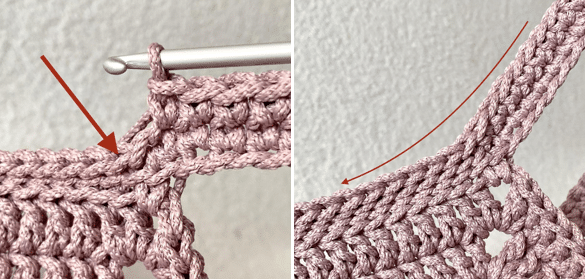
ROUND 4: SL ST in the BLO around.
Break the rope, fasten off and hide the tail.
To make the end of the project invisible follow video instructions HERE or photo instructions below (pic.16)

Sew-on / screw-on handles
You can use any handles you like: leather or faux leather, screw-on or sew-on handles. For my Milk color bag I used screw-on leather handles.
When you finished to crochet bag “body” (ROUND 24) you should work 1 round of SL ST in the BLO around.
ROUND 25: SL ST in the BLO around.
Break the rope, fasten off and hide the tail.
To make the end of the project invisible follow video instructions HERE or photo instructions on pic.16.
Sew/screw the handles to the bag.
Work Rounds 7-9 on the same principle
Congratulations!!!
You’ve just finished your jute shopping bag!