This beautiful casual knot bag is easy and fun to make. The dense handles makes it very sturdy, and the unique closure makes it very functional!
Put your leftover yarn to great use ! Enjoy!!
What you will need
- Hobby Lobby I love this cotton worsted weight yarn, 100% cotton
- Color options:
- Burnet Sienna (red), Olive (green), Rosey ll (Pink), Denim Dark (Blue), Ivory, Gold ( mustard),Antique cream (beige)
- Color options:
- Gauge: 4×4 in square/ #4 yarn /3.5mm hook:17 rows and 18 SC
- Yardage : 430 yrds total
- Crochet hook : 3.5mm
- Fabric for lining : 14”/ 20” rectangle
- Stitch markers
- Elastic: 12” of 1/8” soft stretch elastic
- Tapestry needle
Stitches used
- CH: Chain
- ST : Stitch
- SC : Single Crochet
- DC : Double crochet
- YO : Yarn over
- SL ST: Slip stitch
- Rnd: Round
- Rep: Repeat
Note: Various yarns, even though worsted may change slightly the tension, the stitch definition and the measurement of this pattern. Use a hook size smaller than suggested by your yarn and do a gauge swatch when needed
Step 1- Crochet the body
The bag is crocheted in rounds using Suzette Stitch. For a perfect color transition and alignment, you should join each round with backwards join or invisible SL ST (details next 2 pages).
You will automatically use the backwards join to join all the rounds. For a solid color bag, SL ST and CH1 to join the rounds. See chart in page 7 for color patterns Chain 50 with to make a foundation chain (keep your tension a little loose here)
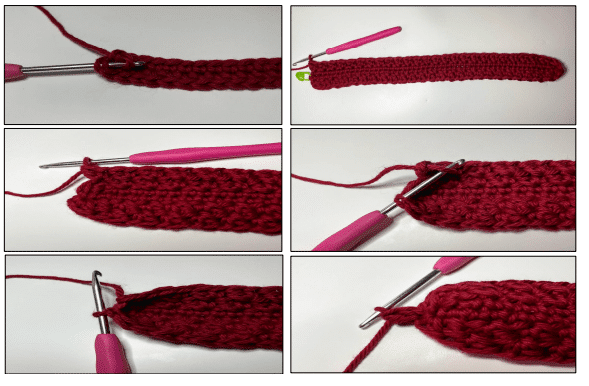
- Rnd 1: 2 SC in the second CH from the hook, SC in next 47 ST, 3 SC in the last CH. Continue crocheting along the back unused loops of the foundation chain, SC in next 47 ST (crochet over the tail to hide it), SC in the last CH already holding 2 SC, Backwards join into 1 st SC . CH 1 with the color you are using in next Rnd
- Rnd 2: *(SC, DC) in next ST, skip 1 ST *Rep from* to* around, Backwards join into the 1st SC of the 1 st (SC, DC) group, CH1 with the color you are using in next Rnd
- Rnd 3 : (SC, DC) in the 1st space formed by the Backwards join and the first (SC, DC) group, (SC,DC) in the next space between the next (SC, DC) groups Repto around. Backwards join into the 1st SC of the 1st (SC, DC) group, CH1 with the color you are using in next Rnd For the pattern Rep Rnd 3 (30 times) , Backwards join, CH1 in the color you will be using in the following
- Last Rnd: SC in every ST around, SL ST to join then fasten off
Note: After you add the new yarn cut the old yarn then tie the two ends together with a couple of tight knots
Backwards join (general information)
For a perfect color transition and alignment of the rounds change colors in the CH1 after the backwards join of each round : Remove hook and insert hook into the back of the beginning stitch.
Pull working loop through to the inside of the bag. CH1 in the color you are using next. You will automatically use the backwards join to join all the rounds.
Other resources:
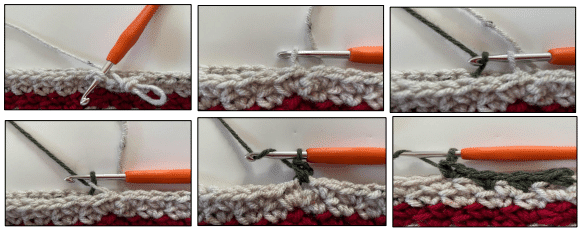
There are numerous video tutorials covering the invisible SLST topic.
I found this video to be very helpful
Step 2- Crochet the handles
The handles are crocheted in rows. The rows are a repetition of SC rows and SL ST rows. Feel
free to customize the length and width of the handle to fit your needs.
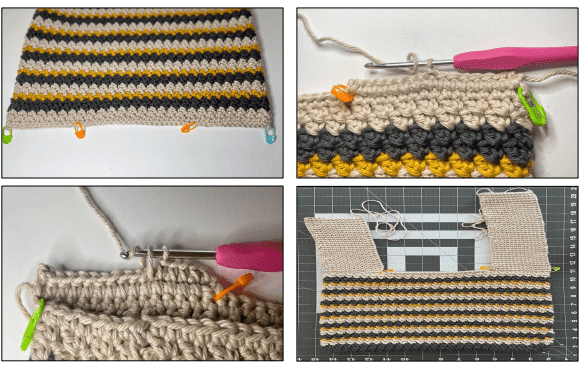
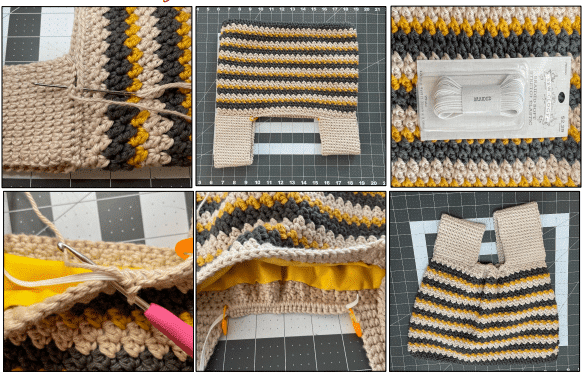
Lay out the body of the bag then place a ST marker in each corner’s ST. Place 2 other ST markers
15 SC apart from the corner’s ST markers
➔ 1st handles : the long handle
Slip knot then
- Row 1: SL ST in the corner ST, SL ST in next 14 ST, CH1, Turn
- Row 2: SC in every SC across (Insert the hook directly into the SC Row bellow, ignore the SL ST Row) CH1, Turn (15)
- Row 3: SL ST in every ST across, CH1, Turn (15) Rep Row 2-3 X 38 times (about 9.5 inches long)
- Last Row: SC in every ST across, fasten off and leave a long tail for sewing
➔ 2nd handle: the short handle
Crochet the 2nd handle the same way you did with the 1st handle starting in the marked Stitch in middle of the front post instead of the corner ST Rep Row 2-3 X 26 times (about 7 inches long).
Last Row: SC in every ST across, fasten off and leave a long tail for sewing
Step 3-Lining the bag- optional
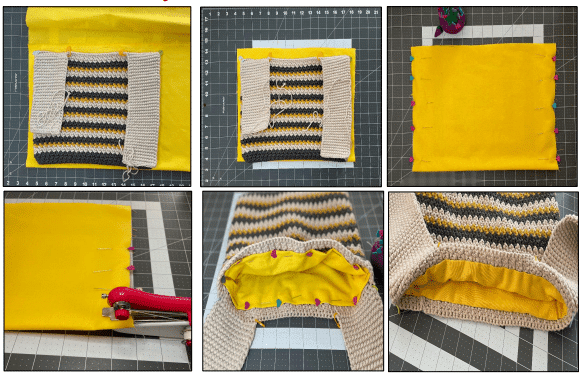
Line the bag before sewing the handles. In this step you will make a pouch with the fabric the same size as the crocheted bag. You will insert the pouch inside your bag then stitch it up . You can hand or machine sew the fabric.
- Before you line the bag, cut /weaving all threads
- Attach the tag using a tapestry needle and the same yarn
- Iron the fabric you are planning to use
- Lay your fabric out on a smooth surface, fold it in half
- Place your bag on top of it. The bottom of the bag on top of the folded side of the fabric
- Trace around the bag leaving roughly 1/2 inch extra fabric along the sides and top of the bag
- Cut out your fabric
- Sew the lateral sides of the fabric leaving the top side only unsewed. You just made a pouch!
- Place the pouch inside of the bag. Keeping the right side of the fabric facing outward
- Adjust the lining carefully, fold down the fabric roughly 1/2 inch at the top and clip or pin to the crochet bag.
- Use a needle and thread to stitch around the top of the bag, sewing the lining and crochet together.
- Optional: stitch up the bottom of the bag to the liner
Step 4- Finish the bag
- With the right side of the bag facing outward, fold the handle in half, then align it with last Rnd of the back post.
- With a tapestry needle and the long tail, sew the handle to the body, one stitch at the time. Sew the other handle the same way you did with the first handle
To narrow the opening of the bag you will use and crochet over a stretch elastic:
- Sl ST at the base of the handle (the marked St), leave a long tail to hide the elastic at the end then place the elastic behind your work
- SC in the same ST, SC in every ST across (to the base of the other handle) making sure you crochet over the elastic.
- Finish with a Slip knot then cut your yarn (leave a long tail to hide the elastic)
- With a needle and a thread, sew one end of elastic to the bag, pull the elastic tight to close the opening then sew the other end. Cut the extra elastic and hide it with few stitches using the long tail and a tapestry needle
- Add the elastic to the back post the same way you did with the front post
- Cut and weave all threads
- Pull the long handle trough the short handle to close the bag
Congratulations!
You just finished the “Y” knot Bag. I hope you enjoyed making it and are pleased with the result