As the name implies, this exquisite bag is constructed from granny squares, but it has been given a distinctive and elegant twist that makes it a spectacular piece of jewelry that you will be happy to make and wear.
The Vicky purse’s unique finishing features and personal touches give it an elegant appearance while keeping it easy enough for crocheters of all experience levels to enjoy making this gorgeous purse.
Please take a moment to peruse my collection of bags!
I created a stunning granny square pattern using color options that you may use to express your creativity and personalize the creation. For this design, my favorite color combination is various colors of blue or gray.
Since the finishing touches make all the difference, I completed the squares using a lovely edge and a particular joining method that complements the design and gives the bag a polished appearance.
And fear not—even an experienced novice may easily create this intricate and simple granny square bag crochet design.
Suggested yarn for the Vicki purse
The ideal yarn for this design is mercerized cotton, such Lion brand mercerized cotton. It is renowned for having a glossy, smooth finish that highlights the stitch definition and provides the completed bag a refined appearance. Additionally, you may get creative with your color selections and customize the bag to fit your style and personality thanks to the wide range of lovely colors available in the Lion Brand mercerized cotton line.
Of course, you could also use Lily Sugar’n Cream Cotton or any other worsted-weight cotton yarn. Sturdy and elegant, the strap is fastened to the bag with straightforward metal rectangles that enhance both the bag’s appearance and use. And I used a big, straightforward buckle to seal the bag. While fastening the closing, it unquestionably gives the design a lovely touch.
Measurements of the Vicki purse
The bag is large enough to accommodate all of your daily necessities, measuring 12 1/2′′ in width and 10 1/2′′ in height to the base of the handles. If you would prefer a different size, you can simply add or remove rows from the bag.
Lining the Vicki purse
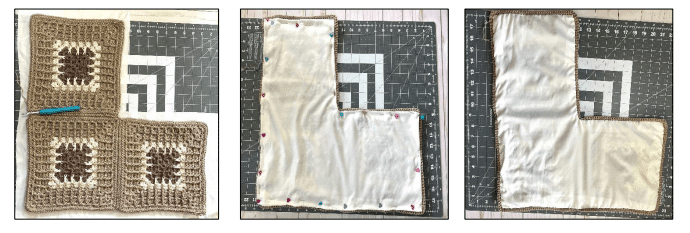
Allow me to explain the lining procedure, which could seem scary due to the bag’s V-shape. It will be simpler and less stressful if you line the bag before you complete assembling the squares! All you have to do is hand stitch the cloth around the squares as seen in the photo. You have no excuse to miss this step because I’ve included a simple, step-by-step lining lesson with the pattern. :).
In conclusion
- The pattern is straightforward, thorough, tested, and comprehensive.
- written using American language standards
- Intermediate skill level
- Made entirely of cotton; crochet hook is 4 mm for the strap and 5 mm.
- Dimensions: W = 12 1/2′′ / H = 10 1/2′′ to handle bases
The pattern comes with both detailed written instructions and a full-photo tutorial in high definition.
The design has links to YouTube tutorials as well as an easy step-by-step complete lining pictorial guide.
Finished Approximate Dimensions:
H=14 “ (to the base to the handles)/ W= 14 ”
What you will need
- Lion Brand 24/7 worsted weight yarn, 100% mercerized cotton.
Color options: – Café au lait,100 yd. I will refer to it as color A. - Ecru, 50 yd. I will refer to it as color B.
- Camel, 420 yd. I will refer to it as color C.
- Yardage: about 570 yards total.
- Crochet hook: 4mm
- Gauge: 4” square = 18 rows and 19 SC
- Buckle: 1 ½” I used Gold Buckle.
- 2 x metal rectangles buckles: 1 ½ “ I used metal rectangle.
- Faux leather
- Fabric: 22”x 22”
- Tapestry needle: to weave in ends.
- Thread and darning needle: to sew the fabric
Abbreviations
CH: Chain _ ST: Stitch SL ST: Slip stitch SC: Single crochet _ DC: Double crochet, TR: Treble _ FPTR: Front post treble_ RSC: Revers single crochet_ YO: Yarn over,Rnd: Round _ Row: Row _SP: Space _Rep: Repeat.
Front Post Treble (FPTR): YO 2 times, insert the hook from front to back to front around the post of the next ST, YO, pull up the loop,(YO, pull thru 2 loops) 3 times.
Note: Other worsted weight yarns may change the final measurements, I suggest making a gauge swatch.
Step1- make the squares
Make 3 squares :
With color A chain 4, SL ST into the 1st to make a circle then,
- Rnd 1: CH 2 (counts as a DC), 2 DC in the circle, CH 2, [3 DC in the circle, CH 2] x 3 times,join with a SL ST into top of CH 2, turn.
- Rnd 2: SL ST in the 1st CH-2 sp, CH 2 (counts as a DC), 2 DC in same CH-2 sp, skip next 3 STS, * (3 DC, CH 2, 3 DC) in next CH-2 sp, skip next 3 STS *, rep * to * around, finish with 3 DC in the 1st CH-2 sp, CH 2, join with a SL ST into top of CH 2, turn.
- Rnd 3: SL ST in the 1st CH- 2 sp, CH 2 (counts as a DC), 2 DC in same CH-2 sp, skip next 3 STs, DC in next sp, FPTR in middle ST of 3 ST group 2 Rnds below (Rnd 1), DC in same sp, skip next 3 STs, *(3 DC, CH 2, 3 DC) in corner CH-2 sp, skip next 3 STS, DC in next sp,FPTR in middle ST of 3 ST group 2 Rnds below (Rnd 1), DC in same sp, skip next 3 STs *,finish with 3 DC in the 1st CH-2 sp, CH 2, join with a SL ST into top of CH 2, turn.Crochet loosely the FPTR.
- Rnd 4: SL ST in the 1st CH-2 sp, CH 2 (counts as a DC), 2 DC in same CH-2 sp, [skip next 3 STs, 3 DC in next sp] x 2 times, (3 DC, CH2, 3 DC) in next corner CH-2 sp, skip next 3 STs, rep * to*around, finish with 3 DC in the 1st CH-2 sp, CH 2, join with a SL ST into the top of CH 2, fasten off, turn.
- Rnd 5: Slip knot with color B, SL ST in any corner CH-2 sp, CH 2 (counts as DC), 2 DC in same CH-2 sp, skip next 3 STs, *[ DC in next sp, FPTR in middle ST of 3 ST group 2 Rnds below (Rnd 3), DC in same sp] x 3 times, skip next 3 STs, (3 DC, CH 2, 3 DC) in corner CH2 sp, skip next 3 STS, repto* around, finish with 3 DC in the 1st CH-2 sp, CH 2, join with a SL ST into top of CH 2, turn. Middle ST of 3 ST group is either a DC or a TR.
- Rnd 6: SL ST in the 1st CH-2 sp, CH 2 (counts as a DC), 2 DC in same CH-2 sp, skip next 3 STS, *[3 DC in next sp] x 4 times, (3 DC, CH 2, 3 DC) in next CH-2 sp, skip next 3 STs *,rep * to * around, finish with 3 DC in the 1st CH-2 sp, CH 2, join with a SL ST into top of CH 2, fasten off, turn.
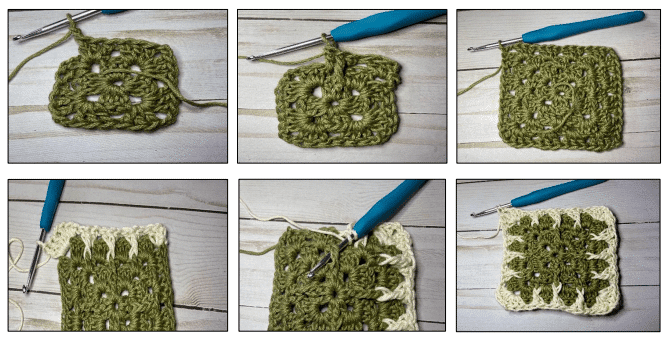
- Rnd 7: Slip knot with color C, SL ST in any corner CH-2 sp, CH 2 (counts as DC), 2 DC in same CH-2 sp, skip next 3 STs, [ DC in next sp, FPTR in middle ST of 3 ST group 2 Rnds below (Rnd 5), DC in same sp] x 5 times, skip next 3 STs, (3 DC, CH 2, 3 DC) in corner CH-2 sp, skip next 3 STS, rep to around, finish with 3 DC in the 1st CH-2 sp, CH 2, join with a SL ST into top of CH 2, turn.
- Rnd 8: SL ST in the 1st CH-2 sp, CH 2 (counts as a DC), 2 DC in same CH-2 sp, skip next 3 STS, *[3 DC in next sp] x 6 times, (3 DC, CH 2, 3 DC) in next CH-2 sp, skip next 3 STS *,rep * to * around, finish with 3 DC in the 1st CH-2 sp, CH 2, join with a SL ST into top of CH 2, fasten off, turn.
- Rnd 9: SL ST in the 1st CH-2 sp, CH 2 (counts as DC), 2 DC in same CH-2 sp, skip next 3 STs, [ DC in next sp, FPTR in middle ST of 3 ST group 2 Rnds below (Rnd 7), DC in same sp] x 7 times, skip next 3 STs, (3 DC, CH 2, 3 DC) in corner CH-2 sp, skip next 3 STS, rep to around, finish with 3 DC in the 1st CH-2 sp, CH 2, join with a SL ST into top of CH 2, turn.
- Rnd 10: SL ST in the 1st CH-2 sp, CH 2 (counts as a DC), 2 DC in same CH-2 sp, skip next 3 STS, * [3 DC in next sp] x 8 times, (3 DC, CH 2, 3 DC) in next CH-2 sp, skip next 3 STS *,rep * to * around, finish with 3 DC in the 1st CH-2 sp, CH 2, join with a SL ST into top of CH 2, fasten off, turn.
- Rnd 11: SL ST in the 1st CH-2 sp, CH 2 (counts as DC), 2 DC in same CH-2 sp, skip next 3 STs, [ DC in next sp, FPTR in middle ST of 3 ST group 2 Rnds below (Rnd 9), DC in same sp] x 9 times, skip next 3 STs, (3 DC, CH 2, 3 DC) in corner CH-2 sp, skip next 3 STS,repto around, finish with 3 DC in the 1st CH-2 sp, CH 2, join with a SL ST into top of CH 2,turn.
- Rnd 12: SL ST in the 1st CH-2 sp, CH 2 (counts as a DC), 2 DC in same CH-2 sp, skip next 3 STS, *( 3 DC in next sp) x 10 times, (3 DC, CH 2, 3 DC) in next CH-2 sp, skip next 3 STS *, rep * to * around, finish with 3 DC in the 1st CH-2 sp, CH 2, join with a SL ST into top of CH 2, fasten off, turn.
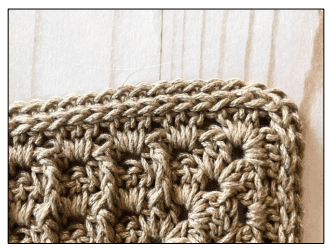
- Rnd 13: SC in every ST around including the corner’s CH2, join with a SL ST in the 1st SC,CH1
- Rnd 14: SL ST in every ST around the square between Rnd 12 and Rnd 13 (in the visible holes at the bottom of Rnd13 stitches)
Step 2- Join the squares
With the yarn still on your hook, SL ST in the corner stitch of the same square then,
- SL ST into the any corner of the 2nd square, * SL ST in next ST of 1st square, SL ST in the opposite ST of 2nd square*, rep *to* across, finish with a SL ST in the corner ST of 1st square.
- SL ST into the any corner of the 3rd square, * SL ST in next ST of 1st square, SL ST in the opposite ST of 3rd square*, rep *to* across, finish with a SL ST in the corner ST of 1st square.
Additional resources:

Joining squares with slip stitches
Step 3- Line the bag
It will be easier to line your bag now before you finish joining the squares, but if you prefer you can line your bag at the very end.
- Weave in all ends, but do not cut the working yarn yet.
- Layout your fabric on a smooth surface.
- Place your unfinished bag on top of the fabric.
- Trace around the squares leaving roughly 1/2- inch extra fabric along all the sides.
- Cut out your fabric.
- Place your fabric on top of the wrong side of the squares. The right side of the fabric facing outward.
- Adjust the lining then fold down the fabric roughly 1/2 inch all the way around. Clip it or pin it to the crochet bag.
- Use a needle and a thread to stitch around attaching the lining and the crocheted bag together.
Step 4- Finish joining the squares
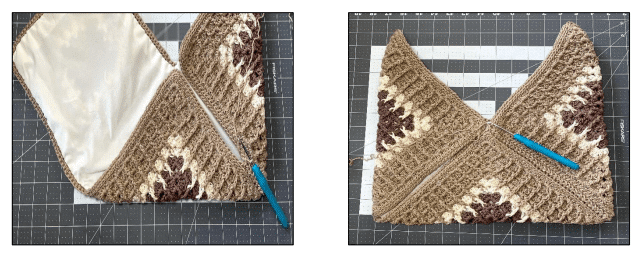
- With the yarn still attached to the 1 st square corner ST fold 1st and 3rd squares referring to picture then continue joining them, SL ST in the 3 rd square corner ST then,
- * SL ST in next ST of 1st square, SL ST in the opposite ST of 3rd square*, rep *to* across,finish with a SL ST in the corner ST of 1st square.
- Fold 2nd square referring to picture, then SL ST in the corner ST, * SL ST in next ST of 1st square, SL ST in the opposite ST of 2nd square*, rep *to* across, finish with a SL ST in the corner ST of 1st square.
- Fasten off.
Step 5- Crochet the edging
To crochet the edging I used a reversed single crochet skipping one stitch in between the reversed single crochets. Instead of working from right to left, you will work from left to right. Make sure your tension a little loose and even.
Edging: Slip knot then SL ST in the right corner, CH 1, * insert the hook to the right into the next ST, then yarn over and draw the loop back to the front, yarn over again, and draw that loop through the two loops already on the hook, skip the next ST to the right, * rep to around, join with a SL ST, fasten off.
Additional resources:
How to crochet a reverse single crochet border
Step 6- Crochet the straps
Shoulder strap:
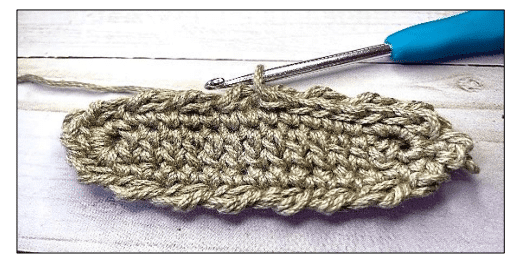
With yarn C, CH 122 ( for a 24”strap, adjust the length of the strap to your linking )
- Row 1: DC in 2nd CH from the hook, DC in next 119 CH, 5 SC in last CH already holding last DC, continue crocheting around along the back unused loops of the foundation chain, SC in next 119 CH, 5 SC in the starting CH 2 space.
- Row 2: SC in next 120 ST, SL ST into next SC , CH1.
- Row 3: Crochet loosely RSC edging * RSC in next ST, skip next ST*, rep *to* around, finish with a SL ST into the 1st RSC last ST, CH1.
- Row 4: SL ST in every ST around of Row 2 ( below the RSCs), fasten off and leave a long tail for sewing.
Strap holders: ( Make 2)
CH 15 then,
- Row 1: DC in 2nd CH from the hook, DC in next 12 CH, 5 SC in last CH already holding last DC, continue crocheting around along the back unused loops of the foundation chain, SC in next 12 CH, 5 SC in the starting CH2 space.
- Row 2: SC in next 13 ST, SL ST into next ST, CH1.
- Row 3: Crochet loosely RSC edging: * RSC in next ST, skip next ST *, rep *to* around,finish with a SL ST into the 1st RSC , CH1.
- Row 4: SL ST in every ST around of Row 2 ( below the RSCs), fasten off and leave a long tail for sewing.
Short closure strap ( for the buckle) Double yarn C, CH 20 then,
- Row 1: DC in 2nd CH from the hook, DC in next 17 CH, 5 SC in last CH already holding last DC, continue crocheting around along the back unused loops of the foundation chain, SC in next 17 CH, 5 SC in the starting CH 2 space.
- Row 2: SC in next 18 ST, SL ST into next ST, CH1.
- Row 3: Crochet loosely RSC edging: * RSC in next ST, skip next ST *, rep *to* around,finish with a SL ST into the 1st RSC , CH1.
- Row 4: SL ST in every ST around of Row 2 ( below the RSCs), fasten off and leave a long tail for sewing.
Step 7- Assemble the bag
Attach the shoulder strap:
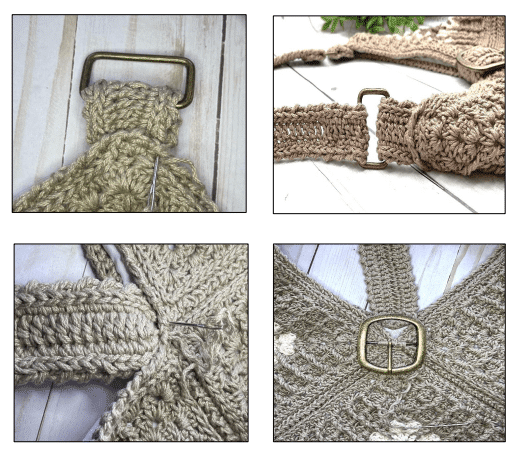
- Thread the strap holders through the metal rectangles then fold them in half.
- Sew the strap holders into the inside of the bag, one at each end.
- Fold the ends of the shoulder strap over the metal rectangles.
- Sew the strap ends.
- Weave in ends.
Attach short closure strap:
- With a tapestry needle and the long tail, sew the short strap to the inside of the top back panel at the bottom of the ”V”.
- Attach the buckle to the top front panel using the yarn and a tapestry needle.
- Thread the strap through the buckle and poke the prong through the strap.
- Weave in ends.
Congratulations!
You just finished the Vicki Bag. I hope you enjoyed making it and are pleased with the results!